Homesteaders have long raised flocks of chickens for eggs and meat, but now a growing number of folks are adding ducks to their barnyard as well.
Ducks make cute farm pets that are entertaining to watch waddle around, but they also lay deliciously rich eggs and can provide an additional source of protein.
While ducks are generally as easy to care for as chickens, there are still a few basics that you need to know, in order to ensure that your ducks are as healthy and as happy as can be.
Whether you are hatching your own ducklings, or purchasing your first adult ducks, this guide will take you through all of the important steps when it comes to raising ducks.
Table of Contents:
Choosing the Right Duck Breeds
There are many different breeds out there, and each one will have its own unique set of characteristics.
Whether you are wanting ducks for eggs, meat, or just as a pet, this will have an impact on the breeds that you should choose.
Duck Breeds for Eggs
Rich and flavorful, duck eggs are absolutely delicious, making it no surprise that many homesteaders choose to keep ducks solely for their eggs.
While some breeds may be heavier layers, other breeds produce eggs that are of a strikingly unusual color, so you may want to get a mix of both.
When cooking or baking with duck eggs you will need to adjust your recipe because all duck eggs are larger than chicken eggs.
Duck eggs usually have a thicker shell, while this may mean they are a little harder to crack, many homesteaders also believe it extends the shelf life of the eggs.
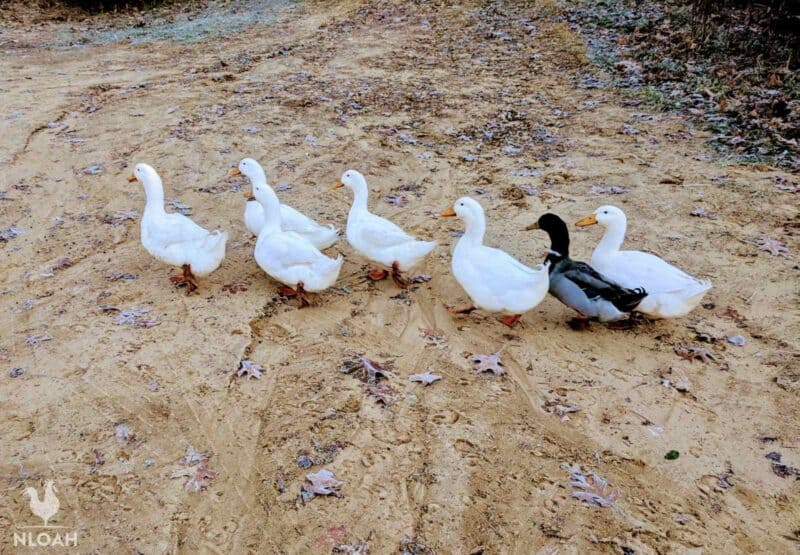
The heaviest layers tend to be Pekins and Khaki Campbells, the latter of which actually lays the most eggs, while the former lays the largest eggs.
Indian Runner ducks are also quite good layers, and while their eggs may be smaller, they are of a beautiful blue-green color.
Both Pekin and Khaki Campbell ducks are notoriously bad sitters. If you want to expand your flock, you will almost assuredly need to invest in an incubator.
A small incubator, one that can accommodate up to 10 ducks, with an automatic turner (you will so want one of these!) will cost about $85.
Khaki Campbell
Khaki Campbell ducks typically lay about 280 eggs annually during their first two years when egg production is at its peak. This breed begins laying eggs when they are about six months old.
A healthy and well-cared-for Khaki Campbell can lay solidly until it is about five years old. Eggs are very large and weigh about 2 and a half ounces on average.
They have almost zero maternal instincts, once the ducklings hatch they will follow their momma around, but do not expect her to take much of an interest in her offspring.
It takes 28 days to hatch a duck egg of a Khaki Campbell breed. This is a medium-sized breed and weighs about four to four and a half pounds on average – making them a great roasting bird too!
Pekin
This breed lays about 200 large white eggs per year. Pekins begin laying not long after they are fully feathered, around 24 weeks of age. The eggs from this breed typically weigh about 2 ounces and also take 28 days to hatch.
Pekins are large ducks and can weigh up to nine pounds, making them also a potentially quality meat bird.
Indian Runner
These ducks are massive layers, often producing up to 300 eggs per year. Indian Runners begin laying around five to seven months of age.
They produce eggs that are small by duck standards and are only slightly larger than a chicken egg. It takes between 28 to 30 days to hatch Indian Runner eggs.
They too are not very good at sitting their eggs, but they make up for their failing with their awesome foraging ability.
Duck Breeds for Meat
If you are hoping to raise ducks for meat, then you need to opt for a breed that is relatively heavy, as well as one that grows quite quickly.
Pekins tend to be one of the fastest growing breeds, ready to process at just seven weeks, and, unlike the majority of duck breeds out there, they produce white, rather than red, meat.

Muscovy ducks are also great for meat, and, since they do not quack, they are a quiet breed that are perfect for homesteaders who have neighbors close by. Males can weigh up to 15 pound and females up to eight pounds.
Rouen and Aylesbury ducks are also popular meat birds, but keep in mind that they have colored feather shafts.
While this does not impact the meat in any way, it does make it harder to achieve a clean-looking carcass.
Aylesbury female ducks generally weigh up about seven pounds and males weigh approximately 10 pounds on average.
Rouen ducks are often mistaken for Mallards – but the domesticated breed is about three times the size of their wild look-a-likes.
Females weigh about six to seven pounds and males between eight to 10 pounds. They are often heralded for their very flavorful yet lean meat.
Duck Breeds for Pets
Ducks are friendly and adaptable creatures, meaning that they make fantastic pets, and are a joy to simply watch waddling around the garden.
Since Pekin ducks are quite large and relatively calm, they are often a top choice when it comes to picking pet duck breeds.
Rouens and Mallards are also popular, due to their size, coloring, and sociability, but the Rouens usually tend to win over the Mallards, because they are a larger breed and are unable to fly.
Cayuga ducks are also too large to fly, and come in vibrant shades of greens and purples, with many people claiming that this is one of the quieter breeds of ducks.
How Many Ducks Should You Get?
Once you have chosen the breeds that would work best for you, it is time to decide how many ducks to get.
This will depend on a number of factors, such as the amount of eggs you go through each week, or how much space you are able to provide.
Of course, you also need to consider the ratio between males, also known as drakes, and females, as having too many males, and not enough females, will only cause problems for the females come mating season.
The over-mating of a female duck can kill her in a relatively short amount of time.
A good ratio to start off with is five females to one male, but, if you are not planning on breeding your ducks, there is no reason as to why you cannot just have a flock of females.
Generally, you should try to have one drake for every seven to ten females.
However, keep in mind that male ducks tend to be quieter, so the number of ducks that you get may also depend on where you live, and your proximity to your neighbors.
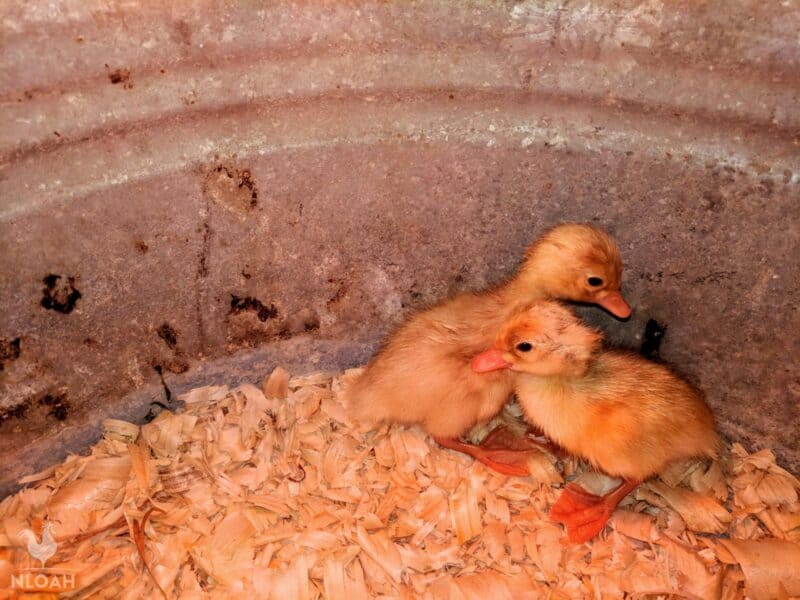
How to Raise Baby Ducks
While it is easy enough to buy adult ducks, there is nothing quite like the bond that you will have with ducklings.
You do not need that much space, and it is easy enough to buy young ducklings if you do not want to hatch them yourself.
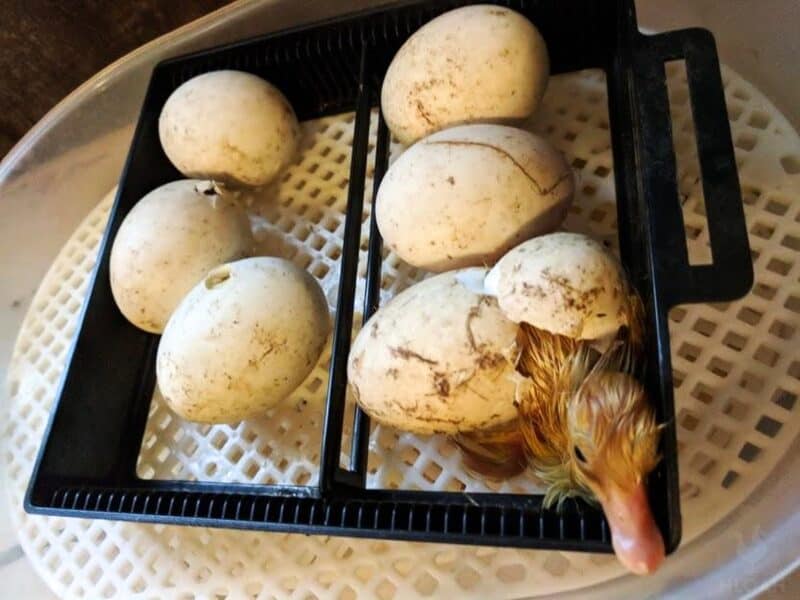
Incubating Duck Eggs
If this is your first time incubating duck eggs, then you will obviously need to get an incubator. There are many different models out there, ranging from small, cheaper incubators to larger, more commercial models.
To start off with, a smaller incubator will work well, but do try to go with a trusted brand, as you want to ensure that your incubator will work in the way that it is supposed to.
Brinsea incubators are popular among homesteaders, and while they may be on the pricier side, you will likely end up using them year after year.
Duck eggs take longer than chicken eggs to hatch, with the exact incubation time depending on the breed. Here is a general guide you can follow:
- Pekings – 28 days
- Mallard-type breeds – 27 days
- Muscovy – 35 days
During incubation, duck eggs need to be turned. The majority of incubators will have automatic turning racks, which will turn the eggs regularly for you.
Alternatively, you can turn the eggs by hand, three times a day. This also gives them a chance to cool off a bit, which many believe results in a better hatch rate.
When it comes to setting up your incubator, follow these guidelines for temperature and humidity:
- Temperature – 99.5 degrees Fahrenheit/37.5 degrees Celsius
- Relative humidity – 55%
Even if your incubator comes with a built-in thermometer, it’s worth having a couple of extra thermometers in there, so that you can ensure the accuracy of the temperature.
You should also do the same with a hydrometer, which measures the humidity.
On the last three days before hatch day, you need to increase the humidity to around 75%, to allow the ducks to properly hatch.
If you are having a hard time keeping humidity up, try soaking a sponge in warm water, and then placing it at the bottom of the incubator.
The last there days before a hatch is often referred to as the lockdown stage, as this is when you need to take your automatic turning racks out, to allow the ducklings to get into their hatching position.
Open the incubator as little as possible, as doing this will fluctuate the humidity levels too much.
This is also a good time to ensure that the floor is suitable for tiny duck feet. Your ducklings will need something to grip onto, so avoid smooth and slippery surfaces. Opt for something like towels or a rubber mat instead.
If you would like to check on the progress of your eggs during the incubation period, you can try candling them. Candlers are relatively inexpensive for this.
Buying Ducklings
As much fun as the hatching process may be, it’s easier to simply buy ducklings instead of incubating eggs. There are many stores that sell ducklings of a variety of ages, as well as farms specializing in certain breeds.
Depending on where you live, you could purchase mail-order ducklings. While this may be a convenient way to buy them from far-away hatcheries, the journey can often be long and difficult, and some ducklings may not make it.
Setting Up a Brooder
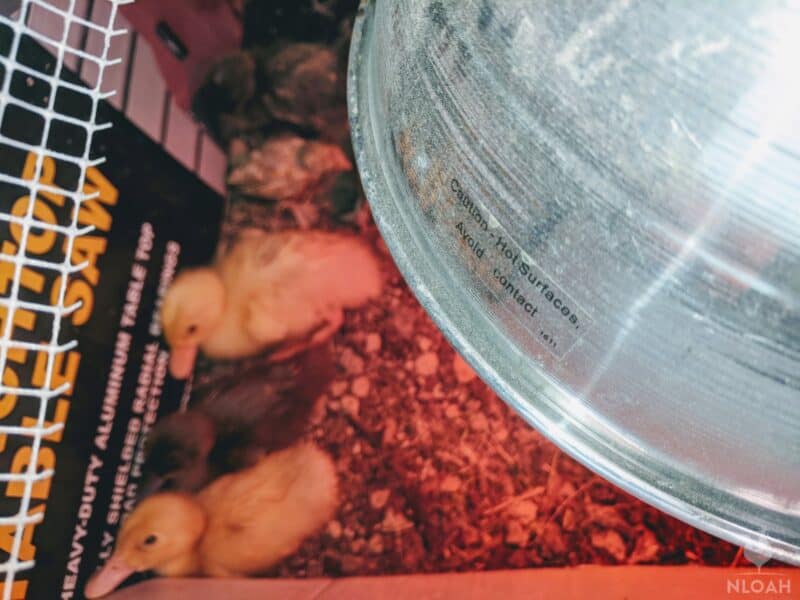
If your ducklings are under six weeks old, then you need to set up a brooder to initially house. This is basically a safe, contained area, to keep them warm.
Electric hens are a great choice for providing heat, because while heat lamps are popular, they’re also a fire hazard if allowed to point towards bedding and not firmly secured into place.
se red, not white heat lamps so the brightness is reduced and permits the ducklings to sleep better at night.
The brooder, doesn’t need to be anything fancy; a cardboard box that you upgrade as the ducklings grow, or when it gets damp will suffice. Other easy brooder options include:
- A deep crate
- A plastic storage box
- A paddling pool
- A wire dog cage, although you would need to ensure that the ducklings cannot fit through the bars
Keep your brooder covered from the top, as some ducklings can jump pretty high. Make sure that they have easy access to their heat source, as well as enough space to get away from it if they need to cool off.
The brooder should be 70 to 75 degrees everywhere except by the heat source where it should be 95 to 100 degrees.
Reduce the temperature by five degrees each day until hitting room temperature when preparing to remove the ducklings from the brooder.
When deciding where to put the brooder, you will want to choose somewhere that is well-ventilated but warm and dry.
While keeping the brooder in your house may seem like a great idea to begin with, you will likely want to move this as the ducklings grow.
Feeding Ducklings
Feeding ducklings is relatively simple, and, for the first ten weeks, chick starter crumb is all you need.
Once they reach ten weeks of age, switch this over to a 15% grower feed, and then move them onto layer’s pellets once they are 18 weeks old.
If you have a duckling that seems particularly weak, and is not interested in the starter crumb, try boiling an egg and then mashing up a small amount of this, before feeding it to the duckling.
This is often a great way to help weaker ones regain strength to eat the starter crumb. Just make sure that you do not do this for more than two or three days, as the egg will not contain the nutrients it needs as it grows.
One vitamin they really need is niacin, as this is something their body cannot produce and process in the same way that a chicken does.
A niacin deficiency can cause everything from lameness to stunted growth, but the genetics of each particular duck has a huge impact on their niacin production, so you need to assess each duck individually.
Niacin supplements are easily available, or, alternatively, you could add some peas, kale and other greens to their feed, as these vegetables naturally contain niacin.
Duck treats and supplements must be chopped up finely, only given in moderation, and tried one at a time to avoid upsetting the digestive system of the young ducklings.
Add a few pinches of cinnamon and oregano to the duckling waterer to boost their immune system.
Watering
For the first few weeks of their life, ducklings need constant access to water, especially while they are eating, as this helps them to wash it down. Never give your ducklings food without water.
Ducklings should not be permitted to get into the water until they are at least two weeks old, after their oil comes in and allows them to dry themselves – a damp duckling will be a cold, sick, and potentially dead, duckling.
However, be prepared for the fact that ducklings love to play in water, and are likely to make quite a mess in their brooder, which is why chick fountains tend to be a great idea, as these help to keep everything cleaner and drier.
If you are giving your ducklings a tub water, make sure that the water is no more than a quarter of an inch deep, otherwise, they may end up drowning in it.
While it’s tempting to give your ducklings the opportunity to swim, ducks do not actually produce their waterproofing until they are around four weeks old, so you need to wait until then.
A little-known fact is that ducks often use their water source to breed. This can be quite interesting to watch, albeit a bit concerning the first time you see it happening!
Drakes can be somewhat rough and often appear as though they are trying to drown the hens. Don’t panic, though – it’s a natural process!
Automatic Waterers for Ducks
To make your life a little easier when it comes to watering your ducks, you might assume that setting them up on an automatic watering system is the way to go.
You can certainly use one of these systems (in fact, an easy “hack” for making a DIY duck waterer is simply to cut large holes in the side of a bucket with a jigsaw, high enough so that you can still fill the bucket with water but low enough for the ducks to stick their heads inside) but you need to be careful about certain types.
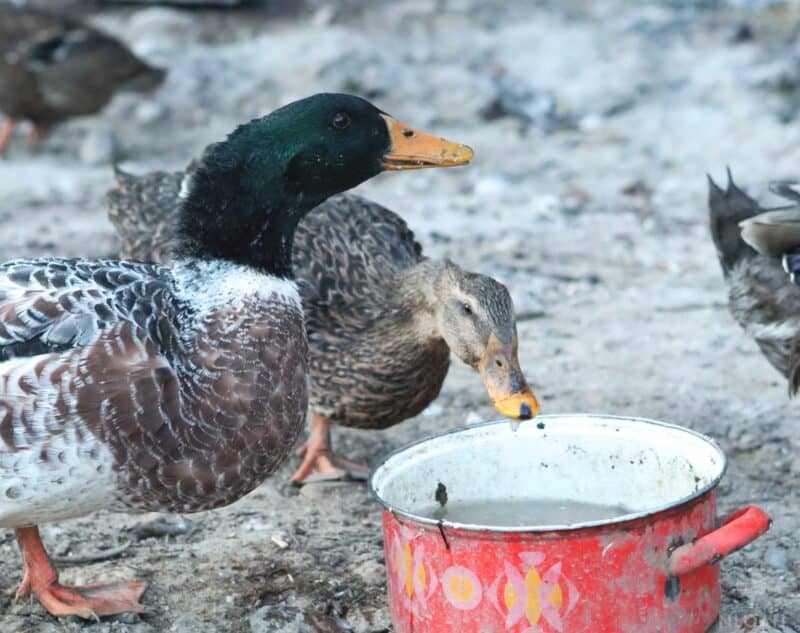
For instance, you shouldn’t use nipple waterers for ducks. While these work just fine for chickens, ducks need to be able to get their entire bill into the water – that’s how they keep their nostrils free from debris.
Watering Ducks Indoors vs. Outside
Whenever possible, give your ducks their water outdoors…
Ducks are messy. They’ll take food in their mouths, get a drink of water, and then make a wet, mucky mess in the process.
If you don’t water your ducks outdoors, you are going to need to put dry bedding in their housing several times a day.
Otherwise, they could get sick from various respiratory issues. Wet litter can also cause poor foot health, leading to issues like necrosis of the footpads and hyperkeratosis.
As it is, there’s not really a way around it when it comes to keeping the brooder dry – you’ll just have to deal with it until they’re ready to go outside.
To avoid a mess when watering ducks indoors in a brooder is to use a plastic brooder or line the one you have with plastic. This will help reduce the water mess and make it a bit easier for you to keep things clean.
Watering In the Winter
A concern that many people have is how they will keep their ducks watered in the winter.
You don’t need to provide swimming water in the winter – ducks will enjoy dipping their heads into a deep tub a few times a week on sunny days, but otherwise, a splash-around area is not necessary when it’s cold.
You can use a heated watering system to prevent the water from freezing and just make sure it has a fount that is large enough for your ducks to stick their heads into.
Another way you can prevent the water supply from freezing is to put floating plastic bottles filled halfway with table salt in the drinker or pool. This should prevent waterers from freezing, at least until you’re in the low teens or so.
You can also use ping pong balls to help weigh down the bottles and prevent them from being blown away in the wind. As the water gets colder, you’ll likely need to add more salt water.
Introducing Ducklings to the Outside World
The age at which you let your ducklings have outdoor access depends on where you live, as the climate and temperature play a huge role in how well your ducklings will cope.
Setting up an outdoor brooder that you use during the day is always useful, as this helps to keep your indoor brooder cleaner, but gives the ducklings the chance to forage.
This means that they will be eating a wider range of nutrients and minerals, and will end up growing stronger.
Duck or Drake?
Unless you are keeping ducks solely as pets, you will likely be extremely eager to find out what gender your ducklings are.
Vent sexing is the method that hatcheries use for sexing ducklings, but, unless you know exactly how to do this, you are best leaving this method to the professionals.
Voice sexing is a method commonly used by homesteaders, and requires you to listen to the sounds that each duck makes.
Females are quite loud, with this beginning around four weeks of age, and will make the iconic “quacking” sound that everybody knows and loves.
Drakes are much quieter and will make a raspy, monotone sound, usually by eight weeks of age. If you are keeping Muscovy ducks, then the males are the ones that will hiss.
There are a few other sexing methods that you can use, although these depend on the breed of your ducks. For example, male mallards will have shiny green heads and a white ring around their neck, whereas the females will be more of a duller brown.
In Welsh Harlequins, dark-billed ducks tend to be male, while ducks with a lighter bill that ends with a dark spot at the end are usually female.
If you are still not sure what gender your ducks are, there is one way to find out for sure. Simply wait and see who lays an egg!
Feeding Adult Ducks
The easiest way to ensure that your ducks have a balanced diet is by purchasing a commercial feed, such as layer’s pellets.
These contain the right balance of grains, vitamins, and minerals, but, keep in mind that these foods will be extremely processed, and will lack freshness.
Alternatively, you could opt for a mix of grains that you put together yourself, picking from ingredients such as corn, wheat, rye, barley, buckwheat, and oats.
However, this may mean that you would need to add in a protein supplement, such as mealworms, although if your ducks are avid hunters then this may not be necessary.
When it comes to knowing how much to feed, a general guideline is around 180 grams per duck, although each duck will have their own individual needs, so you will need to adjust this accordingly.
Adding in Supplements
While supplements are generally not needed for ducks, there are a couple of extra things that you could give them.
If your ducks are laying, putting out a dish of crushed oyster shells for them to graze on is always a good idea, as this gives them the extra calcium that they need to produce a regular supply of eggs.
The ingestion of grit by non-laying hens and drakes can, and often does, cause severe kidney problems. Crushed eggs shells work equally well and can safely be consumed by all ducks.
Electrolytes can also be useful, especially if you live in a hot environment and are worried about your ducks becoming dehydrated.
Another useful supplement is apple cider vinegar, which promotes good gut health, but be sure to only use the raw form of this, mixing in one tablespoon for each gallon of water.
If your birds are in an enclosure and do not have access to much grit, then this is something else that you should provide them with, as they need the grit to help them to grind up their food.
Snacks and Treats
Everybody likes to treat their ducks once in a while, and fruits and vegetables are a great way to give them something fresh and healthy to enjoy.
However, some fruits can have quite a high sugar content, so try to keep these to a minimum.
There are other treats that are higher in protein that you could feed them, such as worms, cooked eggs, and yogurt, but keep in mind that these can often make their manure smell stronger.
Foods to Avoid
Although ducks can eat quite a wide variety of foods, there are some that you should avoid feeding them, as these will only cause health problems in the future.
Onions are also a no-no, as are avocados and nuts. Chocolate is another food that you should definitely keep your ducks away from, with the same applying to sweets and other sugar-filled foods.
You should also refrain from feeding them moldy food, even if you are having a big kitchen clear out, as this can be extremely harmful to their health.
Raising Ducks With Chickens
While some may say that ducks and chickens should be kept separately, many homesteaders do choose to keep them together, with absolutely no problems arising from this.
If you’re raising them from young, and are using a medicated feed for your chicks, then it would be worth keeping them apart until they can eat the same food.
However, if you are using a general starter crumb, there is no problem with raising your chicks and ducklings together from an early age.
Just like with any animals, chickens and ducks do sometimes get into squabbles, but, as long as they have enough space to get away from each other, they should calm down pretty quickly.
However, if you have cockerels and drakes, you may need to keep an extra eye on them, to ensure that they keep things friendly.
Raising Ducklings and Baby Chicks Together
Many homesteaders are already keeping chickens but want to expand into ducks, as well. Space and budget limitations often provoke questions about keeping both egg-producing poultry birds together.
In my many years of personal experience, there is no problem with keeping chickens and ducks in the same coop and run – or even ducklings and chickens in the same brooder.
Raising the chicks and ducklings together in the brooder from the time they are hatched or purchased goes truly helps the birds develop a friendly relationship.
It’s not uncommon for any ducklings that have been brooder mates to maintain that same closeness, developing a type of “mini flock” even once they are turned loose with the existing coop.
If you have a particularly rowdy rooster, introducing ducklings could be a problem. I have had a wide variety of roosters, one that hated everyone but me and would flog them, but he still left all the chicks and ducklings that came into the flock, alone.
I once lost two chickens to a duck baby pool in the coop run. While this was tragic, all 30 or so chicks that had come before them, survived just fine.
Still, the possibility of drowning is something that you should consider when introducing new chicks into the coop and run. Mature chicken hens should be tall enough that the duck pool will not be an issue.
Creating a “dock” or floating a log in the duck pool might make the chickens feel safer if they happen to the area to grab a drink, but those types of pool attachments could also entice the chicken hens to a space where they otherwise would not have ventured.
Chickens and ducks can eat the same feed, but ducklings cannot have medicated chick starter. Feed ducklings only non-medicated chick starter. I never used medicated chick starter even with our baby chickens.
Instead, I go a more natural route and sprinkle cinnamon, turmeric, basil, sage, and oregano on their feed or make herb ball treats to help boost the immune systems of our poultry birds.
Housing Your Ducks
Providing adequate housing for your ducks is essential, as this is what will keep them safe at night.
There is no hard and fast rule about what your duck house should look like, so, if you like a creative DIY project, you can really use your imagination and make something truly unique. Here is an idea to get you started:
To begin with, you need to consider the size of your duck house. Ducks generally need around 4 square feet of space each, so use this guideline to work out how much space you will need for your whole flock.
The flooring of your duck house is another important factor to think about. While flooring does not particularly matter to much to the actual ducks, many predators can dig their way under and into your duck house, so your flooring should ideally be made from cement or wood.
Ensure your duck house is at least three feet tall, and has plenty of ventilation. If not, this will lead to mildewed and mouldy bedding, as well as frostbite in cold weather.
Each morning, when you let your ducks out, they will all try to rush out as quickly, and noisily, as possible.
If the doorway to your duck house is quite small and narrow, this may cause an injury to your ducks as they try to fight their way out, so do ensure that any exits are large enough to accommodate for this.
When it comes to the bedding that you use, there are plenty of different options, and every homesteader will have their own favorite.
Straw is generally a popular choice, as this provides great insulation in colder temperatures, and holds its structure better than shavings or hay do.
The bedding needs to be changed regularly, especially if it has gotten wet, as you do not want it to hold bacteria or mold.
Ducks do not really use nesting boxes, so this is something that you do not really need to include.
Handling Your Ducks
Handling your ducks on a regular basis is important, as this will get them used to it, making it much easier for you if you ever need to catch them, for whatever reason.
If your ducks are not that tame, catching them can be tricky, but try to refrain from chasing them around their pen, as this will only cause them quite a bit of stress.
Instead, you could create a sort of funnel and walk them into that, grabbing them once they are at the end and have nowhere else to go.
Once you have caught your duck, you need to ensure that you know how to hold it in a safe and comfortable way.
Securing their legs is important, and this can be done easily by sliding your hand onto their belly, with two fingers holding their legs together.
Put your other hand on the duck’s back, holding it close to you, but allowing its weight to rest on your arm that is under its belly.
Of course, if you have tame ducks, catching them and holding them becomes so much easier.
If you raised your ducks from ducklings, then they are likely already quite tame, but, even if you only purchased them as adults, there are still many ways in which you can tame them.
The easiest way is simply visiting them every day with different treats that they love, scattering these around for them. It will not be long before the ducks soon look forward to your visit, as they know that this means treat time.
Once your ducks are running up to you on arrival, you can then start working on feeding them from your hand. Do take your time with this, as you need to earn their trust and ensure that you do not scare them.
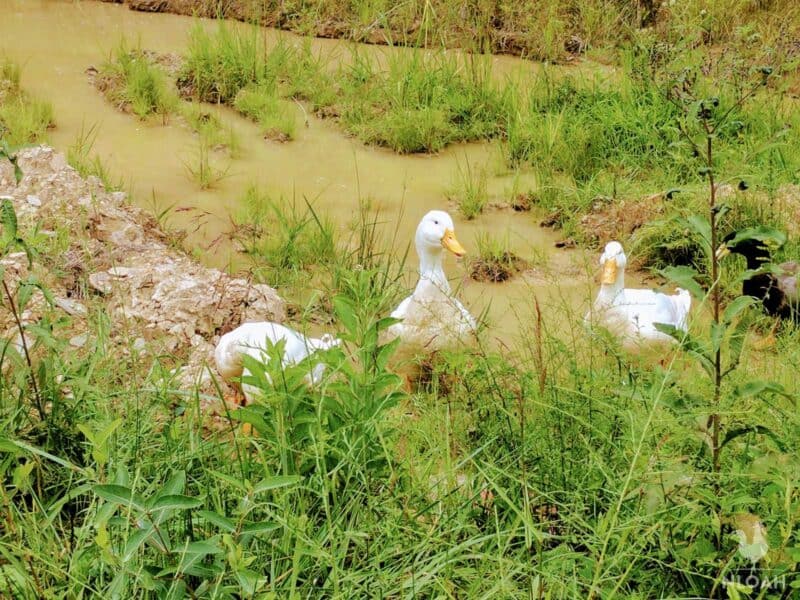
Pros and Cons of Free-Ranging Ducks
Depending on how much space you have, you may be able to consider letting your ducks free-range, rather than be confined.
There are definitely a number of advantages to this, with the main one being that they will have access to a much wider range of proteins, vitamins and minerals, meaning that they will be much healthier.
Free-range ducks also enjoy much more exercise, and are a great form of pest control for your garden.
However, the main downside to free-ranging your ducks is that they become much easier prey for predators. This does depend on where you live, as well as the predator threat in your area.
A high fence that surrounds your property will always be useful in keeping predators out, and you should also make sure that you do not leave any food lying around, as this will only attract predators.
Another point to consider is that you will need to be able to bring your ducks in each night, and shut them away safely.
If you have followed the steps mentioned above, when it comes to taming your ducks, then you should have no problems doing this, as they will be trained to come when you call.
Caring for Your Ducks in Weather / Temperature Extremes
Ducks are quite hardy creatures, and are able to handle a wide range of temperatures and climates.
However, if you often experience temperature extremes, then your ducks may need a helping hand in order to get through the rough weather.
In extreme cold, make sure that they have a thick layer of straw in their duck house, as this will provide insulation. You may also need to remove any water at night, as this can cause a mess and result in wet, cold bedding.
To prevent your ducks from getting frostbite, ensure that their house is well-ventilated, as the moisture that they emit when breathing can lead to frostbite in an unventilated area.
Finally, be sure to feed your ducks some high-calorie, high-fat treats before shutting them in for the night, as this will help to keep them warm throughout the night.
If your duck’s water is constantly freezing over, there are many ways in which you can prevent this from happening. This video will take you through one method:
When it comes to extreme heat, make sure that they have plenty of clean water to splash about in. You could even add in some ice cubes, as this will help to keep the water temperature cool. Adequate shade is also extremely important.
In terms of food, you may notice that they tend to eat much less in the summer. Try feeding them either early in the morning or later in the evening instead, so that the temperature is slightly cooler during their mealtimes.
You can also increase the amount of moisture-rich treats that you feed them, such as chilled fruits and vegetables.
Caring for a Broody Duck
Broodiness is a natural, maternal instinct that your female ducks are likely to experience at some point.
Broody ducks usually tend to make themselves a nest and lay all of their eggs here, before covering the nest with their down feathers to provide insulation.
While some people do not like their ducks to go broody, as this interferes with egg production, many homesteaders find this extremely useful, as it means that they will be able to hatch more ducklings, without the need for an incubator and brooder.
If your duck has made a nest in a spot that is not very safe, it may be worth moving her. This could cause her to break her broodiness, so you are best doing it once she has laid her first egg, before she has multiple eggs under her.
When it comes to feeding a broody duck, keep them on the same feed that they are used to, although you may want to switch this to a non-medicated chick starter crumb a couple of days before the eggs are due to hatch.
To check whether or not the eggs your duck is sitting on are fertile, you can always try candling them. Wait until the duck leaves her nest to go and eat, and make sure that you disturb the eggs as little as possible when candling them.
If your duck abandons her nest at some point during the incubation process, there may be a reason for this.
Many ducks seem to know when their eggs are not viable, or if their ducklings are not going to hatch, and will leave their nest at this point.
By candling the eggs, you will be able to see if there is any movement in the ducklings within. If there is, quickly set up an incubator and complete the incubation process yourself.
Help! My Ducks Have Stopped Laying
If you are keeping ducks primarily for eggs, it can be really frustrating when egg production seems to stop. There are a number of reasons why this can happen, and you need to consider them all:
- Age – older ducks do not lay as many eggs
- Health – illnesses and diseases can stop egg production
- Changes in food – your ducks may be experiencing a nutritional imbalance or deficiency
- Stress – everything from a change in housing to the threat of predators to a new routine can cause stress to your ducks
- Season – as the days grow shorter, egg production may decline
- Broodiness
- Dehydration
- Molting
If your ducks are free range, then it could also be that they have a well-hidden nest somewhere filled with eggs.

Tara lives on a 56 acres farm in the Appalachian Mountains, where she faces homesteading and farming challenges every single day, raising chickens, goats, horses, and tons of vegetables. She’s an expert in all sorts of homesteading skills such as hide tanning, doll making, tree tapping, and many more.
Great information, thank you. We recently became adoptive parents of 6 wild ducklings that walked out of the forest on the back of our property. We listened and searched for the mother, but to no avail. Thus, we decided that our family grew by 6. From research, I estimate that they were around a week old, this was April 28th.
What I cannot find, is how to identify what type of duck they are, or how to tell if they are male or female without actually “sexing” them. Because we do not know what they are? They all look different different color legs and beaks, different color markings?
Do we just just have to wait till they are grown?
.
Great info! We’ll be trying ducks for the first time this spring. We are hoping to free range with a goose for protection. We have a large pond but wondering if they’ll be interested in weeding/worming my garden approx. 500 yrds away? Was thinking of putting their shelter near the garden. Appreciate any input. Once again, great info and thanks for sharing:)
Hi Michelle!
I find that chickens make better gardeners than ducks, but the ducks would still most likely weed/worm your garden. Indian runners and khaki Campbells tend to be the most carnivorous breeds, so they’re great if you have a lot of slugs.
You can also train your ducks to spend some time each day in your garden. Try leading them over with some feed or treats in the morning, sprinkling this over the area you want them to work in.
Good luck, let us know how you get on!
wow, this makes me want ducks now! great post!
Sounds like it is time to go duck shopping, Amy! We are thrilled you enjoyed our duck guide and it inspired you to want to become a keeper! Even if you have only a small backyard, you should have enough space to keep a drake and four females. Please an update and some photos with us once you finally have your first flock. Happy homesteading!