For the beginner, canning can be equal parts excitement and terror. Extending your food sustainment should be the goal of every prepper.
Further, extending the shelf life of otherwise perishable foods expands your food independence. Every calorie on the shelf gets you one more day through rough times.
Canning can come at a cost, though. If it were easy, everyone would do it. I’ll be frank. It’s not foolproof and you must head into it knowledgeable about the rules and be willing to follow them. The good news is that these rules are simple, easy to find, and easier to follow.
So let’s start with the basics.
Oh, and a quick note for you experts. Even if you have a few hundred jars on your shelves, read on. Time enforcing the fundamentals is always well spent. You also may pick up a little gem or two. So read on!
Table of Contents:
Benefits of Home Canning
Ok, Grandma used to do it, maybe even your parents. If you’re like me, you were probably stirring applesauce as one of your first “real” kitchen duties.
If these brief sentences describe your childhood, then you are probably used to seeing shelf upon shelf of fruits, veggies, soups, stews, sauces, and meats.
There’s no denying the appeal of the satisfaction of popping open the lid of veggies that you grew, or fruits off your own trees many months beyond their season. You are truly blessed if this was a part of your childhood.
Even if it wasn’t, you’re reading this article because something deep inside wants to pop a lid on your own jar.
So why can?
First, there is the attraction of making your own meal, possibly from your own ingredients. You control the source (homegrown or purchased from a local farm), the quality, and in most cases, the taste.
That store-bought spaghetti has too much oregano for your liking. Wouldn’t it be nice to master and can your own recipe? Yup, it’s very satisfying.
Second, there’s the economy of it. A quick Amazon search revealed that canned chicken is running about $35-$40 per six 12.5 oz tins. This is about $0.50 per ounce or $8 per pound.
When buying on sale and in bulk I can get boneless, skinless chicken breast at $1.50 per pound.
That’s quite the savings (once you have invested in a canner, jars, and the other minor other equipment–but more on this later).
Finally, there’s the simple fact of extending the shelf-life of your food. Apples, peaches, string beans, and meats only last so long.
Yes, you can freeze them, but how much freezer space do you actually have? Ever compare the cost of freezer space vs shelf space? What happens when the power goes out?
We used to get a whole pig every year. That was between 150 and 200 pounds of pork that had a shelf life of 5 days in the freezer if the power quit. Our longest outage was 10 days. If we didn’t have a generator, we would have lost that and a lot more.
Canned foods only require a cool and dry location to keep them in top shape. Again, read on. There will be more on that later.
Extending the usable life is essential for any perishable goods, especially during the harvest. Just how many green beans or corn can you actually eat when the crops come in?
In short, canning is satisfying and economical, and it keeps your precious goods from rotting on the vine.
What Can You Can
There are few rules to canning. Some of these are universal, but most are specific to the food canned and the method required.
Let’s start with the garden. Most vegetables and fruits can be canned. Any hardy vegetable that will survive boiling is usually good to go.
Root vegetables such as potatoes, carrots, and beets as well as non-root veggies, including corn, beans, and hot peppers, are all perfect for the canner. Watery vegetables such as zucchini and greens are better off eaten fresh.
Most fruits are good to go in several forms. We can apple slices, applesauce, apple pie filling, and apple butter (thick sauce). The same goes for cherries, pears, rhubarb, and peaches. If you think you can store it, find a tested recipe from a trusted source, and go for it.
Meats are also candidates for the canner. They can be raw and unseasoned (chicken and pork loin), highly seasoned (corned beef), or in other forms.
These others include soups and stews (we live on canned chicken soup, chili, and cacciatore in the winter). Don’t limit yourself. We put up a lot of chicken stock and hope to add beef bone stock to the larder soon.
Basically, don’t go into canning with blinders. There are public groups (university departments, cooperative extensions) and federal agencies, such as the US FDA, that either publish canning information or perform testing to develop safe and effective recipes.
Use these resources to your advantage. If you have an abundance of an ingredient (e.g., pole beans) take a trip around your books and the internet and you are bound to find a way to store them on the shelves (e.g., dill beans) and not the compost pile.
Canning Methods
Enough about the “Why”, how about the “How”?
For home preservation enthusiasts, there are two methods, water bath canning, and pressure canning.
In short, water bath canning uses boiling water to kill off bacteria. Further, the food, or the created environment, needs to be acidic. Water bath canning is used to preserve fruits, vegetables, jellies, and jams.
Pressure canning uses a weight or valve to create increased pressure and temperature. Pressure canning is for everything else (with several limitations) and includes meats, soups, and stews.
Let’s dive deeper into each.
Water Bath Canning
A water bath is exactly what it sounds like. This canning method uses a big pot of water to submerge canning jars and surround them with temperatures of 212F (100C).
There’s not much-needed equipment. I’d guess that the vast majority of canning done is a water bath. It’s safe and easy, and the equipment investment is low.
This method is widely used because of its simplicity. Get a big pot, a few jars, rings and lids, and you’re good to go. Water bath canning is a bit more about the limitations than the equipment.
As I mentioned above, water bath canning requires a big pot, jars, tops, and rings. The pot holds the water and hosts the jars during processing. The lids and rings form the air-tight seal.
The primary concern is the foods applicable to water bath canning. You can only preserve high-acid foods via this method.
By high acid, I mean you must create the proper environment to kill off and retard the growth of bacteria. Water at 212 F (100 C) only works so well, and it does not kill botulism spores. This is where the acid comes in.
A pH of 4.6 is required to kill off the spores of botulism, however, this is at equilibrium. This includes the liquid AND inside the foods you are canning (e.g., inside the beans, tomatoes, and apples).
Therefore, it is good practice to shoot for a pH in your canning liquid of 4.3. As it mixes with the food and dilutes, the final equilibrium will land well within the safe zone.
Don’t have a pH meter? Not really sure what I just said? That’s ok. The bottom line is this. Use tested recipes and you’ll be fine!
How do recipes follow all the science and keep us safe? First, they are selective about the foods that are water bath canned. No meats, no fat, just fruit, and vegetables.
Further, the recipes pick the liquid that will guarantee canning in the safe zone. Most vegetables have a pH of between 5 and 6, and therefore must be canned in a vinegar solution.
Fruits are naturally acidic. Yes, that sweet, off the tree apple, has a pH of 3.5 to 4. Therefore, most fruits can be canned in light sugar syrup.
Regardless, find tested recipes and water bath canning that will make a shelf-stable product out of your garden’s plenty!
Pressure Canning
That big, scary, steaming canner that your grandmother used to use is actually a pressure canner. Some foods, such as meats, are not safe when preserved at boiling temperatures and must have a bit more heat applied.
Pressure canners use science (e.g., increased pressure) to bring temps above 212 F (100 C) up to the food-safe range of 245 F (118 C). Pressure canners will either use a weight or a gauge to increase the pressure within the sealed canner.
This increased processing temperature (and time) allows you to create shelf-stable meats, stews, and sauces. This even applies to some vegetables such as corn.
There are still rules to follow, such as total canning time, as well as altitude adjustments.
However, your canner instructions and tested recipes will give you the directions needed to keep your food safe. Follow them and can with confidence.
But What About Dry Canning?
Dry canning uses your oven to create a warm (200 F or 93 C) and dry environment. The combination of heat and low humidity takes away the environment that bacteria need to thrive. You then sealed the jars and the contents are good to go.
First, the USDA does not recommend dry canning. To their benefit, they do not recommend it for the canning of wet goods such as vegetables and sauces.
Most of the articles I have read utilize dry canning for dry goods such as salt, sugar, flour, beans, rice, and pasta (with no eggs).
There are many articles on the web that recommend dry canning for dry goods as those listed above. I have a few issues with this.
First, salt, sugar, and pasta can all be safely stored in buckets and mylar.
Salt and sugar need no extra treatment, however, an oxygen (O2) absorber or two won’t hurt).
Pasta, beans, and rice can be stored long-term in mylar 5-gallon buckets with the use of O2 absorbers. Don’t want to store 30 pounds at a time? Use smaller 1-gallon bags.
In my mind, dry canning doesn’t provide much value for these foods.
Where I use dry canning is for the short-term storage of dehydrated food. Usually, we run the dehydrator at 140 F (60 C) until the fruits or veggies are dry enough to snap.
During the last hour, I place a few clean jars, lids, and rings in the oven at 140F. When the dehydrator is done, I pop the food into the warm jars, add an O2 absorber and descant pack, then seal them up.
After 15 more minutes in the oven, I turn off the oven and let them come to room temp.
This method of storage is only good for the short term (months, not years). That being said, educate yourself, and choose the best methods for your needs.
Canning Equipment
Most canning can be done with a limited amount of equipment. The good news is most of this equipment is long-lived and can be passed from generation to generation with only a minor amount of disposable items.
Water Bath Canning Equipment
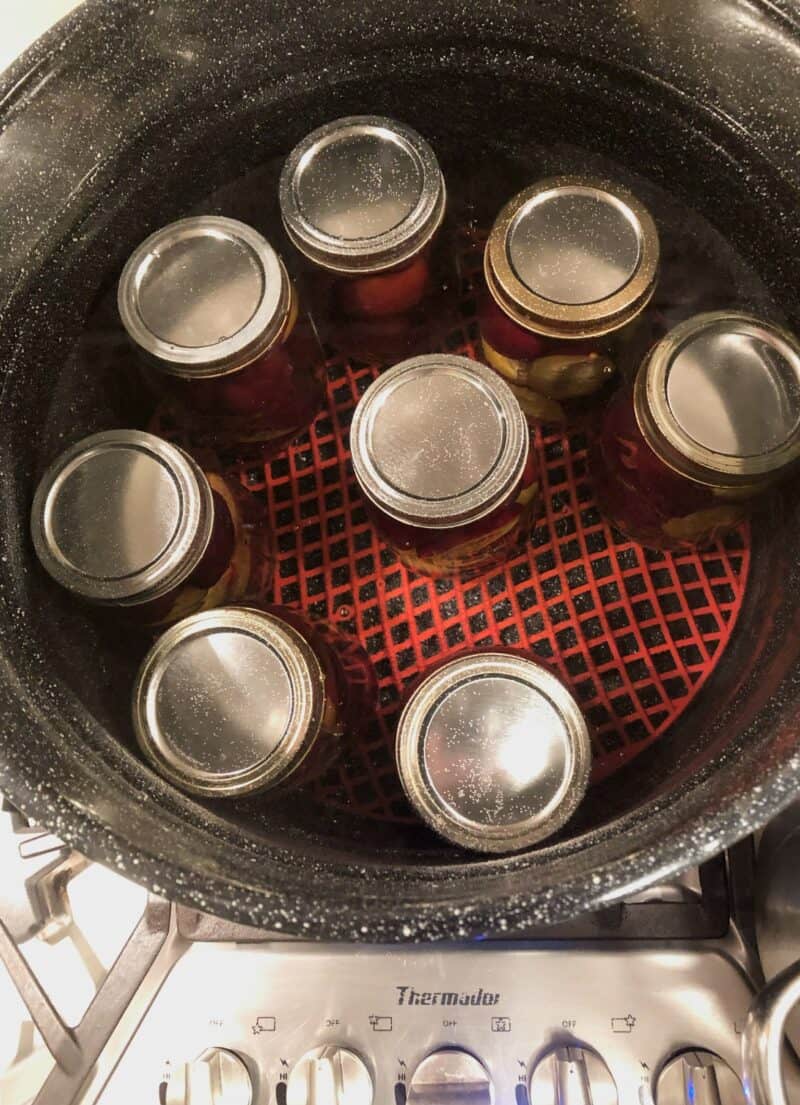
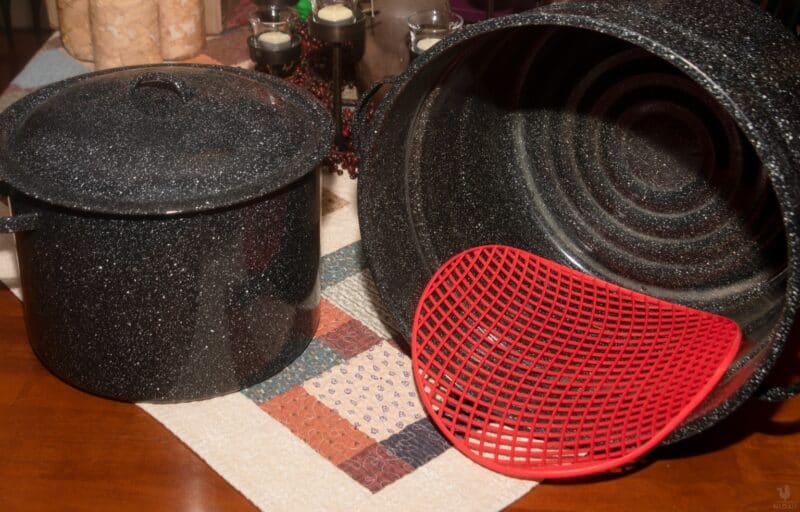
Water bath canning requires one specialized piece of equipment and that’s the pot. A water bath canning pot is little more than a thin steel or aluminum pot.
The traditional pot is enameled and has a capacity of around 4-5 gallons. The larger ones will hold about 8 quart jars, 12 pints, or 14 jelly jars. There are smaller pots for when you only have a few jars to put up.
The canner will come with a rack that keeps the jars off the bottom (a requirement for safe canning – it reduces broken jars) and allows you to raise them up for easy removal. We have moved to a silicon pad as the original rack rusted out some time ago.
If you already have a large pot, use it. Simply get something to keep the jars off the bottom. The aforementioned silicon pad is the perfect accessory for this.
That’s it, that’s all. And it’s the main reason that water bath canning is so widely adopted.
Pressure Canning Equipment
Pressure canning, on the other hand, requires a bit more of an investment. You need a specialized pressure canner.
Pressure canners lock the lid on tight so that as the water heats it builds up internal pressure. The increased pressure increases the heat.
One or more vents keep the operation safe by allowing the pressure to only build so much before venting. Usually there is a main vent and an emergency vent.
In our All American canner, the main vent is a weight that sits on a small nipple. As the steam pressure increases, the weight tilts, allowing the pressure to escape.
You choose the weight value for your altitude and set the heat so it jiggles and vents 1-4 times per minute. The backup vent is a rubber plug. If the main vent gets clogged, the plug pops out, venting the canner.
The exploding canners of the past, are exactly that (if there were actually that many accidents). Safety features on modern canners help to minimize issues.
The “rapid disassembly’s” that I have seen online all appear to be older canners, either passed down or purchased at second-hand stores.
Buy your first pressure canner new, read the entire instruction book, follow its advice, and you’re in for a lifetime of safe and fruitful canning.
Common Equipment
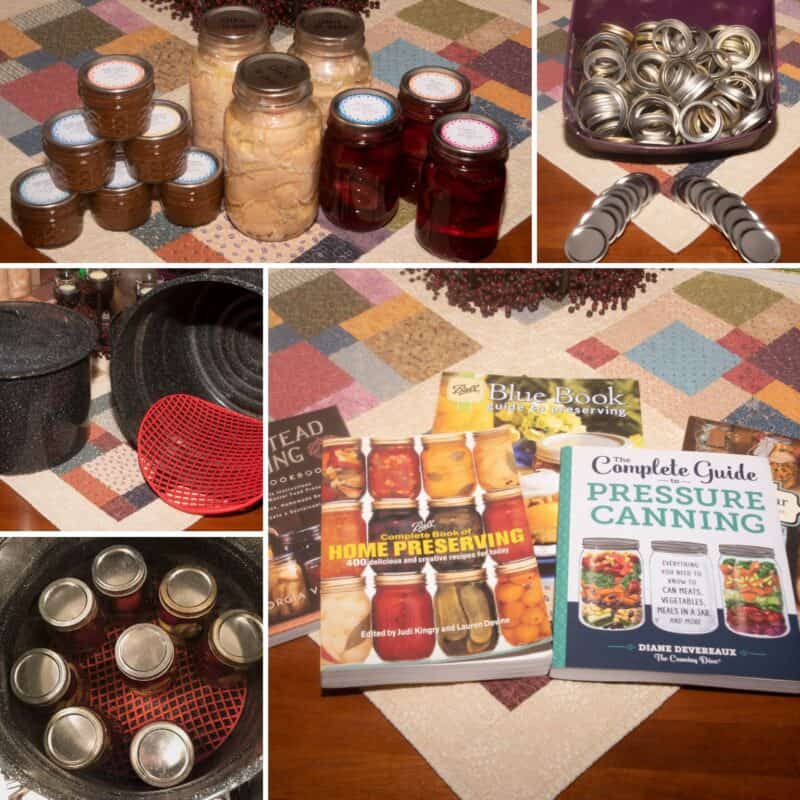
Now that you have your canner, there are several other items that you will need. These include jars, rings, lids, and one or two tools.
Jars are the first items to add to your list. They come in quart, pint, jelly (1 cup), and half’s (4 ounce).
We mainly use quarts and pints, but have a few jellies on hand for smaller portions (one jelly jar holds just enough sauerkraut for 4 hot dogs), and very few halves that we use for fruit butter, hot sauce, and gifts.
The best thing about jars is that they can be re-used. We are the third generation to use most of our jars. Passed down from my grandmother to my mother, then to me.
It’s with some reflection that I can up the fruits of our garden. The jars are the ultimate connection to our preserving past.
You can buy jars at the local feed store, Walmart, and even online. We also like to hit the local second-hand stores.
Any jar you use, new or re-used, you must inspect them for chips or cracks. If there is any sign of distress, either toss them or use them for decoration.
We were recently gifted several cases (over 10) by a friend whose mother was too old to can anymore. She, however, saw the value in them and couldn’t justify tossing them in the recycling bin.
Next are rings and lids (or tops). Rings tighten over the threads of the jars. The threads, by the way, are nearly universal.
Rings are 100% reusable and soon you will have more than you will know what to do with. We have a plastic tote where rings go to die. There must be 200-300 of them in there.
Lids are the main expendable item in the canning process. Lids are pressed into the jar by the rings and are held in place by the vacuum that forms during the canning process.
When you buy a case of jars, they usually come with both rings and lids. You can also buy lids separately. I recommend getting in the habit of buying one or two boxes every time you see them on sale.
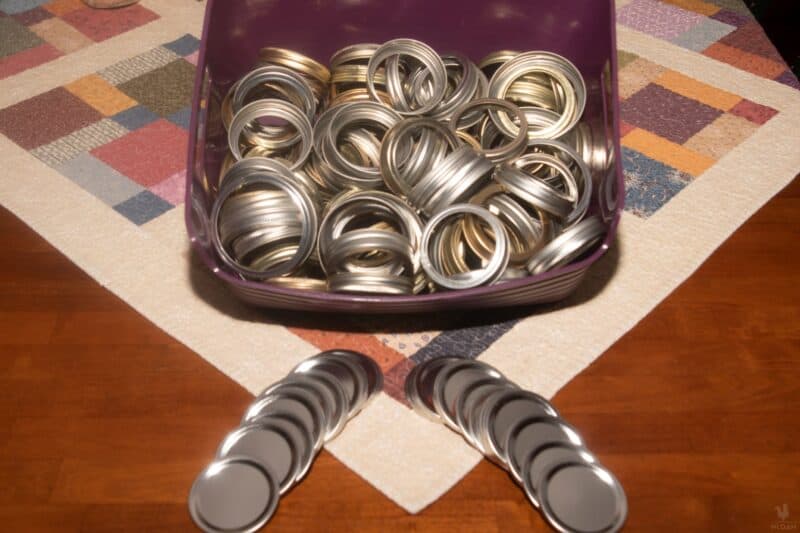
We tend to buy them in bulk. We buy sleeves of 150-200 when we find them on sale. It’s a big investment, however they don’t go bad.
We have our lid box that has several years of tops ready to go. We were lucky enough to stock up before recent shortages drove availability down and prices up. Stock up when you see them!
As I mentioned, lids are a single use item. Once they have made a trip through the canner, the rubber seal becomes compressed and is no longer guaranteed to form a seal.
This can lead to spoilage. If undetected, this can lead to severe illness for you and your family.
That being said, I will save the cleanest lids for short term storage of dry goods as well as making tinctures.
I don’t need a perfect seal when the contents are already shelf stable. This includes medicinal tinctures and fruit liquors that are 80-100 proof. A lightly used lid is perfect for this situation.
Finally, you may need a few tools to make the canning process easier. A canning funnel helps you fill in your jars without making a complete mess.
They are also handy for gauging head space (the space between the canning food and the lid). Either a plastic or metal funnel is fine. You don’t need anything fancy or expensive.
A lid lifter/magnet is also handy and will save you burnt fingers. A part of the process is heating the tops and rings. The lids can be especially troublesome to get out of your pot with tongs.
A magnetic lid lifter is perfect for fishing both the rings and tops out of the pot. Next is a jar lifter.
This wrench is used to place the jars into or get them out of the canner. Not something you want to do bare handed or with an oven mitt. I consider it essential equipment.
References
You are not alone on your canning adventure. Many generations have gone before you and many will come after. The good news is there are lots of resources for you on your journey.
We have accumulated quite a little library for our canning adventures. This includes books from the Ball company. Ball is the maker of canning jars, lids, and other equipment.
The “Ball Blue Book of Canning” is the go to tome for all first timers. Its recipes cover the gamut of foods from apple sauce to bell peppers, to pork.
Next are books by Diane Deveraux aka “The Canning Diva.” She has amassed an enviable amount of knowledge that she has shared primarily with the prepping and homesteading communities.
When it comes to “off the path” recipes, we usually hit her books first. I especially like her pressure canning book.
It alone has expanded our canning efforts into meats and stews as well as given us confidence to try new recipes.
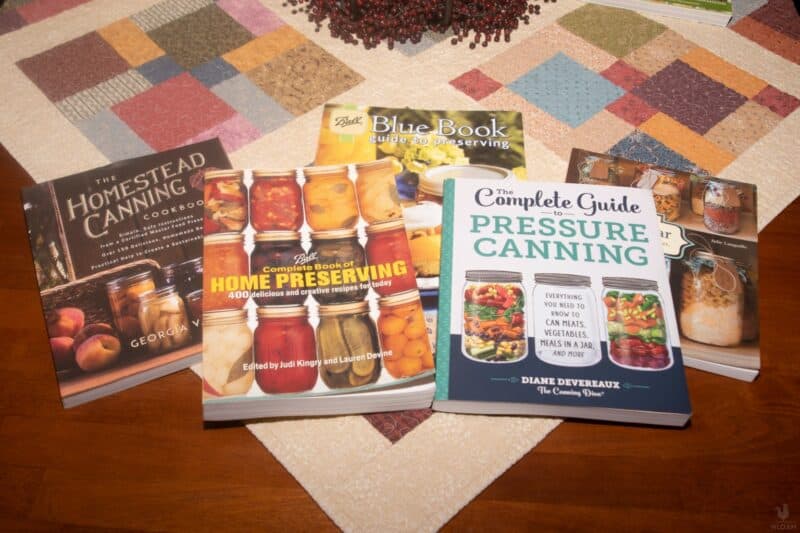
Several of the author’s books for water bath and pressure canning recipes
Next are websites for cooperative extension offices and various universities. These are the groups that are actually testing recipes and evolving the canning world.
Finally, hit the rest of the internet. From YouTube to Reddit, there is a wealth of information out there to be had. Just be careful with some of the less popular sites.
Their data can be sometimes incomplete, misleading, or just wrong. When researching a new recipe, I always look for confirmation about the process from multiple sites. We once wished to can meatballs.
This is possible and is highly recommended. It wasn’t until I paid close attention to the recipes and found that none included cheese like ours.
A little digging later, I found that the addition of cheese is not recommended for home canning. Do your homework before using a recipe from the internet!
Canning Process
Ok, enough about the boring but required background. Let’s get you canning. I’ll discuss two methods:
- Water Bath Canning
- Pressure Canning
This is meant as an intro and to give you the basic processes before you dive deep into your own canning books and manuals.
First, you need to follow these 5 basic rules for both methods:
1. Watch Your Instructions Because They are There for a Reason
If you don’t follow them you may break jars, or you may even get sick. Use trusted recipes from universities, cooperative extensions, books, and well-known websites.
2. Your Instructions Will Have Adjustments for Altitude
The higher the altitude, the longer the boil time or the higher the pressure. If you are above 1000 feet, pay attention to your instructions.
3. Pay Attention to Temperature (and Especially Temperature Differences)
Cold food in warm jars, warm jars in cold water, or cold jars in warm water.
The thermal shock will break a jar quicker than you would expect. Keep the food, jar, and water at similar temperatures.
When canning hot food, I prefer to keep the jars in hot washing water until I’m ready to fill them. Then it’s a quick rinse in hot water and they get filled and popped into the canner.
4. Don’t be Superman
You don’t need to crank down on the rings. Just finger tight. Any more and you may not allow the gasses to escape and a vacuum won’t form. Or you may cause the tops to pucker.
We purchased a sleeve of particularly sensitive lids. If the rings were the least bit over-tight, they would pucker. It took 3 or 4 batches to figure that out.
5. Pay Attention to Your Senses
I’ll touch on this later when discussing food safety. But for now, trust your sight, smell, taste, and even hearing.
If your jar looks, smells, or tastes off, into the trash it goes. Also, listen when placing the jars in the canner. Listen for any sounds of breaking glass. Warning, it may be subtle.
Water Bath Recipe
Here’s a quick water bath recipe that couldn’t be any simpler and it applies to a few foods.
Peaches, pears, and plums can all be put up with a “simple syrup.” A simple syrup, in this case a light syrup, is a combination of sugar and water.
For a light syrup, combine 3 ¼ cup sugar and 5 cups water in a pot and bring to a boil. Prepare this as you clean and skin your fruit.
Then simply warm up the fruit in the syrup, pack your jars, and top off with syrup and can.
Starter Water Bath Recipe
Ingredients
- 5 pounds peaches, pears, or plums
- Rinse and save the spice packets, pour them into a measuring cup for use later
- 3 ¼ cup sugar
- 5 cups water
Instructions
- Prepare the simple syrup by adding the sugar to the water and bring to a boil while preparing the jars and the fruit
- Add rings and lids to a pot, cover with water and bring to a boil
- Inspect the jars for chips or cracks, wash and rinse, set aside in hot tap water to keep warm
- Fill the canner half full with warm water, set on the stove low heat
- Add the fruit to the simple syrup and bring to a simmer
- Empty a jar, and fill with fruit, leaving ½ inch head space (gap between the fruit and the rim of the jar)
- Fill the jar with simple syrup, leaving ½ inch head space
- Clean off the rim with a paper towel dampened with vinegar
- Add lids and rings
- Center the tops on the jars
- Finger tighten the rings – don’t crank down on them
- Place the jar in the canner (on a rack or a mat, it must not rest on the bottom of the canner)
- Once all jars are in the canner, turn the heat on high and bring to a boil
- Once the canner comes to a boil, process for 20 minutes
- After 20 minutes, turn off the heat and remove the jars
- Allow jars to come to room temperature
- Listen for the tops to “ping” as the vacuum forms check all jars for dimpled tops once they have cooled – any that do not seal move to the refrigerator and eat within a week
- Remove rings, rinse the jars, label and store in a cool dry place
- Enjoy within one year
Notes
Pressure Canning Recipe
Protein is a pain to store. Processed, it is expensive. It’s always best to can your own and eat as a part of a continuous rotation.
The following recipe works for either pork loin or boneless and skinless chicken breasts. For pennies on the dollar, you can put up a shelf full of protein when compared to freeze-dried or commercially canned.
This method is called “raw packing.” The meat goes in raw and uncooked while the canning process cooks it thoroughly. The meat generates its own juices.
Starter Pressure Canning Recipe
Ingredients
- 17 pounds lean pork loin or boneless and skinless chicken breasts
- Canning salt
Instructions
- Add rings and lids to a pot, cover with water and bring to a boil
- Add cool water to your canner according to the directions.
- Cut the meat into cubes that are¾” thick.
- Pack each jar with approximately 1 pound of cubed chicken or pork
- Don’t worry about any air gaps, these will fill in with broth as the beef cooks
- Leave 1” of headspace – this is the space between the top of the corned beef and the top of the jar
- Add ½ teaspoon of canning salt to each pint jar
- Clean off the rim with a paper towel dampened with vinegar
- Add lids and rings
- Center the tops on the jars
- Finger tighten the rings – don’t crank down on them
- Add jars to the canner
- Place the lid on the canner and tighten according to the instructions
- Turn the heat on high
- Allow the canner to heat
- Once the steam comes out of the vent, allow the canner to vent 10 minutes – All American specific
- Add the weight to the vent (for All American canners)
- Once the weight jiggles, adjust the heat until it jiggles 4-10 times per minute – All American specific
- The temperature should come up to 240-245 degrees
- Allow the canner to process for 75 minutes for pint jars
- After processing, turn off the heat
- Allow the canner temperature to come back to 200 degrees
- Remove the weight and let the canner vent for 10 minutes
- Remove the lid and then remove the jars
- Allow the jars to cool and come to room temperature
- Listen for the “ping” of the tops sealing
- Test the tops to make sure they have dimpled and no longer flex
- Once cooled, remove the rings and give the jars a quick rinse
- Label and date each jar
- Enjoy
Notes
How Long Will My Canned Food Last
You’ve just extended the shelf life of your food… But for how long? That’s a really good question. Let’s do our best to give you some guidance.
First, the general recommendation for home canned food is a shelf life of 1 year. For this schedule to hold, keep the cans in a cool dry location out of direct sunlight.
For those with a basement, this is the perfect environment. Run a dehumidifier if you need to keep the moisture down.
If you don’t have the benefit of a basement, keep them indoors (avoid garages and sheds). If you are able, store them in an interior room with no exterior walls to avoid temperature changes.
Even without perfect storage, I have definitely eaten a few jars that are past the 1-year mark. Way past the mark.
So why did I take my life into my own hands? Simple. I trusted the process and trusted in the analysis of the jars I was about to eat.
I canned each jar that was older than a year. I knew the process and the recipe and trusted the general results.
Since I knew they were canned properly, I moved on to the next stage of looking, smelling, and tasting, and I’m still here to talk about it.
I’m not recommending that you do this, just saying that it can be done safely.
Canning and Food Safety
As I said above, trust your senses. Look at the jar from the outside and check if there are any chips or cracks in the glass. If so, toss it.
Next, inspect the lid and look for rust spots. Keep in mind that a little mild surface rust is ok. If you see this, immediately rotate these to the front of the stack.
If the rust creates a pinhole and invalidates the seal, then you need to toss it. The lid should be dimpled. This is a sign of a good seal and a good vacuum. Don’t eat it if the dimple isn’t there.
Now look at the contents. They shouldn’t be cloudy and the color should be similar to when you put it up (a little fading is ok).
Next, it’s time to pop the lid. There should be a good hiss when the lid pops. No hiss. You guessed it. Toss it. Once it’s open, smell the contents. Your nose is a wonderful indicator. If it smells off. It is bad.
Finally, give it a taste. If any sign of off flavors, stay away.
In all my years of canning, I’ve only lost two or three jars. These were obviously bad either through sight, sound (no hiss), smell, or taste… Well, I never tasted them.
Common Canning Mistakes
While canning, both water bath and pressure, are pretty easy once you get the hang of them, there is still room for error.
First, it’s easy to get comfortable and run a recipe from memory. Always refer to the recipe regardless of how familiar you are with it.
A little off in your vinegar and you won’t create the correct environment. This will lead to spoilage.
Next, and remaining on recipes, follow instructions on the size of your food you can. Specifically, when pressure canning, food that is too thick may not heat completely through during the giving processing time.
Watch the air in the jars. This is for both headspace and bubbles. Headspace is the gap between the top of the liquid and the jar top.
If you leave too little headspace or leave too many bubbles in the jar, you may experience siphoning. Siphoning is liquid loss from your jar.
With little head space, you don’t leave much room for expansion. Bubbles in the jar will expand as they heat. This may force liquid out of the jar.
There are two issues with siphoning. The first is liquid loss. You want to keep the contents under the liquid for long-term storage. Food exposed above the liquid line will not have the same color, texture, and flavor as that below.
Second, any liquid that escapes the jar may cause problems with the seal. This is mainly a concern with pressure-canned meats. Fats can quickly invalidate the seal. A bad seal is the quickest way to spoilage.
Finally, safe thickeners for use after canning. Never include flour in a canning recipe. There are food-safe thickeners and flour is not one of them.
I see it as flexibility. If I make chicken soup and can it as such then I have two options. You can either can soup, or I can add thickener, and once I pop the seal, I can turn it into a hearty stew.
If I were to add the thickener before canning, then I could only make stew.
Next, pay attention to how you tighten your rings. Don’t crank down on them. Too much pressure and you’ll lock down the seal.
Air can’t escape and the jar won’t form a vacuum. You want the ring finger tight. Too loose and they won’t seal, or too tight and no vacuum.
The final common mistake is setting the hot jars on the countertop. Always set them on a double-thickness of the towel. The countertop may draw heat too quickly out of the jar causing it to shatter. Hot liquid and glass are a horrible mess and a danger.
Wrapping Up Canning
Food preservation is a fundamental skill for homesteaders, preparedness-minded individuals, and anyone wishing to take control of their “food chain”.
While it may be a bit intimidating at first, it doesn’t have to be. In fact, it can be a welcome process to the seasoned canner. In fact, I miss it if I’ve gone a month or two without putting up a few jars.
Soon you will find yourself looking forward to the harvest. Not only for the blessing of fresh fruits and veggies, but for the opportunity to extend the depth of your own pantry.
Once you get into pressure canning, then you’ll never make a single batch of soup or stew again. In fact, I’ll even wager that you’ll start seeking canning-ready recipes and cooking up a few gallons at a time.
Canning FAQ
Yes! Done correctly, may vegetables, fruits, stews, meats, and broths can be safely canned at home. Use a trusted recipe, the correct ingredients, and the right equipment and you can safely can at home.
Most foods will last 1 year when canned at home. Use your senses and common sense whenever you open a jar of canned food.
It is safe to do so if canned within 24 hours. Refrigerate the sealed jar if canning the next day. Replace the lid and re-can as soon as possible.
If the processing time is 10 min or more, then there is no need to sterilize the jars first.
Jars break because of hidden cracks or because of thermal shock. Always inspect your jars before use. Always have the water, jars, and food at similar temperatures.
Yes! Salt only contributes to the taste of your canned product. It does not affect food safety.
Yes! The primary difference between the two is that table salt includes an anti-caking agent. When used in canning, the anti-caking agent may cause the liquid to be cloudy, but otherwise it is perfectly safe.
Local cooperative extensions, homesteading groups, and FaceBook are all great resources for finding a canning class in your area.
No! Make sure to inspect the packaging. There are a lot of decorative jars on the market these days. Canning jars will be clearly labeled as such.
Yes! Never put jars directly on the bottom of the canner. The heat and resulting thermal shock may cause the jar to break.

M. I. Grey is an expert in food processing and preservation (including canning), but also an avid forager. He’s also passionate about anything preparedness, and used to work as a security expert.