Growing red winter wheat does not require a large homestead with double digit acres of fields. Nope, you can grow this shelf-stable food in small patches or even in 5-gallon gardening containers.
By cultivating your own wheat your are not only saving money by growing your own groceries, you also know exactly what is going into the food placed on your kitchen table. The wheat can also be used to make straw for use as bedding for the livestock and pets living on your homestead.
Not only will red winter wheat beef up the food stores you grow and preserve on the homestead, you are also helping enrich the soil in your ground growing plots. This type of wheat makes an excellent cover crop, and can be planted in the garden soil during the late fall after it has been tilled.
Table of Contents:
Red Winter Wheat Uses
The wheat berries harvested from this fall crop planting can be ground into flour and used for cooking and baking. Red winter wheat also make a great natural (and free) food supplement for small livestock like poultry birds and rabbits.
Growing the wheat in small gardening containers simply to generate wheatgrass can be done on even a small suburban homestead.
The seeds harvested from non-GMO red winter wheat can be plucked and preserved for planting during the next growing season. To grind wheat berries you will need a grain mill – the red winter wheat berries are exceptionally hard in texture.
If using the ground red winter wheat berries to make flour, you will likely be mixing it in with regular white flour before using it to bake or cook. While you do not have to go this route, most red winter wheat users and growers mix their powdered yield at a 1 to 1 ratio with traditional white flour before using it in the kitchen.
If you live on an off grid homestead, the hard red winter wheat berries can still be naturally processed via a hand-crank old-fashioned grain mill. If you have never used a manual grain mill before, consider the workout your arms will get an added bonus.
8 Reasons to Grow Red Winter Wheat
- Red winter wheat is a whole wheat, making it healthier to consume than bleached or commercially manufactured wheat.
- This type of wheat boasts a high fiber content due to the brand germ and endosperm of which it is comprised.
- Red winter wheat is also a quality source of both protein and fiber.
- Adding red winter wheat to recipes that call for flour (like past dishes, bread, stews, and cereals) will make them more filling and more nutritional.
- The harvested red winter wheat can be broadcast over the seeds you plant in the garden during the spring to thwart birds from easily getting to them and consuming them before they have the chance to grow.
- Wheat kernels (cracked red winter wheat berries) make a great natural cereal base after they are cooked. Mix the cooked wheat berries with some fruit, cinnamon, or a little bit of sugar – or all three, and done upon a delicious hot or cold breakfast dish.
- It would be difficult to grow a more drought resistant crop than red winter wheat. This fall planting crop is also exceptionally hardy against most types of common insects and plant diseases.
- You can prepare red winter wheat berries to use as a rice substitute in soups, casseroles, and stew recipes.
Shelf Life
When stored inside of a bucket with mylar bags tossed in the homestead grown red winter wheat can last up to 25 years – equally the claims on similarly commercially manufactured long-term storage wheat.
The key to keeping the red winter wheat berries shelf stable is ensuring it is stored in an airtight container and kept in a cool dry place. As with all types of stored food, moisture is the number one enemy to combat to deter bacteria and mold growth.
Red Winter Wheat Planting Tips
The planting of red winter wheat in late September through the first few weeks of October coincides with winter garden prep best practices. By tilling the garden to prepare for the wheat planting, you are also turning the soil and exposing any insect eggs or larvae already laid in it to temperatures they cannot survive.
Killing destructive insects before they have the chance to mature can help protect the seeds and young plants you will be cultivating come springtime.
During the first several weeks after the red winter wheat has been planted it will acclimate to the increasingly colder temperatures.
If you attempt to plant red winter wheat seeds past the recommended middle of October growing time, they may still grow (depending upon your agricultural zone), but the yield they will produce will likely be diminished.
Getting your red winter wheat dispersed into a growing plot before the first killing frost – or cold hard frost, hits, is vital to the growing process.
The later in the fall the hardy red winter wheat is planted and the more rain it is exposed to during the temperature acclimation stage, the likelihood of the crop developing rust increases.
Getting red winter wheat planted as close as possible to the recommended starting time in September can increase the chance of the crop being as winter hardy as possible.
The wheat plants that evolve from the seeds will grow at least three leaves and a crown at the base of the wheat shoot. In the spring, red winter wheat will “regrow” itself from the shoot if it remains strong and healthy enough during the long weeks of winter.
Although planting wheat too early can cause doom for the crop, putting this fall crop in too early can produce equally damaging results.
If the red winter wheat seeds are cultivated too soon they may mature far too quickly and come up fully not during the first warming weeks of spring but during the dead of winter.
Plants that begin to mature too soon often develop mold due to the snow, sleet, and rain that regularly fall from fall through spring.
Red Winter Wheat Soil Requirements
The wheat seeds will have the best chance of proper germination if they are planted in a moist soil. When planted in a dry soil the seeds often experience either stunted growth or do not grow at all. If you are forced to plant in dry soil because of time constraints and weather issues, water the ground thoroughly before planting.
The next step is to till up the dry soil. Depending upon how dry it is, you may need to make 5 to 7 passes over the dirt before you can water once again and plant the wheat.
Wheat Seed Density Calculations
The soil types, condition, and current weather situation at the time of planting will greatly impact how densely the red winter wheat seeds must be planted to give them the best start at germination. As noted above, water the soil thoroughly if it is dry both before and after tilling.
When dealing with naturally or manually moistened soil, disperse red winter wheat seeds in a manner that should foster growth of roughly 30 to 35 plants for every square foot of planting area.
If the soil hardens back to its natural state after the watering and planting, do not water it again because it can wash the surface sown seeds away.
In such a situation, simply broadcast another handful of seeds over the same area to ensure they are infusing themselves into the dampened soil and have a solid likelihood of sprouting.
When red winter wheat is planted at the recommended time and properly placed in moist soil the seeds have roughly a 70% cultivation rate.
How to Plant Red Winter Wheat
- Till the ground with a tractor, push rototiller, rake, or shovel to disturb the soil. The ground must be turned between one to two inches thick for the red winter wheat seeds to take root properly.
- The wheat seeds must be broadcast on top of the freshly turned soil. You can broadcast the seeds by hand, use a seed bag, or an agricultural spreader attachment on a tractor if you are putting in multiple rows of red winter wheat in a large ground plot.
- Toss straw or hay on top of the freshly broadcast seeds, but do so only lightly so sun can still easily reach the seeds. The covering not only deters birds from swooping in and eating your wheat seeds before they can sprout but also increase the humidity level around the seeds to enhance the growing process. Expect to use one 50-pound straw or hay bale to cover a three foot wide and 500 foot long row of planted red winter wheat seeds.
- If you are battling a dry spell, consider spraying just lightly and broadly over the hay or straw covering once again to infuse more moisture into the soil and the recently broadcast seeds.
Pests and Diseases
This is an exceptionally hardy type of wheat, and does not suffer from many types of plant diseases or destructive insects – but it is not immune to the impact of either.
Because red winter wheat is planted in the late fall, the amount of bad bugs milling about is decidedly less problematic than experienced by spring and summer crops.
But, remaining alert to the presence of these destructive insects and watchful for signs of the damage they can do on leaves will help you thwart their efforts promptly.
Destructive Insects
| Thrips | Wheat Curl Mites |
| Aphids | Sawflies |
| Cereal Leaf Beetles | Mites |
| Hessian Flies | Wheat Stem Maggot |
| Stink Bugs | Cutworms |
| Snails | Armyworms |
| Grasshoppers | Stalk Borers |
| White Grubs | Wireworms |
| Slugs | Snails |
| Crickets |
Plant Diseases
Most of the plant diseases noted below are not generally a problem during the fall planting season, but the possibility of red winter wheat seeds and plants contracting them depends upon weather patterns during the cultivation period and your specific agricultural growing zone.
When the temperature turns colder and precipitation increases or humidity rises, red winter wheat will be more prone to developing mildew-type plant diseases.
These style of rotting, mold, and fungus conditions are most likely your red winter wheat seeds and plants will battle during their fall to early spring growing season.
Should you start to notice yellow streaks appearing on the plants or the wheat heads starting to fold under or boast a generally droopy look, they are afflicted with a mold disease that could kill the crop.
To prevent and stop plant diseases and insect infestations, use the same natural insecticides and pesticides as you typically would administer on your spring and summer garden crops.
| Eyespot – Strawbreaker | Wheat Streak Mosaic Virus |
| Black Mold – Sooty Mold | Smut – both flag and loose varieties |
| Stem Rust – Black Rust | Dwarf Smut – Stinking Smut |
| Bacterial Spike Blight | Bacterial Leaf Blight |
| Brown Rust – Leaf rust | Scab – Head Blight |
| Powdery Mildew | Stripe Rust – Yellow Rust |
| Alternaria Leaf Blight | Fusarium Leaf Blotch – Snow Mold |
| Take-All | Karnal Blunt – Partial Blunt |
| Tan Spot Blotch | Black Point |
| Downey Mildew | Ergot |
| Blotch – spot, septoria tritici, and septoria avenae blotch | Rhizoctonia Root Rot – sharp eyespot |
| Barley Yellow Dwarf | Ergot |
| Rot – crown, foot, and common | Southern Blight – Sclerotium Wilt |
Harvesting Red Winter Wheat
The red winter wheat crop will not be ready for harvest until the spring. How you choose to harvest the wheat will depend almost solely upon how you plan on using the crop. On average, it takes about eight months for the wheat to mature – depending upon your agricultural growing zone.
Straw Bales
If the red winter wheat was grown to make straw, follow basically the same process used when growing a hayfield and harvesting it to make either square or round bales.
Once the hay is tall enough to harvest, wait until the weather forecast calls for at least three consecutive days without rain and temperatures above 75 degrees F (23 Celsius). Once the optimal weather conditions exist, cut, rake, and then bale the wheat into bales of straw.
Cover Crop
When growing wheat to make straw, you will need three straight days of no rain and temperatures above a minimum of 75 degrees F (23 C), preferably in the mid 80s F / 30C to cut, turn, and bale the wheat crop.
If you do not have a hay baler, you can harvest the red winter wheat the pioneer way with a machete or scythe, and stack it straight up and down, tied together ¼ of the way to the top, and allow it to dry.
Like hay, damp straw square bales can spontaneously combust – if stacked tightly together in your barn and not completely dry, you could lose the entire structure.
I have seen hay bales spontaneously combust, destroy the ground around them, and take down a barn. It happens very quickly andm sometimes, kills the livestock living in the structure.
When red winter wheat is baled solely as a cover crop to add more nutrients back into the soil, simply till the crop under in the spring once the ground is no longer too frozen and hard to complete the task.
The root of the wheat houses the most nutrient-rich compounds. Make sure this part of each plant is ripped apart thoroughly during the tilling process to facilitate maximum absorption by both the soil, and by the crops planted in it.
Red Winter Wheat Berries
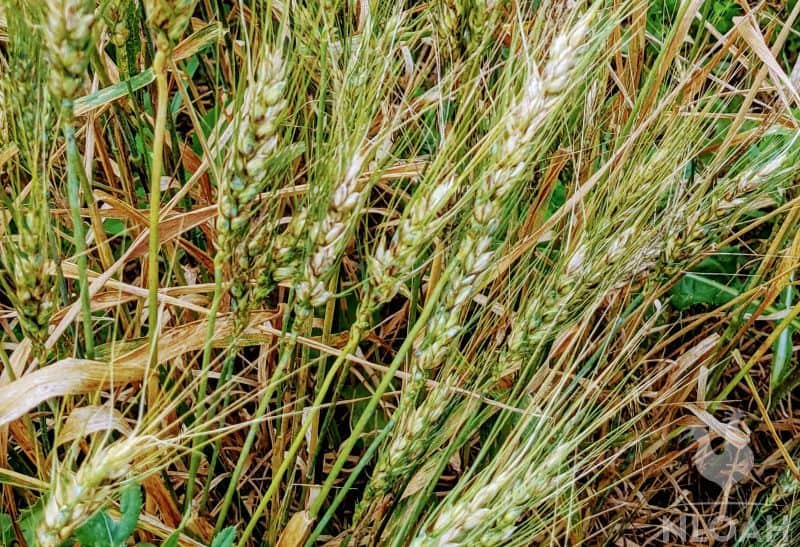
The berries from the red winter wheat are not mature enough to harvest until the tops of the plants turn yellow. Once this occurs, all you need to do to harvest the berries is to run your hands up and through the stalks to free the berries – allowing them to fall in your waiting sack or bucket.
You should also “thresh” the wheat by smacking the stalks of each plant over your sack or bucket to make sure all of the many seeds in each head have been loosened and fallen off.
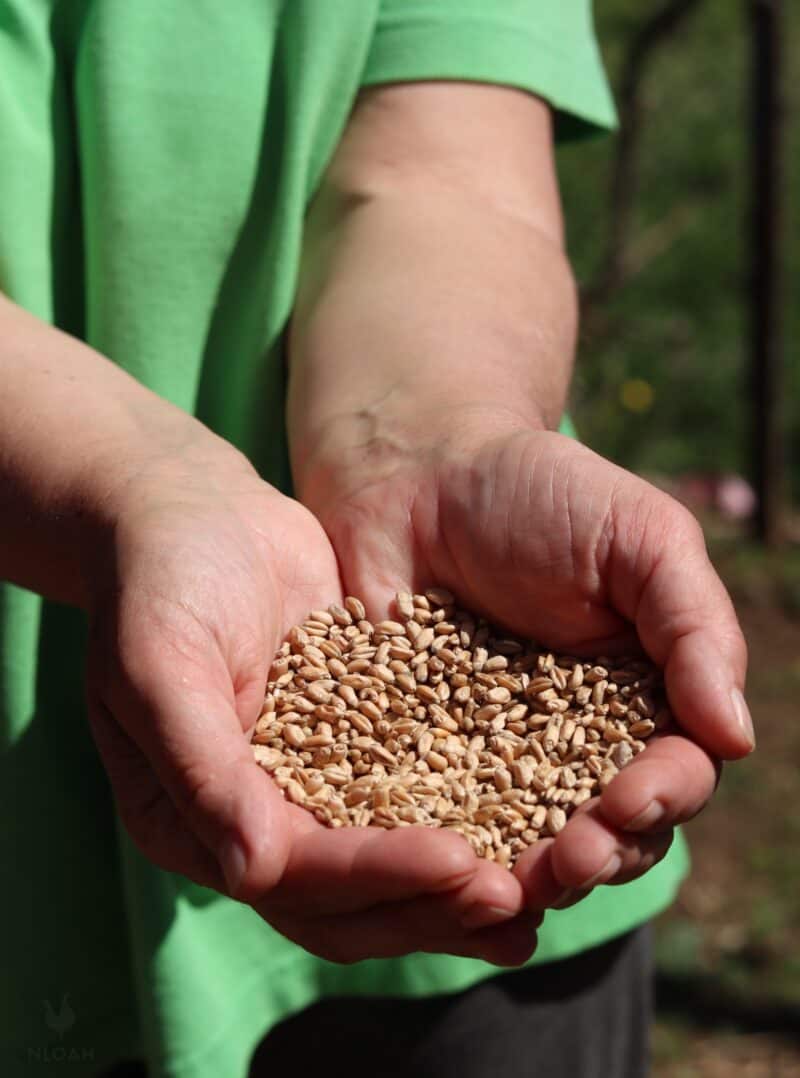
After harvesting all of the red winter wheat berries, separate and lay them out onto a tarp to dry.
With the help of one or two other folks, you can enhance the drying process by holding onto the corners of the tarp and lightly tossing the seeds into the air several times a day – this pioneering drying technique is referred to as “winnowing.”
After the red winter wheat berries have dried completely, store them in an airtight container in a cool dry place to make them as shelf-stable as possible. The more the dried wheat berries are exposed to air and sunlight, the shorter their shelf life becomes.
Growing your own straw and wheat berries on the homestead will help save you money, and increase the vitality of your soil for the groceries you are growing to feed your family. Have you ever tried growing winter wheat? How did it turn out?

Tara lives on a 56 acres farm in the Appalachian Mountains, where she faces homesteading and farming challenges every single day, raising chickens, goats, horses, and tons of vegetables. She’s an expert in all sorts of homesteading skills such as hide tanning, doll making, tree tapping, and many more.
I live in Texas. Zone 8. I planted hard red winter wheat berries on September 27, 2022. It is now January 2, 2023 and my wheat is beautiful yellow and is drying in the field. I hope to harvest the berries but am not sure when they are ready. Will they dry out more when cut and put into bundles.
Wow, crazy that you didn’t get a reply. I live in N. Florida, zone 8b and I plan to plant some this coming September. How did it go for you? When did you wind up harvesting? What advice could you give someone else who is about to do what you did?