It has been a combination of a very exciting and a very frustrating week here on the homestead. The weather keeps fluctuating between spring storms (and mud) and then winter rears its ugly head and we get two to four inches of snow – that turns the ground into a skating rink.
A big snow storm is on the way again now, hopefully this will be the final big one until the end of the year…hey – a girl can hope, right?
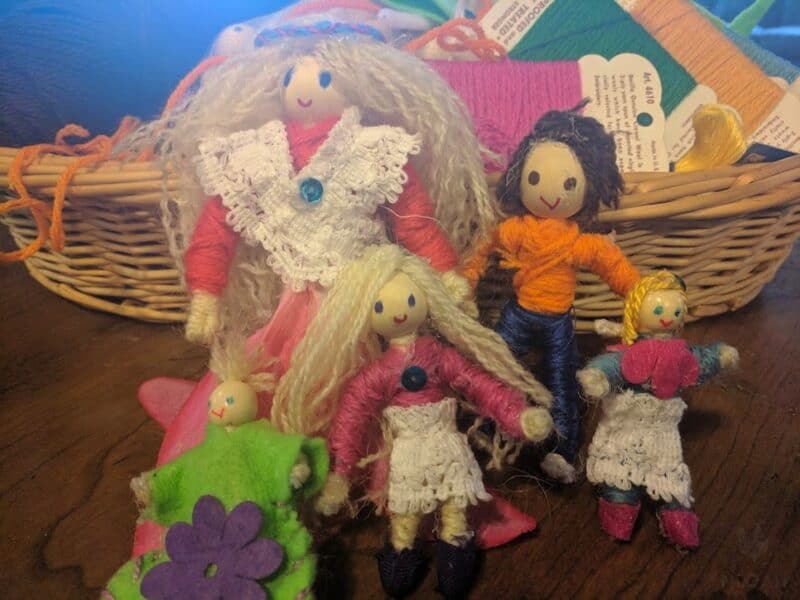
Doll making is my current free-time obsession…
Dolls for our youngest granddaughters and “not dolls but action figures or ‘little guys” for our grandsons.
Being a long-time lover of old-fashioned and vintage toys, the bendy wood bead dolls, peg dolls, and Waldorf baby dolls have become my passions of the moment and first gift projects of this new year. Making them will keep me busy until my cow hide is finished tanning and I can start turning it into moccasins.
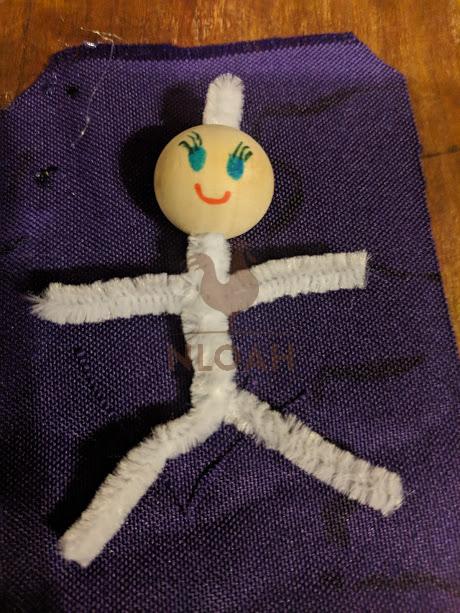
None of the wooden bead head bendy dolls are completely finished yet. They all need some hot glue plucked off and some frays cut away, but they are nearly done.
The only difficult aspect of this project will be keeping the dolls and other toys that I will be making on the homestead, put away until the intended special occasion. Thankfully, this first batch of cuties are for Audriella’s birthday at the end of the month.
So, once I make a pink and lavender castle shaped purse that opens up to allow interior play, I can give these old-fashioned dollies (like the one below) a forever home:
For a few weeks I delved into everything wooden bead bendy dolls, sometimes called Waldorf dollhouse dolls or Wee Folk, on Pinterest.
Because we have satellite internet here on our secluded survival homestead, we are cursed with data limits – the ONLY part of town living that I miss is unlimited internet, I only have a few specific hours a day to play online and not pay dearly for it.
Our service is very reliable and fast, but I have to admit binge watching Netflix was a guilty pleasure, as was listening to music online, and getting on Pinterest. Any time you use the Internet, it soaks up your data unless you are online between 2 and 8 a.m.
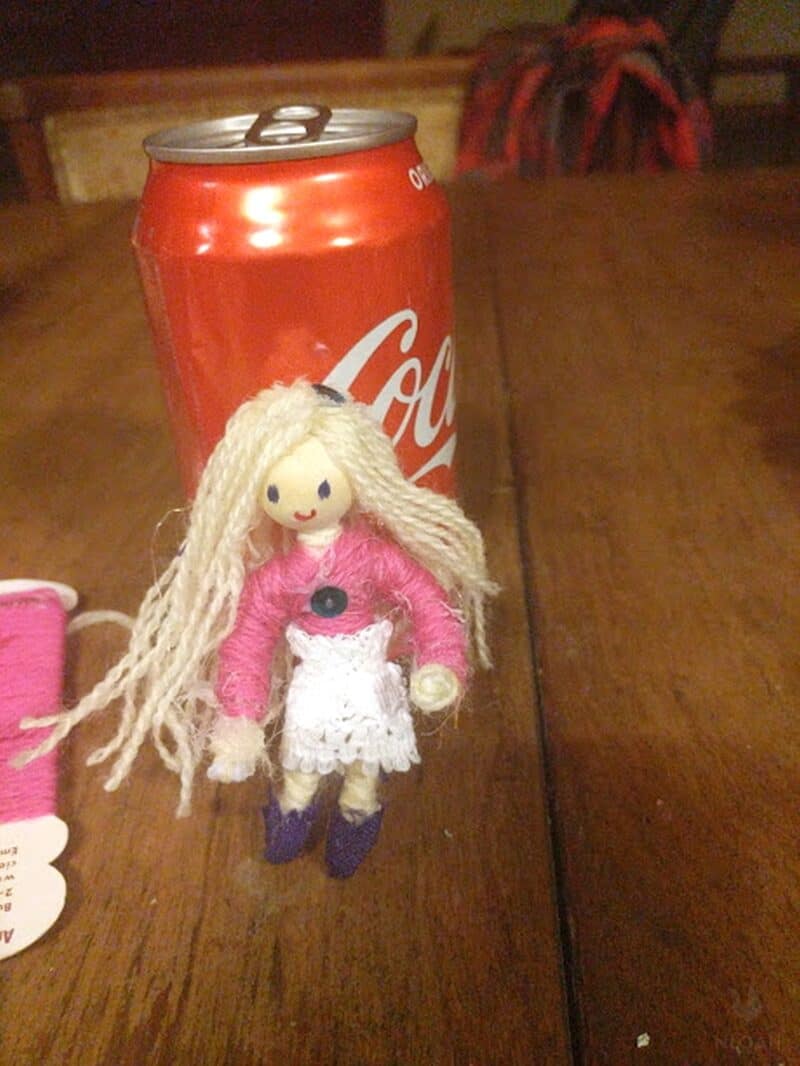
So, while sipping on my morning Coke and watching the news with my hubby at 6 a.m. I would spend some time learning how to make these cute little dolls and their clothes.
It is probably a very good thing I have only a limited amount of time to play on Pinterest before heading out to do barn chores, otherwise I would get lost for hours on there and become inspired to start too many projects at once!
I not only love these dolls because they are cute and I can make each one myself for probably only a $.25 investment, but because they offer the opportunity for imaginative play.
When our oldest granddaughter came into the family I made my first journey into the toy aisle of a big box store in years. I was outright dismayed by what I found there.
Sure, Lego blocks still adorned the toy aisle, but at least half of them featured licensed characters of one type or another… and, my oh my, are even the little sets expensive!
Gone were the dollhouses and dolls that lived in them, gone were the fire trucks, toy guns, cowboys, police cars, Playmobil sets, and a host of other childhood favorites.
It took me weeks to find some Army guys and bow and arrow set for a grandson last year, those old standards have almost completely disappeared from toy sections everywhere. It took a trip 55 miles away to a Rural King store to find the requested birthday gifts.
About 95% of the toys at big box stores in the next county over (we may be the only county in America without a Walmart, and that suits us just fine.) were based on characters from a television show or a movie.
Playing with those types of dolls and figures do not inspire children to create their own adventures and to let their imaginations run wild. Nope. All they do with the hot trend of the moment toys is re-enact what they have already watched on a screen.
My friends and I spend hours upon hours playing with my dollhouse and dolls – even the boys, when we were growing up.
Their G.I. Joe’s were always on hand to rescue any little dolly who found herself in a perilous situation (like when an ‘earthquake’ would strike my dollhouse and shake all of the furniture and inhabitants out onto the floor) or to go on a rescue mission with her to find a wayward stuffed animal.
I still have my dollhouse, every child in the family has enjoyed it at this point. In a few years when Auddie and Ariyah are older, it will be their turn to bring it back to life.
My Sunshine Family was perhaps what fostered my early love of simple things and homesteading. Our grandchildren were going to grow up with toys that allow them to create their own little worlds to explore…even if I had to make them myself!
I bought wooden beads in several different variations so I could make parents, children, toddler, and baby bendy dollies. The adult “heads” are 25mm or 1-inch in diameter. I spent an hour or so on the first two doll heads trying to make rather expressive and detailed faces.
I experimented with acrylic paints, paint pens, good markers, cheap markers, and felt tipped ink pens, until I found what worked best for me.
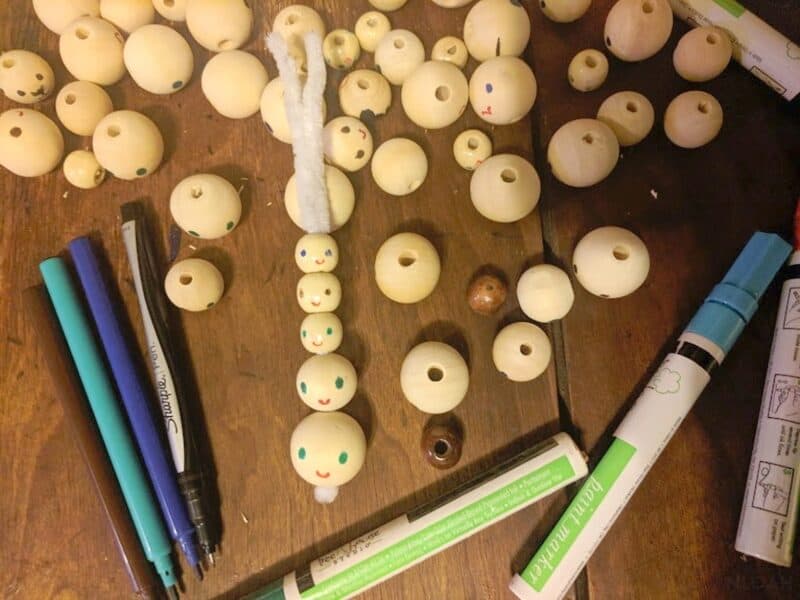
I found it handy to slide the heads in the photo above onto a pipe cleaner to hold them into place while I drew on the faces and to allow them time to dry before adding them to the finished pile. The cheap fine-point markers from the Dollar Tree worked best because the ink dried quickly.
The heads have been in a mesh baggy for days now and the ink has not smeared off or faded. I chose not to put a clear coat on the doll heads because little ones will be playing with them, so the possibility of the secured heads being placed briefly inside a mouth, does exist.
Ultimately, I turned around the fancy heads, deciding I would be as true as possible to the Waldorf “simple is best” mantra and go with just single colored eyes and a basic red mouth.
I did not waste the fancy heads though, I merely turned them around so the markings would be covered by hair and drew new and more simplistic faces on the front.
Many Waldorf dolls have no face at all, so the child can imagine what it looks like and decide how the doll is feeling. That would have made my project go more quickly, but I prefer the dolls to have a face.
Without the need to be rushed to get the first set of dolls finished, like I was when making gifts before last Christmas, I let some older children make some sample ones with me. They were not perfect, but they were made with love and I think will be cherished by their makers for many years to come.
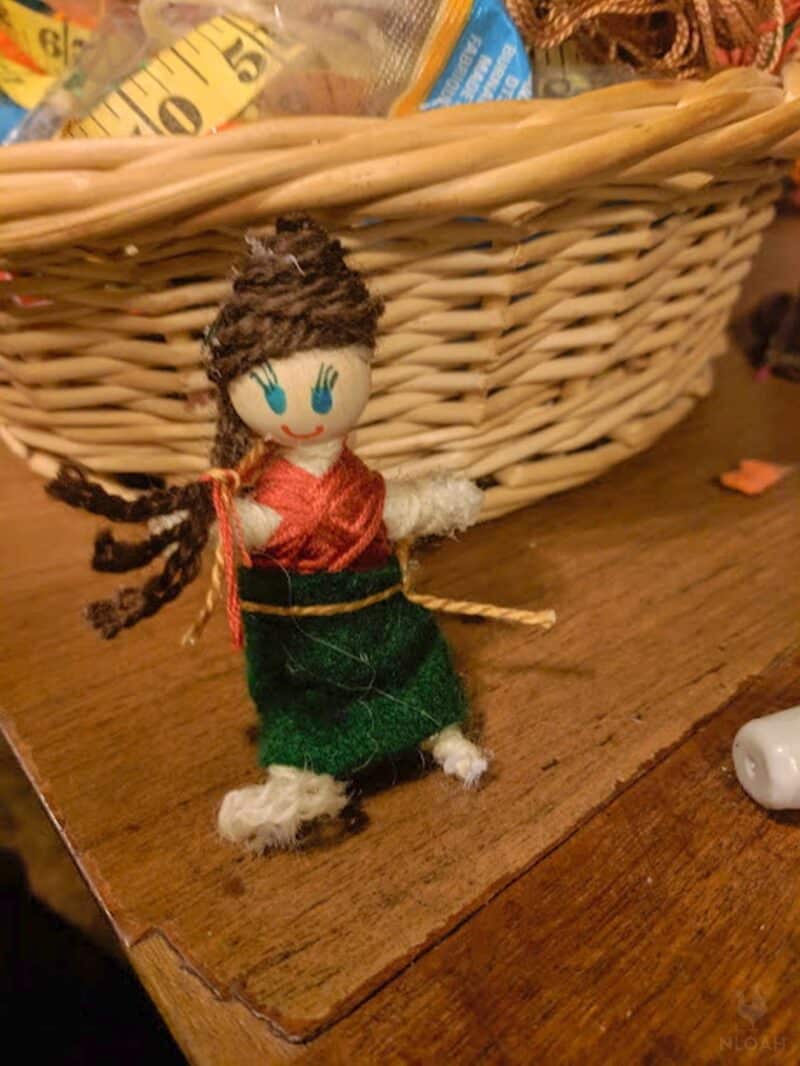
The doll above was toted around for hours, with every child on the homestead that day wanting to take a turn holding her and check her out – even the boys!
Most of the tutorials on how to make bendy dollhouse dolls that I read or watched suggested drawing the faces on with a pencil first, before committing to your design in ink. I did that at first, but I found as long as I kept to a simple design, that step really wasn’t that necessary.
The tricky part is making sure the eyes are lined up and the colored dots are exactly the same dimension and the mouth is not too close or too far away from the eyes. The nose, apparently, is implied, none of the bendy dolls I have seen online have a nose drawn onto the face.
These dolls sell for between $25 to $50 on websites like Etsy. When I looked at the dolls on there for design inspiration, I was aghast at the high cost for something that requires such a small monetary investment.
But now, after having made quite a few, my aching hands will attest to the fact that perhaps the $25 plus shipping fee is a huge bargain!
Bendy Doll Making Supplies
- Wood beads in various dimensions for heads – The wood beads are commonly available in light to dark shades of wood. I leave the wood unpainted, but some folks prefer to paint a flesh tone onto the head instead of leaving it in its natural state.
- 12 to 14 inch Pipe Cleaners
- Markers or paint
- Hot Glue Gun and a handful of glue sticks – I used a hot temp gun that often makes me curse when I mess around with the way the glue is laying, but the low temp guns never seem to hold anything in place sturdy enough when you are making a toy.
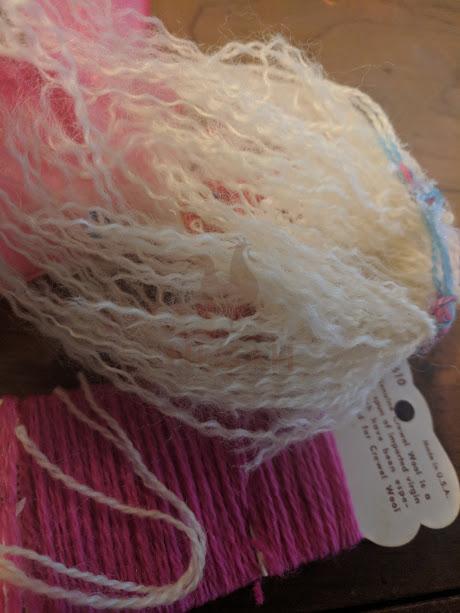
- Yarn and/or embroidery floss. – Purchase a lot of yarn of floss in the skin tone and hair colors you want to use.
- Felt, fabric scraps, lace, or even artificial flower petals, to use to make clothing for the dolls, fairies, gnomes, ninjas, cowboys, knights, pirates – or whatever type of toy figure you dream up to make!
Overview of Wood Bead Bendy Doll Making Process
1. Bend a pipe cleaner in half if making an adult doll. I recommend making the adults first so you can better determine the proper height for child, toddler, and baby dolls.
2. Slide the wood bead head within a pinky finger’s width of the bend in the pipe cleaner.
3. The hair slides through the opening in the pipe cleaner and then the wooden head bead is pushed up to secure both it and the hair into place.
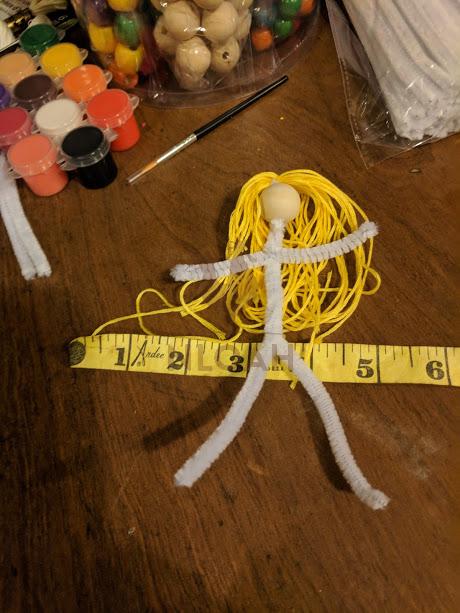
This practice doll has yellow embroidery floss for hair. The doll below had a softer yellow yarn used for her hair.
To make the hair seem more natural and flowing, I spent about an hour pulling each strand of yarn apart into four to six individual strands. I love how it turned out, but swore I was not going to spend that much time on doll hair again…until I did.
4. Once you have the hair positioned and adorned how you want it, use the hot glue to affix it to the sides and the back of the head bead.
Most dollhouse bendy dolls have what amounts to a side part in their hair to better obscure the tip of the pipe cleaner. When making male dolls you can do the wig in two parts, one part that slides through the pipe cleaner whole and a matching topper that is glued over top of the pipe cleaner and the initial wig.
5. Cut a piece of pipe cleaner to make a set of proportional arms. Simply place the arm piece where it naturally fits and twist it around the piece of pipe cleaner holding the head so that you have an even section of arm on either side.
6. Twist the pipe cleaner to form a waist and leg areas.
7. Start at the “hands” area and simply firmly wrap your yarn or embroidery floss around the pipe cleaner.
Once you have passed what will serve as the hand area, bend the tip of the pipe cleaner toward the “wrist” area and secure it into place with more floss, going around it several times before working your way back up the arm, around the neck, and to the other arm. You will repeat these same steps when creating “feet’ and working on the legs.
It takes about one full skeen of embroidery floss to cover an entire upper or lower body if you make three laps around to give the doll thickness and make it soft.
I like to bend the arms all the way around once to form a shoulder and then tightly affix them into place with floss or yarn to add dimension to the doll and make her more possible.
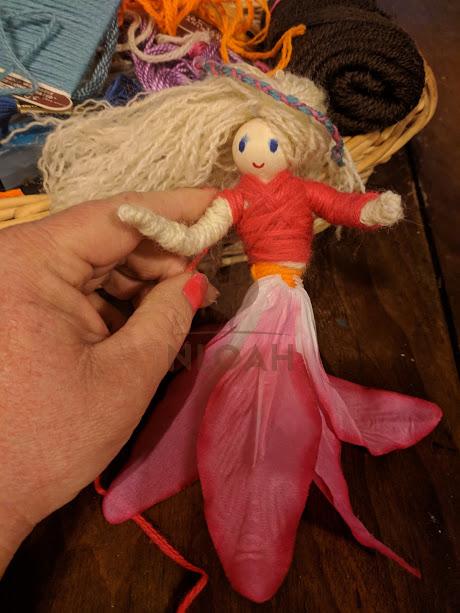
I bought a set of artificial flowers at the Dollar Tree to make a fairy style skirt on some of the dolls. You just pull the flower petal section off, cut or pull out any smaller part of the flower on the inside, slid an opening into the base of the flower petal and slide it up onto the waste of the doll and secure it with hot glue.
8. Once the arms are finished, you will wrap around the shoulders and cover the torso with the yarn or embroidery floss. This part of the process, and the entire doll actually, is really simple to do and will be easier to grasp when watching the instructional video.
9. When you switch from a flesh color to a “clothing” color of yarn or floss, you do not have to add a dot of hot glue (although sometimes I did) you can simply begin wrapping the new shade of floss over top of the last part of the last shade, to secure it into place.
10. Once the doll is finished, you can wrap a bit of lace around her waist to make a shirt and allow the colorful yarn of floss to serve as a shirt.
Felt tunics are often the type of clothing used to cover up the dollhouse bendy dolls, you will find free tunic patterns and a host of ideas to adorn the tunics to make them match the type of doll you are creating, on Pinterest.
Ready To Make These?
My Homemade Dolls Pinterest board is FILLED with possibilities for designing these and other dolls that I will soon be making, and multiple tutorial videos.
If you need any help while making your wooden bead head Waldorf bendy dolls, feel free to leave a note in the comments section below and I will help guide you through the process as best I can.

Tara lives on a 56 acres farm in the Appalachian Mountains, where she faces homesteading and farming challenges every single day, raising chickens, goats, horses, and tons of vegetables. She’s an expert in all sorts of homesteading skills such as hide tanning, doll making, tree tapping, and many more.