So, you live on a homestead and raise your own meat. That’s great. You get extra self-reliance points if you butcher the meat yourself. But, your journey to a sustainable life, an existence where you always use resources wises and for optimal benefit, will not end before you learn how to tan hides.
There are as many way to tan hides as there are animals. Odds are, you will try several different variations until you find the one that works best for your. None of the processes are difficult or involve expensive tools, but each requires both exactness and patience. I always have trouble with the patience part.
Expect a lot of trial and error, when learning how to tan a cow hide. Starting with small animals is best for several reasons. First, they are easier to work with, require fewer hours of manual labor to clean and process them.
And secondly, when you screw up or your creative dreams surpass your current skill set, you will waste only a small amount of leather.
I did not follow my own advice, but I had a good reason. I started with a cow hide it was offered to me by a butcher pal who was going to let it become landfill fodder if I did not jump on the opportunity.
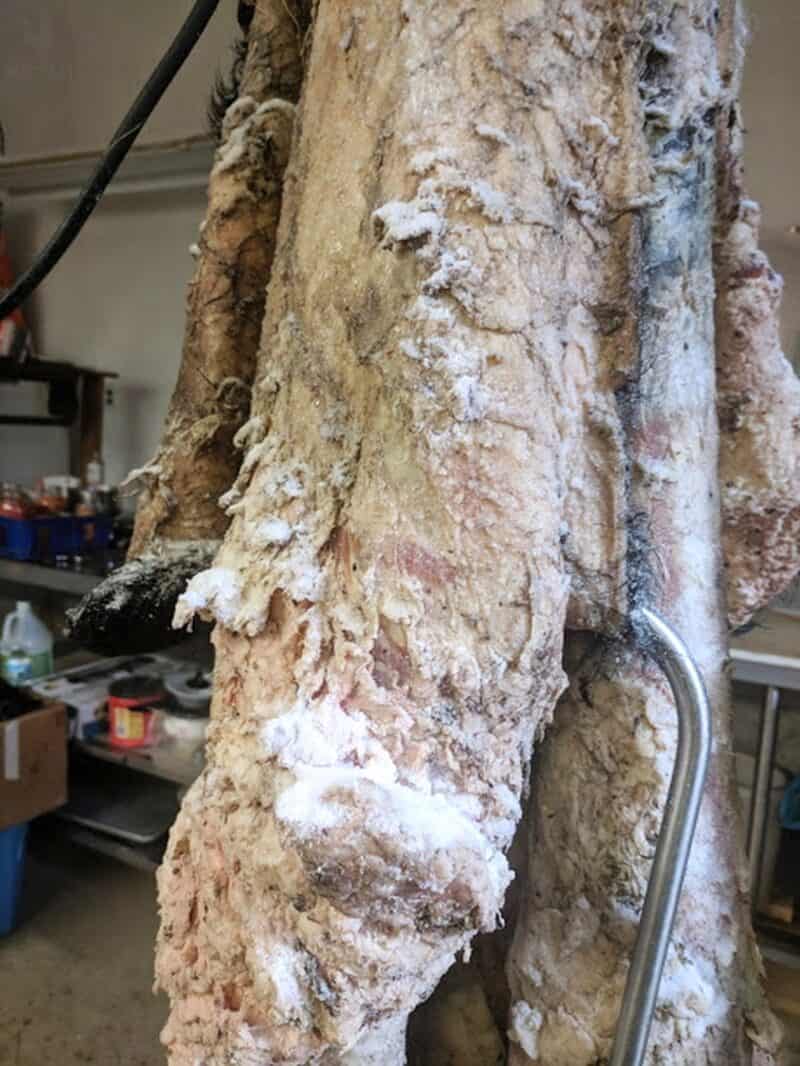
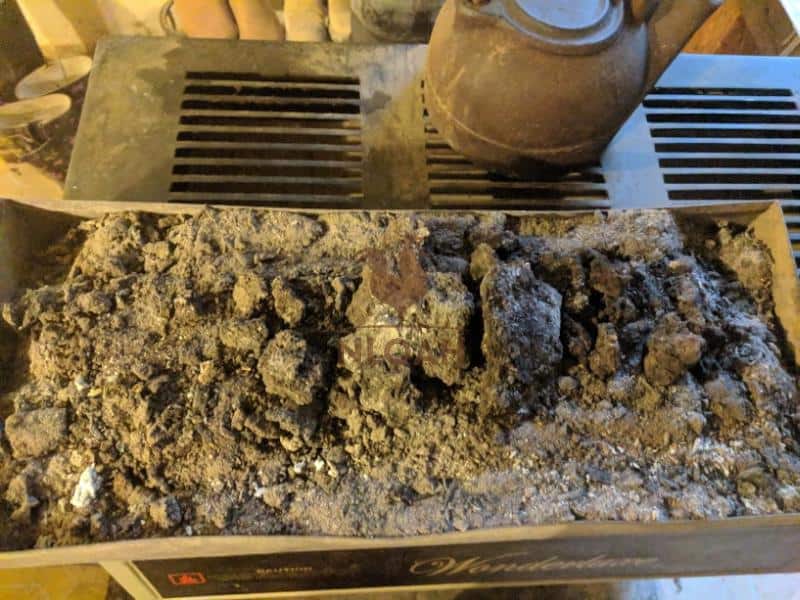
Once the hide is dry after salting, the fat membranes and excess meat still attached to the flesh after butchering, must be removed before the tanning process can continue.
This part of the process can take several hours when dealing with a large cow hide, like shown in this photo. This hide was from a well more than 1,000-pound Black Angus.
Thankfully, I was working with a homesteading friend who had tanned hides before, and was able to pull off the mammoth chore without wasting the beautiful hides.
Since we are about to embark on tanning three hides, one of which we are going to tan in a manner that keeps the hair, Dan and I decided writing a how to tan hides series to create a step-by-step guide for the New Life on a Homestead community, was a stellar idea.
Tanning Hides for Leather
Tanned hides are primarily use for clothing, outerwear, and boot by choice and for saddles, and tack, in our modern world. But, the processing of pelts of both wild animals and livestock was once a necessity.
The tanned leather was used to make pouches for carrying game, blankets, a cot to sleep upon, as coverings for animal bladder based canteens, as the only clothing and footwear material available, and to address other primitive needs.
Buffalo hides were once the primary type of hide used in the making of footwear and saddles because it was so thick and durable.
Before the hides can become soft and pliable leather, they must be tanned. Differing variations of this process have been used, relatively unchanged, for thousands of years.
Even though there are multiple variations and preferences when it comes to tanning hides, there are really only two different types of tanning: Chrome and Vegetable.
Chrome tanning is chemical-based. Nearly 100 percent of all leather goods available on the commercial market today are chrome tanned.
Chrome tanning is a vastly quicker process than vegetable tanning and produces a leather that is extremely water resistant and easily dyed. The downside to this method is obvious, you are using harsh chemicals that will be touching your skin if you are making clothing, accessories, footwear, horse tack, or blankets.
Vegetable tanning take more time and effort that chrome tanning, but typically produces a far more soft and pliable leather – making it a great choice of clothing construction is a part of your leathercrafting plans.
The hide must be tanned and not simply washed and turned into a rug or boots, because the protein structure of the pelt must be changed to turn it into leather.
The first and perhaps, most important step in the tanning process is the drying, salting, or smoking, stage. The hide must be thoroughly dry before the scraping of fat and excess meat and/or hair can be removed.
Then, the skin is either treated with lime or washed (some tanners do both) and then the leather is tanned – worked to crack tiny membranes in the hide and softened with some type of oil.
These are two cow hides being stored in a freezer in our butcher shop until my homesteading friend Sarah and I get done with the cow hide we are tanning first.
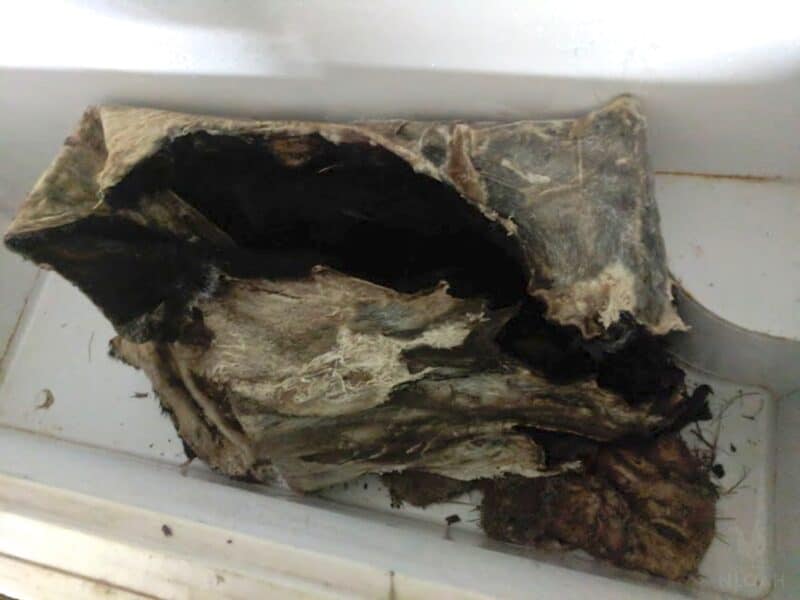
The hides can usually keep for about two years in a freezer before you have to worry about a reduction in hide quality.
Hide Tanning Tools and Supplies
Before we jump into the actual cow hide tanning process, I want to cover the tools and other supplies you will need to tan hides.
You will not need everything on this list, the types of knives, boards, and scrapers used are left up to personal preference. Some of the materials are specific to the style of tanning you choose to try – as noted next to each.
Fleshing Beam – This can simply be a piece of board or form metal frame you can lay the hide over to scrape it and let it dry or a board cut to fit each animal type that will allow you to slide the front and back of hide between it to allow for more even drying.
You can also tack a hide to the side of your wood shed to let it dry and to hold it tightly in place while it is being fleshed.
Native Americans made a frame out of branches to tie the hide to for these same purposes. Because we have a butcher shop on our homestead, I simply hit a button on the overhead track and meat hooks roll my way to hang the pelt upon.
Fleshing Knife – You can also use a draw knife or a dull hacksaw blade to flesh the hide. Before you begin tanning, regardless of the method you choose to use and whether or not the hair will left on the hide, you must wash and then gently yet firmly, scrape away all the blood and thick sticky goo that was left on the hide after butchering.
This is a labor intensive and stinky process – you will NOT want to flesh your hides inside a garage attached to your house! Keeping the sun off the hide during the tanning process is also essential. The goo will attract predators that want to come eat it – and any other animal roaming around your homestead.
Direct sunlight on the hide during the fleshing process will often make the hide become too brittle to process and work with properly to keep it pliable – in essence ruining the leather.
Pelt Scraper – This hide tanning tool has a square edge to remove the fat and meat from the hide on one side and a sharp blade on the other side to remove gristle from the hide. It also comes in handy when you are working in tight spot where there is a lot of gristle, like on the legs of cow and buffalo hides.
Pelting Knife – These knives come in several shapes and are great for when you get into tight spot on the hide.
Tail Stripper – This took is handy to have when dealing with hides that have long or bushy tails, like squirrels and raccoons.
Wire Brush – Some folks use a wire brush or heavy duty scrub brush to scrape the gristle and fat from hides. These will both work, but you will need to be gently when using a wire brush or you will tear or poke holes into the hide. Using a heavy duty scrub brush with plastic bristles will require more effort when scrubbing the hide.
Disclosure: if you visit an external link in this post and make a purchase, I may earn a commission. Read my full earnings disclosure here.
Hoof File – If you have a livestock hoof file that is getting dull and needs sharpening, you can use it as a scraper or pelting knife before you file a new sharp edge onto it.
Bucket or Trough – The animal hides will need to be soaked in water to clean them. If using wood ash to remove hair from the belt, you will use a bucket or trough for this process as well. I used a 25-gallon metal livestock tank to soak a massive Angus cow hide in and it worked just fine.
I had to sift the hide around a bit more than I usually due because of its bulk, but the trough still provided enough free movement for the lye in the wood ash to mix with the water and coat the entire hide.
Gloves and Apron – Native Americans and early pioneers probably did not wear gloves when they tanned hide, but I sure do. A work apron or old clothes that you do not mind ruining, are also highly advised.
Fire – If you are going to smoke the hides, you can use a metal fire ring or sawed off metal drum, to keep the fire contained and going during the smoking process.
Brains – Ironically, every animal possesses just enough brains to coat its own hide for tanning. Butchers do not usually keep the brain matter, so make sure to request its salvage if you are going to brain tan – it keeps in the fridge just fine for a few day to a week.
Lard or Tallow – Animal lard is also a great material to use in tanning.
Wood Ash – I dump the wood ash from our wood stoves into a metal trash can with a firm fitting lid all year long to make my hide tanning stockpile. Once the wood ash has cooled, it can be moved to a plastic tub, plastic barrel, or a trash bag for storage.
Alum – This is often considered a staple material for use during hide soaks. It is usually mixed with agricultural lime and water to create the soaking bath.
Salt – There is always a heated debate when it comes to what type of salt should be used and should never be used when coating hides during the tanning process. Do you own research and decide which type of salt seems like it is the best for tanning hides – and then go buy a LOT of it. Expect to need between one to five pounds of salt if tanning a medium to large hide.
If the hides are not salted as soon as they are removed during the butchering process you will most likely lose the hair on the pelt during the tanning process. Pickling salt, the kind you use for canning or non-iodized salt, is usually recommended for tanning hides.
You can also freeze the hides for a long time, years perhaps, until you are ready to tan them – and negating the need to salt, clean, and hang them all right away after butchering.
Baking Soda – Baking soda is also often mixed with water and/or other ingredients by tanners for use during a softening soak. It is also used to reduce moisture and draw out excess chemicals in some tanning recipes. Borax, bran flakes (yes, the cereal) and raw eggs, are also commonly used by tanners when processing leather naturally.
Neat’s Foot Oil – This product has been manufactured for decade and often used by tanners when they are working to soften the hide into a soft leather. You can also use the same Mink oil you rub onto your saddle and tack, coconut oil, olive oil, or cooking oil for the same purpose.
Wood Stick or Metal Pipe – You will need something long and durable to use as a stir stick to move the hide about in the water during a soak to make sure it is thoroughly treated in your chosen materials. My stir stick is a 4-foot club that I found laying in my Hubby’s junk pile.
Transporting Hides
If the hides are not frozen when you bring them home from the butcher, lay them out as flat as possible in the back of a pickup truck and salt them. NEVER ever, leave the hides in your truck bed overnight.
They smell of the flesh will attract predator and you will awake the next morning to find a pack of coyotes gnawing on what would have become your new leather coat, saddle bags, or fur rug.
If a lot of the salt is shaken loose during the ride home, apply more salt. You want the hide to be as amply salted as possible. The salt draws moisture out of the hide. You will almost always see pools of both liquid and fine skin beneath the hanging hide while the salt is doing its work.
How long salted hide is hung will depend upon the condition of the hide and the weather. It can take as little as a few day up to a couple of weeks for it to get good and crispy.
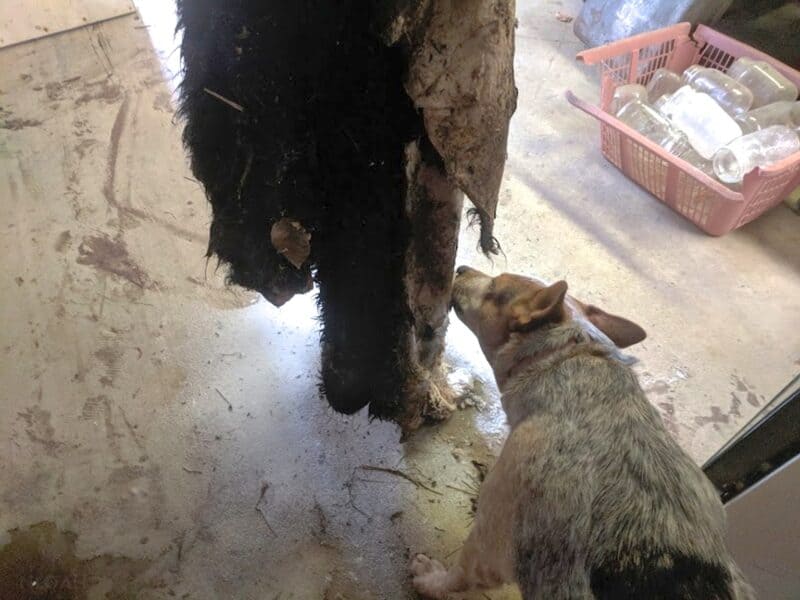
Some Native American tribes chewed on the hides to break up the membranes and make them more soft. I am never going to do that, but Jovie, my Blue Heeler sidekick, likes to gently nibble on all the fat and meat left on the hides, so I will leave the traditional softening technique entirely up to her!
Chemical Hide Tanning Recipe
This recipe is designed with ingredient amounts to tan 10 rabbits, four deer hides, one to two cow hides, and six medium-sized hides (like from a raccoon or groundhog).
I have seen the results of this tanning recipe and the leather turns out great, I just personally prefer not to use chemicals when tanning, or on my homestead, in general.
Supplies
- 16 cups of bran flakes
- 2 boxes of baking soda
- 7 gallons of water
- Stir tick
- 16 cups of pickling salt
- 3 and ½ cups of battery acid
- 2 30-gallon (at least) trash cans with lids
- Stretcher or wood rack framing system of some type
- Wire brush or scraper
- Neat’s foot oil or Mink oil
- Nails and a hammer
Directions
1. Soak the hide in clean warm water for several hours to make sure it is flexible.
2. Boil the three gallons of the water you have set aside.
3. Pour the boiling water over the bran flakes.
4. Allow the mixture to settle for approximately 60 minutes.
5. Strain the bran flake and save the brownish hue brine solution.
6. Boil the other four gallons of water
7. Pour the salt into one o the plastic trash cans.
8. Pour the boiling water over the salt and stir it constantly until it dissolves.
9. Pour the bran flakes brine into the same trash can and stir.
10. Once the water cools to a Lukewarm state, CAREFULLY pour in the battery acid. You MUST wear protective gloves, keep your arms covered, and only do in the outdoors or an extremely well-ventilated area. Covering your eyes with protective goggles and putting a mask over your mouth and nose is also highly recommended.
11. Stir the battery acid both thoroughly and carefully, making sure that it does not splash out of the trash can.
12. Peel the inner dried skin off o the animal hide if using a fresh skin.
13. Put our skin(s) into the solution.
14. Carefuly press the skin down to make sure they are all thoroughly coated and entirely saturated by the solution.
15. Let the hides soak in the solution for approximately 40 minutes – stirring occasionally.
16. Before taking the hides out of the solution, fill the other trash can with warm water.
17. Using the stirring stick, move the hide(s) out of the solution and into the trash can filled with clean water to rinse them.
18. Stir (or slosh, really) the skins in the rinse water for at least five minute to make sure all the salt that was on the skins has been removed. If the water gets dingy and the hides have not soaked long enough or still have a presence of salt, dump the trash can and fill it with clean warm water again.
19. Pour the baking soda into the water to neutralize as much of the acid on the hide as possible. This will help reduce the possibility of any battery acid in the hide irritating the skin when the leather is worn.
Baking soda may have a negative effect on the leather preservation, but it is a commonly used ingredient in many tanning recipes. If the hide is going to be turned into a wall hanging or a rug that children and pets will not be laying upon, you might want to skip the baking soda step.
20. Remove the hides from the rinse water – this may take two people, they will be heavy.
21. Hang the hides up over a board, shed, etc. and let them drain and begin to dry.
22. Use a rag or paint brush to rub your chosen oil onto the hide while it is still damp. The oil should be absorbed into the pelt rather quickly and not leave much of a residue.
23. Now, stretch and nail the hide onto a board, frame, or shed – wood pallets word great for smaller hides, and let it dry completely. Choose a spot in the shade, never place a drying hide in direct sunlight.
24. Dispose of the tanning solution carefully. If you pour several boxes of baking soda into the solution to neutralize it, a possibility toxic gas will be released as the soda causes a froth and bubbles to form on the surface of the mixture.
25. Check the state of your hide each day – several times a day if possible. When you decide the skin is dry at the center, even though it may still be a little soft and flexible on the sides, take it down from the stretcher.
26. Using a wire brush or your chosen tool, go over the skin (lay the hide fur side down if you left the fur on the hide) to soften the leather. This will usually also lighten the color somewhat. Only brush heavily and frequently over each spot if you want a suede-like appearance to the leather.
27. All the skin to remain laid out to dry for at least another 24 hours before working the leather.
28. Once the leather is dry, you need to work it with your hands to break up all of the little membranes.
The leather will get a distinct white cast to it as you work each little bit into a soft leather. Many tanners put a light coat of oil on the leather once they are done and let it dry again before working with it on projects.
Safety Precautions: Look What Happened to Me!
This rather unpleasant photo depicts what a lye rash – or chemical burn, looks like. The photo does not do it justice, my hands were really red and this one was swollen. Trust me folks, you do NOT want a lye rash:
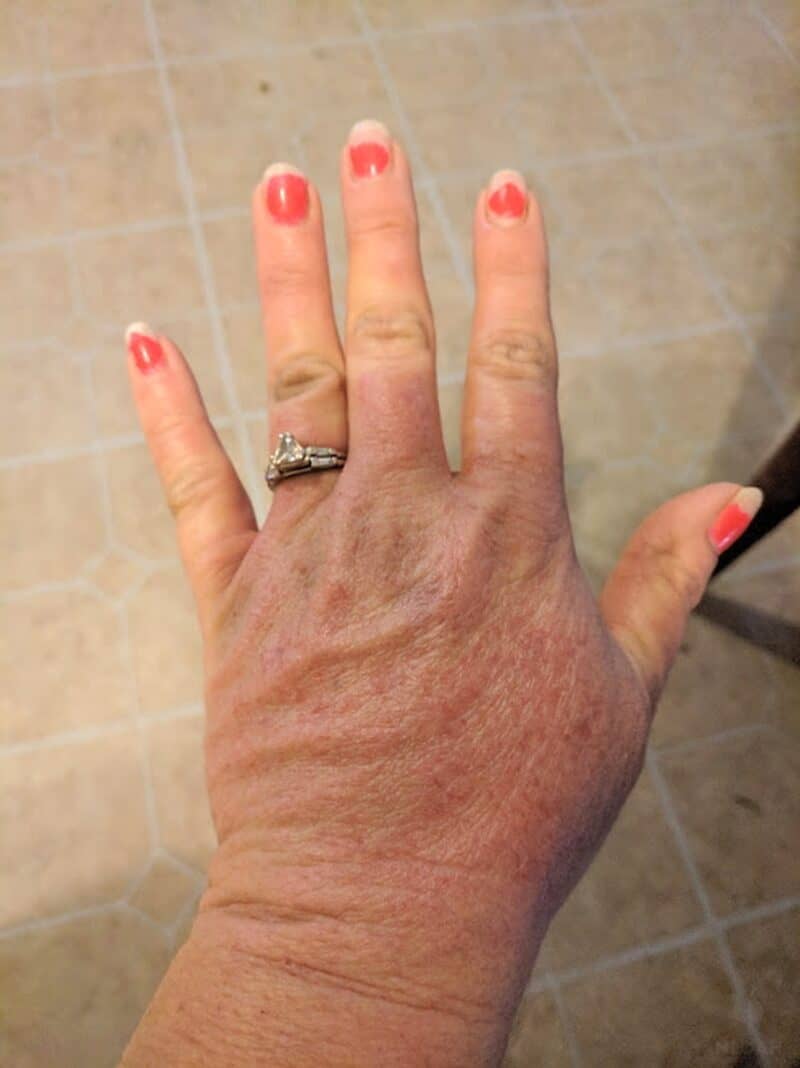
I had my heavy duty work gloves in my pocket, that I keep there for barn chores, and just slipped them on when I started working the hair. That was such a rookie mistake. The gloves are great for protecting my hands from deep barbed wire cuts, but do nothing to keep the dampness from the fur off of my skin.
I alleviated the rash with orange juice, you need something acidic to counteract the chemicals. Orange or lemon juice will work.
Later that same evening, I coated my hands with my homemade salve: 3 parts Petroleum Jelly and 1 part turpentine. My hands are still sore and cracked, but they no longer shock people. The lye rash should be gone in just a few days.
Salting the Hide
If you hide is not going to be kept frozen until it is ready to tan, you must lay, hang, or stretch it out flat and salt it to preserve the hide. It can take several days for a large hide to thaw completely and should be salted while thawing, as well.
A hide that is not salted and left in a crumbled bunch while thawing, or scraped over the course of several days while hanging or laying flat without being salted, can deteriorate quickly, attract both wild predators and bugs, and cause the fur to mildew, rot, and eventually fall out over time.
Never use iodized salt when tanning a hide, it will usually stain the it. Never use rock salt to preserve a hide, it will not only usually stain it, but eat into the hide, as well. A fine, non-iodized salt, like the inexpensive hay and livestock salt, is the type of salt most frequently used and it works great.
Working with a hide when it is still fresh after butchering is highly recommended. When a hide is allowed to hold moisture for too long, it will begin to decompose and rot can begin, especially in tight spaces like around the tail and ear sections.

De-Furring a Hide
There are multiple ways to de-fur a hide without resorting to the use of commercial chemicals. The method I prefer to use has a wood ash base. Our wood stoves provide ample wood ash on a regular basis, making the material both free and an easy to store resource.
To prepare a hide for de-furring using wood ash, I mix together 1 part wood ash with 2 parts water in a livestock tank. When the wood ash dissolve in the water, a lye solution is created. Place the hide in the solution for about 48 hours to vastly loosen the hair.
When you see bubbles form on the surface of the wood ash and water solution, the ratio has reached the right point and lye is being released:
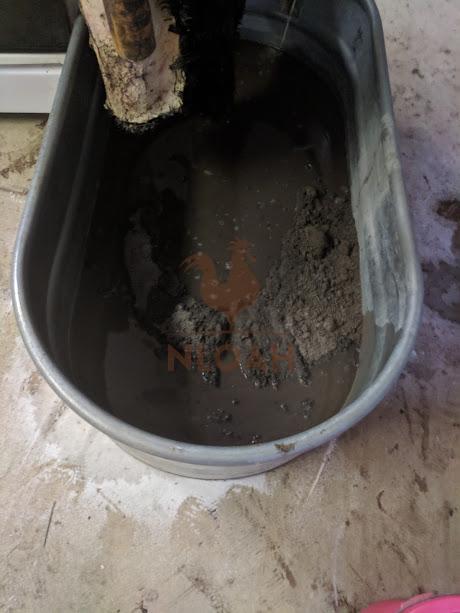
It is now time to place the hide into the solution and add another layer of the solution on top – if you are processing a large hide. If you are processing a small hide, place it in the mixture and then put a brick or cinder block on top to prevent the hide from floating to the surface.
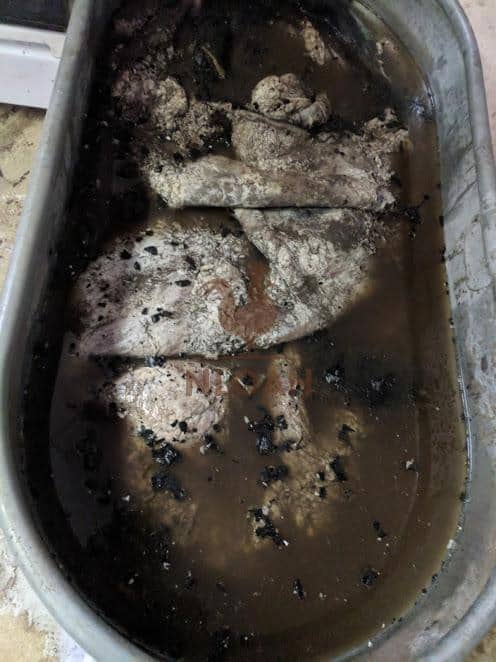
The hide must be able to move freely completely unfolded in the water or be as unfolded as possible, stirred, and refolded another way, if it is a large hide – like the massive Black Angus cow hide I am currently working on to make the moccasins.
The weight of the hide will increase as it absorbs the lye solution, making it more difficult to lift, especially if it is a large hide. I use my husband’s butcher shop and place the wood ash and water bath directly below where the hide is already hanging on ceiling meat hook wenches.
I take the hide off of one hook, leaving it on the other, and simply press a button to lower it into the water, raise it, and put it back into the water folding it in a different manner to make sure it is thoroughly soaked. Breaking the rules? Maybe, but I prefer to always work smarter not harder and love being able to manipulate even large hides all by myself.
You could rig up a similar and temporary system if you have a truck or ATV with a wench and a sturdy tree branch you can swing it over.
Once the hide is removed from the lye solution bath, the hair can be scraped away quite easily, substantially reducing the amount of manual labor that would have been involved in the time consuming scraping process.
Always wash the hide with warm water or warm soapy water – I use Blue Dawn dish soap, to rinse off the wood ash lye solution.
Never fill your tank more than half-way full with the wood ash de-furring solution before placing a medium or large hide inside. The water level will raise significantly after the hide is placed inside.
Wait until the hide is in place to add another layer of solution and add just enough more to cover the top of it. You do not want to slosh all of the lye solution out when stirring or raising and lower the hide in and out of the tank to coat if when dealing with a large hide.
You can also add several cups, or more, of agricultural lime to the wood ash and water mix, it is not necessary, but some tanners prefer to do this because in their experience, it helps remove the hair and loosen the gunk left on the hide even more easily.
I sometimes add lime to my mix and do believe it helps somewhat, if you don’t have ample wood ash or have a particularly tough hide.
Other tanners use only a 2 parts agricultural lime and 1 part water to make a bath to loosen hair and gunk from their hides.
If you choose not to soak the hide to de-fur it, you will need to scrape off the hair using a fleshing knife of some sort and a fleshing beam or stretcher.
Fleshing a Hide
Fleshing a hide is required to remove all of the membranes, fat, and meat still stuck to it after the butchering process has been completed. You must remove this organic matter so it does not rot the hide and to allow for the brain solution or other chosen treatment method, to completely saturate the hide.
Many tanners use a fleshing beam to remove the gunk still on the hide. The beam is typically a smooth board you scrape the hide over while using a fleshing knife or a somewhat dull draw knife.
If you want to go full on bushcraft, used a slightly sharp rock or stick a block of wood on the tip of your favorite hunting, turn it sideways, and use it to scrape the hide clean.
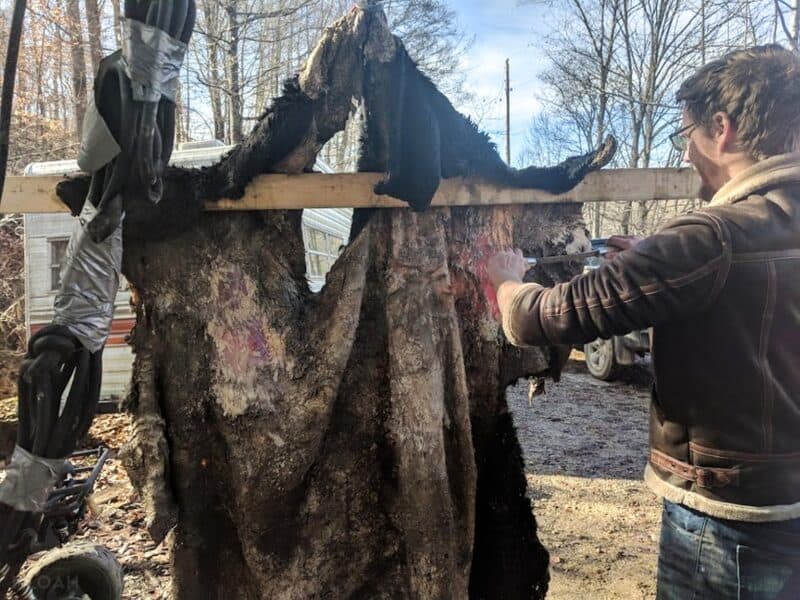
This cow hide is in the process of being scraped. My son-in-law and his city boy cousin A.J. (shown in the photo above and the video below) had been scraping for about one hour when this photo was taken.
We kept the wood ash soak tub beneath the hide to catch as much of the fat and goo falling off the hide during the scraping as possible.
Your homesteading dogs and other critters, will want to munch on the fat. Even though the hide has been washed off after the soak in the lye brine, the goo falling off the hide can still make them very sick, or even kill them.
A 2 X 6 board, especially one with a tapered point, is most commonly used when fleshing a hide. I use the same ceiling wench set up I mentioned earlier to flesh small hides and stretch larger hides before fleshing.
Many tanners prefer to stretch the hide before fleshing it because it is firmly held into place to eliminate movement of the hide and allows you to move from one area of large hides to another without adjusting the hide on a board beam.
I also like stretching a hide before fleshing because it allows you to see how your work on the hide is progressing at a glance and better gauge your overall progress and the consistency of your fleshing work.
You can build a simple wood frame for fleshing and mount it into the ground with poles, but there isn’t a need to go to all of that bother unless you are going to be doing multiple hides at once and frequently.
I simply tack large hides to the side of our wood shed in the winter, early spring, and fall or onto the side of the barn that always remains shady, during the summer months.
Always start at the top of the hide when fleshing, and work your way down to the bottom or tail. When fleshing a large hide, do the work in segments, always starting at the top and going to the bottom and then back up again to work on the next segment.
Scrape hard enough to remove every last little bit of hair, fat, membrane, or meat, but not so hard that you scratch or cut through the skin.
Brain Tanning a Hide
As noted in part 1 of the hide tanning series every animal possesses just enough brains to tan its own hide. If you do not butcher your own meat, ask your butcher to save the brains for your (he or she might charge extra for removing them) or buy brains at the supermarket, they are commonly sold – at least in rural areas.
You do not need to use brains from any specific animal when tanning, you simply need enough to coat an entire hide.
You can mix different types of brains together to get enough from small animals to cover a large hide. If you luck out and have extra brains solution left after tanning a hide, put it in an airtight container and store it in your freezer until you tan again.
To remove the brains from an animal’s skull, split it right down the center – between the eyes. Reach inside the skull and remove both halves of the brain and then carefully pick out any small pieces of bone. The bone chips can easily scratch or cut holes in the hide when the brain solution is rubbed onto it.
You can find two brain solution recipes (along with a few others) here.
It is extremely difficult to apply brain paste to a hide that is being stretched, you will loose too much of the mash when it slides down and off of the hide.
Always take the hide down and lay it flat to apply the brain paste – or any mash you make to naturally tan an animal hide. If you removed the fur from the hide, you will need to apply the brain paste to both sides of the hide.
Working The Leather
Before the leather is completely dry after brain tanning the hide, you must being to “break” the membranes or work the hide.
“Work” is the best way to describe this part of the process, fellow homesteaders. You WILL have sore hands and arms when you are done – no matter how great of a shape you think you are in physically.
You are breaking the membranes in the hide to make them soft and pliable – and keep them that was permanently. A white cast will appear each time a membrane is broken, this will allow you to keep track of where you have worked the hide and where you have not.
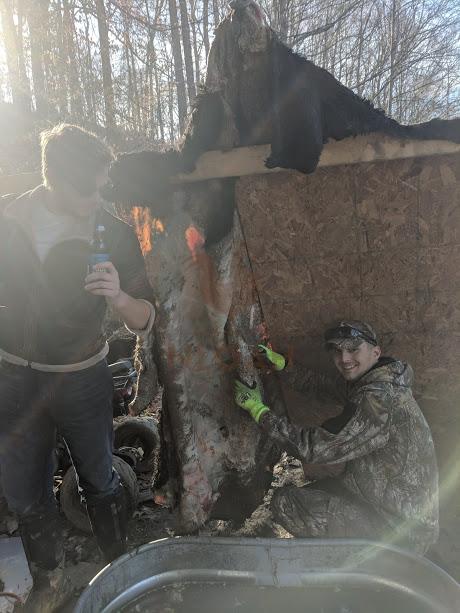
The boys had been working for three hours fleshing the cow hide when this photo was taken. My husband put a board up and slanted it outward to give our daughter, Brea, and I something hard to work against while de-furring the hide as James and A.J. Scraped.
We eventually switched the board to their side to give them a hard surface to scrape against. Working with the wood shed as a backdrop for the hide would have been best, but the weather forecast for the next week was simply not cooperating.
You put your hands on a small, very small, portion of the hide and work it fairly roughly back and forth until the membrane breaks – the motion is similar to how your would work out a stain on a shirt after treating it with a stain remover product.
Some tanners prefer to rub their hide back and forth across the fleshing board or a tree to break the membranes. Tanners can get really creative when working the hide. Some slide it back and forth over a clothesline, other pound it, jump on it, or even chew on it like Native Americans once did.
Choose whatever method or combination of methods your prefer, or dream up your own, to get all of the fibers in the hide broken, loosened up, and soft enough so the leather can be comfortably worn.
The working process is a lot less necessary if making a wall hanging or rug out of the hide. I always work the leather to some degree even in these cases to prevent it from getting rock hard over time and cracking.
Smoking the Hide
We are finally to the last step in the hide tanning process! Not everyone still smokes their hides, so you could have called it quits one step back, but I would not recommend it.
Leather that is not smoked just never seems to be as soft as smoke leather and it often stiffens back up a lot after getting wet an then drying again. Smoking the leather will help weather proof it and usually, deter insects as well.
The resins create by the wood smoke attach to the fibers in the leather and harden them against the weather. Do not use evergreen or pine to smoke leather. This species of wood will generate tar in the resin and typically ruins the leather entirely.
The key to smoking hides to generate a LOT of smoke but not flames or heat. The best way to get the right ratio of smoke and heat is by using rotten old wood and/or allowing the fire to burn down to the coals before hanging your leather.
You can use posts or poles to create a teepee or cylinder over the fire to drape the leather around. Make sure to put the fur side of the leather on the outside away from the fire if you did not de-fur the hide.
Do not use something solid to make your cylinder shape, you want the smoke to roll out of the support system above the flames and funnel out of the top of the system so the leather does not get scorched…or worse yet, catch on fire.
You can also make a teepee-shaped cylinder or non-solid box large enough that you can hang several hides inside at the same time – like you do to smoke meat.
How long the leather is smoked depends on the dimensions of the hide and personal preference.
Checking the hide frequently during the process will make sure it is coated evenly and you can watch the color of the leather change and remove it when it reaches the shade you want. The process usually take about 30 minutes for most hides.
Extra (Kinda) Optional Step – Oiling
Most tanners recommend oiling the leather after it is smoked and working in gently throughout the hide to increase softness and seal in the color.
Neat’s Feet Oil is the most often used commercial hide tanning product for this task, but Mink oil is just as good, in my opinion, and something most homesteaders already having laying around for working on their saddles or kids’ ball gloves.
Coconut oil, olive oil, almond oil, or vegetable oil can also be used. Some tanners apply oil both before and after smoking to help ensure the leather does not dry out too much and crack during the smoking process.
So there you have it! Now that the tanning process is finished, you’ll obviously want to make some actual products from your hide. I cover that here.

Tara lives on a 56 acres farm in the Appalachian Mountains, where she faces homesteading and farming challenges every single day, raising chickens, goats, horses, and tons of vegetables. She’s an expert in all sorts of homesteading skills such as hide tanning, doll making, tree tapping, and many more.
Battery Acid!? I’ll be waiting on part 2! Thank you for this. I’ve been wanting to learn this for a while now.
I know right, battery acid…jeesh. I am still working on the cow hide in the photo, but it is almost ready for the tanning process. Parts 2 and 3 to the tanning series should be published soon, followed by the tanning and then sewing parts – as soon as I get that far and my hands stop feeling so sore from all the scraping and de-furring, lol! It is not a hard process, just one that requires the following of directions, proper timing, and a lot of hard but fun, manual labor!