Whether you’ve purchased a cow hide, or if you finished tanning one yourself (and hopefully applied a protective solution on it), what are you going to do with it? Your options are limited only by your creative imagination and your skillset.
You can make belts, purses, moccasins, saddle bags, like I said, the options nearly limitless. If you are going to turn your hide into a rug, no skills are required, simply put the now completed hide where you want to display it. You can easily mount your tanned hide to the wall by nailing it directly onto the walls of your cabin, or mounting it to a board and hanging it onto the wall.
Using your tanned hide like fabric and making a pair of buckskin pants or a skirt are great options, but will require leatherworking tools to “sew” your projects. You will using leather “stitching” and sewing by hand unless you have a heavy duty sewing machine designed for such a task, at least when working with thick hides.
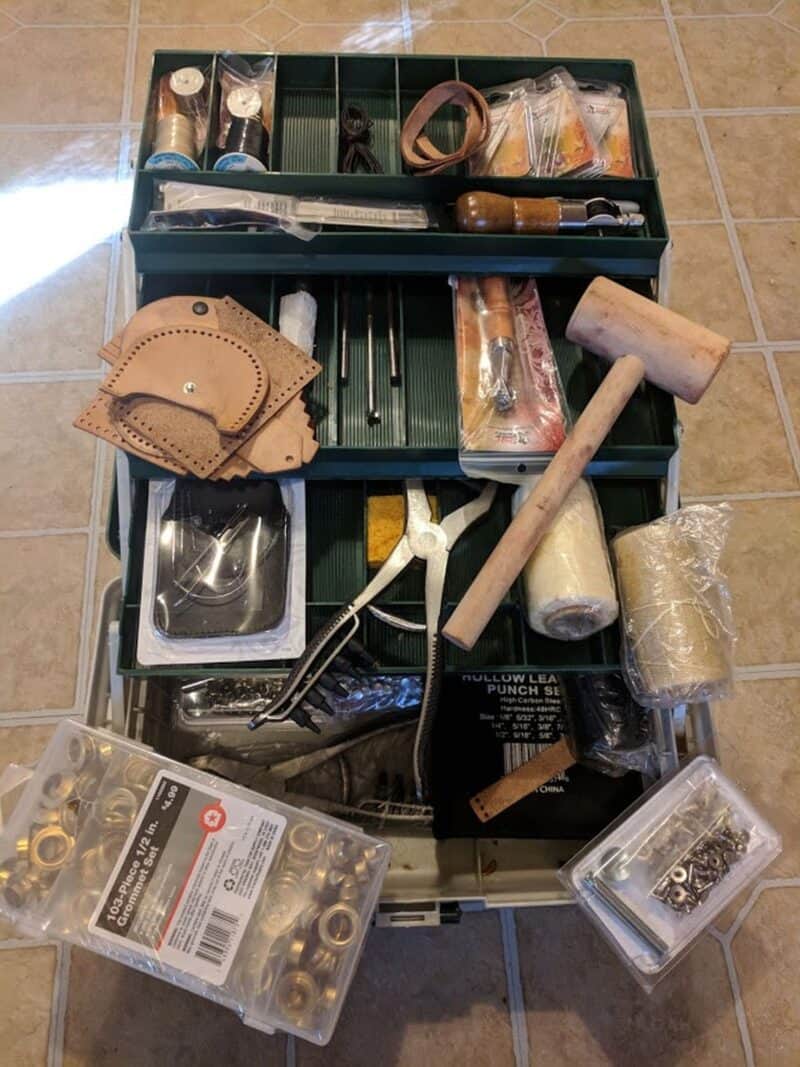
Leatherworking and Sewing Tools
You will need to purchase leatherworking and/or sewing tools to make garments and gear out of your tanned hide. You can also burn or stamps designs onto hard leather if you purchase the inexpensive and easy to use tools to do so.
Disclosure: if you visit an external link in this post and make a purchase, I may earn a commission. Read my full earnings disclosure here.
Stitching Awl – This manual leatherworking and sewing tool comes with either a straight or a curved blade in the shape of a diamond. It I used when attaching two pieces of leather together on either a bowed or flat surface and when sewing round shaped portions of projects.
Stitching awls have two flat sides to give you a better grip when holding them at an angle. I have found that using the awl is very helpful when trying to create uniform and sturdy stitches and creating a more finished look to the project.
Sewing Awl – An awl has one extremely durable needle, wrench, and a wheeled spool of threat. Many versions of sewing awls have a wood handle that doubles as storage for the removable tools. The awl allow you to made locking and secure stitches when working with leather, nylon, and canvas.
Overstitch Wheel and Pricking Chisel – These tool are used to mark the leather when deciding on stitch placement. After the stitches are marked, each whole is then poked with the stitching awl.
You should also run the wheel back over your stitches to compress them to make them tighter and to give them a machine finished look.
Awl Shaft – The shaft adjust to hold various sides all blades and to hold them firmly in place while you are sewing the leather.
Leather Punch – Leather punches resemble paper punches, but are heavier and have interchangeable and heavy duty bits to cut holes in varying dimension into leather, nylon, or canvas.
Leather Punch Bits – These bits are pounded into the leather with a wooden mallet to make larger holes than can be poked through the hide with a handheld leather punch.
Wooden Mallet – The mallet is used to pound large bits and findings, such a grommets and snaps, into the leather.
Awl Needles – The needles created specifically for leatherworking can be secured inside an awl shaft. The round wood handle on the shaft makes the needles easy to maneuver and to apply the pressure needed to stitch through thick hides.
Heavy Duty Sewing Needles – When sewing thin or easily pliable leather, you should be able to use these type of needles that are commonly available in the sewing section of any craft or big box store.
You might break a few, but not necessarily and they are inexpensive and feature an eye large enough to receive leather threat thin laces.
Leatherworking Thread – This heavy duty thread feel like thin string – which can work in a pinch if you run out of actual leatherworking threat. It comes in large spools for hand or machine sewing and on wheel spools that fit into your sewing awl.
Leather Lacing – When creating projects using thick hides and/or when making moccasins, saddles, horse tack, or belts, your pattern will likely instruct you to use leather lacing instead of leatherworking thread.
Grommets – Grommets and various other types of findings, like snaps, are often affixed to leather that is being turned into purses, wallets, saddle bags, and various types of outerwear.
Inspect the Leather
Basic sewing skills are really all that is required to turn your hide into a cherished piece of clothing, footwear, or other project. But, remember, you are not working with pristine store-bought fabric you. Nope, you are working with the hide of an animal who lived a life on this Earth.
Experts to be dealing with scarred flesh areas, fluctuations in thickness, and other flaws, especially around the edges of the hide.
Look the fabric over carefully to determine if there are any spots that are so scarred or jagged that you should cut them off for dye test or sewing practices pieces or to use with your children when teaching them leatherworking.
Cutting a Pattern out of Leather
NEVER, ever pin your patterns pieces together like you would do if using fabric. The holes made by the pins will never disappear from view and the puncture holes can cause the leather to deteriorate or tear over time.
Another don’t, no matter how thin the leather is, NEVER layer one pattern piece on top of another and try to cut them out together for uniformity, as you would do with fabric. Leather is a lot more unforgiving that fabric – and thicker.
You cuts need to be focused and exact, especially when dealing with seam allowances. Cut one piece using your paper pattern and then use the cut piece of leather as the pattern to trace for a matching piece.
When dealing with a piece of the pattern that must be cut on the fold, trace out one side, then flip the pattern over and make the same trace marks on the other side so you are not actually cutting on the fold.
Leather is just too thick and movable to cut more than a single layer at a time – and it stretches a lot more than many types of fabric.
Deal with leather pattern cutting as you would if working with jersey material when trying to estimate how much it is going to stretch when both being cut and when it is worn.
Sewing Leather
Use a scrap piece of leather from the SAME hide to test your stitches before starting to sew the pattern together.
This will take the guess work out of the spacing needed to hold the pieces firmly together, allow you to adjust to a different needle gauge if necessary, and let you know how hard you are going to have to push to affix the pieces without being too rough and damaging the leather.
Typically, it is best to use what would be considered a basting stitch – a long stitch. Sew the leather slowly to avoid making a mistake that can’t be fixed and will cost you the cut pattern piece and to decrease the possibility of breaking a needle.
If sewing on a machine, be mindful once again of how much leather stretches. I have sewn thin hides on my regular sewing machine and often notice the presser foot can drag against the leather and cause it to bunch up and stretch on the back end.
I have found that if you stretch the lower piece and hold it firmly with one hand while running the leather through your machine with the other, the pattern piece stays truer to the form that it was cut. A walking foot or Teflon coated presser foot, are often recommended when sewing leather, to help prevent the issues noted above.
When you have the smooth sides of the leather facing each other, the slickness of the tanned hide will cause it to slip or stretch more than when the rough sides, or one rough and one smooth side, are facing each other.
I sometime used clothespins to keep the pattern pieces together when sewing them. But, they can leave impressions on thin leather that either smooth out entirely or only partially, over time. Quilter’s clips are better to use and fairly easy to find at a craft store and relatively inexpensive.
If I had not found quilter’s clips, I was going to grab my trusty hot glue gun, and sew a felt liner on the inside of the tips of the clothespins to see if that would prevent the indentations. I figure it would, but didn’t get the chance to find out.
Leather seams will not fray on the underside like fabric. However, their bulk can leave an impression that is visible on the outside of the project. Trim the seams as closely as possible and then adhere them to the rough side of the project using leather glue, if necessary.
If sewing darts into the leather when making saddle bags, chair covers, etc. you can put a towel over the leather and pound the darts down to so they are not too bulky or pointy because of the thickness of the hide you used.
Dying and Staining Leather
Dying leather is not difficult, not is it as time-consuming as the tanning process you just successfully survived. But, a decent bit of trial and error is usually involved when you are first learning how to evenly treat the leather, especially if you are going to make your own dye…which is a lot of fun!
I have never worked with chemically, or chrome, tanned leather, so I can only attest to how well these DIY leather dyes work on natural “vegetable” tanned leather. Do not expect different types of animal hides to absorb or react the exact same way to your dyes – whether they are homemade of store bought.
Also, the type of tanning agent used can have an effect, either a positive or negative one, on the hues created by your dyes. Worst case scenario I have experienced when using different tanning agents is the end result is a little lighter or darker than I had wanted.
When dying or painting a thick hide, a second application of the dye might be needed to eliminate a washed out look to the project – unless that is the type of finish you are going for.
* Always put a piece of tape over areas of the leather project that you do not want to receive dye, like snaps, beadwork, and embroidery designs.
Rust and Distilled White Vinegar DIY Leather Dye Recipe
This is probably the cheapest and simplest homemade leather dye you can make. Different variations of this very of dye recipe exist and are often referred to as either Vinegar Black or Vinegaroon dye. Apple cider vinegar is used instead of distilled white vinegar in some of the recipes, both work about equally well.
1. Find some rusty nails, meta shavings, etc. laying around the homestead and gather them up to use for dye making. Wash the rusty metal to make sure it is free of grease or other debris. About 30 nails should give you enough dye for small and medium projects.
2. Heat the Vinegar – Pour about 16 ounces of vinegar into a pot and get it really warm, do not let it boil or get too hot to touch.
3. Drop the nails or other rusty metal and the vinegar into a container that has a lid you can punch a whole through. You can use nails that are not yet rusty if you don’t have any, the vinegar bath will cause rusting while the two react to each other and release ferric acetate. The acetate is what will react to the tanning in the leather and create the dyed look.
4. Put a lid with at least one hole, on top of the container to release the gases that will develop. If you skip this step, the gases could cause them to blow up.
5. Place the container in a warm, dry place that is also well ventilated for a minimum of 7 days. The strong scent of vinegar will dissipate when the DIY leather dye is ready to use. If the smell is still present after a week, add more rusty metal and/or heat the mixture again to enhance the ferric acetate process. The mixture should have a red color.
6. Strain the mixture through cheesecloth or coffee filters until all of the debris has been removed from the liquid.
7. Heat the “black tea” on the stove and then allow it to cool completely before sponging it onto the leather or soaking the leather in the mixture for half an hour. The dye water may have a blue or gray hue at first, but then it will darken to black. When you oil the leather after it dries, it should get even darker. Oil the leather when it is still slightly damp.
8. You must neutralize with baking soda after taking it out of the dye bath and before oiling. Mix about three tablespoons of baking soda per ever 1 quart of water used to make the bath. The bath will stop the acid dying process.
Coffee DIY Leather Dye Recipe
1. Purchase a can of the strongest coffee you can find.
2. Make a big pot of coffee using double the amount of grounds you would typically pour in.
3. Pour the brewed coffee into a pot and simmer it, stirring frequently to prevent scorching, until it cooks down to about 1/3 of its previous volume.
4. Let the mixture cool.
5. Spread the dye on the leather hide evenly and allow to dry before moving on with your project. Coffee only alters the hue of the leather slightly and can be mixed with a commercial dye to create deeper colors. The coffee leather stain can also be used to bring back the color and shine to faded leather.
Walnuts and Acorns
Both of the nuts release tannic acid and can be used as a tanning agent just like bark. You can also brew crush walnut and acorns to make a natural leather dye. Crushed hulled walnuts and acorns will make a dye with a brown hue. If you leave the hull on the walnuts, you will get a green dye shade.
Boil the nuts in water for about 60 minutes. The heated water will release the tannins in the nuts. Soak your leather in the warm water for about 30 minutes to get the stain to adhere. Hang the leather up to dry after the stain soak.
Mink Oil Leather Dying Instructions
If you only want to darker the natural hue of the leather, you can grab some mink oil out of your tack room or baseball bag and get right to work.
First, wipe of your leather with a damp cloth if it has been sitting around for a while and may have small dust or dirt particles on it.
Put the leather in a warm or sunny spot to heat it up a bit. This will help the leather better receive the mink oil.
Next, warm a pot of water, do not let it come to a boil. Place the bottle of mink oil in the water – I usually put my mink oil inside of a smaller pot or coffee cup in case is falls over during the heating process.
Using a clean cloth rag or sponge, evenly apply the mink oil to the leather. Let the leather dry completely for 60 minutes – occasionally manipulate the leather a little bit to make sure it is thoroughly absorbed by the hide.
Plant-Based Leather Dyes
You can make dyes for coloring leather, wood, cotton, wool, and about anything else, from a plethora of natural materials that are probably already growing around your homestead. Some of these give a deeper hue and remain true to color longer than others, when working with leather.
Definitely try out these plant-based dyes on a small piece of leather cut off of your hide before investing the time and energy into treating the entire hide, just in case the results are not as vivid and lasting as you desire.
When picking leaves, blossoms, or berries to make dye, they should be mature or in full bloom.
Making the Dye Solution
- Chop or tear the plant matter into small bits and put them into a pot.
- Pour Water into the pot using a 2 to 1 ratio with the plant matter.
- Bring the mixture to a boil and then dial back the heat and let it simmer for approximately 30 minutes.
- Strain the plant matter out of the liquid mixture.
- The natural dye is not ready to apply to your material. For the deepest results, allow the leather or other material (prepare the material to accept the dye before putting the mixture on to boil) to sit in the dye for a full 24 hours. You may need to dye leather, especially thick leather, more than once.
- Prepare the material or leather for dying by soaking it in a color fixative. If making a dye from berries, mix a half cup of salt with 8 cups of water. To make a color fixative for dyes made from plants, mix 1 part vinegar with 4 parts COLD water. Bring the color fixative mixture to a simmer, put in the material, and allow it to remain on simmer for about 60 minutes. Rinse the material thoroughly and ring it out.
Plant Dye Bases
• Alder Bark – orange hue dye
• Butternut Tree Bark or Seed Husks – light yellow to orange dye
• Carrots – Orange dye
• Eucalyptus Leave or Bark – Dark tan, brown, to rust-colored dye.
• Lichen – Purple, red, or goldish hue dye
• Lilac Twigs – Orange or yellow colored dye
• Turmeric – Orange hue unless mixed with lye, then it becomes red
• Blackberries – Deep purple to reddish black dye
• Amur Maple Dried Leaves – A dark blue to brown or black hue
• Broom Sedge – Golden yellow to a rich brown hue
• Colorado Fir Bark – Tan dye
• Coneflower Petals – Brownish green hue. Leaves and stems make a gold dye
• Dandelion Roots – Rich brown hue
• Goldenrod Shoots – Dark brown dye
• Oak Bark – Light tan dye
• Oregano Dried Stalk – Dark brown to black dye hue
• Pine Tree Bark – Light to a medium brown hue
• Tea Bags – Light brown to tan dye
• White Birch Inner Bark – Brown dye
• Wild Plum Root – A rusty brown or red hue
Commercially Manufactured Leather Dying Kits
Typically, commercial leather dye kits contains the dye, a leather preparer and a sheen or finishing agent. Water based leather dyes coat the leather and change its color.
Alcohol-based dyes change the color as well, but seem to cause stiffening of the leather – this could be a really good or a very bad thing, depending up the type of project your are making. Commercial dying kits are routinely available in a brush on, spray on, and sponge on, application forms.
When applying any type of dye to leather, I almost always prefer the sponge application method. It seems to bring out the natural texture of the leather, especially when you work it into the leather using a circular motion, like is used when applying stain to wood.
I often use a small crafting paintbrush or !Q-Tip to get the dye to spread evenly in tight space and around stitching.
The leather preparer cleans the material and helps prep it to receive the dye. Some kits call for wetting the leather before applying the dye, others do not. Always put on a pair of gloves, I have never come across a commercial dye that does not stain both your hands and your work space.
Once the preparer has dried, apply the dye. The directions will tell you how many applications are recommended, it may take up to five application, letting each one dry in between, sometimes for a full 24 hours, to achieve the desired color.
Use the sheen or buffering agent provided in the kit to give the project a shiny and finished look, it you desire, after the dye hue has been achieved and the project has dried for a full 24 hours.
Turning Leather into Suede
I may love tanning hides to make leather, but I really, really, love suede. Transitioning the supple and smooth leather into suede is not complicated, does not required advanced skills or special tools – and watching the process unfold is a lot of fun.
- Clean the leather if necessary to remove any dust or debris.
- In a spray bottle, mix 1 part rubbing alcohol with 1 part water and carefully add a single drop of liquid dish washing soap.
- Spray the leather thoroughly.
- Use 80-grit sandpaper to lightly sand the leather while it is still wet. You want to sand evenly and until the façade of the leather is roughed up, raised consistently throughout the hide, and has that fuzzy look associated with suede. You may need to gently use a fingernail file to sand small and difficult to reach places.
- Spray the leather again.
- Now, sand once more, but use 220-grit sandpaper this time. This grit gauge is higher and will even out the initial sanding and make the hide far more soft.
- Grab that spray bottle again and thoroughly coat the hide with the mixture.
- Use 320-grit sandpaper to rough up the hide this time. You hands might be getting a little tired by now, but this is still a lot less work than fleshing the hide, right? You do not have to complete the entire suede process in one setting.
- Use a soft hair brush to comb out the hide and get rid of any debris left on the leather from the sanding process. Do not rush this process, make sure you brush over each “raised tooth” on the hide that you created when roughing up the leather.
- If necessary, oil the suede to repair any color distortion or loss created by the sanding. You can now dye or stain the suede if you so choose.
Please share your leather tanning, dying, and sewing project successes and failures with our New Life on the Homestead community in the comments section below so they can help guide and inspire others!

Tara lives on a 56 acres farm in the Appalachian Mountains, where she faces homesteading and farming challenges every single day, raising chickens, goats, horses, and tons of vegetables. She’s an expert in all sorts of homesteading skills such as hide tanning, doll making, tree tapping, and many more.