Beans are one of the most versatile staples eaten around the world. Packed with protein and minerals, there are dozens of varieties out there, each with a different flavor profile and texture. They make a wonderful addition to nearly any meal, and are used in countless recipes, but dried beans can also be an important food to put away for tough times and rainy days: almost nothing lasts longer in storage!
The trick with dried beans, compared to canned beans, is that they require special preparation, specifically soaking.
Now, if you want to start a fight with homesteaders and home chefs, just bring up the topic of proper soaking procedures. I’m telling you, that argument has ended bloodlines before!
To help you cut through the chaos online and hopefully keep your sanity and family intact, I’m bringing you a detailed guide on how to properly soak and then cook your beans, any kind of beans, the right way.
Why Soak Beans at All?
Beans, nominally, need to be soaked prior to cooking to rehydrate them and ensure that they cook evenly.
However, there’s a whole lot of pigeon religion on the subject and in reality, you don’t have to soak beans for 24 hours, two days, or however long some sources on the internet claim. I promise!
All you need to take your beans from dry and in the bag or canister to cooked, tender, and tasty is about two and a half hours, three hours tops, and that includes soaking time…
Do You Soak Beans in Hot or Cold Water?
Either. It depends on how you want to soak them. If you want to quickly soak your beans, you’ll bring them to a quick boil and then leave them standing in hot water, off of the heat, for about an hour.
A longer and more leisurely soak is done in cool water anywhere from 12 to 24 hours.
Both methods work, and both are viable, but I greatly prefer a hot, quick soak both for efficiency and for best taste and texture.
Should You Soak Beans in Salt Water?
Ah, the great debate. This, more than anything else, is likely to end friendships and ruin dinner when it comes to soaking your beans.
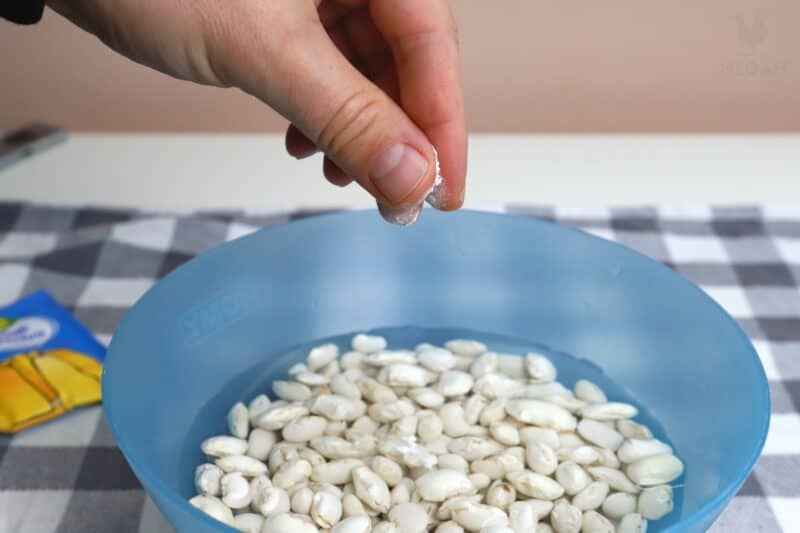
I’ll get right to it. Yes, you should soak your beans in salt water if you want them to be tender and flavorful. I said what I said and I’m standing by it.
Tests have been done over and over again that show salted beans turn out better, and more consistently, than unsalted ones regardless of type.
However, if it rustles your jimmies for whatever reason you don’t have to salt them. All you need to do is add a little bit of salt immediately prior to cooking if that’s the route you want to go, and they’ll still turn out great.
Should You Soak Beans in Vinegar or Baking Soda?
Another contentious, but slightly less murderous disagreement concerning the soaking of beans is whether or not you should soak them with a little bit of vinegar or baking soda. Both are essentially used for the same purpose, to soften the beans even further and ostensibly speed up cooking time.
However, there are some differences and times when you should use one or the other, but never both. As a rule of thumb, you can add baking soda to help soften beans that are very, very old and basically fossilized.
If you’re trying to bring beans back to life that have been in storage for five years or even a decade, a ¼ teaspoon of baking soda for every pound of beans is a good idea.
Vinegar, on the other hand, should only be used if you want to add a tangy flavor, though some people swear that it helps reduce the amount of gassiness that the beans will inflict on you. For my purposes, I will add vinegar to any other seasonings after the beans have cooked to finish the flavor.
Do All Kinds of Beans Soak for the Same Length of Time?
No. But the good news is that beans basically only need to soak until they are tender according to their size. Larger beans take longer to soak, or at least to cold soak, compared to smaller ones.
However, using the method I will teach you size doesn’t matter except just a little bit: you might hot soak beans for as little as 30 minutes in the case of black-eyed peas or lentils, and even the largest beans will only soak for about an hour.
Can You Soak Beans for Two Days?
You can, but you really shouldn’t. The longer you soak beans the more fragile their skins become and the mushier they get, meaning after the cooking process is over, your beans will be downright waterlogged.
Worse, soaking your beans at room temperature for longer than a day could cause them to ferment, ruining them and potentially creating a health hazard. It’s just not worth it, especially if you’ve listened to someone who’s absolutely bananas about soaking beans for extended periods.
There’s truly no reason to soak beans for two days.
Can You Soak Beans Too Long?
Yes, there is such a thing as too long when it comes to soaking your beans. On the near end, soaking your beans just a little bit too long will really only waste time, whereas soaking them way too long will impede the quality a little bit and increase the likelihood that their skins will break during cooking.
Soaking your beans away, way too long will dissolve them into a nasty mush. Remember that water is a solvent!
Should You Change the Soak Water for Cooking?
Another great debate and another one that will see chairs getting thrown across your dining room if you aren’t careful. Truly, the issue of whether or not you should change the water you used to soak the beans for fresh water prior to cooking is a real rager.
Again, I will get straight to the point: no. I say cook your beans in the same water used to soak them because there is still a ton of flavor in that water. Time and time and time again I’ve changed the water on my beans prior to cooking and enjoyed plainer, blander, and far less flavorful beans.
Conversely, whenever I use the soaking water to cook the beans, only adding to it as necessary to account for evaporation and moisture loss, my beans come out better and way more flavorful even without a bunch of added seasonings.
There is no question here: if you want the best beans, do not change that water out although you can if it will hurt your grandma’s feelings.
How Soft Should My Beans Be After Soaking?
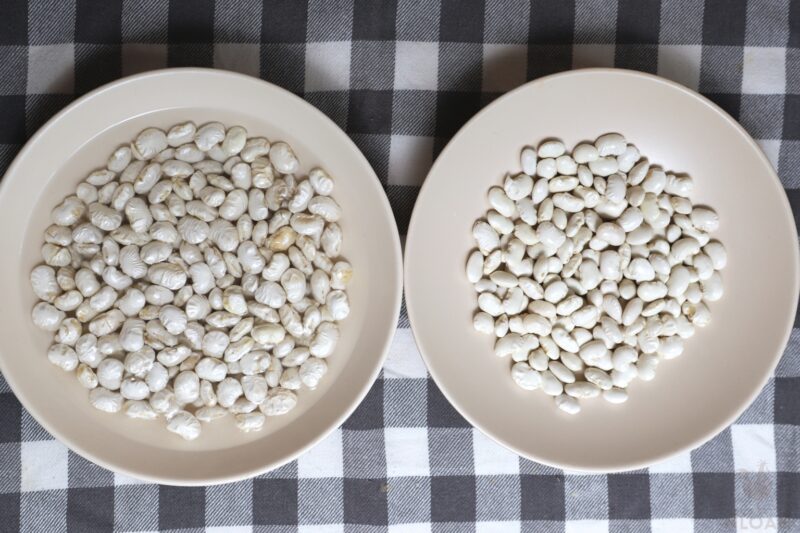
Your beans should be just softened and rehydrated after soaking. You should notice some noticeable plumping compared to the size they are when dry.
Under no circumstances should they be falling apart when you handle them or apply very gentle pressure to them between your fingers.
Remember, the goal is not to soften them to the point that you can chew them! That’s what the cooking is going to do.
What You’ll Need for Soaking and Cooking Beans
You need very, very little to properly and safely soak and then cook your beans according to the method I will share with you below. If you’ve got the beans, you’ve got everything else in your kitchen already, trust me.
Beans: any kind of dry beans you want, from navy beans to kidney beans, pintos to black beans, white beans to lima beans.
Pot, Large: any large pot will do the job here, assuming you are only cooking a couple of pounds worth of beans.
Colander (optional): if you are going to change your water out, a colander is useful for catching the beans while dumping the water. Make sure it is big enough to hold all of your beans.
Spoon: a cooking spoon, preferably a slotted one, to help you stir your beans and get them out of the pot once they are done cooking.
Water: you’ll need water for soaking and cooking the beans. If you’re following my instructions, you’ll only need enough water to cover the beans by about 1 ½ to 2 inches, and a little extra to add later as it starts to evaporate off.
Salt: salt makes for perfectly seasoned, delicious and tender beans. You’ll need about 1 ½ teaspoons for every pound of beans.
Seasonings (optional): once the beans are soaking, and cooking has properly begun, you can add all sorts of other delicious seasonings.
Dried spice mixes are trusty as our vegetables like onion and garlic or even some more exotic and interesting add-ins like cheese, bacon, sausage, or ham.
And that’s it. Time to get down to cooking.
Soaking and Cooking Beans, Step by Step
Before you get started, review the following steps so you know exactly what to expect. And don’t worry about it, soaking and cooking are very easy and straightforward with this method.
Step 1: Add beans to pot. Open the bag or can and add your dry beans to the pot.
Step 2: Rinse. Give your beans a good rinse first. This will remove any debris
Step 3: Cover with water. Cover the beans with water. There should be no less than one and a half inches in preferably two over the level of the beans in the pot. A little extra won’t hurt, but you don’t want a pot full of water because all that’s going to do is dilute the flavor of your beans and the resulting liquid.
Step 4: Cover, bring to boil. Place a lid on your pot, put it on the stove, and turn on the heat. Bring the pot to a boil.
Step 5: Remove from heat, rest. As soon as the pot starts to boil, remove it from the heat, place it on a cool burner or a trivet, and then let it rest for 1 hour. This is your soaking time.
Step 6: Change water, if desired. After 1 hour has elapsed, dump the water out of the pot and cover the beans with fresh water. I recommend that you don’t do this if you want the most flavorful beans possible. Trust me, they will taste way better if you cook them in the soaking water and there’s not one thing wrong with it.
Step 7: Return pot to heat, add seasonings. Place the pot back on the burner, and turn the heat back up to bring the water to a boil. Add all of your salt and seasonings at this time. Remember to use one and a half teaspoons of salt for each pound of beans. Stir.
Step 8: Keep covered, return to boil. Once you’ve added the seasonings, recover the beans until they boil.
Step 9: Uncover, simmer. Once you bring the beans back to a boil, uncover them, reduce the heat, stir, and keep them at a gentle simmer.
You don’t want the beans staying at a rolling boil because that will cause their skins to pucker and then tear, greatly reducing the overall quality and texture of the finished product.
Step 10: Stir periodically and check. Stir the beans every now and then and check them for tenderness every so often. They will be tender and have a creamy texture all the way through when they are finished. Depending on the size of your beans, you’ll have to cook them anywhere from 30 minutes to 1 ½ hours.
Step 11: Add water as needed to cover beans. Note that as you simmer your beans, they will be losing water to evaporation and reduction. Add just enough water over time to keep the beans covered. If they aren’t covered by water the entire time while cooking, they will dry out rapidly and turn nasty.
Step 12: Check beans for tenderness, remove from heat. Keep checking your beans every so often for tenderness. Once the texture is right and they taste good, take them off the heat.
Step 13: Done! And that’s a wrap. You’ve soaked and cooked your dry beans in record time, and if you’re telling the truth they’re probably the best you’ve ever had. Right? Right!
How You Should Store Soaked Beans
Once you’ve cooked your beans you can store them according to whatever is convenient for you or your food storage plan.
They’ll keep in the refrigerator for five or six days, or you can place them in a freezer-safe container and freeze them for about half a year. All you need to do after that is thaw, reheat, and eat!
Frequently Asked Questions
My Beans Wrinkled While Soaking. Are They Okay?
Depends on what you mean by okay. They’re probably still safe to eat, assuming you didn’t soak them for days on end, but the quality is definitely reduced. Oversoaking your beans will allow the skins to split and prune, and they aren’t going to turn out as good.
Can You Soak Beans Overnight on the Counter?
Yes, you can. But you don’t have to leave them out if it weirds you out. You can stick the pot in the refrigerator if you have room and leave them in there to soak.
Tom has lived and worked on farms and homesteads from the Carolinas to Kentucky and beyond. He is passionate about helping people prepare for tough times by embracing lifestyles of self-sufficiency.
You covered about everything except whether or not to use softened water or the normal calcium & magnesium filled water from the tap
Love your article. It would be great to have printable versions that can be added to personal recipes & cookbooks.