The first time I ever heard someone talking about planting potatoes from seed, I wondered to myself, “Where are the seeds in potatoes? I’ve never seen seeds.” I was completely serious.
I can laugh at myself now, knowing what I know, but for those who are starting out where I started out (completely naïve), let me fill you in.
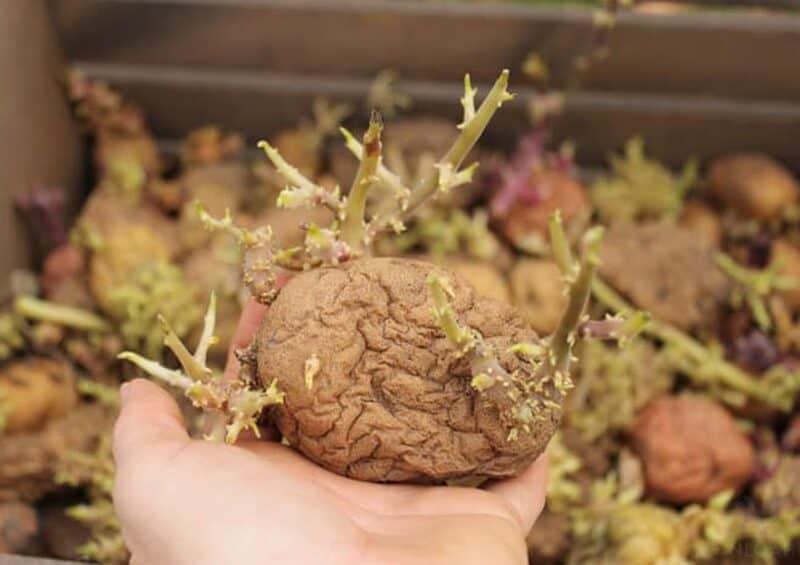
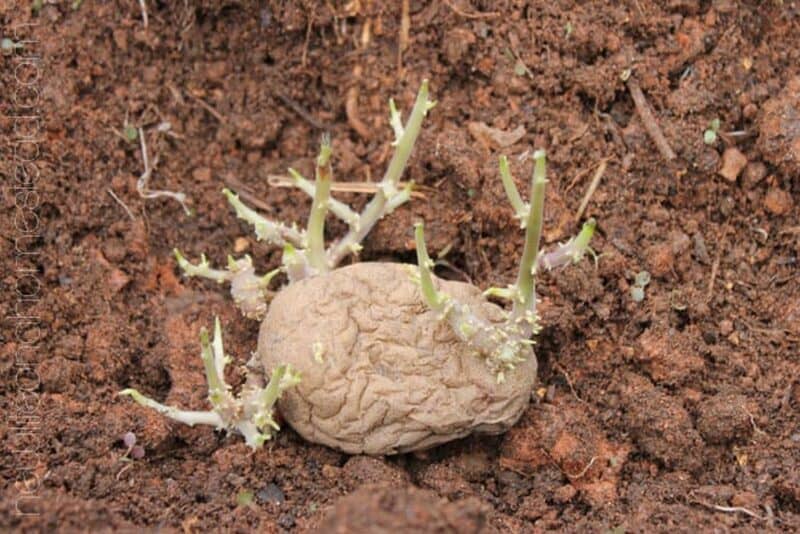
This, my friends, is a “seed potato”– otherwise known as an old, sprouting potato spud. Once planted, those sprouts will grow into beautiful green plants, and the developing roots will form brand new potato tubers in the ground below.
I have to warn you though, potato genetics are funny, and most of the time you never know what kind of potato you’ll end up harvesting when planted from a true seed. It is likely it will not be the same kind of potato you originally planted. Might be a fun thing to experiment with though!
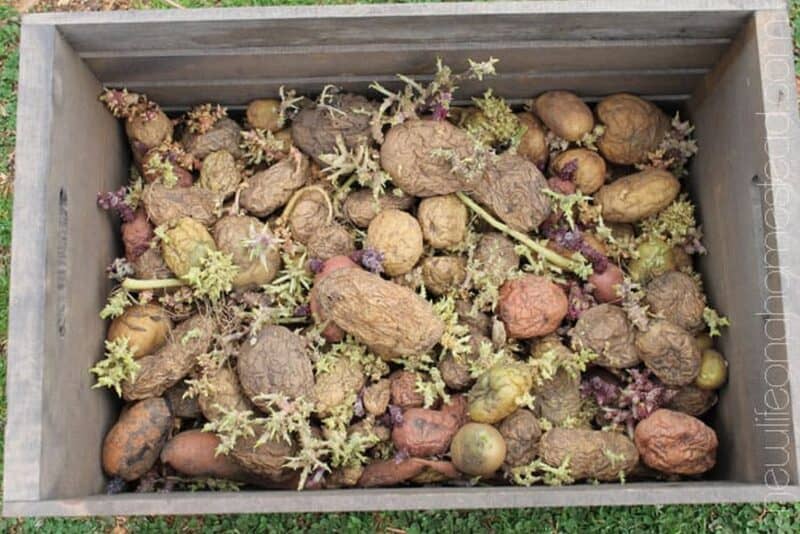
My seed potatoes are potatoes that are leftover from last year’s harvest. They’ve been sitting in a crate in my kitchen since last Fall.
They shriveled before we could get to them, so I let them sit and sprout, waiting to be repurposed in this year’s garden.
Every now and then, I sorted through them and removed any rotten potatoes. There weren’t many, but a few.

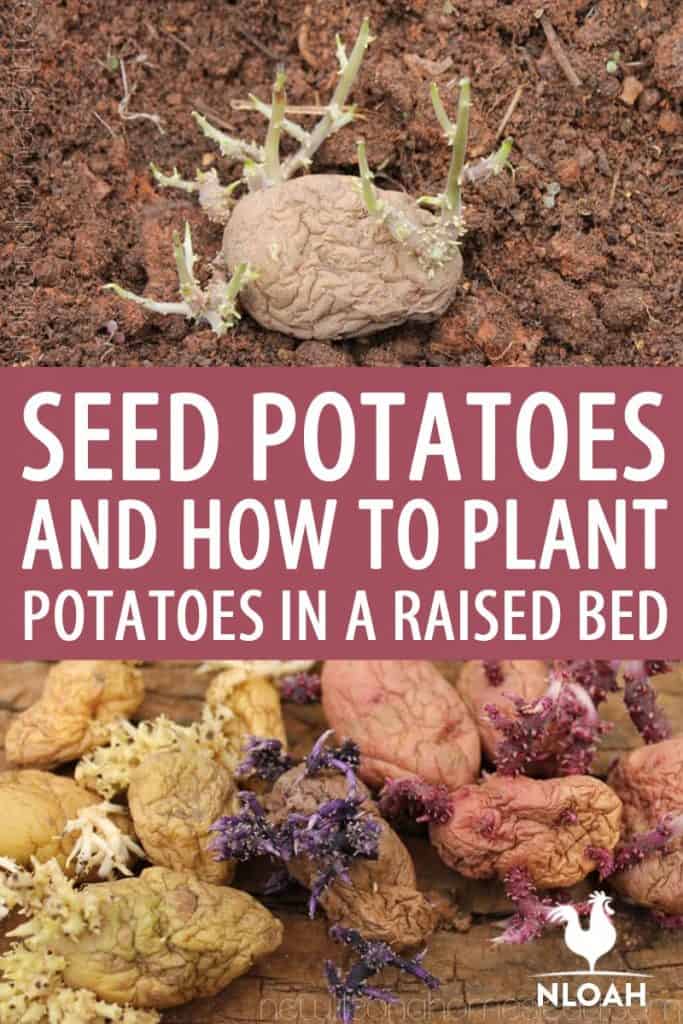
I love growing colored potatoes alongside our white ones. These purple and red potatoes have gorgeous sprouts, don’t they?
Over the years I’ve tried many different ways of planting potatoes. I’ve tried planting in post holes, traditional mounds, trash cans, using the “no dig” method, planting in tubs… all of which had pretty dismal results.
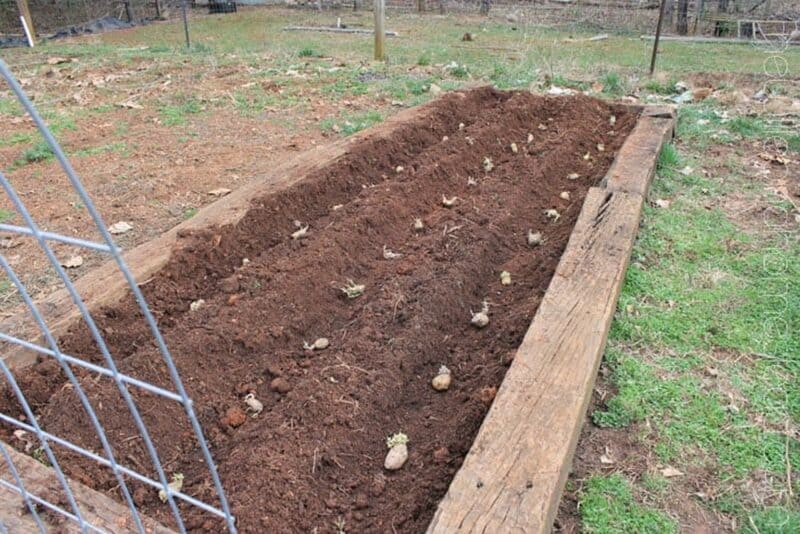
Planting in raised beds has by far provided the most abundant crops. We harvested over 100 lbs of potatoes last year from two 5′ x15′ raised beds! I’ll definitely continue planting in raised beds from now on.
Selecting Seed Potatoes
Head to the grocery store, and you’ll find only about a half a dozen different kinds of potatoes. On the contrary, when you start shopping for seed potatoes from your favorite seed company, you will find hundreds of types. You’ll be able to have much more control over what you grow – and how.
Do some research before purchasing your seed potatoes, though. It’s important to have an understanding of which types of potatoes will grow best in your area, as well as what the seed potatoes were treated with.
Make sure you only purchase seed potatoes from a reputable dealer to ensure that they are disease free and have been treated to prevent rot.
When you are shopping for seed potatoes, you will generally have three varieties to choose from: early season, mid-season, and late season.
Early season potatoes generally reach maturity within 75 to 90 days. These potatoes are popular if you have a very short growing season. Some of the most popular options include Yukon Gold, Norland, and Irish Cobbler potatoes.
Mid-season potatoes take about 95 to 110 days to mature. Popular options include:
- Catalina
- French Fingerling
- Ida Rose
- Kennebec
- Red Pontiac
- Rose Finn Apple
- Yukon Gem
- Viking
- Gold Rush
- Purple Viking
Finally, late season potatoes are those that mature in the latest days of the growing season, taking up to 135 days to mature. Some of the most popular include Katahdin, which is resistant to verticillium potato wilt as well as bacterial wilt, as well as:
- Butte
- German Butterball
- Purple Peruvian
- Carola
- All Blue
I love growing colored potatoes alongside our white ones. These purple and red potatoes have gorgeous sprouts, don’t they?
Ways to Plant Potatoes
Over the years I’ve tried many different ways of planting potatoes. I’ve tried planting in post holes, traditional mounds, trash cans, using the “no dig” method, planting in tubs… all of which had pretty dismal results.
Planting in raised beds has by far provided the most abundant crops. We harvested over 100 lbs of potatoes last year from two 5′ x15′ raised beds! I’ll definitely continue planting in raised beds from now on.
When you’re planning out your potato garden, you should keep in mind that you have way more planting options with your spuds than you do with other types of plants.
Here are some of the most popular ways to plant potatoes – and once you’re done reviewing them, keep reading. I’ll tell you about my absolutely favorite way to plant potatoes!
Trench Planting
Trench planting, also known as planting in hilled rows, is one of the easiest and definitely the cheapest ways to plant potatoes. All you have to do is dig shallow trenches about three feet apart in fertile soil.
You’ll plant your potatoes twelve inches from each other and over them with a few inches of additional soil. When your potato shoots are about one foot tall, you’ll mound soil against the plants – or “hill” them. You will do this multiple times throughout the season to ensure your potatoes are covered.
An inexpensive option, this method of growing requires no movement or soil or any building at all. However, if you have heavily compacted soil or infertile soil, it might not be the best. Plus, it’s not the greatest method when it comes to controlling weeds and moderating moisture.
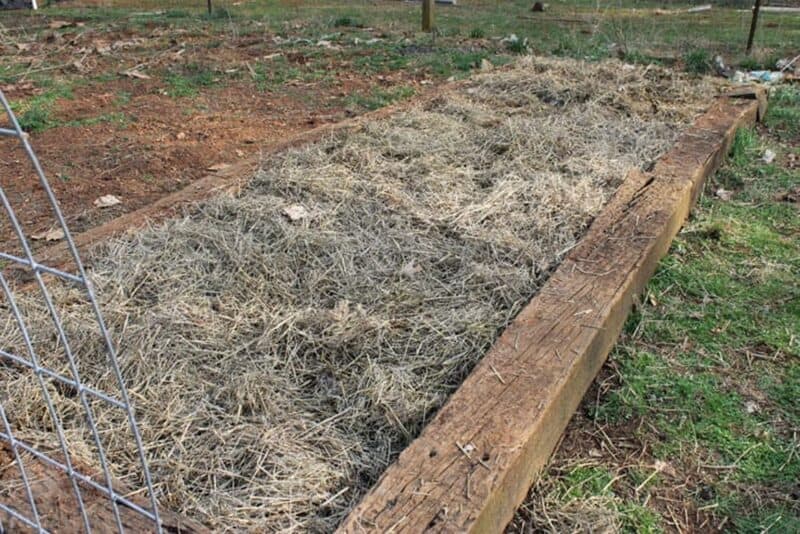
Mulch Planting
Many people like the economics of planting in rows but don’t like the increased susceptibility to weeds and drought. Mulch planting can eliminate these concerns.
To do this, you will plant your potatoes in the exact same way as you would when trench planting. However after you plant, you will cover your rows with a few inches of loose straw. Instead of mounding soil as the plants grow, you will mound up straw.
This method is prized because it conserves moisture and reduces the amount of weeds = you have to deal with it. However it produces a significantly smaller yield of potatoes and it doesn’t help to keep rodents and other pests away from your plants!
Wire Cylinders
If you have a super wet yard to contend with, planting in a wire cylinder might be your best bet. To do this, you will want to use hardware cloth with thin mesh to make a cylinder that is roughly 18=24 inches in diameter. It should be about two feet tall.
You’ll fill with soil part of the way, then plant a few seed potatoes before covering them with more soil. You will add more soil as the potatoes become taller and larger. Harvesting is easy, since all you will have to do is lift back the soil.
This growing method is best for people in wet areas because the wire mesh provides drainage and prevents the soil from becoming waterlogged. However, it does not produce the highest yields since you can’t plant that many seed potatoes in this amount of space.
Grow Bags
If you’ve ever ordered from a seed catalog – which I’m guessing you have – you have probably seen commercial grow bags for sale. These are usually made out of dense polypropylene and are a great way to plant seed potatoes.
You will simply fill one with some soil or compost before adding three or four pieces of seed potato. Then you’ll cover with three more inches of soil, adding soil until you have filled the bag.
When it’s time to harvest, all you have to do is dump the bag out. It’s as easy as that! This method is perfect for people who need to plant on a patio or where the garden soil is nutrient deficient. However, the bags aren’t cheap, making this a cost-prohibitive option.
Garbage Bags
Lots of people like the benefits of planting in grow bags yet don’t have the cash necessary to do this – that’s where the idea of planting in garbage bags comes in.
This idea works great in theory –after all, shouldn’t it function in a similar fashion as a grow bag? – but you might have some issues with drainage. Plus, garbage bags aren’t super aesthetically appealing. The plastic can allow the soil to become too hot, too, which can limit tuber formation.
Raised Beds
Without a doubt, planting in raised beds can produce some of the highest yields in your potato garden.
You can use all kinds of materials for a raised bed, including beds made out of traditional wood, metal, or plastic. You can also repurpose materials like old tires and drums to create makeshift, virtually free raised beds.
While you will still have the expense of adding soil to your raised beds, potatoes grown in beds usually are much healthier and numerous than those grown in the ground. Your spacing and planting recommendations will remain the same as in the trench method of planting.
When you plant in a raised bed, there are tons of benefits. You’ll have fewer weeds, less compaction, and less tilling. Plus, you can often plant more potatoes closer together.
How to Plant Potatoes in a Raised Bed
Here’s how to plant potatoes in raised beds. You’ll love how easy it is…
How to Make and Prepare a Raised Bed for Planting
You can build a raised bed out of a variety of materials. Here’s a basic guide on raised beds but know that they can be made from just about any kind of material, including:
- Cinder blocks
- Rock
- Concrete
- Old tires
- Steel
- Galvanized metal
- Wood (untreated options like cedar, Douglas fir, redwood, and black locust are best)
How Deep Does a Raised Bed Need to Be For Potatoes?
The answer is that it depends on the type of potato you’re growing. For early or baby potatoes, a depth of 8-10 inches is usually sufficient. Maincrop potatoes will need a minimum depth of 12 inches, because they will produce larger tubers.
Of course, deeper beds will give your potatoes more room to grow, so if you have the space, it’s always better to err on the side of too much rather than too little.
How Many Potatoes Can I Plant in a 4×4 Raised Bed?
The answer to this question depends on a few factors, including the type of potato you are planting and the spacing between plants.
For example, if you are planting Yukon Gold potatoes, you will need to allow for about 9-12 inches between plants. This means that you could potentially fit up to 16 Yukon Gold potatoes in a 4×4 raised bed.
However, if you are planting Russet potatoes, which can grow to be quite large, you will need to allow for more space between plants. As a result, you might only be able to fit 8-10 Russet potatoes in a 4×4 raised bed.
In addition to the type of potato you are planting, the spacing between plants will also depend on how you intend to harvest them. If you want to harvest your potatoes by digging up the entire plant, you will need to allow for more space so that the plants can swell without crowding each other.
However, if you plan on harvesting your potatoes by gently digging around the base of the plant and only removing what you need, you can get away with planting them closer together.
What Happens if I Plant My Potatoes Too Shallow?
If you plant your potatoes too shallow, the tubers may not develop properly and the plants may not produce a good yield. The tubers need to be buried deep enough so that they can develop a strong root system.
If they are planted too shallow, the roots will not be able to anchor the plant properly and it may topple over when it starts to produce fruits or vegetables.
Additionally, shallow planting can also lead to potatoes being exposed to sunlight, which can cause them to turn green and develop a bitter taste.
For best results, plant your potatoes at least eight inches deep. This will give them enough room to develop properly and produce a bountiful harvest.
Planting the Potatoes
Once your raised bed is built and filled with soil, you can start planting.
To do this, first, dig a long trench for your potatoes to be buried in. I use a hoe and dig down as deep as I can to the hard soil at the bottom of the raised bed, about a foot deep.
You want to at least be able to cover your potatoes completely with soil. Space the rows about 18″ apart.
If you have a limited supply of seed potatoes, you can cut them into quarters or halves, making sure each chunk of the potato has a sprout or eye on it- otherwise it won’t grow a plant.
If you plan on cutting your potatoes, give them a couple of days to “cure” so the cut side can dry up. Curing reduces the chances that your seed potato gets a disease.
Chitting the Potato
Most people allow their potatoes to “chit” or sprout before planting. This is done by placing the eggs in shallow trays with shoots facing upwards. Put the tray in the sunlight, protecting it from frost and extreme heat. You will want to let the potatoes sprout for about six weeks.
Chitting is not mandatory, but it can help. If the potatoes have already begun to sprout or if you have a variety of potato that is early-maturing and want an even earlier harvest, chitting can be a smart choice. Make sure you do this at least one month before your planting date!
When you’re ready to plant, you can choose to cut your potatoes or not to cut them. Some people do this in order to stretch their seed potatoes out a little bit, helping to make more from their money.
While the choice is up to you as to whether you do this or not, know that cutting your potatoes does increase the likelihood of rot.
If you choose to cut your potatoes before planting, cut them so that each piece has at least one eye. You can have more than one eye per potato, but you need to make sure there is at least one to ensure production. The potato also needs to be relatively large – at least an ounce.
Let your cut potatoes cure in a cool, humid place for about three days. Then, you can go ahead and plant.
I don’t cut my seed potatoes anymore because I have more than enough to plant our beds using whole potatoes. When you put the sprouting potato in the ground, make sure the sprouts are facing up. Space each seed about a foot apart in rows.
Once the rows are filled, cover the potatoes with dirt and mulch heavily with straw, grass clippings, pine needles, or crumbled leaves. As the plants grow, add more soil or mulch to cover almost all of the plant to encourage more tubers to develop along the root system.
Planting Potatoes
Timing your planting is of the utmost importance. Potatoes that grow in too-cold or too-wet soil can rot, while potatoes grown in soil that is too warm or dry may simply not produce. Plant your potatoes after the danger of frost has passed but while you are still experiencing a light frost.
When you plant, put them about two or three inches deep and 24 inches apart. This will be done, typically, regardless of how you choose to plant your potatoes.
The planting methods may vary slightly if you are planting in a grow bag or another similar container, but in raised beds and rows, the same process will be required.
Keep in mind that if there is a light frost after you plant, it can potentially kill your new growth. However, try not to panic. This won’t kill your potato plants and the potatoes will put on new foliage quickly.
Caring for Your Potato Plants
When it comes to fertilizer, less is more when it comes to potatoes. Too much fertilizer can actually lead to fewer and smaller potatoes, since a flush of nitrogen encourages too much leafy green growth at the expense of the tubers. A light application of fertilizer every few weeks is all that your plants will need.
In terms of watering, potatoes love moisture, so be sure to keep the soil evenly moist throughout the growing season.
Common Potato Problems
Potatoes are super hardy crops, which is why so many gardeners choose to produce them! When you grow them in a raised bed, you’ll notice higher yields that will get you through an entire year when the tubers are preserved correctly.
There are some problems you’ll need to watch out for, though.
Potato Scab
Potato scab is common issue. This issue is caused by a too-high soil pH. Placing straw atop the potatoes can help prevent bacteria, and making sure your soil is nice and acidic can help prevent scab.
Cabbage Worms
The larvae of the cabbage worm are a common sight on potato plants. These small, green caterpillars feed on the leaves of the plant, causing extensive damage. In addition to eating the leaves, the larvae also leave behind a sticky substance that can attract other pests.
The best way to control cabbage worms is to use an insecticide that is specifically designed for larvae.
This type of insecticide will kill the larvae before they have a chance to do any damage. In addition, it is important to keep an eye out for early signs of infestation and to act quickly if larvae are present.
Colorado Potato Beetle
Another issue on the list of common pests and diseases is the Colorado potato beetle. This pest will need to be hand-picked from where they appear on the undersides of leaves. You can also use diatomaceous earth to control them.
Other Common Potato Diseases
Besides potato scab, potato plants can be affected by a number of other diseases, including blight, early die back, mosaic virus, and root rot.
Blight, including both early blight and late blight, is a fungal disease that attacks the leaves and stems of the plant, causing them to turn brown and wilt.
Early dieback is caused by a bacteria that infects the potato itself, causing it to rot from the inside out.
Mosaic virus is spread by insects and causes the leaves of the plant to turn yellow and mottled.
Root rot is caused by a fungus that attacks the roots of the plant, making it difficult for the plant to absorb nutrients and water.
These diseases can all have a significant impact on the yield of a potato crop, so it is important for growers to be aware of them and take steps to prevent them.
One of the best ways to prevent these diseases is to purchase disease-free seed potatoes. This will reduce the likelihood of your plants being impacted by any kind of disease.
Another tip is to make sure your watering and fertilizing are on point. Many common potato diseases are caused by nutrient imbalances or too much or too little water.
Make sure your soil is loose and well-draining – consider adding a layer of compost and working it into the soil with a garden fork prior to planting, ideally sometime in March or April. This will ensure that your soil is both fertile and adequately well-draining.
Harvesting Potatoes
Potatoes are ready for harvest about three weeks after the plants have stopped flowering – if you want new potatoes. If you only want to harvest mature, large potatoes, wait until the plant’s foliage dies back.
Then, start counting down on the calendar – you will need to wait another two or three weeks. The tops of the vines must completely die before you start to harvest.
If you plan to store your potatoes, stop watering them, unless it’s extremely dry, toward the end of the growing season. If you aren’t sure how ready our potatoes are, you can dig a test hill. Mature potatoes will have skins that are thick and firmly attached to the flesh.
To harvest your potatoes, wait until a dry day. Then, dig gently, trying not to bruise or cut the potato skin in any way. This will cause rot during storage. If your soil is wet, make sure you let the potatoes dry before storing them.
You don’t need to leave your potatoes out in the sun to let them cure, but you should let them sit in a cool, dry place for two weeks to preserve and cure the skins.
When you store your potatoes, don’t keep them with apples. This can cause the skin to rot. Similarly, you should avoid storing your potatoes in the refrigerator and you shouldn’t wash them until you are ready to use them.
You can save seed potatoes from year to year, too, but this is done at your own risk. Some seed potatoes can transmit soil borne diseases, and since you can’t test your seed potatoes like seed companies can, you might be putting your harvest at risk.
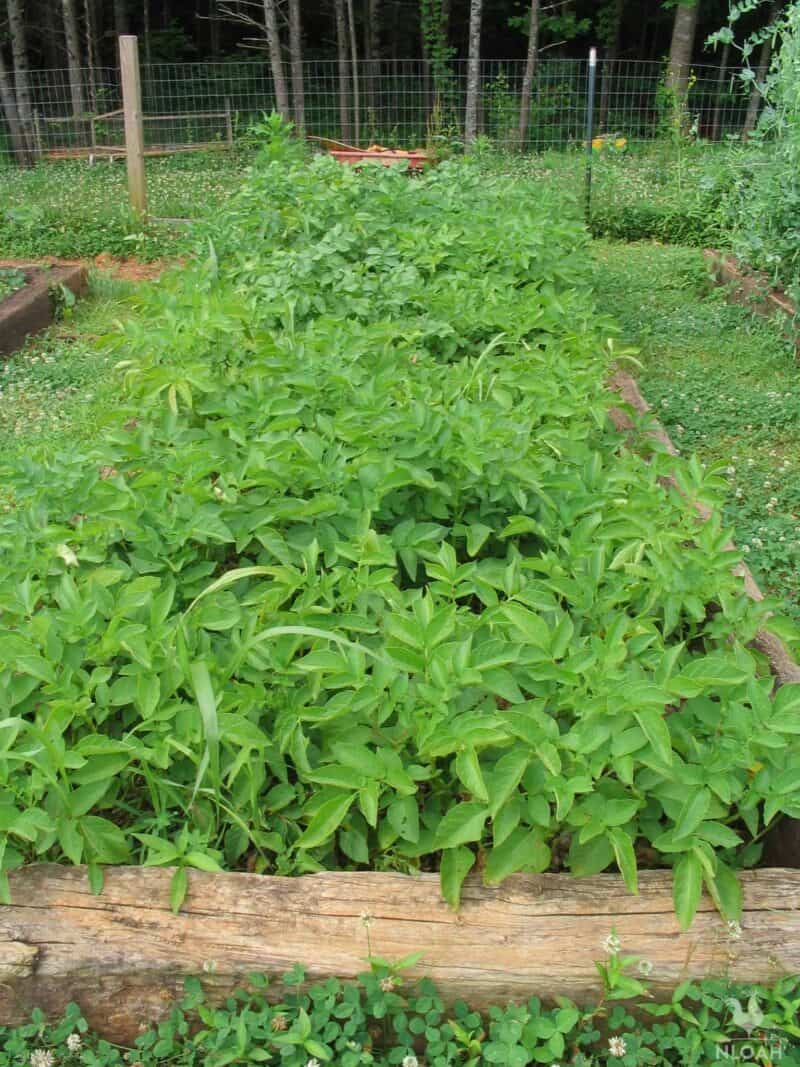
Two months later…
It’s May now, and the potatoes are looking great! If I had another row of railroad ties that I could stack on top of these and fill in with more dirt, I’d get way more potatoes. But even in the 10″ of dirt they’re in we still expect to harvest another 100 pounds or so.

A city girl learning to homestead on an acre of land in the country. Wife and homeschooling mother of four. Enjoying life, and everything that has to do with self sufficient living.
Read this link and learn about why you should never EVER use rail roald ties in the garden https://www.gardeningknowhow.com/garden-how-to/info/are-railroad-ties-safe.htm
If you already have beds made with them, replace them with anything else and throw them in the local landfill. They have been encouraged by the EPA specifically not to be used in the garden because they are considered toxic. As they break down they release dangerous chemicals that are persistant in the soil for a very long time. I know they look pretty and are cheap but they do not belong near your food source! This is a big big deal that is extremely dangerous and I really am not overreacting. Please reconsider advising people in this article to do something so dangerous!
When you add mulch/dirt to the growing potatoes, do you cover the green sprouts/leaves coming up? Everyone says to add dirt, but I’m having trouble picturing how that works.
thanks
Not to be a wet blanket, Kendra, but I would try to use something besides railroad ties or pressure treated lumber for the raised beds. The creosote, and chemicals can, and do, leach out into the soil, and can be absorbed by the plants. Regular wood id best, but of course it rots out after several years…
I have double stacked railroad ties for my raised beds. I had “cherry picked” them from a huge pile a gentleman had. He let me pick through and he used a piece of heavy equipment like a ‘log picker’ to get the ones I want. My criteria was simple, the grayer the better and they had NOT have rotted ends. When I got them all home, my helpers dumped them in the yard. I only noticed bubbles of creosote on one. I used the others first and put that one on the top layer- not touching plants, and draped a long piece of heavy plastic over it and down into the garden. Bottom line – older = less creosote. Seven years later, no creosote leaking and I love the high, sturdy raised beds. I can sit on the edges.
Creosote is still in the ties for some time. You likely are ingesting and you do not even know it. Trust me I worked on a rail line and have wayyy too many hours around that crap.
The easiest way to solve this problem is by using a plastic liner, for some odd reason plants supposedly do not absorb the chemicals from plastic, not sure I buy that but there is no scientific data to say that it happens.
Please, seriously be careful with the ties and pressure treated lumber.
I just wanted to agree with Shrek about how you should not be using old railroad ties. They can be quite toxic for a long time. Its too bad because I know they seem so perfect!
You can get pressure treated wood from home depot the chemicals they use are no longer toxic and do very well. I use 2x12x8 and some I cut for smaller beds that are 2x12x4
How late can you start seed potatoes?
We usually plant in Spring or Fall. Typically when we plant in spring, we harvest in late summer. The potatoes are stored and what isn’t eaten by the following spring has begun to sprout and can then be planted again.
We plant potatoes in truck tires. Used to be tires had a trade-in value, now you have to pay to leave them at the tire store. Throw a tire down, add good soil and chunks of seed potatoes. Keep adding soil as the potatoes grow until they are above their tire. Add another tire and keep going, adding soil as needed. Ambitious folks can cut the beads out of the tire with a Saws All and a demo blade, but it works leaving the tire as-is. Keep adding a tire until the pile is four high. You can put Re-may on top to discourage the beetles, if you want.
When the killing frost hits, grab a doughnut and a cup of coffee and go lean on the pile of tires … until it tips over. You have just harvested your potatoes. The tires will keep for about 30 years or more, so pick a kid to bequeath them to.
I’m in New Hampshire next to a lake so although my basement stays cool year round, it is pretty damp. What can I do to store potatoes over the winter. And I’m not spending $40 per month to run a de-humidifier. I think I saw once you could cover with dry sand and they’ll last longer.
Dave,
I would store them in the house instead of a damp basement. I store mine in my kitchen in a bin under the counter where they stay dry and around 70*.
Thank You for sharing your knowledge.
WHen my husband cleans the fish we catch he takes the head and bones to the spot where we plant our tattors and tills them under. It is great for the soil and grows huge potatoes.
Great tip!
Will it attract any flies?
Buried in the ground? No.
I’ve had great success with potatoes the past three years… (Hey, I AM in Idaho! Ha!) Here is a vid from 3 weeks ago. We finished planting the whole garden today. These ‘taters are pushing up through the ground now!
https://www.youtube.com/watch?v=S7tkHZhFSFk
I tried planting potato seeds last year in my raised garden. Got about 30, the size of a dime. 🙁 any idea what I did wrong?
Charlie,
Maybe they didn’t have long enough to mature? How long did you leave them in the ground?
If I lived in a place where I could not grow my own food I would move!
My family has been growing our own food my whole life. I remember when the cart at the gro. store just had staples in it, flour sugar, corn meal etc. I remember when my grandmother bought her first paper plate. she thought that was the greatest invention ever! For a period of time we raised our own beef and pork, chicken and eggs!
We fished and hunted, Life was great!
Then one day our family decided we needed to make money from an our source. That is when SHTF so to speak!
we were just farmers, some would say we were poor, but I never knew it!
Sounds like you grew up during a great time, Steve. If only we can get back to such simple joys.
Dime? Just cut one whole potato in half, cut side down , just until you get good at it and they will grow
you must of cut out each eye
No no no
I see in the stores now that you can buy the small potatoes. About golf ball size. They are in small packages. I thought if these sell good, they might move to a larger bag. We always went through all the rows and picked the small ones too. They are wonderful to use and you have to save on the grocery bill if you run out of your regular potatoes that you raise. The kids thought they were really helping by picking up the small ones. And that is true.
My friend broke the 3″ sprout off a seed potato accidentally. She put just the sprouted part in a flower pot to see what would happen. It grew a potato. The potato she broke it from grew a potato, too.
Potatoes are on my mind too. With our clay rocky soil–and gophers, we only grow in raised beds. On whim, I picked up in inexpensive a small package of “gourmet organic” fingerling potatoes in a variety. I cut them, cured them on my kitchen window sill, then tossed them into my SmartPot planter. Now I have about 20 pounds of fingerlings to harvest.
Good Morning!
I have limited space in my backyard garden so I’m doing an experiment in a few raised beds this year. In one bed I dug out a bed section at a time (all the way down to hard pan, approximately 24 inches) and put down my seed potatoes. Dusted them with DE (Diatomaceous Earth)then covered them with plenty of dirt from the middle section of the bed (double digging) then put down a layer of compost (taters love their compost!). On top of that I put down garlic cloves, covered them and at the very top of the bed I put down seed of Romaine, Pak Choy, Swiss Chard and Spinach (Cool short season). The seedlings on top have already started germinating so I’m hoping they will get a root system established before the potatoes make their appearance. I’ve planted potatoes in other places in my garden, harvested them and planted other things just to find that one little tater popped up that I had missed. Everyone seems to get along so I’m doing ” French intensive intentional” in layers. In another raised bed I put down potatoes and garlic only, so I can do a comparison. In another raised bed I planted the potatoes and garlic last fall at harvest time and right now the garlic is knee high and the potatoes are putting out leaf, about 7 inches high. All beds are identical in size and depth. I have one raised bed left and last year another bed did very good with sweet corn & Bush beans with lemon cucumber and zucchini at the sunny sides. I have (2)10 ft. ground rows that I planted in potatoes last fall. This is a repeat rotation from 2 other ground rows harvested last fall. I just plant all the unusable potatoes, roots, eye stalks & green leaves, the whole plant gets tossed in the row. Cover with soil and then I composted on the top of the row through the winter then cover the compost with a tarp. Keep those taters warm and fed in the winter! I pulled the tarps off about a week ago, any compost needing more time was put into a current heap and the tops are breaking surface now. My last years harvest was huge and I had reds 7 inches long. (About the eye sprouts): You can break those off your potatoes and start new plants from them in moist seeding soil. Done right one potatoes can make a hundred plants! I’ve also broken them off and raised them in a glass dish with diluted organic liquid fert. Yuppers! They do what they do best, grow roots!
That sounds AWESOME, Sheri! I’ve never done French intensive planting. That sounds very interesting to me. Let us know how it goes!
As long as everything stays well fed and their harvest times differ (bottom last) it like a “3 Sisters Circus!”
In regard to “cutting” potatoes to increase your overall number of planting …. besides leaving a few “eyes” on each piece the most important step is to allow the cut raw skin areas to dry and heal over ….
You’ll have planting failures cutting and planting immediately ….
Yes, Illini Warrior. That’s what I meant about curing the cut potatoes before planting them.
I cut and plant immediately and never have a crop failure. I read this all the time, but my experience is different.
Hi Kendra: Thanks for the idea really never thought of putting the potatoes in the raised beds. I just always planting the potatoes in the main garden area, it has been so wet here in Georgia. I can’t get the potatoes in the ground it is all mud, and now on Saturday and Sunday down below freezing. If I plant now will they freeze in the raised beds? I have plenty of goat straw on top of each raised bed what do you think wait till next week? More rain for late tonight and maybe light rain again tomorrow. Ellen from Georgia
Ellen,
I would probably wait until the ground dries up. If the potatoes stay damp for too long they’ll just rot.
Oh my but you would laugh if you saw my potato seeds. Our purple potatoes from last year were quite small and I didn’t use them all. Went to the basement the other day and found exceptionally long spears sticking out of the potato basket. Husband laughed. Each potato must have an 18 to 24″ running coming out of it. They apparently were reaching for the small amount of light coming thru the basement window. I wasn’t planning on planting anymore purple because of the small size, but I may have to plant some since they went to the bother to get such nice long shoots on them. Your seeds look really nice. Last year was our first year for potatoes and it was so much fun growing them. It was like digging for buried treasure.
I LOVE digging for potatoes, Kathy. It is just like digging for treasure, lol. And it never gets old to find another potato in the bed. I actually just dug up a perfectly good, BIG potato from last year’s bed. I thought they’d rot over the winter or something, but it was totally fine. I wondered about leaving all of them in the ground and just digging them as we want to eat them. It wasn’t even sprouting yet. Interesting.
My seed potatoes were like that last year. Good 16″ runners on all of them. I planted my potatoes after most other people but had taters a week or two before them. I planted them just as deep as I could dig. You just have to be very careful not to knock off the runners while planting.
Great advice about being careful with the runners/sprouts, Yolanda! I forgot to mention that.
Some of my potatoes were very small last year, but they made the BEST Roasted potatoes with herbs or new potatoes sauteed in butter with onions. The taste and flesh couldn’t be compared to the blemished things you get at the grocery store now. A good part of the potato has to be cut away from store bought potatoes. Can’t wait for this years crop!