It’s no secret that growing your own food can be a great way to save money and get healthier food.
But what if you don’t have a lot of space? Or what if you’re not sure how to start gardening? Don’t worry! You can grow potatoes in trash cans!
In this blog post, we’ll show you how to grow potatoes in trash cans using a few simple tips.
So read on to learn more about this fun and easy gardening project!
Why You Should Grow Your Potatoes in Trash Cans
Potato plants are notoriously difficult to grow. They require a lot of water and nutrients, and they are susceptible to pests and disease.
However, there is one method of growing potatoes that can help to improve yields and reduce the risk of problems: growing them in trash cans.
When potatoes are grown in pots or raised beds, they often produce a large number of small, misshapen tubers because the soil is rocky or uneven. However, when they are grown in trash cans, the roots have more room to spread out, resulting in bigger, healthier potatoes.
In addition, trash cans provide protection from pests and diseases, which can devastate a potato crop. For these reasons, growing potatoes in trash cans is an ideal way to improve yields and ensure a bountiful harvest.
How Do You Grow Potatoes in a Trash Can?
Ready to get started? Follow these steps!
Plant at the Right Time
If you want to grow potatoes in a trash can, it’s important to plant them at the right time. After the last frost date, make sure the soil is at least 50 degrees. Potatoes are cold hardy crops, but the cold wet ground may cause them to rot this early. Harvest before the first fall frost.
If it seems like the soil in your trash bin is taking forever to heat up, pull it out into direct sunlight. You may want to consider using a black plastic trash bin or putting a tarp over it to heat it up a bit more, too.
Choose the Right Variety of Potato
When it comes to growing potatoes, there are two main types: indeterminate and late season. Indeterminate potatoes produce new growth throughout the season, so they are ideal for growers who want a continuous supply of potatoes.
Late season potatoes, on the other hand, only produce new growth during a brief window at the end of the season. As a result, they are best suited for growers who want to harvest a large quantity of potatoes all at once. When choosing a potato variety for growing in trash cans, it is important to consider your own needs and preferences.
If you want a constant supply of potatoes, an indeterminate variety is probably your best bet. However, if you are more interested in harvesting a large quantity all at once, late season varieties may be more appropriate.
Prepare the Seed Potatoes
Prepare your seed potatoes. Cut them into small pieces, making sure that each piece has at least one “eye.” These eyes will sprout and become new potato plants.
Get the Soil Ready
Before you plant potatoes in a trash can, it’s important to make sure the soil is of good quality. The soil should be slightly acidic and rich in calcium, phosphorus, and potassium.
You also want to make sure there’s not too much nitrogen present. Too much nitrogen will produce leaves at the expense of potatoes. You can test the pH level of your soil with a home testing kit available at most garden stores.
If the soil is too alkaline, you can add sulfur to lower the pH. If the soil is too acidic, you can add lime to raise the pH. Once the pH level is where you want it, you’re ready to plant your potatoes.
Choose the Right Location
Simply choose a location that gets at least six hours of sunlight each day and rotate the location where you plant your potatoes each year to prevent pests and diseases.
What Size Trash Can Grow Potatoes?
When it comes to choosing a trash can for potato growing, size is an important consideration. Ideally, you should choose a can that is 20 to 32 gallons in size. This will give the potatoes plenty of room to spread out and grow.
The material of the trash can is also important. Plastic or metal are both good choices, but avoid using a galvanized can, as the zinc can be toxic to plants. If you live in a climate with cold winters, you may also want to consider using a black trash can, as the dark color will help absorb heat and keep the soil warm. Otherwise, any color will do.
Add Drainage Holes
Be sure to add drainage holes by drilling several half-inch-wide drainage holes in the bottom and up the sides, about 2 inches up from the bottom. Good drainage is essential to prevent the roots from sitting in constantly wet soil and rotting.
Fill the Bottom of the Can With Soil
Fill the can about six inches deep with soil. It’s not a bad idea to put a few inches of soil with added nutrients, like potting soil or a slow-release fertilizer, at the bottom of the trash can, either.
Plant the Potatoes
Put five inches of compost or potting soil in the bottom of the can, and water it well before planting. For best results, choose just one variety of potato per can. Place seed potato pieces on the soil, spacing them about eight inches apart. Cover the potatoes with two or three inches of additional garden soil, then water thoroughly.
When the vines reach four inches tall, cover all but the top inch with more compost or potting soil. You can also use wood chips or straw for this purpose. Just make sure to keep the potatoes well-watered throughout the growing season.
Care for Your Potatoes
When growing potatoes in a trash can, it’s important to water deeply once or twice a week. Potatoes need 1-2 inches of water per week, so make sure to check the soil often and add water as needed. You should also care for your potatoes by adding compost or fertilizer to the soil every few weeks.
Harvesting Potatoes
The best time to harvest potatoes is two weeks after the plants have died back. At this point, the potatoes will be fully mature and their skins will be thicker, making them less prone to bruising. Once the plants have died back, stop watering them. This will help to toughen up the skin and make the potatoes easier to store.
To harvest, simply dump out your trash cans. It’s as easy as that!
After Harvesting Your Potatoes
After you’ve harvested your potatoes, it’s important to take care of them so they will last. Don’t let them store in the sun too long, as light exposure can cause the potatoes to develop green skin. Instead, brush the soil off and store them in a cool, dark location. If you do this, your potatoes should last for several months. A root cellar or dry basement are both good options.
At the end of the growing season, you can dump the plant parts, including the stems and leaves, into your compost pile. This is a great way to get rid of them and return some nutrients to the earth!
Common Problems When Growing Potatoes in Trash Cans
One common problem is that the foliage can be depleted or chewed. This is usually due to beetles or aphids. The best way to combat this problem is to use an eco-friendly spray.
Another common issue is scabs on the potatoes themselves. This is usually caused by low pH levels in the soil. To prevent this, you should plant scab-resistant varieties of potatoes.
Finally, misshapen potatoes are often a problem when growing potatoes in a trash can. This is usually due to the red wire worm. The best way to combat this problem is to rotate crops and not reuse soil.
If you keep these things in mind, you can successfully grow potatoes in a trash can.
The Upgraded Method: Growing Potatoes in Trash Cans With Straw
Growing potatoes in straw is not only an easy and fun way to get a great crop, but it’s also environmentally friendly. In the traditional method of growing potatoes, farmers till the soil, which loosens the soil and makes it easier for weeds to take root. This can cause soil erosion and damage to the environment. However, by growing potatoes in straw in trash cans, you can avoid these problems.
Why Should I Use Straw in My Trash Cans?
Straw helps to hold the potatoes in place and prevents them from falling through the holes in the bottom of the can. In addition, it helps to keep the potatoes from rotting by providing a layer of insulation. Finally, straw helps to absorb excess moisture, preventing the potatoes from getting too wet.
How Deep Do You Plant Potatoes in Straw?
It is important to plant the potatoes deep enough in the straw so that they are well-covered. If the potatoes are not buried deep enough, they may be exposed to too much light and heat, which can cause them to turn green and develop toxins. For best results, plant potatoes in straw at least six inches deep in trash cans.
When Should I Put Straw on My Potatoes?
You can add any straw at any time. I like to add it right when I plant, but the choice is yours.
For the most part, and the most important benefits to the plants, straw is usually added shortly before the plant begins to bloom. This helps to keep the potato tubers warm and protected from frost. It also helps to encourage early growth. However, adding too much straw can result in the potatoes being too dry. When adding straw, make sure to leave some space between the top of the potato plant and the straw so that water can still reach the roots.
Use Straw Instead of Hay
Unlike hay, which can contain seeds that will germinate and compete with your plants for nutrients, straw is sterile and won’t introduce any new weeds to your garden. In addition, straw breaks down more slowly than hay, so it will continue to provide weed control and moisture retention throughout the growing season.
Straw is also a good choice if you’re concerned about using herbicides or pesticides in your garden. Because it doesn’t contain any seeds, there’s no risk of contamination, making it a safe and environmentally friendly option.
Other Containers You Can Use for Growing Potatoes
While traditional potato growers may only think of using an in-ground garden plot or raised bed, there are actually many other options that can be just as successful. You don’t even have to have a big trash can! There are other options to consider.
For example, tires stacked on top of each other and held in place with a rebar pole make an excellent container for potatoes. Grow bags or a raised planter are two popular options, as is the idea of planting potatoes in trenches.
Drums or barrels can also be used, as long as they are at least 18 inches deep. For those with limited space, even a small trash can or container can be used to grow potatoes, as long as it is at least 18 inches deep.
Growing Potatoes in Trash Cans: My Experience and a Word of Advice to You!
I noticed that some of the potato plants in my trash cans had started to die back, so yesterday I decided it was time to harvest them. This was my first attempt at growing potatoes like this, and I couldn’t wait to see how they’d done!
I probably should have waited ’til the plants had all died completely back, but I was afraid I’d wait too long and the potatoes would rot.
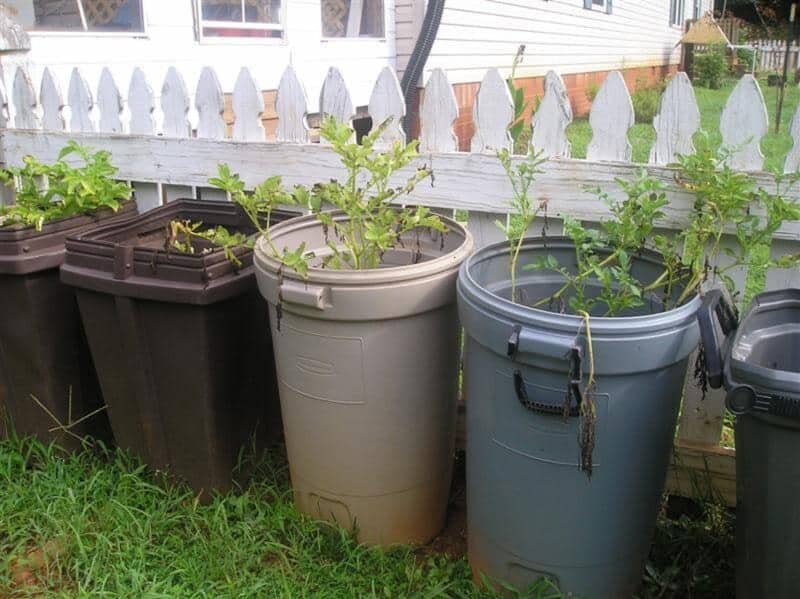
I was grateful that most of the trash cans were on wheels, ’cause they were very heavy and I needed to pull them next to my compost pile to dump them out.
I’ve heard stories of people dumping their cans over to unearth dozens and dozens of beautiful, huge potatoes. This was the image I had in my mind, though I knew better than to count on it.
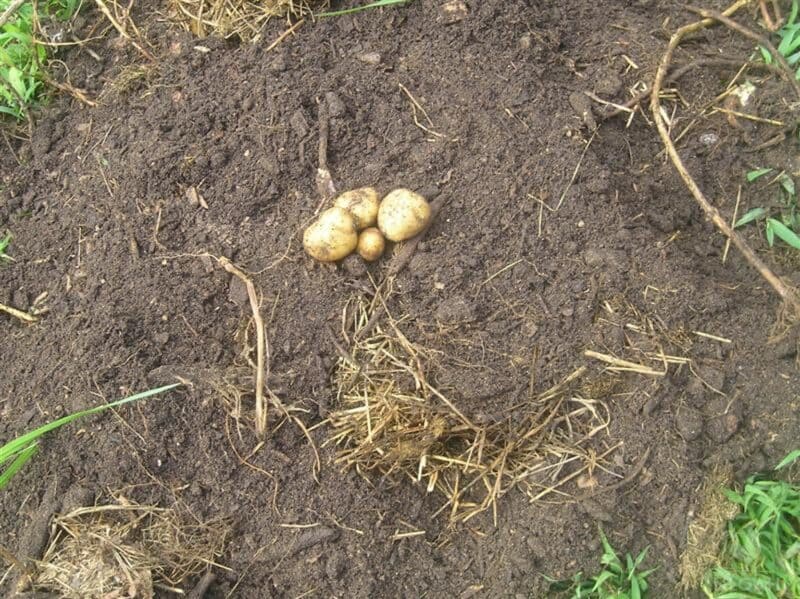
It’s a good thing I’m not easily discouraged! Here was my first can’s findings – four tiny potatoes:
As I continued dumping the trash cans over and digging through the dirt in search of new spuds, I came across several shriveled potato skins that were crawling with tiny little insects.
I couldn’t tell if these were the seed potatoes that had rotted, or if they were new potatoes that had been ruined. I’m pretty sure they were the seed potatoes.
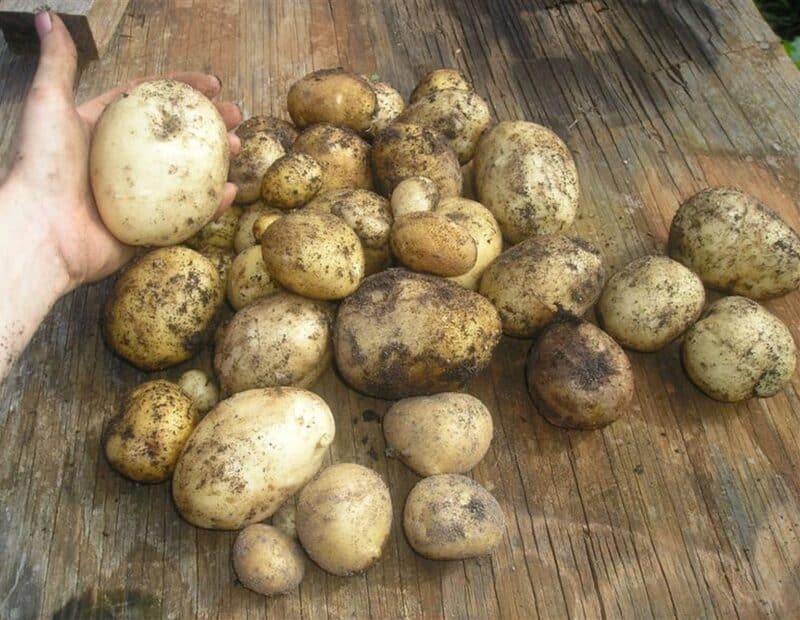
After sifting with my hands and a pitch fork through five trash cans’ worth of dirt, I ended up with 4 1/2 pounds of good potatoes:
The problem?
I harvested too early… When you’re growing potatoes in trash cans or anywhere else, for that matter, you need to wait until the plants die completely back.
Not only will this ensure that your potatoes are the right size, but it will also allow the skins to toughen up and cure in the ground so you can keep them for long-term food storage.
Have you tried growing potatoes in trash cans? How did it go?

A city girl learning to homestead on an acre of land in the country. Wife and homeschooling mother of four. Enjoying life, and everything that has to do with self sufficient living.
Hi There – Thank you to all for the info. I do not have a garden at this time (!poor me!). Anyway – I want to add this to the conversation.
http://www.snopes.com/food/ingredient/potato.asp
As a senior person – in my life – I believe I have experienced some of the (green). I have been aghast to have actually recently purchased a 15 pound bag of potatoes (russets from Oregon)
only to have to trash the entire bag. This is because they were all ‘green’. It would be wise to get more info on this (I think) for the do-it-yourselfers. This seems to be a problem that the ‘old timers’ seldom ran across – but seems very common nowadays.
Potatoes in containers intrigues me! Do you drill holes in the bottoms or sides of the containers?
Thanks!
Laurie
Laurie,
Yep, I just drilled several holes in the bottom of the cans, and added about a foot of good soil before placing my seed potatoes in and covering with a little more soil. Then add mulch or more dirt as the plants grow to keep the spuds from direct sunlight 🙂
I have watched dozens of YouTube videos and read blog articles where people have used tires or trash cans. Almost every one I have watched yielded a small batch of small potatoes. Lately I am seeing articles on growing them in trash cans. While I am all for trying out new methods, it seems that the appeal of the trash can and tire methods are to save time and energy for the grower. But if the work you put into something “quick” results in failure or a low yield, then you have really expended more time and energy than if you had gone ahead an planted potatoes in rows in the ground. The tried and true methods, I find, always work best even though they require more work initially. Hundreds of years of planting potatoes can’t be wrong.
I think that’s a great turn out esp. if this is your first time trying it in trash cans. I’m excited to see how your ground crop will produce compared to the trash cans. We have ours in the ground and have never had problems. We have heard of people growing them in stacks of tires? and we’ve thought about giving that a try next year.
Hmm.. I’ve never heard that there are determinate and indeterminate varieties of potatoes! I’ll have to find out more about that! Always learning something! We grow our taters in 200 gallon smart pots (cloth like containers)and have pretty good results. We really like the way the fabric lets the soil breathe. I’ve never pulled out a rotten potato. We planted very late this year, so were a little disappointed with our first harvest. We had a volunteer tater plant (didn’t get ’em all last year) in a smart pot I planted Chinese Noodle beans in this year. That plant seems to have done better than the ones we planted on purpose. I think the shade from the beans helped during our over 100 degree weeks, and I’m sure the nitrogen fixing properties of the beans helped. And maybe the volunteers just do better…. We did have a much better first harvest last year, but the plants are still growing. So maybe our second harvest will be better.
(There is a lot of info about growing potatoes in smart pots online.)
This is very interesting! I planted potatoes in trash cans for the first time this year too. I am a little scared that nothing is growing underneath the soil! I keep adding soil though, so I guess I will see! Your potatoes look great though!
This year I did the straw method, but had to replant many times when my chickens dug them up. I ended up with about 70ish plants and have harvested about 3/4 of them so far. I don’t know how many pounds, but I have about 2 full milk crates of red potatoes. I used my own seed potatoes from last years harvest to plant this year. I am completely sold on this method. It was SO easy to harvest and easier to plant since there was no hoeing or raking up more dirt. I should note that I did put just enough dirt on each seed potato to cover it before I added the straw and after they sprouted through the straw, I put grass clippings on top of the straw to keep the weeds out and keep the sun off the new potatoes. I figure I would have had an even better crop if the chickens hadn’t gotten involved! Fence-check, wings clipped-check! I was glad to hear how the trash can method worked for you and the others who have commented. It is something I have considered. I really appreciate all the information you share. thank you!
Here in our backyard located in the central U.S., we planted the entire 50 lb. burlap bag of pontiac red potatoes. This yielded hundred of lbs. (we are a backyard garden of 1100 sq. ft. ((think garden the size of a small house)) and there are other crops planted in this space as well). I have the harvested potatoes stored in bushel baskets which are sitting all over the kitchen and we can only walk in a narrow path.
How did we do it? Plant a healthy chunk of potato…BIGGER than a large hen’s egg. Plant it deep…4 inches at least. After the plant emerges, cover the ground with a thick layer of wheat straw to keep weeds down and the ground moist (less watering). If any potatoes grow near the surface, they are protected by straw from the sunlight. Yes you could mound up more dirt several times during the growing process, but it is labor intensive. Here in our state, where we are having drought conditions, the straw mulch is a blessing for conserving water. After harvest, I let the straw decompose somewhat as it lays on top of the soil, and I let it break down until the next February, then I rotor till it into the ground. This organic (somewhat composted) material is what the soil wants…NOT fertilizer.
Now all that is basic instruction. Here is where my method looks different from the typical home gardener. When I begin my harvest, I generously give the first of the potatoes to the feeding mission. I give the first of the tomato crop. The first of the onions, peppers, lettuce, apples, peaches, etc. Not one bite goes into our mouth until I take some to the mission. It is my first fruits offering and I’m trusting God that there will be more to harvest in the days ahead.
Those people who are in need get physical food and spiritual food, as it is the word of God that sews up the holes in people’s pockets to pull them out of poverty. Yes I could give to mobile meals or wheels on meals types of programs BUT I want the living word of God to go with the garden produce.
Thirdly, I remember to let my land rest in it’s 7th year. Here in the plains states, those tractors plow the land EVERY YEAR and it never gets a rest. It needs to re-mineralize. God wants the land to rest and the people to rest and trust Him that what He has provided in the 6th year will carry them through the uncultivated 7th year. No wonder our food is void of essential minerals, the land never gets to rest!
This is my 12th year to grow and I rotate my food plots to allow them to rest in their 7th year. In hindsight, I, Me, Myself should have rested as well, as frankly, I’m tired! God has given us an abundant, beyond belief garden this year. I’m putting it up but next year, I’m going to take a year off and rest…and the land an early rest too!
Hope something from this helps each of you to be the best gardener you can be!
I absolutely LOVE your advice, Fluff. I have found so much agricultural wisdom in the Word of YHWH.
I’m not sure how you proceeded with planting in barrels. Being originally from Maine I’ve never tried any other method that planting in rows and hoeing as they grow. Potatoes are from the stem of the plant, not the root. I don’t grow them anymore because Mr. D doesn’t eat potato, but if I did, I might try the barrel method just once to see what happens. Adding more growing medium along with the plants as they grow would be a must though.
Did you know: Like tomatoes there are two types of potatoes, determinant and indeterminant. Most modern potatoes are determinant which makes them great for machine harvest but not for staking methods of growing. I did tires when I was a young bride and was fine with the results (until I learned what tires add to the soil…yuck)
I currently grow my modern potatoes (yellow, most reds and peanuts/fingerlings) in a barrel cut the long way and set in a cradle.
I have a wooden stacking potato bin my son made. I am growing Burbank Russets in it (an indeterminate potato that I REALLY had to search for (the information, not the potato). Old fashioned Red LaSota is also indeterminate. Many Russets are indeterminate but not all of them.
I did not believe there was a difference at first either (I always get feed-back saying that people do not believe this)
Debs of the Toy Box.
That’s interesting, Debs! I’ve never heard that.
Congrats! That’s awesome. I keep saying I’m going to try potatoes, but never do…
I’m always amazed to hear when people are harvesting their different veggies. We won’t harvest new potatoes for about a month and it will be near the end of September when we harvest everything. Of course we only have a two to three month growing season so our potatoes are just starting to really shoot up.
I know what you mean, Doug. The different growing seasons are so crazy sometimes!
Oh can you e-mail me and let me know how to start potatoes, jacob,and I never tried them yet,and are wanting to do them in fall garden if possible..
Blessings,Renee
Renee,
Here’s a little how-to I wrote a while back, though it isn’t a complete step by step as I’m still learning too, lol! https://www.newlifeonahomestead.com/2009/04/planting-potatoes/
I was told we couldn’t use plastic garbage cans because they contain herbicides and pesticides to deal with garbage odors. Not sure if this is true about all garbage cans or if it played a role in your small harvest.
But it is worth the effort to keep trying! We eat sooooo many potatoes and a fresh garden grown potato is so delicious!
I planned on simply piling more dirt and straw on my crop last year and kept forgetting. This year I will not be so lax.
Interesting reading how they turned out…and everyone else’s! I haven’t tried this method although I have been wanting to. Thanks for the update!
This year, we just planted them in the ground and didn’t build up around them at all. We had tried the “straw” method in the past and did ok, but one year our straw was so full of seeds it was a weedy mess! The vertict this year?? We planted 8 plants, have harvested 4 so far, and have…12 1/2 lbs of potatoes!! WooHoo!!
That’s AWESOME, Susan!
We have planted potatoes in old tires before but our harvest was not too great. I cannot really remember why. We have since just planted them the old fashioned way. The store potatoes will NEVER be the same. Home grown ones are SOOOOOOOO good.
I’ve tried the in potato bags two years in a row and haven’t gotten too many, but they are so wonderfully good! Much better than the store. I think I will try in the ground next.
I’ve tried potatoes in different containers here in Oklahoma. All the buckets, trash cans etc. failed miserably. I think the Oklahoma heat is too much for them in smaller containers. This year I planted them in a kiddie pool (an old one with a hole in the bottom filled with compost) and in the ground and got bumper crops from both.
I tried growing potatoes with the tire stacking method.
It was a complete waste of time for me. I kept stacking
as the potato plant grew. The towers ended up 4 or 5
tires high. I was SO excited when the time came to knock
them down! I had a couple of potatoes… that’s it.
I’ll never try this kind of method again. Growing in the
ground and hoeing dirt over them as they grow is the best,
most productive method, in my opinion.
I’m working on my second year of 5 gallon bucket potato’s. I pulled them way to early last year so this year I’m hoping for better results.
I think next year will be in the ground!
I’ve dug around a bit in our trash cans and haven’t really found any potatoes at all…hmm…I wonder if we can expect a harvest similar to yours. Dang, man. The best thing about gardening is there is always next year…and trial and error is the best way to learn!
There’s a lot of people out there who don’t believe in building them up at all. We did raised beds where we adding a layer of bed and dirt. We didn’t get ANY potatoes in the higher up part, only in the part initially under the ground when we first planted. Yep, just normal row gardening style potato growing. And we got a good 50 lbs of potatoes in a bed about 3 or 4 feet by 6 feet.
We grew some potatoes in tall bags this year. They did ok, but our potatoes planted in rows did much better. It is easier to plant and harvest them from the bag though.
Lanie
You may not have gotten as many as you wanted but they taste sooooo much better than the store bought kind. I harvested about as many as you did in my garbage cans but my mother planted a few in 5 gallon buckets. Well !! wouldn’t you know it! Hers grew and grew and cracked the buckets. She harvested as many potatoes in her buckets as I did in my garbage cans! Oh Well . I keep trying.
Oh, that’s too funny, Jerrie!! I wonder what made the difference?? Well, if it means anything to ya, you made me feel better to hear that your harvest was like mine 😉
Thanks for sharing this, Kendra. I tried something similar this year except we planted the seed potatoes in the ground and then put raised bed frames, stacked on top of each other, as the plants got taller. We didn’t go high enough, I’m sure, as I had to quit when the potatoes grew faster than my husband could build the frames. But we shall see in a few weeks when harvest time comes. I am hopeful, of course, but prepared for the worst.
Carol,
What a neat idea! I hope you have great success!!
I tried growing potatoes in a half whiskey barrel last year and was similarly disappointed by the small harvest, although they were good. Imagine my surprise when I noticed potatoes growing in the raised bed where I’d dumped the dirt after harvesting last year. I let them go, didn’t hill up or anything because there were other things growing there. I finally harvested a dozen potatoes (as many as I did when I purposefully planted them last year)–and half of these were large and lovely, larger than the ones last year too. I was pretty surprised when I reached down and pulled out a full sized potato as I’d been expecting just small ones again.
Our potatoes did pretty good this year but I’d like to try this to get some early potatoes. Sometimes we can’t get into the garden for one reason or another (to wet, etc.)