One of the great joys of gardening is watching your plants develop, and especially if you have planted fruits or vegetables watching your future harvest mature right before your eyes is borderline magical. Sometimes it makes it very difficult to be patient!
Every fruit and veggie goes through its own development process after planting, and the miracle of Life is on full display as you watch a tiny seed sprout, grow and eventually produce the wonderful food that we eat.
Today we are looking at the pumpkin, the largest of the squashes that are commonly eaten, and also used for many other purposes.
Learning the growth phases of your pumpkins will help you nail down when they will be ready for harvest, and also help you pinpoint potential problems during development.
I’ll tell you all about what happens after you plant that seed just below!
Germination Takes Place
The germination phase of a pumpkin seed is the first part of its life cycle. This starts when the seed comes into contact with water and is triggered to begin growth.
During this phase, the seed begins to swell and crack open, and the first tiny, fine roots emerge from the seed coat. As the roots grow, they anchor the seedling into the soil and absorb more water and also nutrients.
The seedling also sends up a tiny shoot, called the plumule, which will eventually become the pumpkin plant’s stem, leaves, and flowers.
The germination phase is absolutely crucial for the successful growth of a pumpkin plant. Proper watering and soil conditions are mandatory to ensure that seeds germinate and grow properly.
Once the seed has germinated, you need to continually provide the seedling with appropriate care including adequate light, nutrients and protection from pests and diseases.
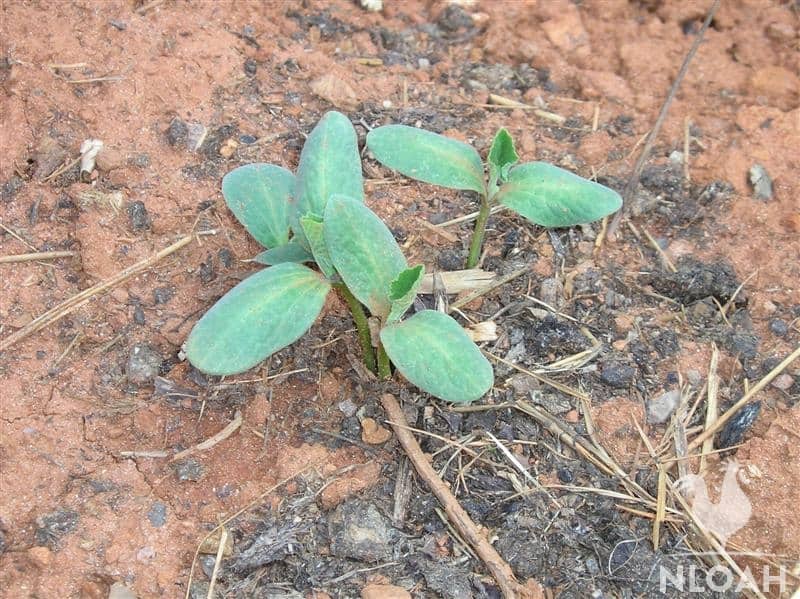
Sprouting, Leaves Form
Once the plumule has pushed up through the soil, it will begin to form the first leaves of the plant. These first leaves are known as the cotyledons.
These leaves emerge from the plumule, or the embryonic shoot of the plant, shortly after germination. In pumpkins, the cotyledon stage usually occurs two to three days after germination.
At this stage, the plumule elongates and develops into a stem with small, heart-shaped leaves that are essential for the initial survival of the plant.
As the plant continues to mature, the true leaves gradually replace the cotyledons, which will eventually fall off.
While the cotyledons function as the plant’s primary source of nutrients, they also help the pumpkin seedling to adjust to its environment by adapting to different light, water, and nutrient conditions.
Vining Begins
After the spouting is completed, the pumpkin plants growth properly begins! The plant will begin developing its second set of true leaves and enter the vine formation stage.
This stage is marked by the growth of flexible, long and slender stems, which are essential for supporting the growth and development of the fruit.
During the vine formation stage, the pumpkin plant produces strong, robust vines that can grow as much as an unbelievable 6 inches per day!
The vines also produce lateral shoots, which are responsible for the production of flowers and fruit.
As the vines continue to grow, they can become quite long and unwieldy, making it difficult to manage the plant. To prevent the vines from taking over your garden, it’s essential to prune them regularly.
Removing the lateral shoots will encourages the plant to direct more energy toward the development of the fruit rather than the production of more vines to cover more ground. Aside from better returns, your other plants will thank you!
The developing vine structure is essential for supporting the weight of the growing fruit and ensuring that the plant produces high-quality pumpkins.
This is the phase where you’ll be highly involved with directing and tending to your crop!
Flowers Form
Flower development is another critical stage in pumpkin growth, and occurs during the latter part of the vine formation stage. Pumpkins produce large, showy flowers that can measure up to 10 inches in diameter.
When the flowers begin to grow, you should look at the bottom of the blooms; female flowers will show a large, bulbous protrusion. This is actually your future pumpkins! Male flowers lack this protrusion.
As the flowers on the vine develop, it’s more essential than ever to keep an eye out for any signs of disease or insect infestation, as these can significantly impact or even halt fruit production.
Insect pests such as the squash bug can damage the young fruit or cause a reduction in yield, while plant diseases such as powdery mildew can damage the leaves and reduce the plant’s ability to photosynthesize, again harming growth.
Once the flowers are open, it’s time to cross your fingers and hope the next step goes off without a hitch.
Pollination (Hopefully) Takes Place
For your pumpkins to grow, they must be pollinated. Pollination is essential for the development of the fruits, and most pumpkins are insect-pollinated.
It entails fertilizing the female flowers with pollen from a male flower, either by wind, insects, or other pollinators, such as bees.
In pumpkin plants, the male flowers usually appear first, and they produce large amounts of pollen. The female flowers, on the other hand, take longer to develop and only open for a short time.
The female flower has a stigma that is receptive to the pollen when it is transferred over from the male flower.
Efficient pollination is, again, absolutely critical for the development of the pumpkin fruit as it helps produce plump, healthy pumpkins.
If the pollination of a pumpkin flower is inefficient or unsuccessful, the fruit may start to develop and then fall off. This results in smaller and less healthy fruits, which will have a reduced yield and poorer quality.
For effective pollination, the plants need to have adequate pollinators in the area to service them, like bees, which help to transfer pollen from the male to the female flowers.
Providing a favorable environment for pollinators such as planting flowers, reducing the use of pesticides, and ensuring the pumpkin garden is free from any clutter can help bring in more pollinators.
If you lack efficient pollinators, it is possible to pollinate your flowers yourself using a soft paintbrush or specialty tool, but this is highly laborious and you’ll never be as good as a bee!
Fruit Develops
With the job of pollination done, the growth of the pumpkin, the fruit proper, begins. One pumpkin plant can give multiple fruits and it’s an exciting time for a grower as it means their hard work is beginning to pay off.
A developing pumpkin goes through several stages of growth, starting from a tiny green bump and eventually growing into a fully mature pumpkin.
During the early part of this phase, the pumpkin plant will require regular watering, fertilization, and weeding to ensure optimal growth.
It’s once again essential to keep an eye out for any signs of disease or insect damage during this time. Infestations can easily cause damage or destroy the developing fruit.
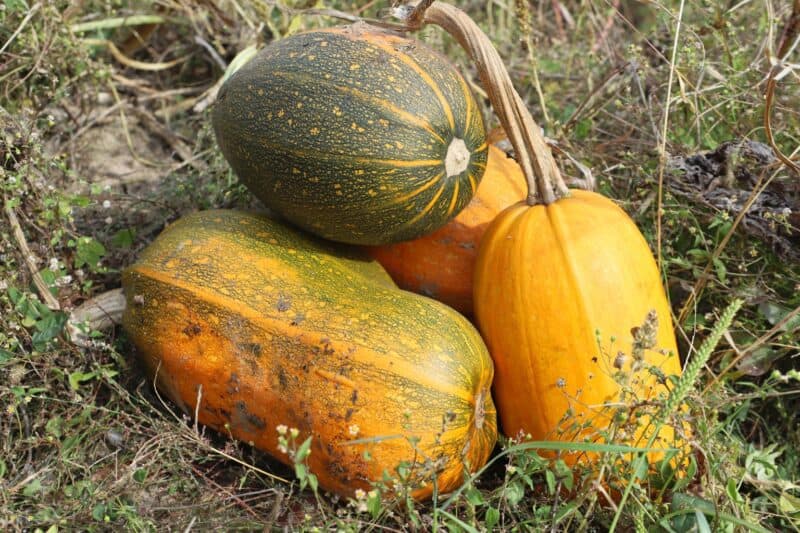
Fruit Grows and Matures
As the fruit rapidly grows, it will greatly increase in mass and start to undergo radical changes in appearance. It will start to change color (dependent on the variety) and develop its signature ribbed texture.
The size will vary greatly depending on both the variety of the pumpkin and its overall health and conditions.
As the pumpkin matures, the rind will begin to firm up and then harden, and the stem will begin to dry out, indicating that the pumpkin is ripe and ready for harvest.
Finished!
A fully matured pumpkin will have a deep, uniform color and the rind will be thick and hard enough that you can’t puncture it with your fingernail.
Full maturation takes between 90 and 115 days if all goes well, and once it happens, you can go ahead and harvest it.
Simply cut or snip the stem several inches above the body of the pumpkin to help keep it from spoiling, and you’re all set. Once you’ve harvested the pumpkin, it should last for weeks provided that it is stored in cool, dry conditions.
Understanding Growth Stages Ensures a Great Harvest
And there you have it: The cycle of pumpkin growth complete, from beginning to end.
With the right conditions, helpful pollinators, and tons of diligent care, you should enjoy a hearty crop of pumpkins ready for whatever recipe or craft project you have in mind.
Take what you’ve learned, get out there, and start growing.
Tom has lived and worked on farms and homesteads from the Carolinas to Kentucky and beyond. He is passionate about helping people prepare for tough times by embracing lifestyles of self-sufficiency.