
Have you ever wanted to grow pumpkins yourself? It’s lots of fun, and whether you want to make pumpkin pies or other desserts, grow them for feeding your animals, or sell them in the fall, you should give it a go.
But pumpkins are somewhat notorious among gardeners: they are surprisingly fickle and vulnerable, and it’s easy for things to go wrong. Wasting all that time and effort is heartbreaking, but you don’t have to experience that.
Getting a bumper crop of pumpkins going is mostly a matter of treating the seeds right in the very beginning. To get you off on the right foot, I’m bringing you a detailed guide for planting your own pumpkins from seed. Let’s get straight into it.
It All Starts With Good Seeds
Of course pumpkins grow from seeds! What else? But that’s not what I’m talking about here. I’m talking about the quality of the seeds themselves. Your pumpkins need every advantage they can get, especially early in their life cycle, and for that reason you must select, sort, and plant only the highest quality seeds you can get.
No matter the variety, be they pie, carving, or giant pumpkins, the quality of the individual seeds is everything because that directly influences germination rates and the vigor of your growing plants.
You have two options here: save, wash, and store your own seeds from non-hybrid pumpkins or look up reputable sellers in your area or online to get yourself some high quality, disease-free, and preferably organic seeds.
Whether you buy or harvest your own, remember this: pumpkin seeds tend to remain maximally viable for only 4 years at the absolute most if they are kept in perfect conditions; after that, viability starts to decrease.
But assuming you have your hands on a good batch of seeds that you trust, it’s time to go to work preparing them for planting.
Planting Timetable
Pumpkins are a warm season crop, even though they are associated with cooler weather, specifically the arrival of fall and all of its associated festivities.
Most cultivars will thrive in temperatures between 70 and 95° F, and most types take a long time to fully mature, around 4 months, though some smaller varieties can be ready in just 2 1/2 months.
Accordingly, you’ve got to plan your planting based on your zone. If you live anywhere where late frosts are an issue, you must delay planting or start your seeds indoors. More on that in just a couple sections.
Prepping Your Pumpkin Seeds
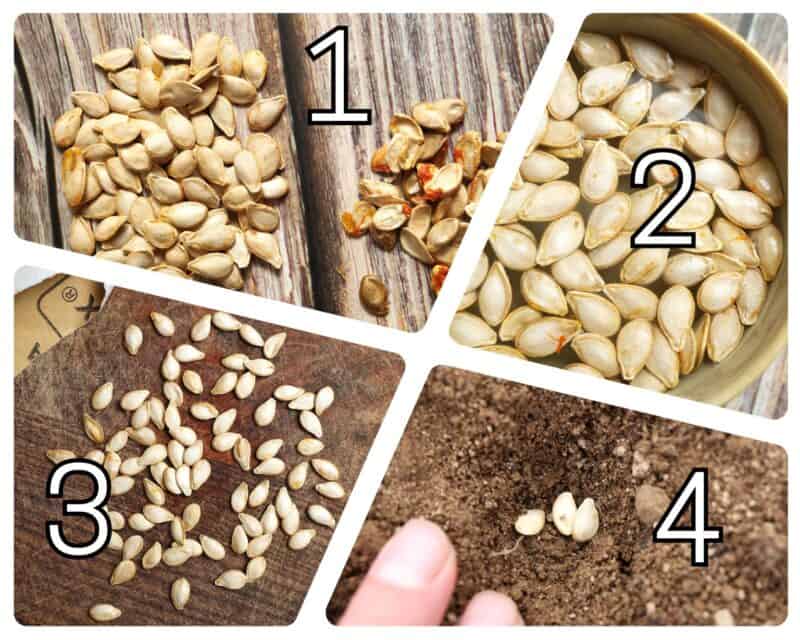
Your work begins with the seeds themselves. The day before you are ready to actually plant, do the following.
Sort: gather all the seeds you are going to plant, and remember you’ll be planting multiple seeds together in most cases, so get a bunch. Go through them one by one and discard any of the seeds that look damaged, deformed, or undersized compared to the rest:

Soak: for all of the seeds that made the cut, place them in a bowl of warm water for up to 4 hours or overnight at most. Note the water just needs to be warm, about skin temperature, not hot! That can injure or destroy the seeds.

Dry: after the soak, pull out all of the seeds and thoroughly dry them, even if it’s going to be just a few hours before you get them in the soil.

Optional – Disinfect: if fungal and other soil-borne diseases are problematic in your area, consider a quick disinfectant bath for the seeds. Mix one teaspoon of hydrogen peroxide with a cup of water and stir. Dunk the seeds in the solution for 30 seconds, then remove and dry.
Optional – Score Coat: some old-timers swear by this tip, and I’m including it here for completeness. I, personally, have never had to resort to it and enjoy great pumpkin crops.
Taking a fine grit sanding stick or sandpaper and lightly, lightly scoring the seed coat can lead to increased and faster germination, they say. This should be done immediately prior to planting.
Okay, your seeds are sorted and ready. Time to get them in the ground!
Should You Start Pumpkins Indoors?
It depends. Mostly it depends on your local climate and the anticipated length of your growing season. If you live anywhere with a short warm season, let’s say in zones 3 through 6, or potentially as low as zone 7, you might want to start your pumpkins indoors as seedlings.
Whether it’s a necessity or just a convenience option for you, you should be aware of the pros and cons for this method.
Pros: controlled environment protects delicate seedlings from late frosts, heavy rain, and pests. Indoor growth usually results in better root development. Allows head start for slow-growing varieties.
Cons: you’ll need a lot more equipment, including containers, growing lights, and more. Young plants still take up a lot of room. Pumpkins don’t do well when transplanted, and you should expect to lose some of them when moving them outdoors.
Transplanting Tips
As mentioned just above in the cons section, pumpkins generally don’t like to be transplanted. Specifically, plants will suffer and often fail if the roots are disturbed while they are young. This makes growing them indoors a tricky proposition.
But there are a few tricks that can make the difference for you if you want to give it a try or have no other choice. The smartest thing you can do is choose a biodegradable pot for them. Coir is excellent, but peat will also work. This means you can just stick the pot in the ground without having to gingerly, carefully pry the seedling out without damaging the roots.
Also, hardening off your seedlings is imperative for transplanting success. About 10 days prior to moving them outdoors, start taking them outside for an hour, adding an hour every day. After 10 days, bury the entire pot according to the instructions below, and they should be good to go.
Site Selection and Preparation
Picking and preparing the right spot for your veggies is always important, but rarely is it more important than when you are growing pumpkins. I told you they are a demanding plant!
Consider and provide for the following when prepping the site, and most of the hard work will be done.
Space
Pumpkins are infamous for being space hogs. Vining varieties can spread up to 20 ft if uncontrolled. Even the smallest bush varieties can reach 5 ft in diameter or more.
Find out and account for spacing requirements for your specific variety. You’ll need anywhere from 6 to 12 ft between vining types and three to five feet between bush types.
Also be sure to leave extra room between your rows, so you have room to work and tend to them without risking damage. A minimum of 8 ft between rows is generally adequate.
Drainage
Ponding water or soaked roots will be utterly ruinous for your pumpkins. Don’t plant in any low-lying area where water can pool. Make sure your soil shows adequate drainage before you plant, and add sand or compost to improve drainage if needed.
If you don’t have a good patch on your property, consider creating mounds that are at least 6 in (15 cm) high for the purpose. That will help keep your pumpkins out of harm’s way.
If you have very large raised beds, now is definitely the time to use them!
Soil Composition
Pumpkins need a soil pH that is, optimally, between 6.0 and 6.8. Test and find out well before it is time to plant. Loose soil is best with plenty of loam.
If your soils are heavy with clay, add amendments as needed to loosen it up. You should provide ideal soil conditions at least 12 inches deep and preferably 18 inches to support a healthy root zone.
Nutrients
Pumpkins grow big, and despite their size, they grow pretty fast all things considered. This means they are very heavy feeders.
Prior to planting, you should treat the patch with a balanced fertilizer. I like triple 7 or, if the soil is very depleted, 10-10-10. If you tested your soil for nutrients ahead of time (and you should) calculate how much is needed to bring your levels up to an acceptable range.
If you haven’t done so or just don’t want to, a rough rule of thumb I’ve used for success is one 1/2 lb of fertilizer for every 100 ft in the patch.
Pumpkins invariably need a boost of nitrogen once they start putting out vines, so side dress with a straight nitrogen-rich amendment. Later, just prior to the fruits developing, give them phosphorus and potassium. I like to dress with 0-10-10.
Sowing the Seeds
Now we get to the fun and easy part. Planting the seeds themselves. This is straightforward. Place two or three seeds in a group where you want each plant, tapering end downward.
The seeds should be 1 inch (2.5 cm) deep, no deeper. Plant 2-3 seeds per hole, like so:

Gently cover them with soil and softly press it into place. I said softly! Don’t tamp them down, or you will hinder germination and sprouting.
Thin out the smaller, weaker plants after they sprout.
Watering
Seeds should be kept moist, but never allow them to become waterlogged or flooded. Check on them after heavy rains to make sure they have not been revealed or washed away.
A thin layer of straw or other mulch can help the soil retain moisture and also help suppress weeds.
Ongoing Care
Once vines start to grow, keep a sharp lookout for insect pests like squash bugs, aphids, vine borers, and slugs as usual. Young pumpkin plants are extremely vulnerable at this phase of growth.
Pick off insects manually or implement row covers as soon as practical. Ensure that all plants continue to get plenty of air flow to reduce the risks of fungus.
Time-to-Harvest
Anywhere from two and a half months to 4 months, again depending on variety. Small varieties and lots of bush pumpkins are fully grown and ready to harvest in 100 days or less. Most of your giant varieties take 100 days or longer.
Frequently Asked Questions
How deep should you plant pumpkin seeds?
Just one inch. The tapering end should point down, and seeds should be loosely covered with soil after planting.
Can you replant seeds taken straight from the pumpkin?
Yes, but you still have to give them a little prep. You should only plant seeds from non-hybrid varieties to make sure they breed true, and seeds should be rinsed of any remaining pulp, then dried thoroughly and left for a couple of days before being planted.
Is it possible to grow pumpkins in pots or other containers?
Definitely, but obviously you’ll need big containers for big varieties. Mini pumpkins or the smaller bush varieties like Cherokee, Baby Boo, and Jack Be Little are great bets for container gardening indoors or out. Larger varieties can be grown successfully in containers with supports.


Get your gift and learn things like:
- how to make this really quick pest spray
- how to prevent egg waste
- two cheap automation devices that will make your life easier
Tom has lived and worked on farms and homesteads from the Carolinas to Kentucky and beyond. He is passionate about helping people prepare for tough times by embracing lifestyles of self-sufficiency.