
Hyssop is a perennial herb that has been beloved around the globe since antiquity. Versatile, used in many recipes, as an aromatic, in religious ceremonies and also in folk remedies, the fresh fragrance of hyssop is unmistakable…
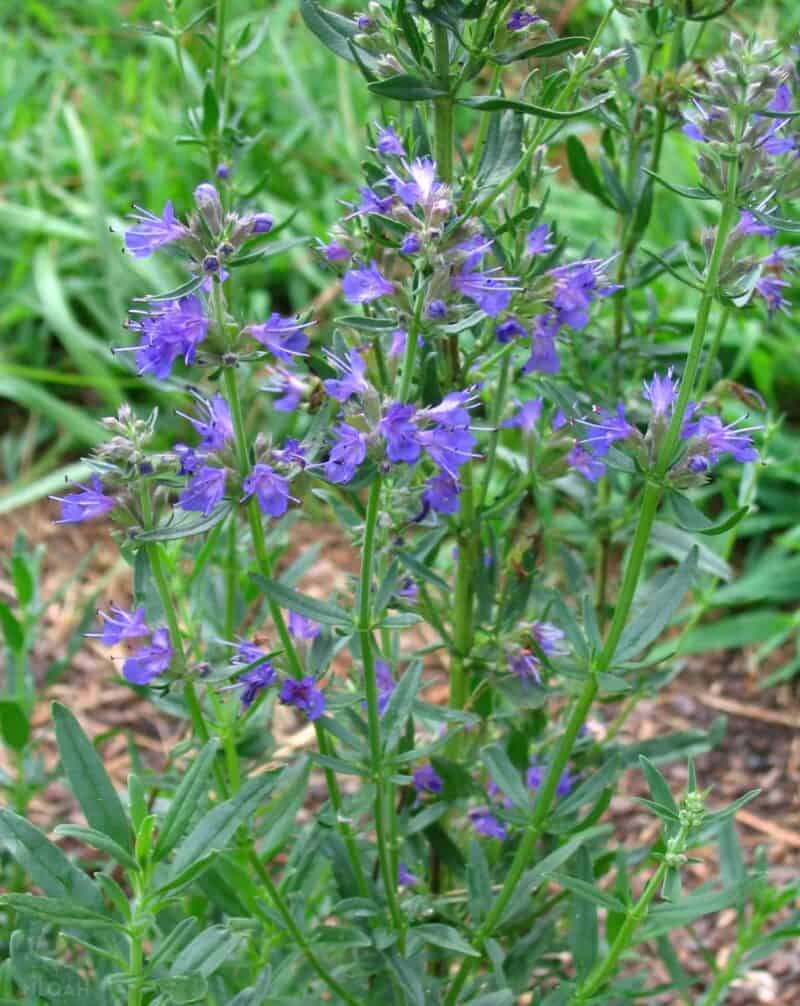
It’s also a remarkably adaptable plant, easy to grow with just a little bit of care up front. Once it is established it will basically take care of itself! Unlike relatives such as mint, hyssop isn’t quite as tenacious, meaning it is easier to control and cultivate as a border plant or for interplanting.
Beautiful and useful, hyssop might be just the thing for planting in your herb garden, landscape or along fencing and sidewalks as edging. Keep reading and I’ll tell you everything you need to know about growing this pretty remarkable plant below…
Make Sure You Are Getting Actual Hyssop!
Real quick, before we get started, this guide is talking about actual hyssop, Hyssopus officinalis, not Anise Hyssop (Agastache foeniculum) – that is a totally different plant! The two plants look vaguely similar when they are mature, and every now and then I see one advertised as the other at big box home improvement stores with garden centers or even referenced accordingly online.
Double check the scientific name above to make sure you’re getting the real deal especially if you are buying sight unseen or getting seeds.
Getting Started Growing It
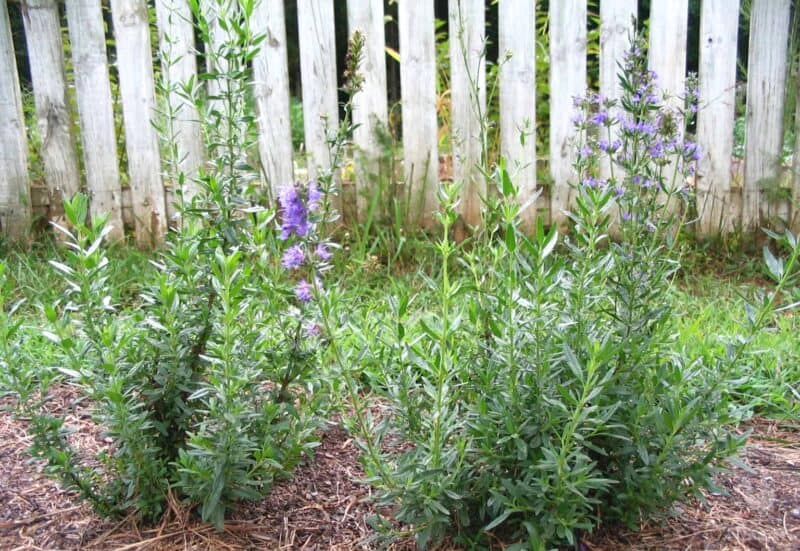
As mentioned above, one of the best qualities of hyssop is just how versatile and unfussy it is. Unlike your roses that will keel over when the slightest little thing goes wrong, hyssop is quite hardy once it is established and it grows well in the ground, in raised beds or even in containers, and as you learn it is fairly resistant to different soil types and inclement weather, also.
If you want, you can grow it in window boxes, hanging baskets or even on wall planters for a stunning vertical effect or privacy screen. You can let it grow big, bold and beautiful or keep it tightly trimmed back to make a sharp hedge with a pleasant aroma.
This is especially good news for folks with a limited gardening footprint or for those who live in a townhouse or apartment: no matter where you are you’ll have at least one way to grow this plant! It is a wonderful patio or balcony plant, and it overwinters wonderfully indoors if you’re willing to bring it inside.
Hardiness Zones
4 through 9. Hyssop is native to regions of Europe and Africa surrounding the Mediterranean, but it has become naturalized elsewhere in the world, including some cooler climates. You’ll find it growing wild all over the United States in the northern part of the country and along Canada’s southern border with the US.
Soil Conditions
Your hyssop will thrive in a soil range of 6.5 to 7.5 as a rule, but it can still do quite well anywhere from 5.0 to 8.5. As always, you are strongly advised to perform a soil pH test with a good kit before you commit to planting; as tough as hyssop is it won’t thrive, or even survive, if the soil is too acidic or too alkaline.
Highly fertile loam is the very best bet for this plant, but owing to its Mediterranean origins it still does well in sandy and rocky soil, so don’t sweat it too much unless your chosen spot is hideously bad or loaded with clay. In the latter case, you can amend with compost, sand and pebbles to improve composition, drainage and aeration.
Don’t be afraid to enrich your soil with manure or compost if you had a planting but don’t overdo it: most hyssop plants do best in comparatively lean soils.
Water and Light
6 hours of daily direct sunlight is the magic number for outstanding hyssop that is full, vibrant and packed with blooms. Less than that and there’s a good chance it will go leggy. More is fine: most cultivars love all the sun they can get and can tolerate partial shade.
As for water, you should keep the soil moist to help it germinate and to sustain new plants which will grow fast and vigorously. Once it is established after the first season you can water only when the soil is totally dry; if you stick your finger in the soil down to about two or two and a half inches and it feels dried out, it’s time to water. If it’s still moist, though, hold off.
This is easier to care for and also essential for the health of the plant: heavier watering less often will promote the plant to grow deep and strong roots. Avoid inundating the plant; water just at the base over the root zone.
Pay careful attention to any containerized hyssop plants as they are more vulnerable to root rot and fungal issues because they tend not to drain as well.
Tools and Supplies
Basic gardening tools are all you will need to grow hyssop. A small trowel, gardening gloves and a watering can is all it takes, but if you want to start your plants indoors before the last frost heading into spring, get yourself a seed tray of your choice.
If you’d rather plant your hyssop in containers of any kind, you’ll need those too, of course.
Grow from Seeds
It’s easy to grow hyssop straight from seeds, and this is the most common method. Germination takes anywhere from 2 to 3 weeks, so time accordingly depending on the last frost in spring and your growing zone. In colder regions or for convenience you should start your seeds indoors 6 weeks to 2 months before the last frost.
Place seeds one half inch to 1 inch apart just under the soil as they do need some light in order to germinate. Keep them moist with a mist bottle and try to maintain a soil temperature of at least 65° Fahrenheit. Once the sprouts have a couple of leaves, thin them out or, if growing indoors, carefully transfer them after hardening off for 7 days.
Transplanted seedlings or seeds placed directly in the soil should have at least 6 inches of space between them, or up to one foot. If you get hit with a cold snap or misjudge the planting window, don’t hesitate to use a cold frame.
In good conditions hyssop will reach maturity in 10 to 11 weeks.
Grow from Cuttings
You can rapidly propagate hyssop from cuttings, and do so with less effort and vulnerability than planting from seeds. This is one of my favorite methods if I want to duplicate particularly bountiful or aromatic plants.
Once your plants are fully mature, snip about 6 inches off of a half-ripe stem from any non-flowering shoots on the plant. Make sure you use a very sharp and clean tool to do this. Pull off the lower two to three inches of leaves from these segments, then pinch the tops to promote branching after planting.
Stick the lower, stripped part of the cutting into a pot with soilless potting mix or a 50-50 blend of sand and compost that is just damp. Place your containers in an area that will get bright but not full direct sunlight that is at least 65° Fahrenheit.
In about a month, roots will form and the cuttings will resume growth. Once they are properly rooted and starting to branch you can transplant them.
Ongoing Care and Fertilization
As mentioned hyssop does pretty well in lean soil, and a common mistake among new gardeners is overfeeding. It doesn’t need much, as a surplus of nutrients can easily cause leggy, sparse growth. So stick to a balanced but mild all-purpose fertilizer suitable for fruits, flowers and veggies like 3-5-5 or 3-3-5. Feed in late spring.
Maintain good air flow around all plants to reduce fungal issues. Pests of all kinds are a comparative rarity for hyssop because its natural, volatile oils are a potent repellent.
Winter protection is not needed for mature plants in the ground down to at least -20 Fahrenheit (that”s -29 Celsius).

Preservation and Maintenance
If you want to harvest the leaves of hyssop for culinary or any remedial purposes, do so before the flowers bloom as they’ll have peak fragrance and a maximum amount of active compounds. Leaves can be dried by hanging or by spreading out on a wire rack in a warm but shaded space for about a week.
Any plants grown specifically for these purposes should be removed and replanted every 4 to 5 years as older plants lose potency and become quite woody.
Keep your plants looking good by deadheading spent flowers quickly as hyssop is capable of effective self-seeding and it can spread quickly if not managed. Prune to maintain shape as needed and encourage additional blooms.
If you collect your own seeds for future plantings, allow the heads to fully dry out in the fall and then carefully pinch off or snip the prominent brown capsules. Dry them out carefully like you would other seeds and then store them in a cool, dark place inside a plastic container or paper envelope.

Get your gift and learn things like:
- how to make this really quick pest spray
- how to prevent egg waste
- two cheap automation devices that will make your life easier
Tom has lived and worked on farms and homesteads from the Carolinas to Kentucky and beyond. He is passionate about helping people prepare for tough times by embracing lifestyles of self-sufficiency.