There is now officially less than a week to go before Christmas day, but it is still not too late to save money and warm hearts with homemade gifts straight from your prepper retreat, survival compound, or homestead. The gifts will cost you nothing or next to nothing, but look like a million bucks!
If you are lucky, you will stumble upon this post the day after Christmas and have an entire year to plot, plan, and craft your homemade gifts for next year – and all the gift giving occasions in between now and then.
That is exactly what I will be doing, starting one month before the big day could have turned into a supreme and epic fail. Instead, I went straight for writing all day to barnyard put up before dark, to my sewing machine and crafting table…until 1:30 a.m. – rinse and repeat and back up by 6 a.m. for weeks.
Yep, I went to Christmas dinner at my mother’s house with massive bags under my eyes, but they were not too puffy to see the huge smiles that all of my homemade gifts brought to my kin – many of which asked where on earth I had found their beautiful gifts.
Gifts for Babies and Toddlers
Little ones are not hard to please, and never double check to make sure all of your stitches are straight!
Sensory Cube
1. Cut six pieces of scrap fabric into squares – I made mine 4 inch square. This is a great way to use up small pieces of fabric that does not even have to match. I used material from old shirts and jeans of the baby’s parents, grandparents, great grandmother, and even a small patch from a Christmas sweatshirt that had belonged to a great grandmother.
This turned the simple baby toy into a cherished keepsake, and did not cost me a dime…ok, a few dimes for thread, but that’s it.
Choose as many different types of fabric as possible so the infant can enjoy touching all the different textures for a sensory learning experience. I used soft, scratchy, silky, thick fleece, corduroy, and denim fabric, as well as felt and several different types of ribbon.
2. Choose a square of fabric for the bottom and then, one by one, sew all of the sides to it. Make sure all of the fabric is facing inward if it has a design or definite front and back side.
3. Once all side pieces are sewn onto their own side of the bottom square, sew each side pieces to the side pieces adjacent to it. It will resemble an open box when all of the sides are attached to each other.
4. Making sure the top fabric is also facing right side down, sew three sides of it to the sensory cube.
5. Turn the cube inside out, fill it with poly fill, old fabric scraps, bean bag material, and/or jungle bells.
6. Sew the final side of the top square to the sensory cube.
7. Now it is time to decorate your cube. You could sew embellishments onto each square before you begin assembling, but I chose to simply use hot glue to add more attention-grabbing decorations and extra texture.
8. You can also sew a piece of ribbon or scrap material that you have finished the edges on to prevent raveling, to the cube. Then sew a piece of hook and latch (Velcro) to the attache portion and the unattached portion, so the sensory cube could be attached to a baby carrier or stroller. I added a flap to one cube panel so the baby could pull it back and reveal another sensory surprise inside:
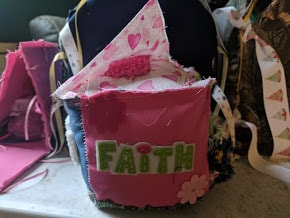
Fabric Quiet Books
Quiet books are the best “no tech” toy I have ever come across, to entertain children when they are stuck in a car, waiting on food at a restaurant, or for their turn at a doctor’s appointment. The interactive books sell for between $50 to $100 on crafting websites like ETSY A single page, heck even a PDF pattern for a page, can cost as much as $10!
You can make the fabric or felt quiet books yourself even if you possess little sewing ability – you could probably use hot glue and and no sew fabric glue to make the entire book, if you didn’t try to get too fancy. .
Because I did not decide to forever more give only homemade gifts or presents with a preparedness purpose for Christmas and birthdays (except for few “just out” toys at the top of the grand kiddos Christmas lists) until November, I did not have time to make quiet books for all of the little ones on my list.
Instead, I was forced to take the quicker route and buy printed fabric, fill it flat fabric backing, and put it together like a book. It turned out cute, but was not interactive and engaging like a quite book:
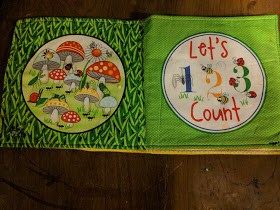
Check out my Pinterest board to see what quiet books look like in detail and see what I will be doing on every cold and rainy Saturday from December 26 until planting season begins.
Gifts for Little Girls and Little Boys
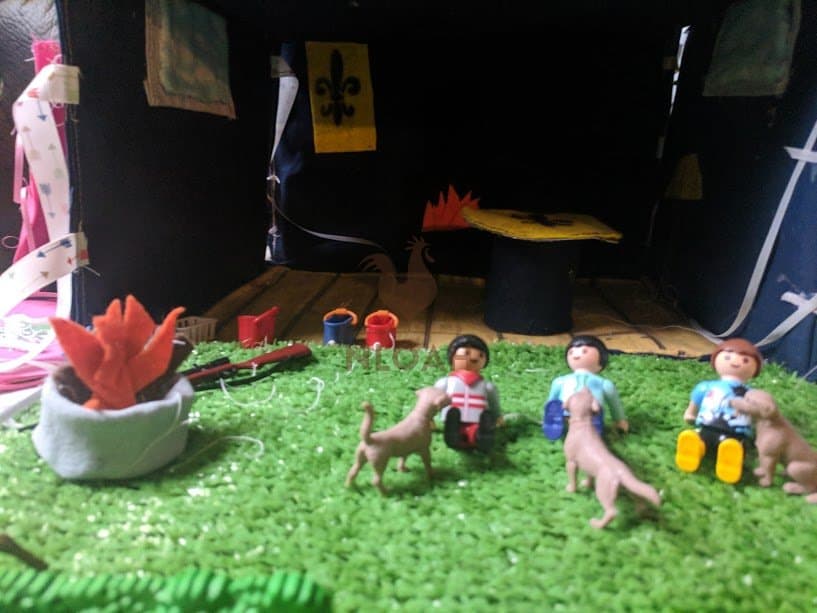
Dollhouse and Lodge Decor
Making your own dollhouse is not hard, you can make a sturdy one out of a cardboard box, cardboard pieces covered in fabric, cut sheets of plastic, or wood. Making the dollhouse is typically the easiest and least expensive part of the project. It is making or buying the furniture or dolls that makes the sweet and traditional gift for girls, quite expensive.
This year I made fabric dollhouses for all the little girls on my list and fabric lodges for all the little boys awaiting a gift from me. As I noted above, that was the easy and cheap part, I had to find a way to decorate and fill them without spending a fortune. So, I turned to that cool old 1970s crafting material – Mod Podge and felt to make the “furniture” and “appliances.”
You can also transfer the images onto fabric that is then glued to cardboard, make a stand out of another piece of cardboard so they dolls resemble a board game piece, and can stand on their own.
The faces of the children in the photos could be solely mounted onto the face of a felt or fabric doll that you make, or print out vintage paper dolls to stuff and use the paper clothes as patterns to make doll clothing.
Some of the graphics I printed I used as patterns to cut the shapes of couches, beds, and the like, out of felt that was hot glued to the walls of the house or cut out of cardboard to make more traditional furniture pieces.
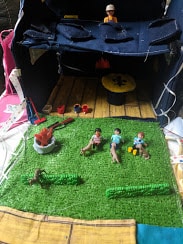
Photo: Boy Scout lodge made out of cardboard covered fabric, for the little Cub Scout in my life. I used a scrap piece of indoor/outdoor carpet, felt and part of a toilet paper roll to make a fire ring, logs, and fire. I also made a table out of an empty cardboard ribbon role, sleeping bags from scrap material, and use some Playmobil figures and animals that were in a toy bin at the playroom at our house. The front of the folding fabric playhouse features a faux door with the Boy Scout emblem drawn on it, there is a corresponding banner inside and felt “furniture” glue to the walls.
I searched online for free graphics to transfer to the dollhouses and playhouse walls. I printed the graphics on both our laser printer and our ink jet printer – which is the most common type of residential printer, I had to run to my husband’s office to use his laser printer, and of course, ran it completely out of ink by the time I was done.
I decided to use both types of printers because I kept discovering conflicting “how to” articles related to Mod Podge transferring online. Some said ink jet absolutely would not work, it has to be a laser printed, and other crafters swore by the ink jet version.
As you will see in the photos, the ink jet gives a more muted hue, which worked with the rustic look I was going for – and is a lot cheaper way to print. If you want the look of the laser printer and don’t have one, don’t to to Walmart, they use ink jet also. Staples is the only store in our rural region that has a laser jet printer.

The vintage doll images on screen left were printed with a laser printer. The vintage doll graphics on screen right were printed with an ink jet printer. This project used the remainder of a sweatshirt that belonged to my grandmother to make an activity lap blanket for my youngest granddaughter.
When it was finished, the dolls were sewn onto colorful ribbon so they could not be tossed away by the baby and the shapes made out of scrap fabric (the daisy fabric was a bit of material from one of my daughter’s baby dresses) were stuffed, had dog squeakers added to the inside along with stuffing, and attached to ribbon as well.
I sewed thick lace to the bottom of the sides of the activity lap blanket so it could be attached to a car seat, stroller, or shopping cart.
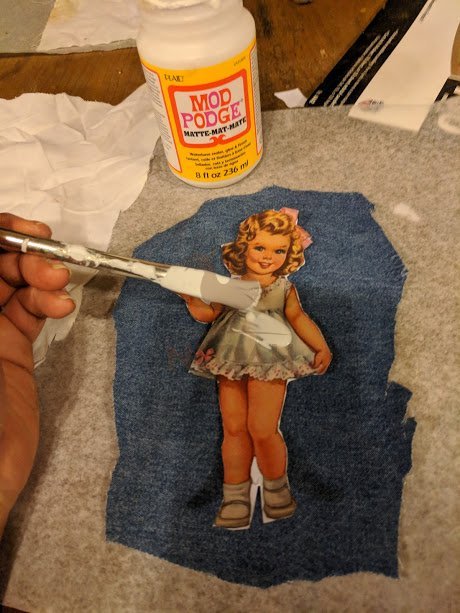
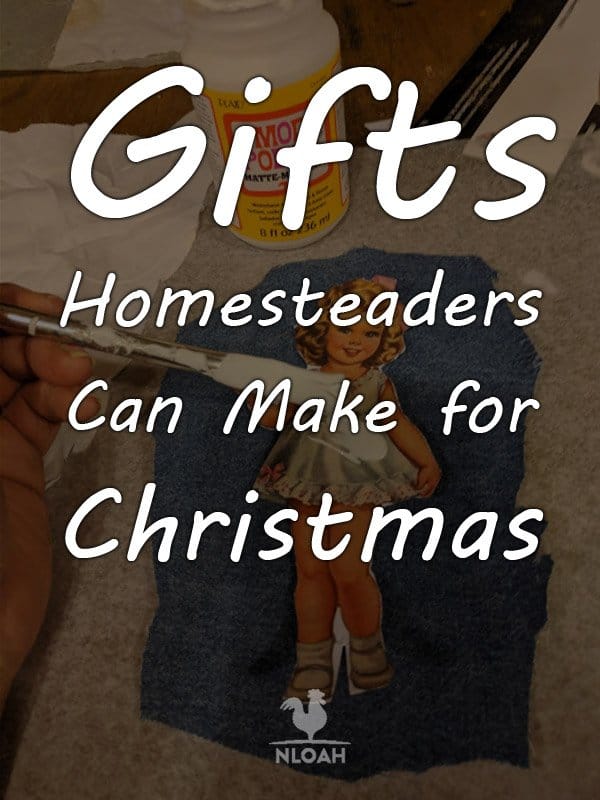
One you print the graphics you want (in reverse if words are on the page or you are particular about the direction of the graphic) on regular or card stock paper (NOT photo paper) allow it to dry thoroughly for at least a few minutes.
Open up your bottle of Mod Podge, it really does not matter what type you use There is no reason to buy the expensive photo medium version unless you are making a display piece. Lay a piece of wax paper down on your work space to avoid the graphic getting stuck to the table while the Mod Podge is being applied.
Brush the Mod Podge all over the top of the image and do not stop until you can barely see that graphic. Mod Podge matte dries clear, but I do not believe all of the other version of the medium do, so carefully wipe away any excess. Press the covered graphic to your selected piece of fabric, wood, or glass. The transfers do not work well on plastic because it is too porous or old barn wood because it is too coarse.
Using your fingers, gently smooth out any air bubbles and wipe away anymore excess that appears. Allow the graphic to dry for at least two hours. Some directions say to wait overnight or 24 hours, but when I tried this method, I had a heck of a mess of residue that had to be removed.
The wood stove in our home creates a lot of dry heat. If you also heat with a wood burner or fireplace, I think you will find waiting only a few hours will work best for your transfer project as well.
Run lukewarm or cold water over the graphic, or soak it in water for about five minutes, and then GENTLY rub away the backing residue like you would a temporary tattoo backing. Allow the graphic to dry thoroughly. If more residue appears, repeat the rinse and gentle rubbing process until the graphic appears clear and crisp on your project.
I used this same project to make a set of dolls to go with the dollhouses and playhouses. I took a full body standing photo of all the children in the family, striking whatever pose they desired, without telling them why.
Then, I transferred the image onto a piece of fabric (white or really light fabric works best with ink jet transfers) and cut around their respective shapes – cutting around the arms and legs so the dolls are more poseable, if desired.
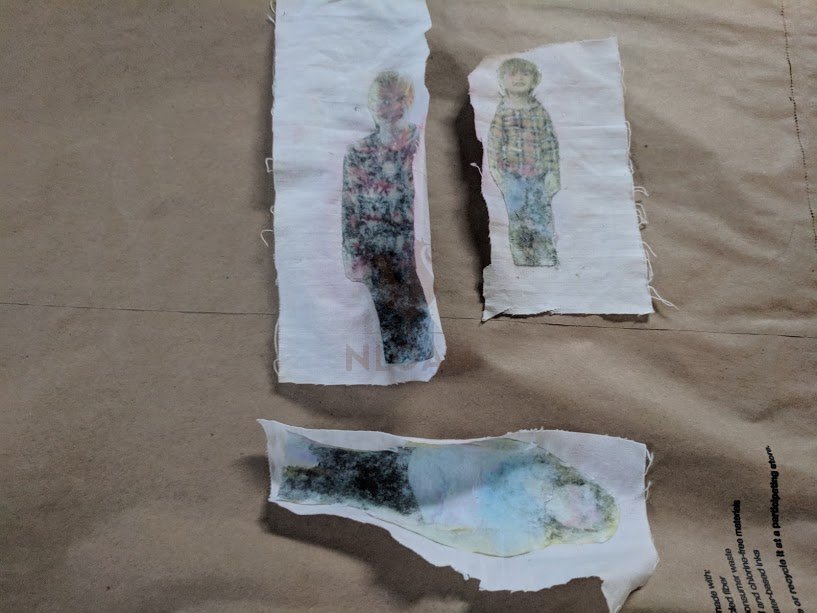
Drying cousins dolls. This is how the Mod Podge transfers look when they are drying and more backing residue is still present. These dolls had to be washed and gently rubbed again before all of the back was removed.
Cut out another piece of fabric in the same shape to use as the backside of the stuffed doll. You can either turn the right sides of the fabric so they are facing each other before you sew them almost entirely shut, and then flip them right side out, stuff, and finish sewing, or sew the dolls right side out with the cut edges turned inside to create a seam or finished edge.
This vintage paper doll was printed on a laser printer. That type of printer produces a more vivid image and one that is less prone to running ink when the backing residue is washed away. I have transferred more than 100 ink jet images for Mod Podge projects on paper, fabric, and wood, and only two of them had running that was substantial enough that I decided to pitch them and start over.
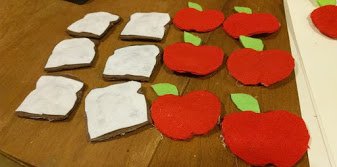
Play Food
Cut simple square, round, and oblong shapes out of wood and paint them to resemble food: hamburgers, bologna, cheese slices, buns, fried eggs, pancakes, hot dogs, etc. You can also cut the same shapes out of felt and make stuffed play food.
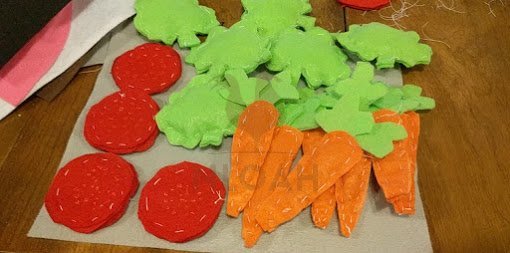
Add some hook and latch to your wood or felt play food so the children can build sandwiches and put together and pull apart their loaves of bread.
Boy Playhouse Adventure Sets
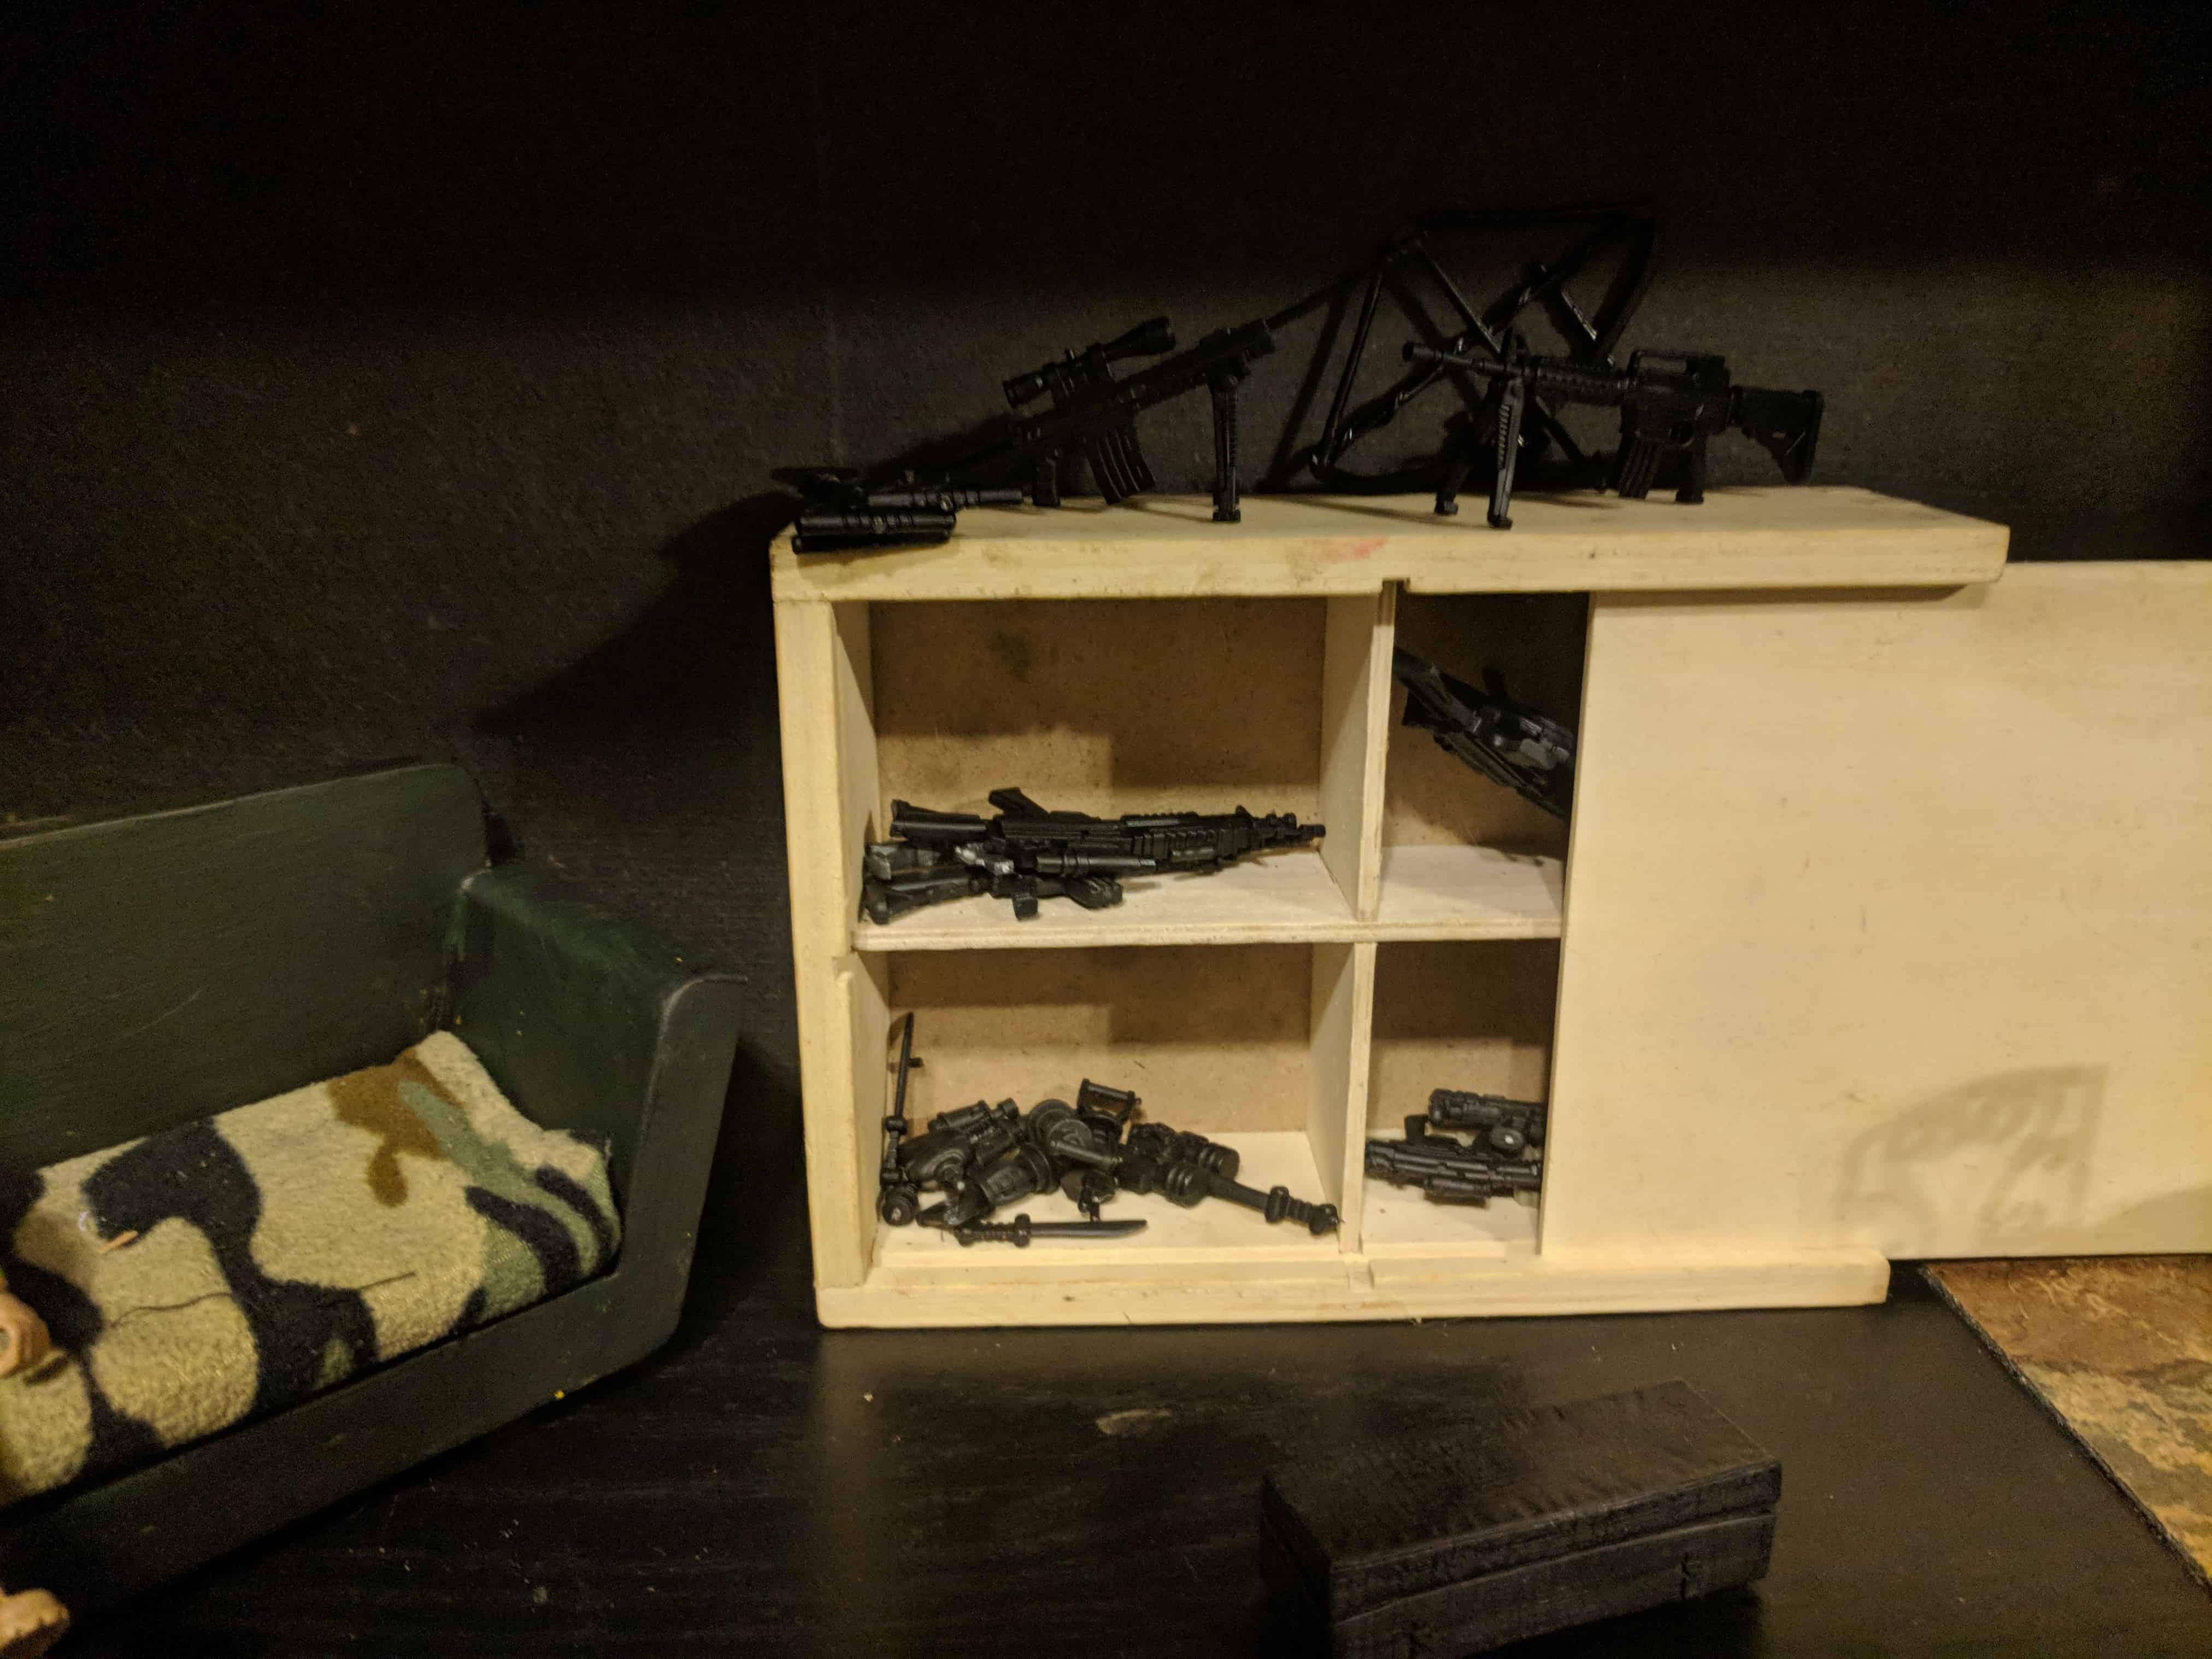
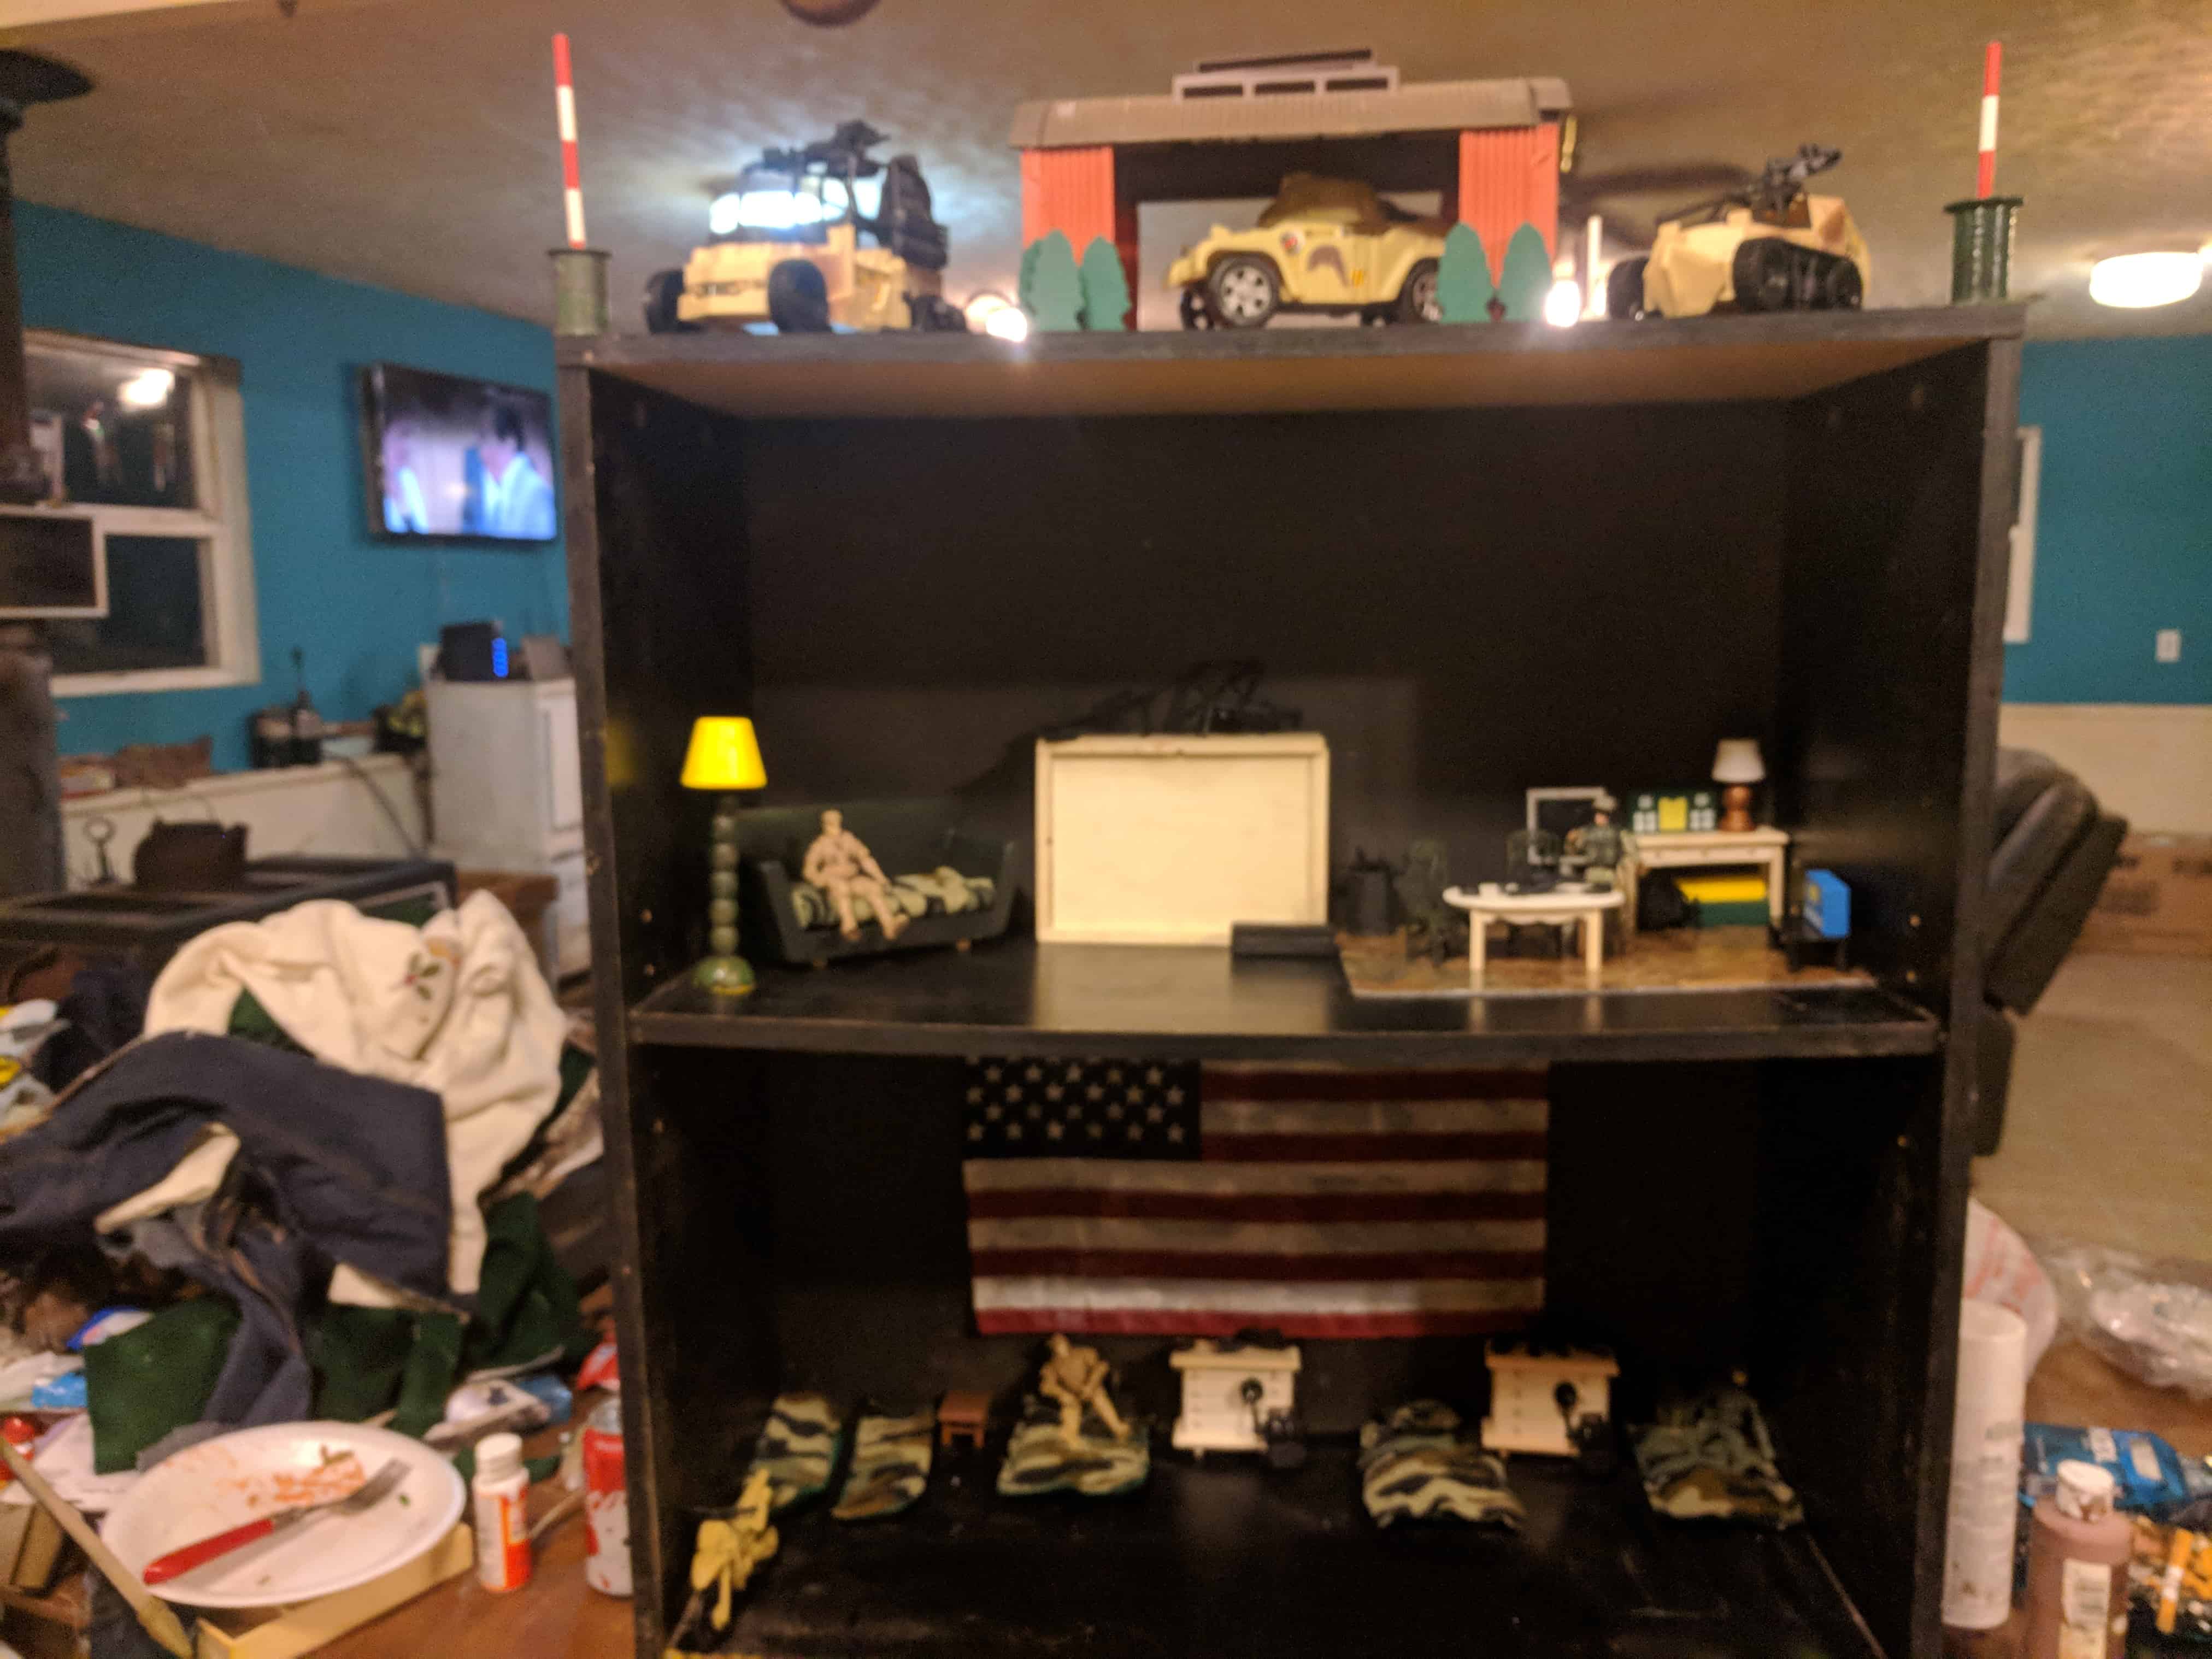
I also turned too old 3-tier book cases into “boy dollhouses.” It is nearly impossible to find toys that are not based on licensed characters from television or movies. These type of toys do not allow children to use their imagination. After I gave up trying to find a military playset that consisted of more than a couple guys, a few accessories, and a vehicle, I got very creative with the old bookshelves.
After spray painting the bookcases in camo colors and allowing them to dry, I braided some rope and attached it to tea cup hooks that I screwed into the top of the bookshelves.
Next, my husband cut circular openings on each shelf and the top of bookcase and placed the rope down through them. At the opening in the top, we affixed a camo color painted PVC pipe elbow for the little soldiers to climb into to reach the rope.
Watchtowers were made out of cardboard and popsicle sticks. An armory comprised half of one shelf where all of the small weapons and other tactical gear accessories were stored. I made open face “lockers” out of cardboard with slits cut into them to hold popsicle stick “shelves” to house the accessories.
I made sleeping bags out of scrap Army camo printed material that came from a well-worn pair of pants. I bought plain wood furniture at the Dollar Tree that was typical dollhouse scale and painted it to match the military compound theme.
A host of other accessories, include a “chain link fence” made out of plastic strawberry produce baskets and sand bags, were also added to the play set.
Last year, when I tried to find a toy barn and cap guns, the pickings were slim, to say the very least. I finally find the cap guns and other cowboy gear, but ended up making a barn out of a small kitchen cabinet (the kind that fit over your refrigerator) because all the ones I could find were either made outside of America out of cheap plastic, or small wood ones that cost about $200!

I painted the wood cabinet barn red, painted large popsicle sticks white and put them on the “barn doors” in the traditional “X” shape. Then, my husband and I made stalls out of more popsicle sticks, bought some tiny hinges from the dollhouse section at the craft store, and put doors on each stall. The homemade barn was a massive hit with our youngest grandson, and every child who has played with it since.
Gifts for Teens
Natural Homemade Make Up
Cool homemade gifts can even put a smile on a teenagers face. If you cannot convince the young women in your life that they do no need to slather make up onto their faces to look beautiful, print some recipes for cosmetics made from natural materials and give them some supplies to get started on their new no cost to low cost beauty regime adventure.
You can find free recipes for foundation, concealer, eye shadow, lipstick, loose powder, and even mascara online. I purchased travel shampoo, lotion, and soap containers at the Dollar Tree, three to a set for only $1, to go with the herbs, corn starch, arrowroot, cinnamon, and other ingredients that are used in the natural make up recipes. Once I am done weaving a cut little basket to house them all, they will make a fun and engaging gift for a teenager, or woman of any age that wears cosmetics.
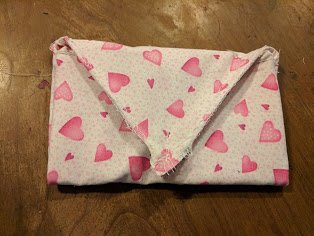
Sew a simple envelope style pouch from scrap fabric to serve as a cosmetic bag for the natural makeup the young ladies in your life will be making. The gift could also include a printout of how the herbs and spices used in the cosmetic bags also boast medicinal properties and detail how each can be used as a first aid item during a SHTF scenario.
Shooting Range
Creating your own shooting range is a lot of fun, why not make some cool targets to go with it that will cost you only a few dollars?
I snagged a bunch of scrap particle board and plywood from one of the pole barns on our homestead, downloaded some free graphics, and used an overhead projector we scored cheaply at an auction, to trace and then paint them onto the wood. I had some posts laying around after taking down an old corral that will serve as the bases for the targets.
When my son-in-law wakes up on Christmas morning, he will walk outside and see the gun and bow targets, along with a bow stand made out of PVC pipe, to set up in our growing gun range.
I am also drawing some wild game targets onto some old sheets and tying them to straw bales for additional bow targets. I also made target the children can use with their BB guns and squirt guns with colored water.
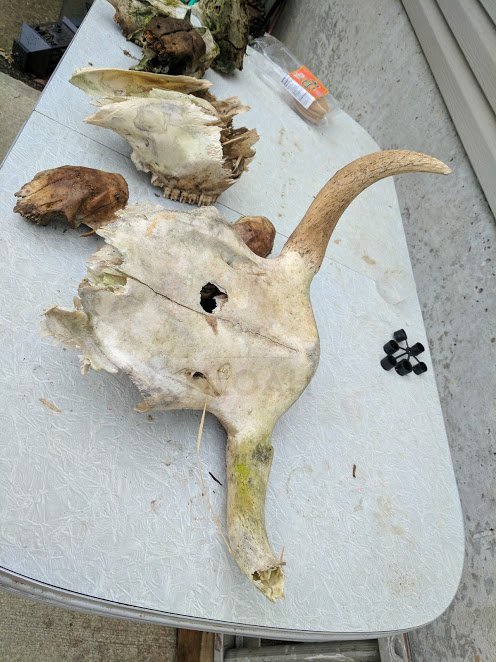
I also used some old steer heads and deer heads that were cast aside after the animals were processed through the butcher shot on our retreat, as targets.
Gifts for Adults
What can you give someone who already has everything or is an elderly adult with few active hobbies? Photos of their children, grandchildren, and great grandchildren transferred onto wood slice you harvested, split, and cut, from your own property.
Using the same Mod Podge transfer method detailed above, put photos of loved ones taken from an outdoor photo session at a beautiful spot on your prepper retreat to give as gifts. The photo of Ariyah was transferred from a laser print image.
The ink jet images turned out slightly lighter, but still looked very clear and attractively rustic. Make sure to sand the wood thoroughly and wide away the sawdust before transferring the image.
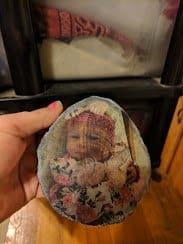
If you use Mod Podge gloss finish or Mod Podge Photo Transfer Medium, you will not be able to see any of the wood grain through the image. I like the look of the grain, so I used Mod Podge matte finish.
I used the same process to transfer images onto some pieces of old barn slate and larger pieces of cut firewood. Buy some quilted material, sew a finished edge on it, and make grandma a throw with cute graphic images or photos of the family.
A family tree quilt with a simple tree drawn with fabric paint pens and images of each loved one in the proper spot, would make a beautiful gift for an elderly family member.
Even though old barn wood is too course to transfer images upon, you can still use stencils to paint slogans, names, and draw images on, or turn the wood into frames for gifts.
I turned some old barn wood into planters and gave them as gifts with some organic heirloom seeds, growing instructions, and compost from our manure-rich pile.
Turn a slice from a piece of round firewood or a cool-shaped piece of board into a chopping board or cheese serving tray. The process is as simple as it is attractive.
Simple sand down the wood, rub it deeply, perhaps two or three times, with mineral oil, and you are done. When I make these as gifts I usually grab my wood burning tool and add the initial of the person’s last name or a simple graphic onto the wood.
What is the greatest success or epic fail you have had when making a homemade gift?

Tara lives on a 56 acres farm in the Appalachian Mountains, where she faces homesteading and farming challenges every single day, raising chickens, goats, horses, and tons of vegetables. She’s an expert in all sorts of homesteading skills such as hide tanning, doll making, tree tapping, and many more.
Not a good idea to use mineral oil on food grade items, just sayin’
It’s funny that the title of this article is gifts for Christmas since you have written a long blog on the reasons why you are not celebrating/participating in Christmas anymore after “much studying and prayer”. which do you believe really. seems like a mixed message here. what gives?
Hi Amy, this article was written by someone else, not Kendra.. 🙂