Ok, this is not your mom’s corned beef…
Quick story. My dad always has corned beef hash the night before hunting season opens as a good luck charm. He cooks up corned beef and potatoes, stories are told, and the tradition remains alive for another year.
For decades, he cooked Hormel Corned Beef. Then, one year, he couldn’t find it. In that drought of about 5 years, he had to make do with sub-par brands.
Enter our new pressure canner. One of the first recipes we tried was corned beef. It was St. Patrick’s Day… There were sales… We had room in the canner… We were curious…
After we had a successful taste test, we sent off a jar. I guess it was good, as he has sworn off Hormel. I can’t remember if he got a deer that year. It’s a pretty good chance as there’s only been a small handful of years in the past 50 that he’s been skunked.
So, let’s get you started on this savory treat that will not only fill your plate but will fill your pantry with protein and calories! Oh, I hope it will give you a little hunting luck as well.
Diversity, Protein, And Cost!
I have no plans to ride out whatever long-term disaster is coming with a cellar full of corned beef. That being said, what I do need is protein. Second to protein, we need variability.
One of our most prized preparedness possessions is our spice pantry. We purchase in bulk so that we can add variety to our stored mountain of beans, rice, and pasta. This demonstrates the power that variability has.
Food fatigue is real. Protein is one of the nutritional components that is lacking in variability. We store beef, chicken, and pork. Some of us add game meats such as venison, fowl, and fish. It’s nice to add variation to the pantry and corned beef fits this niche.
More fundamentally, we need protein and calories. Corned beef has these in spades. Well-trimmed corned beef has about 800 calories per pound and 56 grams of fat. This is on par with ground beef.
These calories may not be needed now. But, when you are putting in long days and the pantry is more carbs than you are used to, the nutrition in a can of corned beef will be a welcome sight.
We can’t look at home canning without comparing costs. As with most things you can do at home, corned beef can be canned for much less at home when compared to the salty and sub-par goods from the grocery store.
As far as other nutrition facts go, home-canned corned beef is lower in cholesterol and sodium than the store-bought variety. It has other valuable ingredients like potassium and iron, plus it’s lower in harmful additives like sodium nitrite (which isn’t great for your heart).
Currently, a tin of Hormel is about $3.99 for a 12-ounce can. This equates to $5.32 per pound. On sale, especially around or just after St. Patrick’s Day, corned beef is available for a little less than $4.00 per pound. Oh, and the product is much, much better.
Now the price difference isn’t as good as you will find with chicken or pork. This is because corned beef is already significantly processed. If you prefer to cure your own corned beef, it’s pretty simple. All you need is a brisket and some time.
If using these recipes, do only the first half. Brine the corned beef but do not cook it! If you go this route, you can reduce your cost to below $2.00 per pound. Even more savings!
Getting Into Pressure Canning
You cannot preserve meats and other low-acid foods with a water-bath canner. The fats and high pH of meats and their juices don’t sufficiently sterilize in the 212 Fahrenheit water of a traditional canner.
Luckily for our pantries, we have pressure canners. Pressure canners, as the name suggests, use higher pressures to achieve higher temperatures.
An integrated gauge or weight allows the internal pressure to build up in a very controlled manner. When at the recommended pressure, a pressure canner will operate 30 degrees warmer than its water-bath cousin.
The 240-245 Fahrenheit (115-118 Celsius) temperatures of a pressure canner are used at specific canning and cook times, as developed by food preservation specialists, to preserve meats and other low-acid foods safely.
Disclosure: if you visit an external link in this post and make a purchase, I may earn a commission. Read my full earnings disclosure here.
When in doubt, grab a reference text (pressure canning cookbook) to verify a recipe. Now that I have over a decade of pressure canning under my belt, I’m comfortable branching well outside of simple canned pork and chicken.
When I do, I scour my pressure canning books, the internet, the website of my local (and other) cooperative extension offices, as well as several universities for a consensus of recipes. But I always start with a good book.
Pressure Canning Equipment
Most canning begins with a few tools. Pressure canning is no different.
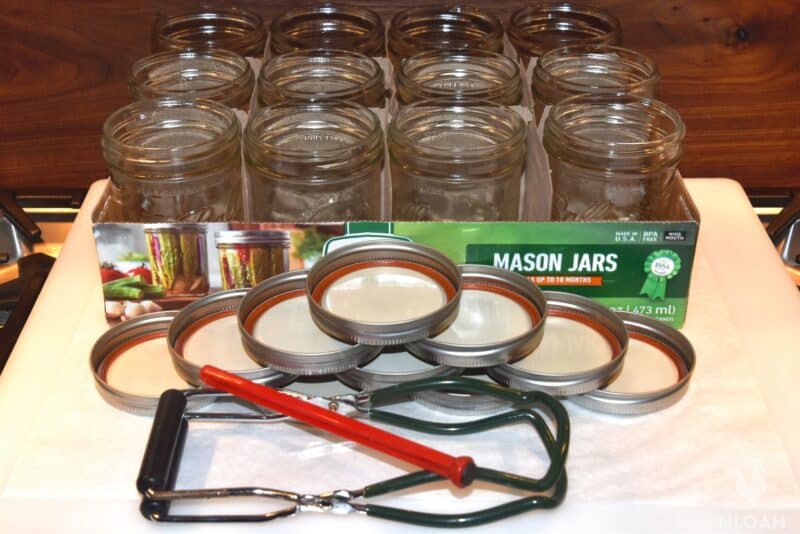
Let’s start with a few convenience items. In order to save you from a few burned fingers, I highly recommend jar lifters and lid lifters.
A jar lifter is a handy tool for getting your scalding hot jars out of the canner. This simple wrench is shaped to grab both regular and wide-mouth jars and safely lift them out of the canner.
Next are lid lifters. I survived for years using a fork, or butter knife, for taking rings and lids out of a pot of boiling water and never really scalded a finger. That being said, it was a little sketchy at times. A magnetic lid lifter makes this job as simple as it’s supposed to be.

Next are your jars. Stack them high and deep.
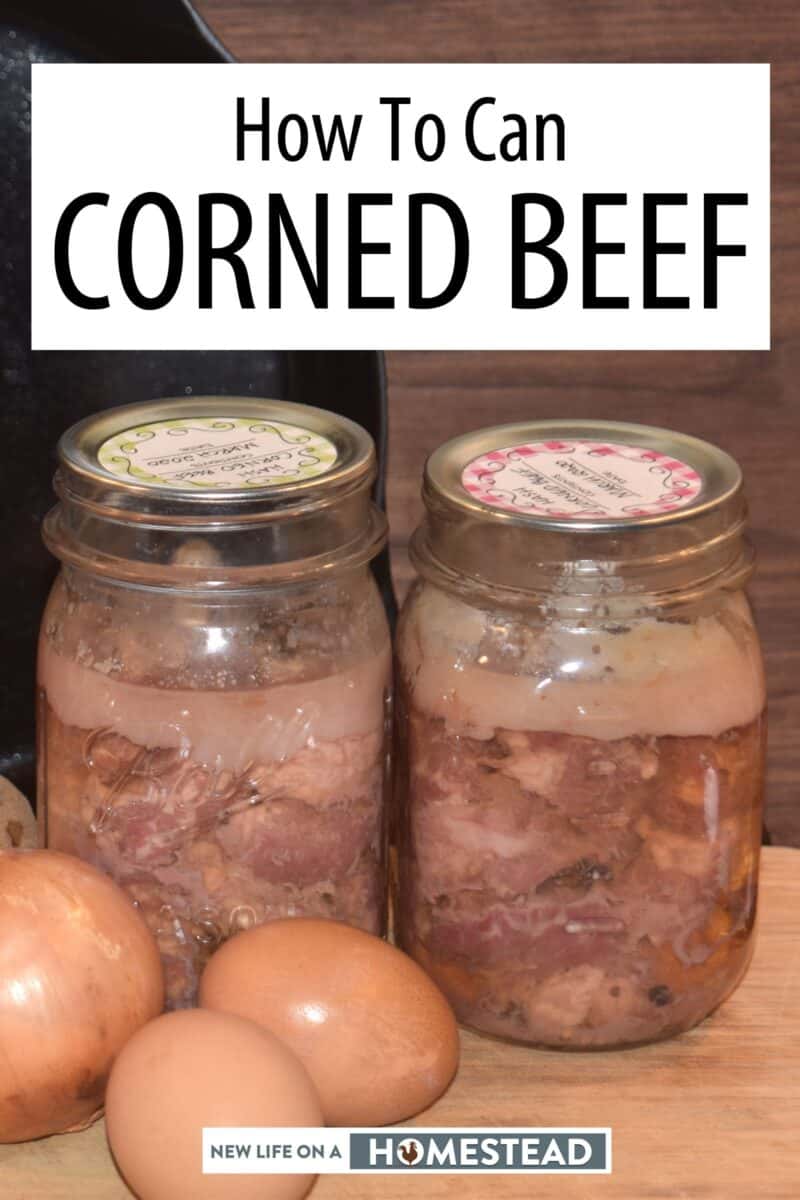
All kidding aside, jars are one of your most valuable resources. This recipe will use pint jars. Each jar will hold about a pound of corned beef. Jars come in one of two sizes, regular- and wide-mouth.
The wide-mouth jars are a little easier to get the canned corned beef out of, but it really doesn’t matter which you use. I often mix jars in the canner, just based on what I can get my hands on first.
Jars are a little expensive these days, however, the good news is that you can re-use them. I wouldn’t even hazard a guess as to how many trips to the canner mine have made. Especially since many were first used by my grandmother.
When purchasing jars new, double-check they are canning jars and not decorative. The jars sold specifically for use as centerpieces, etc. won’t hold up to boiling. The last thing you need is to spend time cleaning out your canner. Worse is having a jar burst in your pantry.
If the local shelves are empty, hit the second-hand stores. Visit Goodwill, and Salvation Army for used jars. As long as the jars are free from cracks and nicks, you’re good to go.
Unlike jars, lids aren’t reusable. You need a new one for every trip through the canner. I try to buy in bulk when they go on sale. A sleeve of 150 makes my pantry happy. Even then I still watch the stores for sales. I’m more than willing to buy a few boxes when the prices dip.
If you’re new to canning, make sure that your jars and lids match. Once you have a few seasons under your belt, you’re bound to have a healthy mix of wide and regular jars. Then you can hit the sales and buy whatever is the best deal.
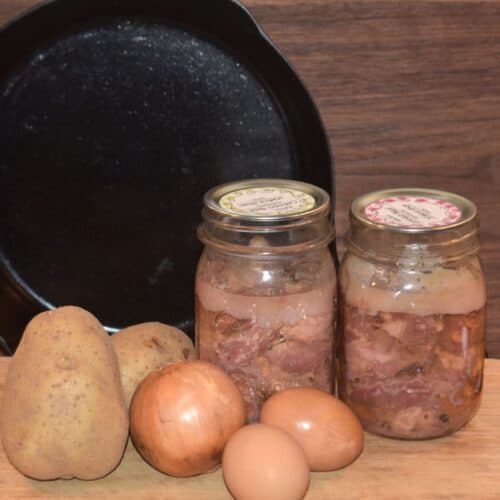
Finally, on to canners. A pressure canner is a sizable investment. The market has several to choose from and reviews abound. We saved our pennies and purchased the All American 915. It fits 7 quarts, or for recipes like corned beef where we use pints, it fits 17 pints in two layers.
I have friends that cook and can with the Presto with great success. Both of us have processed hundreds of jars without a single issue. I’ve recently been looking at the presto for when I only have a few jars to process. That All American is a beast to pull out for only 3 or 4 jars.
Cautions To Look Out For While Pressure Canning
When it comes to cautions, most are similar to common water-bath canning.
Let’s start with basic sanitation. Always wash your jars before use. A quick scrub with a bottle brush and lots of suds will do the job. Get rid of any leftovers from the previous use of the jar.
Additionally, clean off the threads. Grease and rust can get on them and persist from use to use. A quick run through the short cycle in your dishwasher is usually enough to get them spotless.
You don’t need to sanitize them. For example, pre-boiling. The entire process of pressure canning suffices to kill any critters outside and inside your jars.
Next, pay attention to your temperature. Cold jars get cold food and go into cold water. Hot food gets hot jars and goes into hot water. Changing up the temperatures will lead to thermal shock of the glass. This can lead to a broken jar.
Finally, pay attention to the specific instructions of your canner regarding altitude. Most canners will have you adjust your time or pressure starting about 1000 feet above sea level. Read your instructions and set your weight or gauge accordingly.
Modern pressure canners have multiple systems that make them much safer than the canners of old. We’ve all heard the horror stories of the past. With proper maintenance and precautions, those stories will stay in the past.
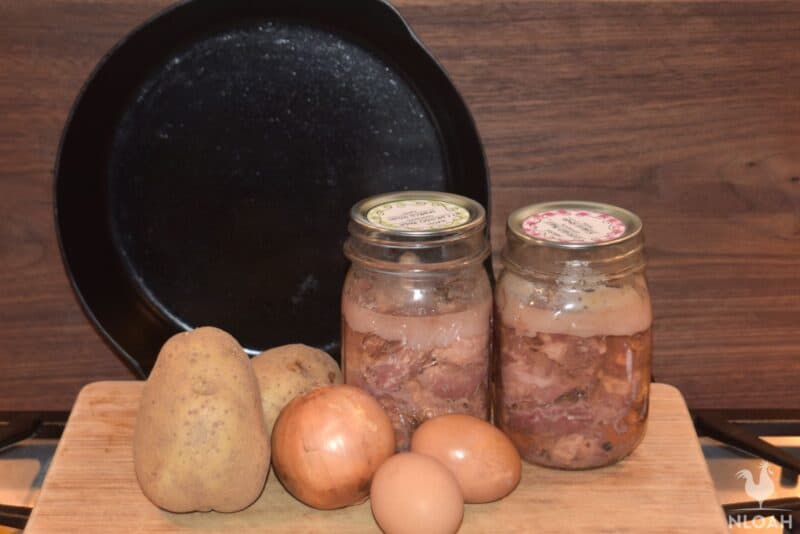
Canned Corned Beef Ingredients
Just like the other meats I can, chicken and pork, corned beef is exceptionally simple. Get a slab of corned beef and then can it.
Ok, there’s a bit more to it, but I promise not much.
Your one and only ingredient is corned beef. We purchase the exact same package we get for Irish-boiled dinner.
If you’re not familiar with this, the corned beef comes in a sealed package. The “bag” contains brisket and curing brine. They usually contain a little packet of spices as well. This bag has everything you need.
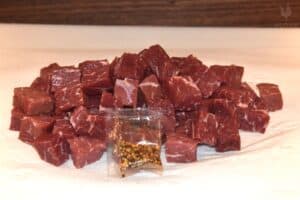
Briskets come in two cuts flat cut and point cut. The flat cuts are more expensive than the points, primarily because of the amount of connective tissue and fat in the point.
Flat cuts are one large muscle and butchers trimmed them pretty lean. The point makes up a slight majority of the brisket and it is well-marbled.
Which is better? I’m not sure there is a better choice between the two. I will say that using just point cuts produces a final product that is a little fatty. Not to say that fat is bad, but I find that with point cuts alone; I end up with a little too much fat in each jar. And I hate throwing away fat.
To solve this problem, I’ll buy 1 flat cut for every 2 point cuts. Once cut and cubed, I mix them thoroughly so that I get a good distribution of the fatty pieces among my jars.
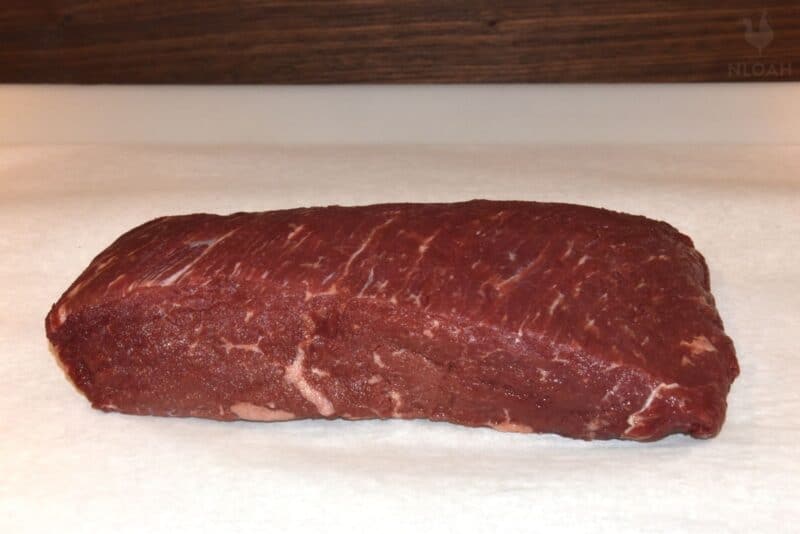
One final note about preparing your corned beef. The curing liquid can be messy and slimy, so as I pull each cut out of its bag, I give them a good rinse, then pat dry. Oh, and don’t lose the spice package!
Cutting And Cubing
As stated, canning corned beef is really, really simple. Unpack, rinse, dry, cut, can. Doesn’t get much easier than that!
I plan on about one pound per pint, so I buy accordingly. That is, I purchase enough to hit an even pound.
My canner holds about 17 pints. So, this is about 18 pounds of corned beef. If I’m going to pull out the canner, I’m going to fill it. If I have room left over, I’ll usually experiment with a jar or two of something new. As long as the processing times match up.
Once I’ve rinsed and dried all the cuts, I start slabbing and cubing. Each brisket gets sliced into ¾” slabs. You don’t want to go any thicker than ¾”. Too thick and the heat won’t penetrate all the way through.

Each slab then gets diced into ¾” cubes. Again, ¾” is your maximum thickness.
If you want to trim out some of the fat, that is fine. Remember, fat is calories. Fat also means flavor. You can always leave it in and skim it off later.
We usually place the cubes into a large bowl and mix them well. This distributes the fatty cubes amongst the leaner cubes so one jar isn’t dominated by fat chunks.
You may need to be a little creative with the irregular shape of the point cut and that’s fine. Just keep the final pieces smaller than ¾” and you’ll be fine.
Fat Is Our Friend
As I just mentioned, fat is an important component of our diet and therefore a significant part of this recipe.
First, fat is calories. While we may not need the calories now, it’s a good habit to be calorie-conscious. Keeping the fat in the jars will allow you to have this vital resource later if you need it. If you crack the jar during non-crisis times, just remove the fat and move on. No loss.
Second, fat is flavor. When you cook with the fat, it flavors the end product. You will be canning at high enough temperatures to liquefy the fat and therefore flavor the juice that renders out of the beef.
By removing the fat ahead of time, you are minimizing the added flavor in your final product.
Third, the fat will render out. The temps in the canner will melt both the top fat cap and any intermuscular fat. That is the fat between the muscle fibers.
As it liquefies, it moves out into the canning broth (created during the cooking process) and eventually floats to the top.
Once the jar cools, the fat will solidify into a whitish, reddish layer. It may be a little unsightly, however, it has value.
If you don’t want the added fat in your diet, simply open the jar and scrape it out. It has a greasy texture and comes out quickly and easily.
Now, if you want to live a little, keep the fat and use it in your recipe. We always cook our corned beef with potatoes. The rendered fat is perfect to brown up the potatoes. Once the potatoes brown, it’s easy to pour off or soak up the extra with a paper towel.
Getting Into The Raw Canning Zone
You have two options for canning meats: raw and hot pack. I’ve never seen a hot pack method for canned corned beef. That being said, I’ve also never specifically looked for one.
Raw canning leaves all the cooking to the canning process. The raw, or in this case cured, meat is cubed and jarred, then packed in a jar and immediately canned. You might ask yourself, when does the corned beef get cooked?
You will hold the corned beef for 75 minutes at a temperature of 240 degrees F. This ignores the 45 minutes it takes to get there and then the 30-45 minutes it takes to come back down to normal boiling temps. After boiling for almost three hours, it’s cooked and cooked well!
The nice thing about raw pack canning is its simplicity. There are no other pots too dirty, no other spices to add. Just cut, pack, and can. I’m all for the easy route!
Canned Corned Beef Recipe
Ingredients
- 17 pounds corned beef commercially cured and packaged
- 2 packs spices
Instructions
- Add rings and lids to a pot, cover with water and bring to a boil.
- Add cool water to your canner according to the directions.
- Wash and rinse the corned beef cuts.
- Cut each slab into ¾” cubes, mix well to distribute the fattier pieces.
- Pack each jar with approximately 1 pound of cubed corned beef. Don’t worry about any air gaps, these will fill in with broth as the beef cooks. Leave 1” of headspace – this is the space between the top of the corned beef and the top of the jar.
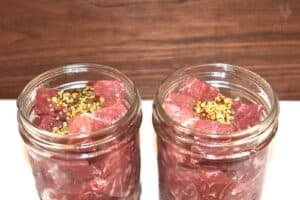
- Divide the reserved spices among the jars.
- Clean off the rim with a paper towel dampened with vinegar.
- Add lids and rings. Center the lids on the jars. Finger tighten the rings – don’t crank down on them.
- Add jars to the canner.
- Place the lid on the canner and tighten according to the instructions.
- Turn the heat on high.
- Allow the canner to heat.
- (All American canner specific – this varies by canner) Once the steam comes out of the vent allow the canner to vent 10 minutes. Add the weight to the vent. Once the weight jiggles, adjust the heat until it jiggles 4-10 times per minute. Usually this is around medium heat on the stove top.
- The temperature should come up to 240-245 degrees F (115 – 118 degrees C).
- Allow the canner to process for 75 minutes for pint jars.
- After processing, turn off the heat.
- Allow the canner temperature to come back to 200 degrees F (93 degrees C).
- Remove the weight and let the canner vent for 10 minutes.
- Remove the lid and then remove the jars.
- Allow the jars to cool and come to room temperature. Listen for the “ping” of the lids sealing.
- Test the lids to make sure they have dimpled, and no longer flex.
- Once cooled, remove the rings, and give the jars a quick rinse.
- Label and date each jar.
Notes
Storing Canned Corned Beef
Every jar of corned beef, as any food in your pantry, is precious. Treat it well and it’ll treat you well. This means cool, dry, and dark.
Attics, garages, and even the shed in the yard with the spiders are no place to keep this precious cargo. You want cool, even temperatures. The colder, the better.
Set up storage spaces in your kitchen, pantry, closets, or under your beds. Even better, make room in the basement. The cooler the better. Our basement averages 60 degrees F (15 Celsius). A little cooler in the winter and a little warmer in the summer. But never above 65 F (18 Celsius).
Next is dry. Moisture attacks metal and your lids are no different. Manufacturers coat the inside of the lids to resist corrosion in the presence of salts and acids. The outsides are coated, but not to that level of protection.
Moisture, especially present in basements, will slowly work at your lids. I highly recommend annual, or even better, seasonal, inspections of your pantry.
During these reviews, pay close attention to each lid. As you find pin-pricks of rust, rotate those jars to the front and use them up as soon as possible. When you open them, follow the rules below for safe consumption.
Finally, avoid the light. Light physically alters the nutritional chemistry of food. It can diminish the nutritional content as well as alter the texture. Neither is harmful, just not optimal.
Always avoid direct sunlight. Again, basements excel at this. If a closed-off room is not an option, store your jars in boxes. Local stores always have a surplus of boxes available. By making the right selections, you can get ones that perfectly fit a dozen pint jars.
If you can provide your canned food in a consistently cool, dry, and dark environment, you’ll get at least a year of storage. The USDA recommends that all home-canned goods be consumed within a year.
With that in mind, I have opened, tested, and eaten too many jars beyond the 1-year mark to count. Several have pushed the 5-year mark.
Now, I’m not recommending anyone do this. I’m simply stating that I have, my family has, and we’re all still here to discuss the matter. Your health and tolerance for food beyond one year is your own matter to address. I’m a big fan of personal responsibility. Just be safe with your own decisions.
Eating Canned Corned Beef
Speaking of safety…
When you open a jar, always use your senses. We’ve trusted them for tens of thousands of years, so why stop now?
Every time you open a jar, whether it be a day old or a decade old, observe it for any signs of spoilage.
First, look at the contents for color and clarity. Is the canning liquid cloudy? Are the contents the color that is expected? If the answer to either is no, then don’t eat. Pitch the contents and recycle the jar for next year.
Second, look at the lid. Is the lid dimpled as it should be? In extreme cases, the lid may be bulging. If it is anything other than dimpled, pass it by.
Listen to the jar as you pop the lid. There should be a slight hiss as the air sucks in to replace the vacuum. No hiss. No eat.
Finally, give the jar a sniff. Trust your nose. If it smells off, then it is. Empty the jar into the bin and wash the jar for the next round of canning.
I’ve only had a few jars go bad in over a decade. I have had no issues in pitching a suspect jar. I’m not so tied to a single jar that I’d risk the health of my family.
Making the Best Canned Corned Beef Hash
Time to cook up that good luck meal of corned beef hash!
For this recipe, you will need 2-3 medium potatoes, a small onion, and 1 jar of home-canned corned beef.
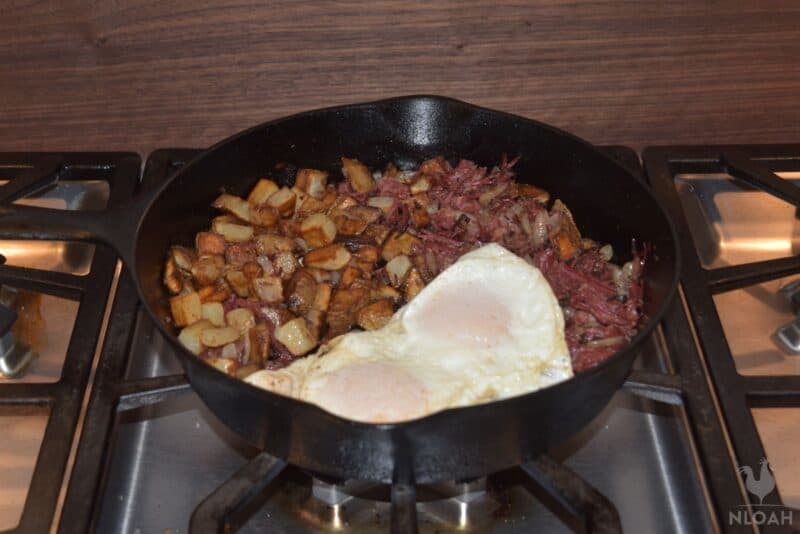
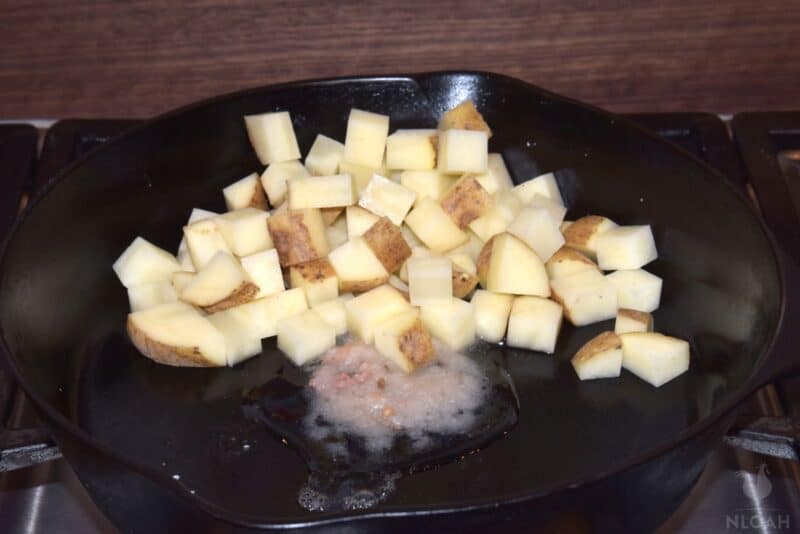
Pop the lid on your hash after you have completed the external inspection of the juice, corned beef, and the lid. After passing the sniff test, scrape out the fat layer and put it into a pan (cast iron is preferred). Turn the heat on to medium.
Wash the potatoes and cut them into ½” cubes. Finely dice the onion. Rinse the diced potatoes and pat dry. Toss them into the pan with the now melted fat and cook until they brown and crisp. Once the potatoes start to brown, add the chopped onions.
While the potatoes are going, drain the liquid from the corned beef. I highly recommend rinsing the jar once or twice to get rid of the excess salt. Simply fill the jar, replace the lid, and gently shake for 5-10 seconds. Drain and repeat.
Set the potatoes aside and pop the corned beef into the pan. Sautee until the beef just crisps up. Return the potatoes to the pan to reheat.
Plate up a portion of your hash with an over-easy egg or 3 for the best pre-hunting good luck charm I can provide you!
Other Ways to Eat Canned Corned Beef
The canned corn beef hash recipe above is delicious, but it’s not the only way you can eat this delicious food.
Here are some other great ideas:
- Make a corned beef sandwich on rye bread with Swiss cheese and bacon
- Serve it with a bit of black pepper, Worcestershire sauce, and garlic as a tasty main course
- Whip up a corn beef and corn casserole (I like to add a bit of cabbage, rice, and tomatoes for more vitamins and minerals – and of course, lots of flavor!)
- Make pasta with your favorite sauces and corned beef
- Don’t forget about the classic corned beef and cabbage vegetable dish, either – I like to add a bit of vinegar to mine
Just remember, once you open a jar of your canned corned beef, if you don’t eat the whole thing you’ll need to store it in the fridge.
A Few Final Thoughts
I was first introduced to corned beef on a Friday night before what was to be a successful deer hunt. I can’t tell you the exact year as the many occasions have blurred together since then.
What I can tell you is that now I get to contribute to this tradition in a way that is a bit more meaningful than just packing the pantry with calories.
Our first batch of corned beef came out of a few “throwaway” jars we tossed into a batch of something else. We had several open spaces in the canner and tried a very small batch of corned beef.
We immediately followed this success with a full canner. Every March, we now hit the sales to get nearly 20 pounds of corned beef for ourselves. Then we go out for several more pounds to give to family and friends.
The sheer volume of jars we dedicate to this recipe is a testament to the ease and how much we value the flavor and diversity it brings to our pantry.
I can’t offer more than that to you. You owe it to yourself to give this one a try. Even if it’s just a pint or two, the next time you have room in your canner.

M. I. Grey is an expert in food processing and preservation (including canning), but also an avid forager. He’s also passionate about anything preparedness, and used to work as a security expert.
Can I hot water bath can corned beef?
I made it yesterday and my husband really loved it.
Unfortunately, couple of glass jars got cracked inside of pressure canner, not sure why.
Also, not sure why, but even when there was no cracked jars, I found corned beef juices inside of my pressure canner. What causes this? My concern that there will be a problem with a proper seal.
Overall, very, very delicious.
Unfortunately some jars crack. Mainly is that in pressure canner processing the jars may be touching, or there are scratches in the glass., because of removing air bubbles with metal knives. The canning process allows for fluids in jars to escape via lid. If you have too much fat in recipe this will escape and a lasting seal will not be achieved. Been there, done that.