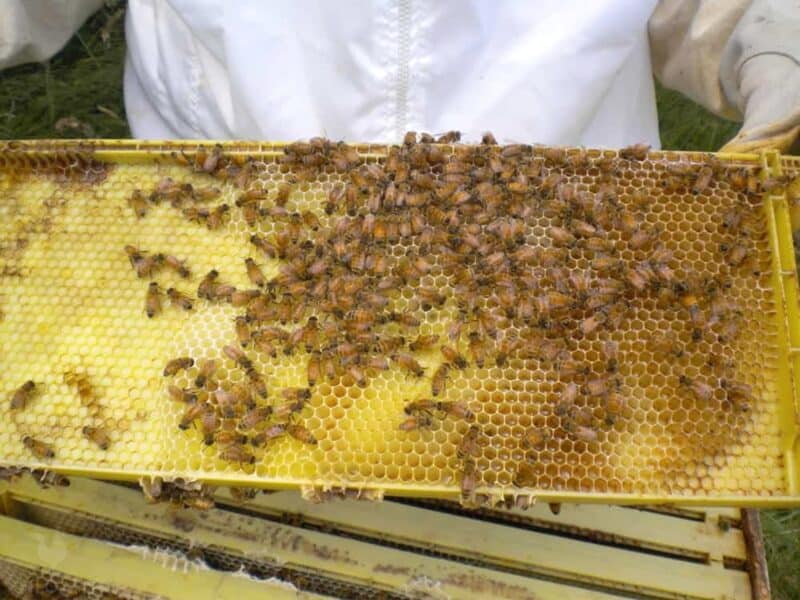
Honeybees can be a great addition to any homestead, no matter how small. The bees will not only pollinate the crops you are growing to feed your family or sell, but also provide honey, wax, and propolis to use in natural remedies.
There has never been a more important time to start a beekeeping operation. It’s a lot of work, but the payoff will be well worth it. Established bee colonies can also be cultivated into a queen and/or drone selling business and rented out to other homesteaders, fruit growers, and farmers to pollinate their crops.
Why Keep Honeybees?
Honeybee populations have been on a rapid decline since around 2005. What exactly is causing Colony Collapse Disorder remains a hot topic. GMO crops and chemical pesticides have often been labeled as the culprits.
Bees are responsible for pollinating about 70 percent of the food we eat. Our dependence upon honeybees increases even more when the fact that they also pollinate feed consumed by livestock we raise to put meet on our table is taken into consideration as well.
In 2005 alone, bees in more than 40% of the hives in cultivation in the United States, perished. That was the most extravagant loss of bees during a single year. Nearly every year since, about one-third of the bee hives in America have experienced record-breaking drying up of colonies in their hives.
At whatever scale you want to keep bees ,getting it right from the onset is important. Even if it is just for pure leisure, beekeeping can be one of the most fulfilling homestead activities.
Honey
The United States produces 161 million pounds of honey every year. It is a multi-billion dollar industry and a key ingredient in health and beauty products. There are about 6,000 beekeeper currently active in the United States. That is simply not nearly enough to fulfill the food supply needs of the entire country.
Benefits of honey:
- Prevents diseases like cancer and curing the common cold and coughs
- Reduces ulcers and used to treat disorders of the stomach
- Increases athletic performance
- Acts as an antibacterial and anti-fungal agent
- Strengthens immune system
- Used to treat burns and injuries
- Natural sweetener
- Beeswax
- Selling bees to other farmers and homesteaders
A number of products are made from beeswax are candles, lip balm, moisturizers, and hair creams to name a few. If you want to manufacture some of these products, having a steady supply of wax is not a bad idea.
Are Bees for You?
Consider these before making the decision.
Allergies
You need to determine if you or anyone in your family and neighbors is allergic to bees. Don’t overlook this because the consequences could be fatal. A round of allergy shots may do the trick. More on this later.
Laws and regulations
Local and/or state laws could impact either a hobby or commercial beekeeping operation. A lot of the regulations and laws are dependent on where you live. People in more remote and rural typically will not have any restrictions placed upon their beekeeping efforts, but checking local laws and the property deed before purchasing bees is still highly recommended.
If engaging in a commercial beekeeping operation, an inspection by an apiary inspector or similar government official, might be required.
Bee Varieties
Like any other animals, bees have different breeds. These breeds vary in characteristics and each has their own advantages and disadvantages.
The main factors to consider before purchasing any type of bees are:
- You will need to decide early if you are keeping bees as a hobbyist, for honey or other byproducts.
- The weather in your area will have a big impact on the health of your colony. Buy a breed that will easily adapt to your environment.
- How experienced are you in handling bees? Take into consideration, how docile or aggressive they are. I would recommend buying bees with moderate temperament if you are a newbie and live in a populated area.
- Choosing bees that have natural resistance to diseases that are common in your area will help you to avoid expensive treatment
- Their ability to survive winter.
- How likely are the bees to swarm?
- The availability of nectar and pollen in your area
- You will need to count the financial cost of using more expensive bee breeds than others. You then further need to assess this in terms of if the added cost is worth the benefits to your hive like disease resistance and honey production.
- Over time and the more you keep bees you will generally get a sense of which bees are best for your area.
- Consultation with local beekeepers will certainly point you in the right direction.
The main varieties of honeybees are:

1. Italian
Italian bees are the most common bees. The main physical characteristic of Italian bees is that they have stripes on their abdomen and they are generally a light yellow in color. Italian bees are best for people just starting out with beekeeping.
Here are some of the Italian bee’s strengths:
• They are very clean and hygienic. This makes them very resistant to diseases caused by unsanitary conditions in the hive.
• They work hard and collect good amounts of pollen and nectar.
• They generally produce a good yield of honey
Weaknesses:
• They don’t do very well in cold climates
• They require extra food in the winter because they tend not to huddle together as other bees do. The extra activity makes them eat more.
• There have a weak sense of direction and therefore can spread disease quickly from colony to colony
• They tend to swarm more than other bees.
Here is a great video of Italian bees. https://www.youtube.com/watch?v=0SgAz93kieI
2. Carniolans
This smaller type of bee is normally very dark brown in color with brown spots. If you are looking to keep bees for environmental improvement and other ecologically related functions then this is a good type to keep.
Here are their strengths:
- These bees are docile and one of the easiest kind to keep. The non-aggressive nature also makes it very easy to inspect and maintain the hive.
- They continue to try to forage and gather food in winter making them a good alternative for beekeepers in cold areas. This also makes them require less supplementary feeding.
- They are very good for the environment in terms of pollination. They remain active throughout the year and travel long distances.
- They have a good resistance to diseases.
- These bees also adjust the expansion of their brood according to the availability of food.
Weaknesses - Their honey yields are not as high as other bees.
- They are also likely to swarm if not enough room is provided for them in the hive. This, however, is common to all bees.
- Their small physical size can make them less capable of defending their colony from robber bees.
3. Russian Bees
Russian bees can be identified by pale abdomen and predominantly black to dark brown color. These bees are a good choice for beekeepers in cold climates.
Here are the main strengths of Russian bees:
- Russian bees are very tolerant of cold weather. It is a good idea to use Russian bees if you live in cold regions.
- They also do very well in terms of their resistance to mites. Mites are the most common bee disease and having a breed that is resistant to them will save both time and money.
- They can adapt their productivity and expansion according to the amount of food or forage they are able to find.
- They guard their nests very well.
Weaknesses:
- They are dependent on nearby sources of food. They don’t fly too in search of honey and pollen. This means that they may need extra help if your area has insufficient honey and pollen reserves.
- They require sufficient space in the hive to prevent them from swarming.
- They can be aggressive.
4. African bees
African bees are a cross breed of Italian and African bees. First developed in Brazil, I have nicknamed them the intercontinental bee.
Strengths:
- African bees are one if not the most prolific producers of honey
- They begin to gather food when they are very young and therefore can produce more.
- They reproduce very fast meaning they are able to sustain high worker bee populations.
- They do well in warm climates.
Weaknesses:
- Very aggressive, they will chase any threat for several hundred yards to defend their colony
- An attack from African bees can be fatal. There are cases recorded every year of them killing humans and animals.
- Only expert beekeepers should attempt working with African bees.
- They don’t do too well in cold climates.
5. Caucasian
These bees are brown and light silver in color. Strengths:
- They do fairly well in cold climates
- They are able to collect forage on some winter days and therefore needing less winter food supplements.
Weaknesses:
- They produce high levels of propolis that makes it difficult to inspect the beehive. Propolis is bee glue that they use to seal unwanted spaces in their hive.
- They don’t produce as much honey as other breeds.
- They have a poor resistance to many diseases.
6. Buckfast
Buckfast bees are yellow with brown stripes. They are the most visually attractive bees. In addition, they are a hybrid made by crossing the Italian honeybee and the western European bee. Hobbyists favor it as it does more pollen spreading than honey making.
Strengths:
- Buckfast bees do well in areas with warm temperatures and mild wet winters
- They ration their winter store of food, therefore, they are the least likely to die from starvation
- There resistant to mites makes them a favorite among beekeepers.
- They are docile and are easy to work with for beginners.
Weaknesses:
- Don’t produce as much honey as other bees
- They breed is likely to be robbed of honey because of its docile nature.
Beekeeping Equipment and Hive Components
Disclosure: if you visit an external link in this post and make a purchase, I may earn a commission. Read my full earnings disclosure here.
• Smoker – Infusing smoke, at least a little bit of smoke, into the hive can help calm the bees before working in the hive or with the little pollinators.
• Hive Stand – A hive stand is a rather simple yet very necessary part of any beekeeping operation. The stand is typically made of wood and elevated the hive to prevent it from becoming warped or garnering too much mold and moisture from exposure to the ground. The hive stand also reduces the wear and tear on your back when bending over to complete beekeeping tasks.
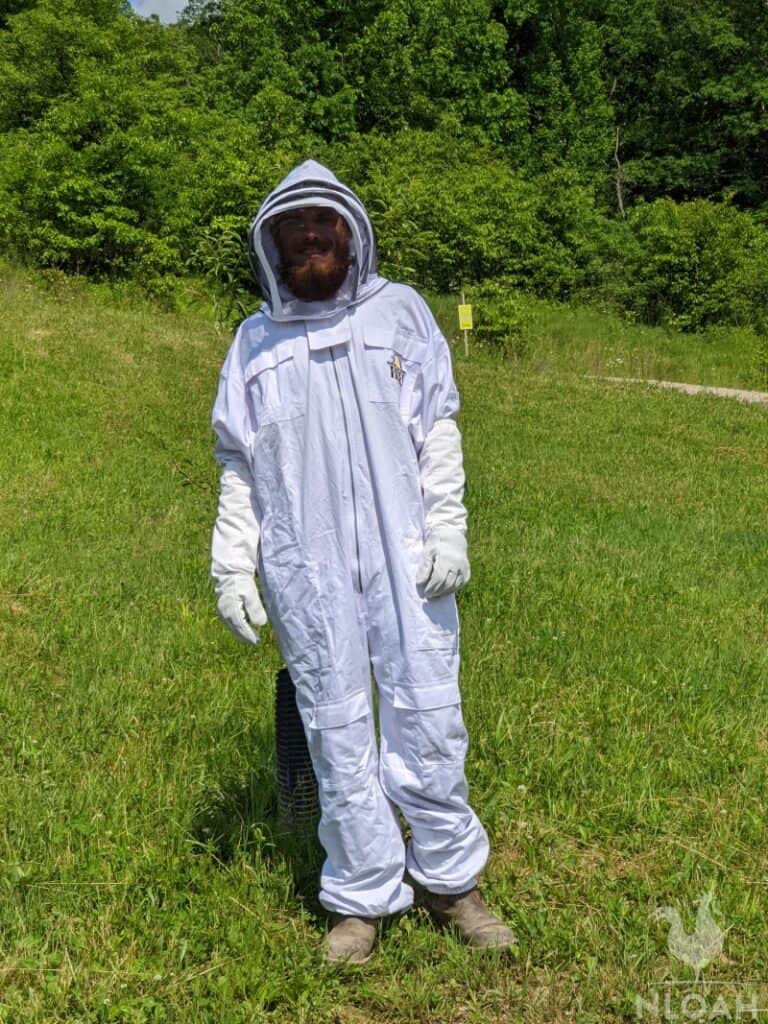
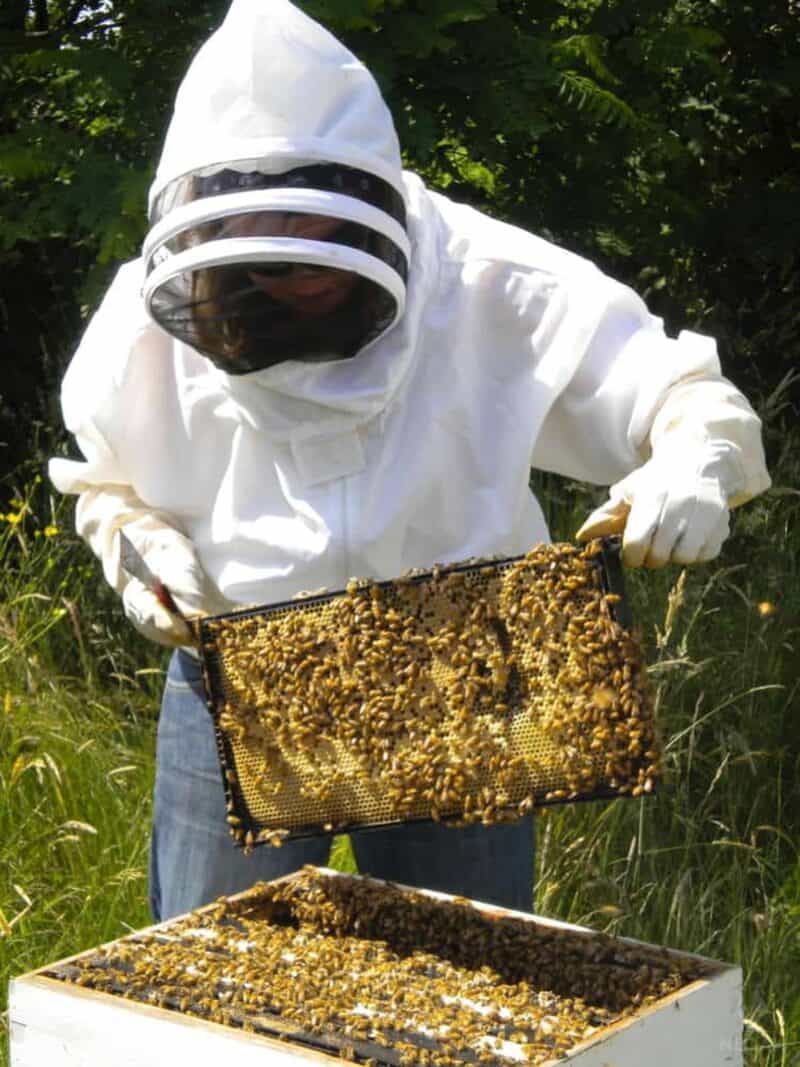
• Clothing – Beekeeping requires the wearing of protective clothing. Swarming bees is not a typical reaction from a colony, but it does happen. When properly adorned, even individuals who have a mild bee allergy, can often engage in beekeeping.
- Beekeeping clothing:
- a full coverall suit or pants and a jacket designed for beekeeping
- beekeeping hat
- special beekeeping gloves that fit firmly over the cuffs of the overalls or jacket
Expect to spend around $200 on beekeeping gear. The typically white costume will become stained with yellowish waste from the bees, over time. Most people prefer to buy it from their local beekeeping store so they can try out the gear in advance. You can then order it online later as it will probably be cheaper.
- Veil- This will keep your face protected from bee stings.
- Hat – Similar to a veil but will also provide added protection from the sun.
- Jacket- Provide protection for your upper body
- Gloves– These will protect your hands from stings.
- Uncapping Knife – Beekeepers use the knife to free wax cells that contain honey from inside the hive.
- Hive Tool – This tool is used by beekeepers to loosen both the frames and boxes that comprise the hives.
- Bottom Board – The bottom of the hive should include a wood board. The bottom of a hive is made of rails that hold the frame to prevent honeybees from being exposed to the elements. The cold air and damp ground outside during the winter in most climates can kill an entire colony rather quickly. During the summer months or in warm climates, a simple mesh screen to keep the bees in and enhance ventilation inside the hive. The mesh screen should also allow even a novice keeper to remain watchful for a varroa mite infestation. Varroa mites can can destroy a hive even more quickly than fowl weather.
- Entrance Reducer – Minimize the entrance to the beehive with a cleat, to control both temperature and ventilation during winter and the early spring. The cleat is not attached to the entrance in a stationary manner but allowed to hang somewhat loosely so it can be either adjusted or removed. The entrance reducer can be hung as either a small notch or a large notch attachment. When using the small notch cleat the opening to the hive is only about as wide as a finger. The large notch cleat allows the entrance to be about four fingers wide.
- Frames – You can purchase several variations of removable frames for a beehive: nuc, British National, Langstroth, and observation. Honeybees carefully craft their honeycomb onto the frames that are removed when full by the keeper. The honeybee frames generally come in three different sizes: shallow, medium, and deep.
- Hive Body – Most beehives contain two parts that are positioned on top of each other. The bee colony uses the upper part as a food chamber. This is where both the honey and the pollen are stored. In the lower portion of the hive, a brooder is created to care for the thousands of tiny baby bees.
- Super – This part of the hive collects the all of the honey you hope to harvest. You should only harvest excess honey and not the honey located in deeper regions of the hive that the bees themselves use to feed. Supers are typically sold in just two sizes, shallow and medium. A shallow super is around 5 ¾ inches tall. The medium super stands about 6 5/8 inches tall. When filled with honey, the medium supers weighs approximately 55 pounds. When it is full, a shallow generally weighs about 35 to 40 pounds.
- Super Extractor – This part of the hive is also commonly referred to as a centrifuge/ While the super extractor is optional, it is well worth the nominal cost charged at the cash register. It is a handy little tool that is used to remove the honey from the super.
- Inner Cover – If you choose not to use a top feeder on your hive, then a cover tray has to be used to prevent the honeybees from escaping. Most covers have ventilation holes.
- Outer Cover – The top covering on the hive functions like a roof. It protects the honeybee colony from the weather and debris. Usually, the outer cover on a hive is comprised of metal or cedar to make it fairly weatherproof.
Before whipping out your wallet and buying bees and a hive, spend some time reviewing possible locations for the bee hive(s). Thinking any one spot in the backyard or on the homestead will do, could turn an otherwise successful apiary project into an epic failure. A multitude of factors must be taken into consideration before placing a hive on the ground.
Hive Location
Have you ever heard the old saying, “made a beeline” before? The phrase relates to how quickly a person or animal rushes in a straight line, from point A to point B. Honeybees will only thrive when their hive is placed in the most direct path of their likely food source. The bees will refuse to deviate from their chosen path the least little bit, no matter what obstacle is standing in their way.
If you see a honeybee flying in anything but a straight line, its nervous system may have been harmed by the neonicotinoids present in chemical pesticides.
Some studies suggest that the chemicals used by the biotech industry in agricultural aids disrupt the nervous system of bees and impacts their ability to find their way back to the hive, and/or makes them too lethargic to fly to a food source and back home again.
Placing a beehive next to your home is bad for several reasons, even if you are growing medicinal herbs, plants, and container crops as edible landscaping.
If a family members or a visitor is allergic to bees, they could die before the ambulance arrives, if targeted by a bee swarm.
Plus, bees always defecate while flying. How much could tiny bee droppings bother you or discolor your patio furniture? A whole lot. A hive that contains about 100 bees, which is fairly standard, will make quite a mess with their in-flight droppings.
Wind and Sunlight
Bees are most likely to survive and thrive when their hive in place in an environment where fluctuations in temperature are kept as the bare minimum. If the colony of little pollinators becomes either too cold or too hot, they will flee their hive – usually never to return.
Honeybees crave normalcy in their environment. They want to live in a spot where the level of wind and sunlight they receive remains as constant as possible. It is always a bad idea to have the hive entrance facing south. Many newbie beekeepers make this mistake in an effort to help keep the colony warm during cold months.
Bees can quickly and easily become deceived by bright sun (especially when it reflects off the snow) on winter days. The sunlight and slight warmth entices them outside of the hive prematurely and leads them to their chilly death.
Never place your beehive on a tall slope of hill. The wind can vastly reduce the body temperature of the bees, especially during the early spring and winter months.
Food and Water
Bees love water…well, shallow water. Honeybees must have easy access to a source of pollen, nectar, and water to survive. During the early spring and winter months you will likely have to supplement their food source. You must work such costs into your budget before investing in more bees than you can afford to feed during cold seasons.
Multiple varieties of hive feeders are available on the market, but feeder frames tend to work the best. These type of feeders generally prevent the colony from drowning in the thick and sticky syrup they are fed. Ladder style bee feeders that are inserted into the colony’s home are also frequently used to provide a supplemental food source for bees during the winter, early spring, and late fall months.
You can buy manufactured bee syrup, but it is fairly inexpensive to make your own. Simply mix together 2 pounds of sugar and about 1 gallon of water. This heavy syrup honey replacement recipe should provide enough food for a colony that weighs approximately 120 pounds.
Space Requirements
In the very beginning set aside adequate space for your bees to live. Here are some factors that you should consider.
Size
Here are the measurements of the two most common hives. We will look at both in detail later
- Top Bar Hives will grow to about 40x 20 inches
- Langstroth Hive will grow to about 16 x 22 inches
Entrance
The direction you point the entrance of your hive is extremely important. Bees enter and exit the hive all day long. Make provision this traffic flow when placing your hive.
The space around the hive
For most part of the day, your bees will occupy a radius of about 6ft so space your beehives 10 to 12 ft apart. Some newbies mistakenly put their hives close together. While this looks better is certainly is not practical for both you and the bees.
Working space
Ensure you have sufficient space to work on each beehive. Make provision for this behind the hive where there is minimal bee traffic.
Keeping bees in small areas
The homesteads’ sizes have been getting smaller every year because cost of land and increasing population. The most common method is by creating a barrier of about 6 ft. around your beehive to direct the traffic in an upward direction.
Keeping your bees on the rooftop can also help you with space. Ensuring that you have a good sturdy roof will prevent injuries. This method is not for the faint hearted. Carrying equipment and apparatus up and down the ladder can be a toll order.
Getting To Know Your Bees
Bees are often extremely social little creatures. A very regimented and distinct society exists within a honeybee colony. There are only three components to any bee society: a queen, drone bees, and worker bees.
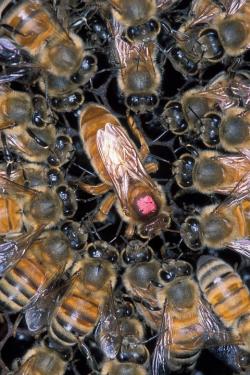
The Queen
The queen bee is THE most important member of the colony. She lives a sweet life, spending her days eating and mating. She is destined to become the mother to hundreds, potentially thousands, of future pollinators. Laying eggs, as many as possible, is her single goal in life.
Being a queen bee is a massive responsibility, not just any female bee can pull off the monumental job. If the honeybee colony does not accept a queen, she will be either run out of be killed.
There are two common methods for introducing a new queen bee to a colony: the indirect method and the direct method.
The direct method is the quickest and simplest, but does not always yield good results.
When employing this method, you simply release the queen into an established colony and let nature take its course. Sometimes the drone and worker bees accept the queen after they all get acquainted, but other time she is attacked and killed rather rapidly.
No bee hive can survive without a queen. Because a quality queen often costs between $45 to $150, losing it through the direct method of introduction can be costly. The indirect method of introduction allows the colony to get to know her at a far slower and protected pace.
The queen is placed into the hive through a food frame that keeps the rest of the colony inhabitants separated from their prospective new leader. Only after they all get better acquainted, is the queen released into the hive. This introduction method generally results in a vastly decreased number of fatal queen attacks.
- A queen bee has a lifespan of about 3-4 years and will lay over 500,000 eggs during this time. She is most active during the warm months of the year.
- The average number of eggs a queen will lay in a day is about 1500-2000 at her peak.
- Bee colonies are quick to kill and replace an under performing queen.
Drones
Drones are male honeybees, and they have only one job their entire lives: to mate with the queen bee. Once a drone mates with the queen, it dies. A drone not strong enough to mate with the queen also dies – it’s killed by either the queen or other members of the colony.
Drones make up a small population of the hive and their main function is to mate. Their lifespan is several months.
Only the strongest drones mate with the queen. Mating takes places several hundred feet in the air where weaker drones cannot reach
In cooler climates, worker bees will injure drones before removing them from the colony and let them die.
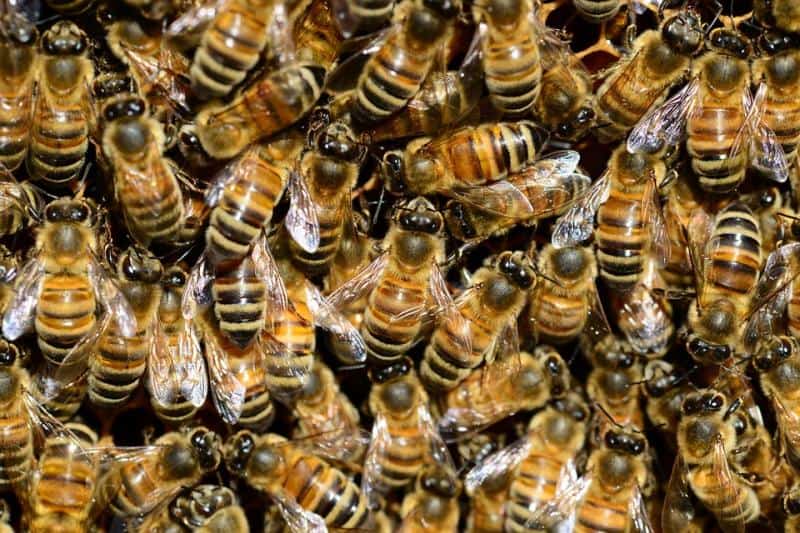
Worker bees
The workers are the backbone of the colony, both male and female worker bees are can be present and diligently working in just one hive – but the worker bees are usually primarily females.
Worker bees are responsible for building the honeycomb, stockpiling the food supply, guarding the hive entrance, and tending to the needs of the queen bee.
In summer, they live about 6 weeks and 6 months in the winter.
Overview of the beginning of a bee’s life:
- Day 1- 3 – incubation and the cleaning of cells in the hive
- Days 3-10 – Feeding older and then younger larvae
- Beginning on day 8 and lasting through about day 16 – Receiving nectar and pollen collected by older worker bees
- 14 days – Leave the hive to begin gathering pollen and nectar.
Catching Wild Bees
Although the practice is not often still used, it is possible to gather your bees from the wild. Plucking bees from nature is tricky, takes patience, and can definitely be dangerous. The best time to do this is spring because they are docile while looking for a new place to call home.
The odds of a swarm developing when angering bees during the collection process could be substantial. Using a smoker to try to calm the hive members down before approaching them too closely is highly recommended.
To gather the bees it takes at least two people: one to herd them toward the collection container and one to open and close the lid. You’ll need a thin board of a piece of cardboard to gently push resistant bees from the sides of the container so they fall inside.
When you come across a swarming colony, capture the bees using an empty box and place them into an empty hive. Alternatively, you can cut the branch where the bees are resting and place them in a box. Carry of this hive to your where you want to place your beehive.
One distinct advantage of gathering bees from nature is that they are already hardened against the environment, climate, and disease that cold be lurking in the local area.
Honeybees can also be bought from local beekeepers, online retailers, and commercial apiaries. The bees are frequently sold in groups or packages, except for the queen who is sold in a solitary container.
Hives can be filled by purchasing a nucleus – nuc for short. This is a little pricey, but keep in mind all of the bees have already cultivated a society and work for a queen.
Bee Buying Tips
The key to great beekeeping is ensuring that you have a good colony of bees to start with. So how do you get one?
Buy Locally. Local apiary dealers are probably the best place to purchase an established colony. Another option would be to order your bees online.
Here is a video on how to purchase a bee colony:
Questions To Ask The Seller
- What exactly am I paying for? Let the seller describe the products in his own words.
- What breed are the bees?
- If you are buying a hive, you may want to ask how many frames are in it.
- Is the equipment new or used, keeping in mind that used equipment could come with diseases and extra maintenance costs?
- Where the bees are from, are they local, and if not, where are they coming from?
- Make sure that the bees are specifically suited for your area.
- Ask to speak to the supplier’s old customers to get a feel of their previous performance. If their product is good, they probably won’t mind you speaking to a few happy customers.
Understanding brood
Throughout this article, we will speak about brood a lot. Brood is the housing for cells within the hive where larvae, eggs, and pupae develop.
Worker bees start by creating comb where the queen can begin laying eggs. Where the brood is located and its size will determine its function in the hive.
Brood cells
The different types of brood cells:
• Worker cells- These form the majority of cells in the hive and are darker in color than honey cells. The queen lays an egg into these cells and worker bees will feed it special royal jelly for 3 days. Royal jelly is special bee excretion that is extremely nutritious. Larvae then feed on a special food known as beebread for a few days. The larvae will turn to pupae and eventually emerge as worker bees.
• Drone cells- Drone cells develop better at lower temperatures. This is why the queen bee lays drone eggs in the outer cells of the brood. Drone bees are larger than worker bees and so are their cells. Drones are mostly dormant in the hive for the most part of their life and their population is normally under 15%. The number of drone cells will also determine the state of health of your brood.
• Queen cells- When a queen becomes unproductive she is replaced through a process known as swarming. These are much larger than the worker and drone cells. They are an oval shape and hang from the brood cell.
The inner cells inside a hive nest the brood, while the outer cells house pollen and are similar to the thin soft layer of pastry just below the crust. The outermost cells store the honey.
When you pull a frame from a beehive, you are essentially cutting or removing a piece of the pie. It will have the inner filling, inner and outer crust.
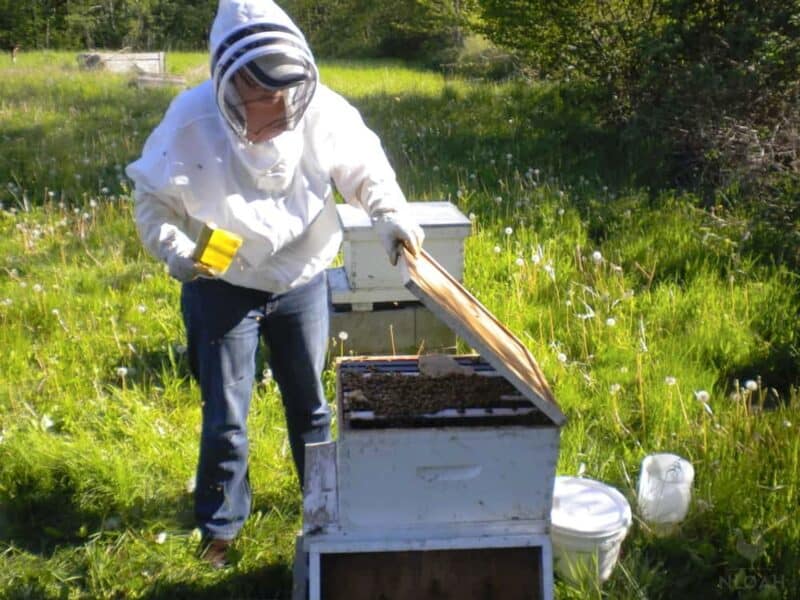
Brood inspection
Understanding and inspecting the brood is key in determining how well the colony is doing. Brood inspections need to happen quickly, as they are intrusive to your bees.
Here is how you should inspect your brood, and key things to be on the lookout for:
1. Ensure you are wearing protective clothing.
2. Inspect your brood on a warm sunny day, when most of the worker bees will be out, but also to have better visibility.
3. Inspect the hive from behind so you don’t block the entrance.
4. Use your smoker to calm down the bees, remove the beehive lid and place it on the ground. Use the smoker to calm the bees on the inner lid too, then remove it.
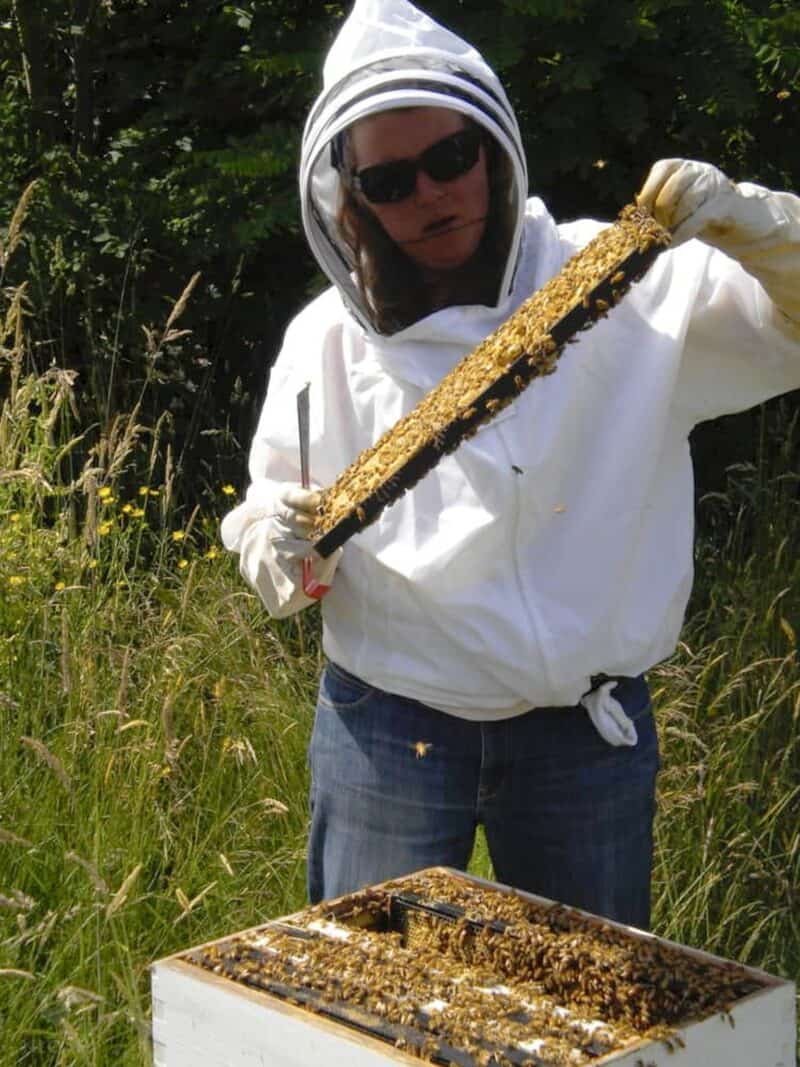
5. Remove the end frame, inspect it, and put it aside.
6. Ensure to slide your frames in the direction of the outer frame you first removed. At the end of the inspection, the empty space will be at the other end of the box.
7. To avoid killing the queen by accident, slide all other frames into an empty position before lifting them out.
8. Slide your frames backwards after inspection so they return to their original position and replace the frame you first removed.
9. If you have several boxes, carefully lift the top box and set it aside to inspect the next box until you get to the bottom brood box.
Things to look for:
- If there are queen cells present in the outer cells of your brood, then your colony is preparing to swarm. You can prevent this by reading the section “how to prevent swarming”.
- If there are queen cells on the surface of the brood, then your bees are beginning to supersede the queen meaning she has become unproductive.
- When your cells have new white comb, it’s is a sign that your hive is overflowing with honey.
- If there are eggs in the cells, it means your queen has been active within the last 72 hours.
- Pollen should be stored in an arch shape between brood and honey cells.
- Drone brood must be present at less than 15% of all brood cells.
- There should be very few empty cells. Too many empty cells can mean that your queen has become unproductive.
Here is a great video on how to inspect brood cells:
Life cycle of a colony
Spring
The life cycle of the colony begins in spring when the brood nest grows rapidly in size. This is because pollen now becomes available to feed larvae that in turn develop into bees. A colon begins brood production in anticipation of warmer months when they can collect lots of nectar and pollen.
One of the most important tasks of a beekeeper is to ensure the colony has enough worker bees ready for when nectar is abundant in their region. Supplement pollen feeding increases the brood population in bee hives. More on this later.
Swarming
Bees normally swarm or divide themselves in the spring. This is because the hive becomes overcrowded and is failing to handle an expanding population.
Feeding royal jelly to selected larvae will create queen cells. Royal jelly is special bee secretion produced by worker bees to feed adult queens as well as larvae intended to produce a new queen.
The bees will stop feeding the old queen royal jelly, which will cause the queen to lose weight. This, in turn, will enable her to regain her ability to fly. She will leave the colony with other older bees and settle in a nearby tree or hole.
In the hive, the queen that hatches first will kill the other queens that haven’t hatched. Other bees may prevent the new queen from killing the other queens and if this happens, she will leave with a small group of worker bees to from her own colony. This is known as a “virgin queen” and when mated she will resume expanding the number of bees.
How to prevent swarming
Swarming will reduce your bee population by about half if not more. Here is how you can stop your bees from swarming.
A. Replacing the Queen
Aim to replace the queen in the hive at least once every two years in autumn.
B. Destroy Queen cells
Do this after making sure that the existing queen is healthy and still laying well. Destroy all the cells because just one cell will lead your bees to swarm.
C. Ventilation
Lack of good ventilation is one of the main reasons bees will swarm. You can improve the ventilation in your hive by:
• Checking to see if your inner cover has a ventilation hole and opening it if need be.
• Drilling holes in your honey supers will help decrease traffic to the main entrance and increase ventilation
• Create a gap between the inner cover and the hive by lifting it slightly and inserting wedges to keep It in position
• On a hot day try to create temporary shade for your hive and supply, them with an alternative water source nearby.
Here is a video on how you can prevent your bees from swarming:
Autumn and Fall
In the fall, the queen begins to slow down the laying of eggs to prepare for winter. Worker bees normally kill drone bees when they become useless to the colony.
As the days get colder, the bees begin to feed the queen with honey instead of royal jelly. They also begin to regulate their diet and feed for winter in order to make it through the months without a supply of pollen.
Winter
During the winter, the colony will form a cluster around the queen and food stores to generate heat. Bees flap their wings in a quick motion to generate heat for the queen who is at the center of the colony. The optimum temperature for the queen to survive is about 75-80F.
As it starts to warm up the bees will raise the temperature to about 96F for the queen to start laying eggs. She first lays worker bees and then later she will lay drones as winter turns into spring.
Beehives
One of the most important tasks you will have in beekeeping is setting up your hive. After all, this is where your bees will live
Bees don’t need hives to survive but you need a place to easily harvest your honey from. Let’s look at the main hives you can use.
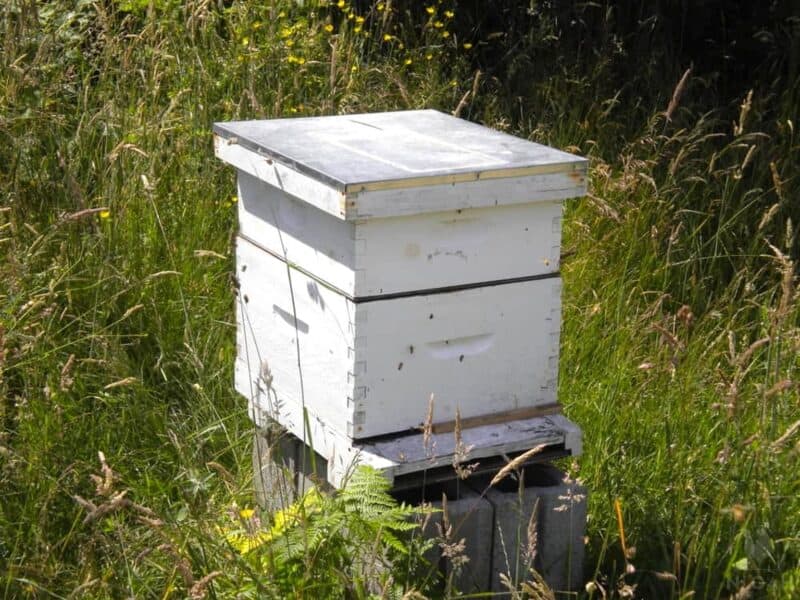
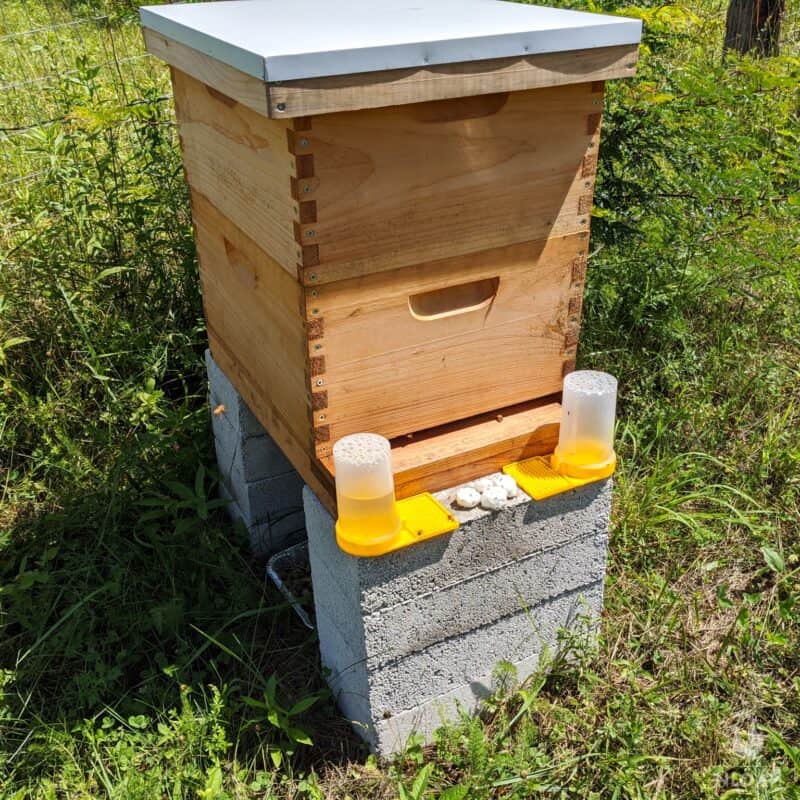
Langstroth Hives
Langstroth hives are the most common type. Each box normally measures 16in in width, 19in in length, is 9in deep, and when filled with honey it weighs 80lbs.
Components:
Frames: Frames also referred to as supers and fit into a box in the hive. A Langstroth frame usually has 10 frames.
Entrance regulator: An entrance reducer is simply a piece of wood that reduces or increases the size of the entrance to the hive. It’s essential in allowing younger bee colonies to defend themselves from robber bees. As the bee colony grows, the entrance to the hive can be open wider to allow more bees in and out and because their ability to defend the colony is increased.
Inner cover- Placed at the top of the topmost box and sometimes has a hole to allow for an upper entrance and exit for bees.
Outer cover – This overlapping cover that protects the box from the element it also prevents water from seeping into the box.
Langstroth beehives are cheaper because of their availability and the number of manufacturers that make them. They are easy to maintain and operate because of their basic box design.
Most classes that cover beekeeping use Langstroth boxes, therefore, knowing how to use it is more important. Langstroth hives yield more honey than other bee hives.
Some drawbacks:
- Weight. Langstroth boxes become heavy when filled with honey. Weight becomes a problem when multiple boxes are stacked on top of each other.
- Their design makes inspection difficult. Removing several boxes before getting to the one you want to inspect makes it labor intensive.
Here is a video that speaks about the Langstroth beehive:
Top bar hives
The second most common beehive is the top bar hive. Its main feature is that it is lighter than Langstroth beehive and it’s easier to work with. This is especially important for beekeepers who have back problems, or simply don’t like bending.
The anatomy of top bar hives:
Top bars– Bees are encouraged to build comb on the frames specially designed and normally with foundation comb on their base. They are carefully spaced to ensure that the honeycomb develops well.
Roof – The roof of a top bar hive is similar to an attic design and can be used to store insulation during the cold months. Roofs are painted white in summer to cool the hive or black to warm it in winter.
Follower boards– The boards partition the hives and removing them will extend the growing space. Follower boards hold fondant and other supplementary feed during the winter.
Legs– The legs of the Top bar hive play two important roles. First, they raise it to a height where it is easy to handle and they provide optimal flying height for the bees.
Windows with shutter- This feature allows the beekeeper to open the shutters in the window to inspect the bars and close them when done inspecting to ensure the hive remains dark.

Advantages of top bar hives:
- Top bar hives are normally cheaper than Langstroth hives.
- They are easier to work with.
- Inspecting top bar hives is easy.
Drawbacks of top bar hives:
- Because they’re fairly new, instruction on handling and working with them are not as common as for Langstroth hives.
- You need special techniques on straightening and handling the frames. Inspecting the bars can be difficult for beginners.
- The yields on top bar hives are lower than Langstroth hives.
Here is a video that speaks of Top bar hives in detail:
Warre hives
Good for small bee colonies; they boast an artsy house like design. It is similar to a top bar hive in that it uses bars to form honeycombs.
Features of the Warre Hive:
Bottom entrance- Warre hives have an entrance at the bottom of the hive. It, however, is a small entrance and therefore there may be no need to employ the use of an entrance regulator.
Feeders- You will need to improvise where to place your feeders on the Warre have as they come with no provision for this.
Top Bars- Warre hives usually use top bars, which means that bees build combs from the top down as they naturally would. This makes a Warre hive very similar to natural hives.
Beehive feeders
The feeders are obviously important in keeping your bees well fed during the colder months of the year.
Fondant feeders
Fondant is a thick paste that provides bees with food in the winter because it does not freeze as liquid entrance feeders do. Fondant attached to the follower board by mesh and covered with mesh that allows the bees to feed while keeping larger pests away. We will discuss this more in detail later
Entrance feeder
Bees feed from a mason jar with holes on the lid where honey drips to where bees can access it. The follower board attached to the hive holds this jar in place.
Some additional tips on beehives…
In the rainy season, using small quarry stones or mulch on the ground will help you with dealing with mud.
Ensure you keep your beehive off the ground. Buying a stand or building one will reduce the risk of damage or rot from termites.
How to Keep Your Hive Healthy
Knowing if your hive is healthy is important. You will be able to determine this by looking for the following signs
In a commercialized society, bigger is normally better. Most hives now come with a preformed comb to encourage larger yields. The other name for perforated comb is foundation.
While foundation comb helps in improving the yield it also causes undue stress to the bees in the sense that they have to work harder and longer to fill the combs. The use of preformed comb also encourages diseases like Varroa mite growth, more on this is the section on diseases.
Developing comb- Your comb should be steadily developing and signs of new comb should evident.
Presences of new eggs- When your hive is constantly developing new eggs then you know that it is healthy. The rice-sized eggs lie in a gel like liquid. This indicated that your queen has laid eggs within the last 72 hours
Installing bees into the hive
Knowing exactly what to do when you first receive bees is important. This will guide you in making use of all the other information in this guide as well as other important day 1 tips.
Before you begin installation, you should have gone through the following pre-arrival steps.
Prepare your Hive to receive bees
Prepping your hive is essential in making sure that you are ready to house a new colony of bees. Paint your hive with clear varnish or wood stain. This will protect the hive from the element like rain and snow.
Give the hive sufficient time to dry in fresh air so that the smell of the stain or pain is gone by the time your bees arrive.
Place your hive(s) in the desired location
By this stage, you should have already identified the location that you want to place your hive. Consider the following additional factors when choosing where to place your hive.
- A hive is best near an uninterrupted water source.
- It should be away from all traffic like people and animals.
- Make sure your hive gets sufficient sunlight during the day.
- Place the hive as close as possible to the source of pollen and nectar.
You can watch this great video on hive placement to understand this concept better:
Bee package
A package contains worker bees with a queen that has no eggs, pupae, or larvae. The queen, raised separately from the other bees is now to the package. Bee packages are more suited to Warre and top bar hives because they allow the bees to begin building their own combs without the frames found in Langstroth hives. The bars in the top hive may come with the foundation to increase productivity.
The queen comes in a cage in the package to give the other bees time to become familiar with her pheromone.
The main reason people decide to start out with a package is because they want to use a top bar or Warre hive. Since the bees are not already in a frame, you can start out with any type of hive.
Installing bees from a package
Installing package bees can be a challenge for the first timer. The best time to do it is late in the afternoon, and remember wear protective gear before attempting to install bees.
Make a sugar syrup solution with 1 part water and 1 part sugar. Bring the mixture to a boil until the sugar dissolves in the water. When the solution cooled off, put in into a spray bottle
Unwrap the bees from the box and place them in a cool dry place indoors. Spray the mist lightly on to the cage twice a day as you prepare the hive for installation.
Make sure you have these tools handy:
a. Hive tool
b. Smoker
c. Smoker fuel
d. Sharp Knife
e. Duct tape
f. Paperclip
g. Bee brush
Light your smoker and feed you bees before beginning installation. If the weather is cold, don’t feed bees, as you would prefer they are huddled together.
Open the box carefully using the hive tool and gently bump your box to the ground to remove the bees from the lid.
Carefully remove the feeder can while holding onto the queen cage, to make sure she does not fall into the bees. Remove the queen from the cage and brush any bees that may be on the cage back into the box and replace the lid.
Before you go any further you will need to inspect the queen by:
- Counting that all her legs are there and she can walk well
- Observe her for a few minutes to make sure she’s ok. If she is injured or dead you may need to return the package to the dealer.
Remove the cork from the end that has candy or the queen’s cage.
Remove a few bars from the opening of your hive. Choose an empty bar that is about 4 bars away from the entrance of the hive. This is where you will hang your queen. Hanging your queen correctly is extremely important. Using your paper clip hang the queen cage directly in the below the bar.
Using the hives follower board, close off an area of about 10 bars of empty space for your bees to live in.
The next two bars on either side of the bar where the queen is should have honeycombs to be able to feed the bees.
Install the rest of the bees
Open the lid of your box and shake out a cup worth of bees into the cage where the queen is. The bees that you add to the bar will form a cluster around the queen. These bees will release a pheromone to tell the rest of the bees where the hive and location is.
Shake the rest of the bees into the open space in the hive where you have removed the bars.
Close of the hive
Replace the remaining top bars and put the lid on the hive
Leave the box of bees overnight to ensure that any bees that remain in the packaging will find the queen by the pheromone that the other bees release.
Post-installation checks
Do the following 3 hours after installing your bees:
• Your bees should form a cluster around the queen. If the bees have not formed a cluster then that means that there may be another queen in the packaging that is confusing the rest of the bees. Make sure to locate the second queen and remove her from the hive.
• You may want to install a feeder in the hive. Do it as close to the cluster after using a smoker to keep the bees calm.
After 72 hours
Your bees remain from the time you install them to up to about 72 hours. Make sure you leave your bees alone for this 72 hours period. This is important for them to adjust to the move.
- They will first be flying in a disorganized manner around the cage, trying to acclimatize to their environment. They will begin to settle after this.
- Undertaker bees should be carrying dead bees out of the hive
- Worker bees should begin carrying pollen into the hive.
Remove the Queen
On the 4th day after the installation, it will be time for you to remove the queen from the cage like so:
- Wear your protective clothing and use the smoker to make the bees calm.
- Open your bars until you reach to the bar where the queen and the cluster are houses. New combs are fragile so take care not to disturb them.
- The bees should have released the queen from the cage but if they have not you can remove the cork and release her taking great care that she does not fly away.
- Return the bar and don’t disturb the hive for 7 days.
In about a weeks’ time, a healthy queen should have started laying eggs. Check to ensure that this is happening. If the queen is not laying eggs consult with your local bee expert to determine why.
Here is a great video on how you can install package bees into a top bar hive.
Nuc
A nuc or nucleus colony is the preferred method of starting out a beehive. It normally consists of 5 frames, 3 of which will have brood and the rest will have honey and pollen stores.
The bees in a nuc will normally come with a queen that they are already used to and are normally the offspring of that particular queen.
Nucs specially designed for use with Langstroth hives are already on frames that fit directly into the Langstroth box.
Installing a Nuc
Installing a nuc is less complicated than installing package bees. The bees remain far more calm, there is far less of a chance of either a swarm of anyone getting stung.
1. Wear protective clothing before attempting to work with bees.
2. Make sure that the size of the frames that the Nuc comes on is the same size as your hive box.
3. Remove the frames in your existing hive box to make room for the Nuc frames. If your Nuc has 5 frames, remove two additional frames in your hive to make room install the nuc frames easily.
4. Start by removing one of the outer frames from your Nuc box and placing it in one of the empty slots in the hive box.
5. Install your frames in the same order you received them from the dealer.
6. Place your Nuc box next to your hive box to shorten the distance you have to lift. Don’t forget to calm your bees with a smoker.
7. Installing an entrance regulator will help your bees to defend against robbers who will take advantage of their small number.
8. Ensuring your bees have an initial supply of food like liquid feed will help them remain healthy while they are acclimatizing to their new space. Even though the colon is established, the worker bees need a few days to be able to begin foraging.
Here is a video on how to install a Nuc into a hive
Smokers
A smoker is a device that releases smoke by the burning of fuel inside its chamber.
This smoke then calms the bees as they anticipate fire so they tend to begin to huddle around their honey and begin feeding on it. The reaction is that the bee then has less capability to flex its stinging muscles.
Smoke also dulls pheromones, which is an alarm signal that guard bees send out to the rest of the colony when they are in danger.
Avoid using a smoker when bees are swarming, as they are docile because they have no honey to defend. Normally when bees swarm, they are full and would have recently fed well off the beehive.
Here are the most common types of fuels used for smokers:
• Cardboard
• Pinewood
• Twine
• Burlap
• Compressed cotton
Some other beekeepers use liquid smoke as a more ethical approach to beekeeping. Here is a video explaining more on liquid smoke:
Queen Excluder
A queen excluder is an apparatus used in the hive to limit the movement of the queen. It has holes that are small enough for the worker bees to pass through but not big enough for the queen.
A queen excluder is used for several reasons:
1. To prevent bees from swarming and
2. To ensure that brood does not get into the honey supers.
Here are some tips on using a queen excluder
1. Make sure the excluder is in good shape. A warped excluder with holes too small or too large will not prevent the queen from escaping. The worst-case scenario is that the workers will not be able to get to the queen to feed her.
2. Make sure that you locate the queen before using the excluder. There is no use placing an excluder if the queen is not in particular area.
3. A queen excluder will normally always go above the brood box because that is where the queen normally is.
General care and maintenance
The best days to do the maintenance are when there are the fewest bees in the hive. A sunny day when flowers are blooming is ideal.
Don’t forget to use a smoker to ensure that your bees are docile. Releasing a bit of smoke into the hive is also helpful. Exercise caution when doing this because it will indicate to the bees that there is fire and they will start eating the honey.
Make sure that you wash or change your clothing when you visit the beehive. Bees will remember the scent of previously stung clothes and this will lead to another attack.
Part of your maintenance routine should be inspecting of the combs in the progress of honey making.
Feeding bees
Providing good food sources for your bees is one of the most overlooked factors. The availability and quality of the pollen and nectar found in the plants that are close to your beehive will have a great impact on yield.
Consulting with your local specialist will enable you to understand if you need to plant any particular plants nearby. In general, bees will benefit from plants with plenty of pollen and nectar. Here is a list of potential plants you should consider planting.
The herbs on the list like thyme and mint don’t only provide your bees with a source of pollen and nectar but help prevent diseases and pests like mites.
Here is a video about bee-loving plants:
Supplements
Earlier we mentioned fondant and liquid feed which helps your bees making it through the winter. Ideally, if you leave enough honey for your bees you should not need supplementary feeding. Some people on the other hand like to harvest all the honey and supplement their bees’ food needs in the winter.
Before opening your hive to feed, ensure that the temperature is above 40F. Let us look at some food to feed to your bees
Stored honey
Storing honey for your bees is not only the most natural and ethical source but it does not cost you anything, except the lost potential income from the honey. Reeving discolored honey for winter use it a good idea in this case.
Remember never to use honey from other beekeepers or purchased from the store, as it could introduce diseases into your hive.
Sugar
Sugar is a great addition to your bee’s diet Honey is essentially glucose that has turned into fructose. Here‘s more on the topic.
Marshmallows
Ever wondered why your marshmallows attract bees when you are out camping? Well, marshmallows contain sugar in the form of gelatin.
Homemade marshmallows are easy to make. Follow the recipe below to make this superfood for your bees.
You will need:
- Saucepan
- Candy thermometer
- Bowl Mixer
- Baking pan
Ingredients:
- 2 ½ cups of sugar
- ¾ Cup of Powdered sugar
- 2 egg whites
- ¼ teaspoon of salt
- ¼ cup Gelatin
- 2 Teaspoons of vanilla
- ½ cup of cornstarch
Instructions:
1. Mix the powdered sugar and cornstarch in a bowl.
2. Oil your baking pan and dust with ¼ of your cornstarch and sugar mix.
3. Use your saucepan to dissolve the ¼ cup of gelatin in ¾ of water. Set it aside and prepare step 4 and 5.
4. Use another saucepan to boil 2 ½ cups of sugar in ¾ cups of water. Ensure that the temperature reaches but does not exceed 240F. Ensure you don’t stir the sugar, as it will crystalize. Brush the crystalized sugar back into the pan by dipping a pastry brush in cold water and pushing the crystals back into the syrup. Remove from the heat and let it cool to 200F.
5. If you have not already done so, whip your eggs into whites. A nice trick to whipping eggs is adding a pinch of salt to them. Set mix aside.
6. Take the hot sugar syrup, pour it into the gelatin, and stir well. Mix the two in a mixer until it begins to make foam.
7. Add egg white and vanilla into the bowl and mix until it rises and combines well.
8. Pour the mix into a bowl and let it sit overnight until or until fully cooled.
9. Use the powdered sugar and cornstarch to prepare a cutting surface. Tip you marshmallow block onto the cutting surface and cut into desired size pieces. Coat your marshmallow with the remaining cornstarch and powdered sugar mix.
Here is a great video on how you can make marshmallows for feeding bees.
Pollen Patties
Bees thrive on protein. Pollen supplies the bee’s protein needs and supplementing with pollen patties will help to expand the number of bees in your brood.
It’s usually better not to supplement strong and healthy colonies with pollen patties. The weak and sparsely populated ones will benefit from the added pollen more.
Some key factors on feeding your bees pollen patties:
- Don’t give them pollen too early in winter. After consuming too much patties, the bees will need to excrete excess waste. If given pollen patties too early in the winter they will excrete inside the hive, which will lead to disease.
- Pollen will encourage a larger brood. This means that you will have more bees and in a few months, more mouths to feed. You will need to increase your supplementary feeding in order to keep up with the expanding brood.
- Try holding off feeding pollen until February or March to avoid your bees from swarming in the spring.
- Consult your local aquarist about when the best time to supplement with protein is.
Here is a great video that explains more on pollen patties:
Fondant
Fondant is one of the most costly things in beekeeping, but you can also make it on your own. Here’s how. You will need:
- 16. Oz Water
- 8 x 8 oz. cups of Sugar
- 1 tsp. Vinegar
- Pan
- Candy thermometer
Instructions
1. Begin by the 8 cups of sugar with water. As a rule, to make fondant for every 4 cups of sugar you need 1 cup of water.
2. Put this mix into a pot or pan and bring to the boil.
3. Stir continuously. If you mix turns into a transparent color then this is an indication that you have not mixed it enough. if that’s the case, you should throw it away immediately.
4. Cover your mix and let it boil until it reaches 234F. This can be a tricky process. Removing it from the heat at about 232F will help you not to exceed 234F. Make sure it doesn’t surpass 234F, as it’ll be harmful to your bees.
5. Allow cooling to 200F
6. Whisk until the mix turns white.
7. Place a non-fluffy towel on a baking tray, and waxed paper over it. Pour your mix onto this paper and allow to cool
8. Once fully cooled remove your fondant, place in a ziploc bag and store in the freezer until needed.
Preparing your bees for the winter
While we have already briefly mentioned important winter beekeeping tactics like supplementary feeding, it is important to be well prepared for the winter.
1. Keep Calm
Keeping calm while handling your beehive will cause the least amount of shock to your bees. You may want someone experienced to help you with this in the beginning. He will show you the proper procedure.
2. Timing
The temperature outside is the best indicator, but most beekeepers start preparing for winter in October and November. In some cases, you may not have to winterize until December.
Getting an indication from local experts about the right time to winterize is also a very helpful resource.
3. Carefully move your bees to an area with the most sunlight
Bees will thrive off sunlight during the winter and ensure your hive is a part of your garden that enjoys the best sunlight will be beneficial. Moving your bees can be tricky here are a few tips on how you can do it safely.
- Move your beehive after dark when most of the bees are in the hive and there is no traffic coming in and out of the box.
- Always ensure that you are wearing protective gear.
If you are moving your bees a short distance, move them 3ft at a time until you reach the destination. - If you’re moving your beehive a long distance then you may want to consider covering the entrance so they cannot escape.
- Never block the beehive entrance for more than an hour.
4. Provide ventilation
During winter, bees will huddle together to provide warmth. As they do this, they release moisture. Since most hives remain closed during the winter this moisture accumulates inside the hive and lead to disease. Slightly opening the door on warm days for a few hours to allow moisture to escape and fresh air to enter.
5. Closing the door
A common newbie mistake is shutting the door all the way. Door regulators are the best to make a slight opening for ventilation during the winter.
6. Hive covers
Covering your hive in the winter is a good idea especially if you experience severe weather. You can either wrap or insulate your hive.
Wrapping your hive involves using black roofing felt or a similar material to provide heat. The black material will attract heat from the sun and increase the temperature inside. Wrapping, however, does nothing to prevent heat loss. Insulation prevents heat from escaping your hive.
A material like foam is good for insulation. Some people both wrap and insulate their hives.
Buying a hive cover is also a good idea. Their use extends over several seasons, and is an excellent heating tool.
Here is a video on beehive covers:
7. Check your bees from time to time
Ensuring that your bees are healthy and have enough warmth and food is one of the most important tasks in the winter. It is easy to lose a colony in the winter by simply forgetting about it.
How to treat a bee sting
It’s pretty much certain that a bee will sting you at some point. Knowing how to treat bee stings is an important aspect of beekeeping for you and your family. Here’s what you should do:
Ensure that children don’t play near the beehives. It is typical for children to try to poke their noses in every corner of the homestead.
Always wear protective equipment, even when you’re skilled with bees. Don’t try to be cool or a hero by working without it.
If you do get stung, remove the sting as soon as possible and wash the area well with water and soap.
Using ice to make a cold press and place it over the affected area.
Keeping an epinephrine pen is important for emergencies. Here is a video on how to use an epinephrine pen:
Check for allergic reactions and seek medical attention if the bee sting is severe.
By no means am I saying go out and have a few bees sting you, don’t get me wrong… but the more a person is stung, the better body is at coping with future bee stings.
How to detect bee sting allergy
A common reaction to a bee sting is swelling in the area where you have been stung. The more serious case would be where you begin to notice swelling in other parts of the body. The victim’s lips and face may become pale and have difficulty in breathing.
If you notice any of the above symptoms, seek medical attention immediately. The situation can become fatal if not quickly treated. Getting an allergy shot from the doctor for your family before you begin beekeeping generally in your best interest.
Here is a list of things you can do at home if you are stung by a bee. Remember to remove the sting before administering any of these remedies. If you notice any allergic reactions seek medical attention immediately.
Keeping in mind we are not doctors and we’re not offering medical advice, check with your doctors about using the following in an emergency:
1. Placing ice on a towel and applying it to the affected area for 5 minutes.
2. Dipping a swab of cotton in apple cider vinegar and placing it on the affected area will also help with the pain and swelling.
3. Making a paste with turmeric and water and applying it to the affected area.
4. Rub a crushed onion on the affected area.
5. Squeezing raw potato juice and rubbing it into the skin of the affected area.
6. Applying crushed garlic to the affected area.
7. You can also rub the affected area with cucumber for a few minutes. It will help neutralize the venom.
Home remedies against bee stings:
Pests and diseases
Keeping your beehive free from pests and diseases is one of the most important steps.
Let’s look at some of the most common diseases.
Varroa Mites
Varroa mites are the most common pests that affect bees. They attach your hive by laying eggs on the larvae of the bees. Once these larvae begin to develop into bees, they attach themselves to the bees. They begin to suck the blood or hem lymph from the bees, which weakens them.
When the affected bees begin to move around the hive, they infect more larvae and begin to feed on other bees. You could lose your whole colony in a matter of days by this deadly disease.
I recommend you regularly inspect your hive for mites, because they reproduce every 10 days and spread very quickly. Honey yields can drop by about 28% by just 3% infestation.
The starting point in identifying Varroa mites is the way they look. They are red in color with 8 legs and measure about 1.5mm. You should have no more than 3 mites for every 100 bees.
To check for varroa mites:
1. Cover the bottom of the white collection basket with rubbing alcohol or windshield wiper liquid.
2. Remove on frame from your brood after using a smoker to make the bees docile
3. Identify the queen and ensure that she is not present in the sample you are about to take.
4. Remove the white easy check and fill it with about 2-300 bees.
5. Carefully return the frame to your hive. Place the basket back in its place and close the lid.
6. Shake the container with bees until sufficiently coated with the liquid.
7. Open the lid and fill the Easy check with the fluid provided up to the mark indicated.
8. Close the lid and shake for about one minute. Inspect the collection bowl at the bottom of the easy check-to-check how many mites have been collected.
To interpret the results, contact a specialist, as the meaning of the results will differ according to the area and the type of bees you have.
Here is a video of how you can use the EasyCheck mite tester:
DIY Mite check Kit
You can also use household ingredients and tools to check your hive for mites. (Always wear protective gear when carrying out these tests.)
You will need:
- 2 tbsp powdered sugar
- Measuring cup with 100ml clearly marked
- An empty container with white bottom ( i.e. ice cream tub)
- Sugar jar (With screened lid)
- Magnifying glass
- Water
Instructions:
1. Find the brood nest. Since mites will first attack your brood nest, testing the nest for mites is the best place to begin.
2. Testing a similar frame each time will help you monitor the level of mites correctly. Choose a frame that has both larvae and developing brood.
3. Inspect and check that the queen is not inside your chosen frame. If she is isolated protect her so she does not get into the sample.
4. With a hard, swift thump, shake bees off into your white plastic container and use a scoop to collect and place them into a jar. Use the measuring cup that they are up to the 100 ml level.
5. Add 2 tbsp. of heaped sugar to the jar and coat your bees with this sugar by shaking gently.
6. Place your jar in the sun for 3 minutes. This will make the mites stick to the powdered sugar and prevent them from being able to crawl back onto the bees.
7. Shake you jar vigorously for another 60 seconds over the white tub to make sure that none of them is stuck to the bees or the side of your collection jar. The mites should fall into the white tub.
8. Return your bees to the frame and insert it back in its box.
9. Using a little water to dissolve the powdered sugar you should soon see the mites in the tub.
10. Count and record the number of mites using a magnifying glass.
11. Try to collect samples from each of your colonies and keep track of results.
You can replace the sugar jar with a mite counter that makes it easier for the mites to collect into the other jar for counting.
Here is a video on how you can test your Hive for mites using this DIY method:
Mite remedies
While beekeeping you are likely to face a couple of incidents of mite infestation. Use the following remedies to control mites.
Miticides
Miticides are normally chemical products that will help with a mite infestation. The two most common types of Miticides are
Apistan
Apistan is a commonly used miticide. Placing these strips right in the brooding frame make them extremely effective. As the bees move around they will brush against the strips and spread the miticide throughout the hive.
Mite away
Mite away is an alternative treatment method similar to Apistan. Mites develop resistance to Apistan, hence the need for an alternative.
Here is a video on how to use Mite Away:
Hop Guard
Hop Guard is a very good natural alternative to Apistan. Use the strip 3 times a year by applying one to every 5 frames of bees.
Here is a video of how to use hop guard to treat mites:
Powdered sugar
Talcum and powdered sugar are used to prevent mites attaching themselves and feeding off them. The powder is not very effective in the control of mites on larvae and can only treat minor infestations. I prefer to use powdered sugar, as it is more natural than talcum powder.
Drone combs
Since mites start attacking drone cells, drone combs have proved to be an effective treatment for mites. The drone comb foundation frame, made from sheets that have hexagon shaped imprints on it will encourage your bees to build drone cells on these sheets. Mites are attracted to the sheets, and once your drone cells have been capped you can then remove and freeze these sheets to kill the mites.
Here is a video of how you can use drone combs to kill mites:
Garlic
Garlic is another natural treatment against varro mites. Garlic is a natural antibiotic and can help to control moderate mite infestations. Another advantage of powdered garlic is that it’s cheap. Adding garlic to powdered sugar and dusting your bees with this is the most effective way to use it.
Here is a video on how you can use garlic to control mites:
Acarine or tracheal mites
These mites infest the trachea of bees and, then begin to feed on the bee’s haemolymph.
These mites will enter, mate and lay eggs in the trachea of an infected bee. New mites will then leave the bee’s trachea and attach itself to the bee’s body hairs. When another bee meets the infected bee, the mites will attach themselves to it.
Identifying tracheal mites
Tracheal mites are invisible to the eye, which makes them hard to detect. However, one can deduce from the bees’ behavior that they could have a tracheal mite infestation.
Signs to look for:
- Bees falling to the ground and crawling around.
- Bees unable to climb trees and grass.
- Bees are disorganized and not clustered even when the weather is cool.
- Their wings will be in an irregular position, different from other bees that are able to fly
- Bees abandoning the hive in spring, even when there is honey.
To be sure you’re dealing with a tracheal mite infestation, collect a sample of about 50-100 bees from the ones crawling on the ground and send them to your local agricultural office for testing. Place them in a glass jar with alcohol before you do that. The specialist will then dissect the bees to determine whether you have tracheal mite infestation or some other disease.
Treating Tracheal mites
Menthol crystals
Menthol crystals are one of the most effective methods against tracheal mites. Place the crystals on the bottom board of the hive in warm months and on the top bars in cooler months. Leave them in the hive for 14 days, then remove. The best time to apply this treatment is when the weather is between 60-80F. The vapor from the crystals will kill the mites.
Grease Patties
Grease patties are another effective method against tracheal mites. As you supplement your bees with sugar, they come in contact with grease that prevents the mites from being able to attach themselves to the bees.
DIY grease patties
You will need:
- ½ pound honey
- 1/3 cup of mineral salt
- 1 ½ pounds of vegetable shortening
- 4 pounds of sugar
Instructions
Blend all the ingredients together and mold into hamburger-sized patties. Each patty should last about a month depending on the size of the colony. Place the patties on the top bars of your inner chamber on the hive. Store the remaining patties in the fridge in Ziploc bags
Here is a video on how to make grease patties:
Essential oils
Essential oils made from plants like spearmint, lemon grass, and wintergreen me be effective in combating tracheal mites. They also have the advantage of being natural.
Watch this video to understand more about treating tracheal mites with essential oils:
Oxalic Acid Vaporizer
It is certainly worth mentioning the use of oxalic acid vaporizers in the treatment of all types of mites in bees. This is one of the most important tools in beekeeping and can save your hive from mite infestation. Before using an oxalic acid vaporizer, you need to check if it is legal to do so in your state.
You can use the vaporizer to spray your bees as well but using vapor is the least harmful method for your bees.
Oxalic acid is an organic compound found in many fruits and vegetables like rhubarb. Handle this fine crystal powder with care. Oxalic is a very strong compound.
Here are some things you should consider when using oxalic acid:
- It is extremely effective in controlling of mites, especially when there is no brood.
- Mites don’t develop resistance to this treatment, unlike other methods.
- Bees are not disturbed by it
Drawbacks of using oxalic acid:
- Vaporization can be dangerous to both the user and bees if not used correctly. It can burn your skin and protective clothing must be warm when handling and applying it.
- It is not as effective on mites in the brood.
Other methods like spraying oxalic acid on your bees is helpful but in moderate amounts.
Small hive beetles
Small hive beetles are the second most common problem you’ll face in terms of pests after mites. An infestation of hive beetles will eventually cause your bees to abandon their hive. These reddish and dark brown insects are extremely destructive and can cause substantial damage to your honeycombs.
The larvae will spread in the comb and feed on the honey, and pollen stores. These beetles will cause discoloration and fermentation of your honey.
Mite treatments
The remedies used to prevent the spread of mites will also help you fight small hive beetles. However, the most common treatment method is the installation of traps as described below.
Traps
Installing traps around your hive can prevent hive beetles from destroying your combs. Let us look at some of these traps:
1. Beetle jail traps
Beetle jail traps are an excellent preventative method that aims to stop the hive beetles from getting into your hive. The beetles are trapped inside the “jail” and drowned in oil.
Here is a video on how to use beetle jail traps:
2. Wasp Traps
The most important thing to remember about wasp traps is you need to remember to keep the oil level order for the beetles to drown. The slanted design ensures that the bees don’t fall in the trap. It is placed on the bottom board of your hive.
3. Hood traps
Beetles fall into these traps because of the apple cider vinegar. Hood traps are attached to the frame.
Wax Moths
Wax moths or wax worms are another disease that is common in bees. These moths don’t attack the bees but instead feed on wax that used to make honeycombs. This affects the development of brood by depleting the protein contained in the comb.
Wax moths cannot survive cold temperatures, and therefore they’re found in warmer states and during the warmer months of the year. If you live in a cold state, you should not have any problem with wax moths.
Bees normally clean their hives from moths, but sometimes they need extra help when the webs created by moths are too thick.
To treat wax months simply spray your hive with a wax organic pest control agents.
Preserve stored honey by using a wax moth control canister.
Harvesting Honey
Harvesting honey is the most important and most rewarding thing you can do as a beekeeper. The best moments to harvest honey are on a warm day with no wind.
Harvest your honey following these steps:
1. Ensure that you are wearing full protective gear that has been properly washed
2. Use your smoker to make the bees docile and make the honey harvesting a much easier task
3. Don’t crush any bees as this release more pheromone making the bees more aggressive.
4. Try not to breathe directly on bees. They don’t like the smell of carbon dioxide.
5. A useful tool in harvesting honey is a bee escape board. You can use this to remove bees from the hive. It allows bees to enter but not to leave. Here is a video of how a bee escape works:
6. Using a sharp knife, you can detach the honeycombs from the supers or bars into a bucket or dish.
7. You can also buy a centrifuge to separate bees from the honey. Here is a video of how to extract honey using a centrifuge:
Let bees eat some of the honey
It’s only fair that you allow the bees to eat some of it. This is also considered as part of something known as ethical beekeeping. Ethical beekeeping is using practices of care and extraction that do the least damage to the bees as possible.
In most cases, we supplement our beehives in the winter with commercial feed, but their own honey is an ever-healthier alternative to use for your bees in the winter. When harvesting honey it is advisable to leave 1 or two combs with honey and store them for use later.
Here is a great video explaining how much honey you need to leave for your bees in the winter:
Honey Harvesting Steps
Honey is harvested naturally, and in some parts of the world, it’s still common practice. Honeyguide birds normally lead humans to honey nests.
If you do decide to harvest wild honey here are some things to keep in mind
1. Make sure you’re squeaky clean. Bees hate the smell of sweat and they will sting you even under your armpits if you are sweaty. Taking a good shower and wearing a fresh change of clothes is the first technique to natural honey harvesting
2. Scout your potential hive. Once you suspect there is a hive, make a proper assessment of the hive and develop a safe strategy of how you think is the best way to collect the honey. Make sure that the hive is actually a beehive as other flying creatures as wasps also have hives that can be confused for a honey beehive. Check to see if there is lots of traffic to and from the hole by honeybees.
3. Suit up. Ensure that you are wearing protective clothing. Wild honeybees are more likely to attach you than those from a domestic beehive.
4. Prepare your smoke to calm down the bees. Burning pinewood is a good alternative to a a smoker. Place your smoke very close to the hive, but make sure there’s no fire hazard.
5. Harvesting with a sharp knife prevents destroying any larvae on the comb. Don’t take all the honeyout as this will cause the colony to swarm or die from starvation.
6. Be sure not to accidentally carry or temper with the queen. Most bees will tend to follow their queen, which means you could bring a swarm of angry bees into your home.
Beekeeping Myths
Before we wrap this up, let’s bust some myths.
1. If I’m nice to my bees, they will be nice to me
Bees whether wild or purchased from the store, can rarely be tamed. At certain times, bees will be docile like when swarming. This is a very short seasonal behavior; don’t get used to it. Even bees that are swarming can still be aggressive if they feel their queen is in danger.
2. Bees don’t like chemicals
While the main function of worker bees is the collection of honey and nectar, they also collect chemicals to use in the colony. The natural chemicals are toxic and used to fight infections. This does not mean that chemicals don’t affect bees. Carefully administer chemical treatments and where possible use natural alternatives.
3. All bees sting
It may come as a surprise but not all bees sting. Only female bees have a stinging mechanism on their bodies. This really doesn’t help much as female bees make up more than 70% of the bee populations.
4. Bees only live in hives.
Bees live in all sort of hollow spaces. Bees will form a colony anywhere where they feel they are less likely to be disturbed and robbed of their honey. This includes abandoned houses, old tires, and holes in the ground, old cars and many more. Take care not to accidentally run into a beehive when walking through abandoned houses and scrap yards.
5. Not all bees work hard
The saying “busy as a bee” is true for the female bees. The male bees only work very seldom when it is time to mate with the queen!
Take a beekeeping class
Find a beekeeping group or class in your area. This will help to connect you with other enthusiasts and form a support network where you can share problems tips and tricks. Joining a class will also help you remain motivated when things get tough. Members of beekeeping groups are also sometimes breeders, and may offer queens, drones, and supplies for sale.
A mentor can be very important in beekeeping. Having someone around to who understands the specific breed or area you are in is an almost invaluable resource. Get creative and take a beekeeping field trip. Visit the local veterans and soak up as much knowledge as you can.
Wrap-Up
Beekeeping has been gaining in popularity over the years. It is a worthy hobby for all the reasons discussed in this article. Whether you decide to start beekeeping as a hobby or a small business, I recommend you start small. Beekeeping can be costly so learn to manage a small apiary before scaling your operations.
Starting small also means that you may want to start with a trial hive and inexpensive tools. Many professional long time beekeepers began with simply handmade hive and only purchased expensive equipment when they had more experience.
By following the recommendations, tips and suggestions above your journey into beekeeping can be successful and problem free.
We would love to hear how your beekeeping goes. We also would be happy to get comments from more experienced beekeepers as to tips and information that may be practical to other homesteaders.

Tara lives on a 56 acres farm in the Appalachian Mountains, where she faces homesteading and farming challenges every single day, raising chickens, goats, horses, and tons of vegetables. She’s an expert in all sorts of homesteading skills such as hide tanning, doll making, tree tapping, and many more.