Thyme is great. It’s an easy addition to the garden for several good reasons:
- Can grow in a small amount of soil, including rocky crevices
- Is a perennial, evergreen plant
- Tolerates neglect
- Requires no fertilizer
- Is available in drought-tolerant and winter-hardy varieties
- Produces abundant growth that can easily be added to a market gardener’s offerings
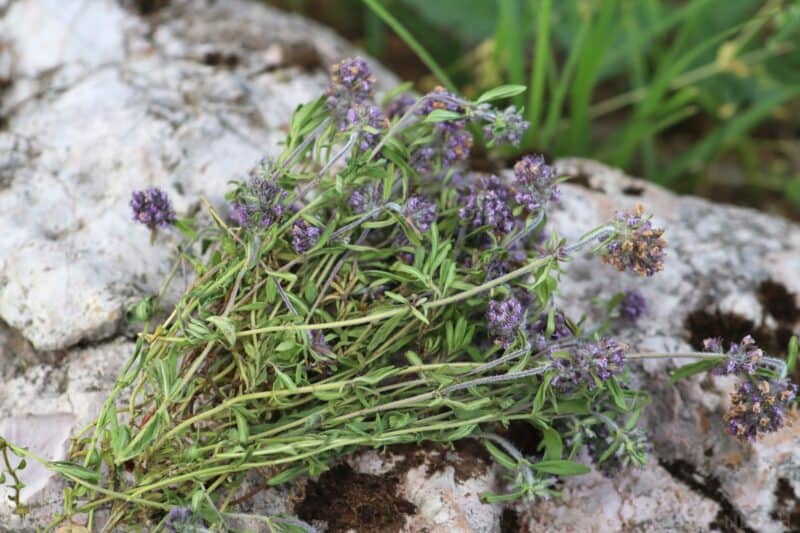
Thyme is also a pretty little plant. Its delicate, beautiful little leaves and tiny lavender flowers add beauty to any container. It can be used as a fragrant ground cover, or to add visual interest to rock walls.
Thyme is delicious! It can be used in a wide variety of dishes, but classic uses are in pasta and on poultry and fish. Thyme also pairs well with cheese and chanterelles.
Like many herbs, thyme is rich in Vitamins C and A. It also contains iron. Thyme has other benefits. Thymol is a compound extracted from thyme plants. It is the active ingredient in some natural cleaning products because of its antibacterial properties.
Selecting Varieties
There are over 50 thyme varieties to choose from. You don’t have to choose just one! These are some of the common types of thyme available:
- French or Summer Thyme: This has an extremely robust and sweet flavor. The leaves are grey-green.
- English Thyme- This is the quintessential thyme plant. It is probably what you think of when you close your eyes and imagine the flavor of thyme. Like French thyme, it has pretty grey-green leaves.
- Winter Thyme, or German Winter Thyme- This is slightly less flavorful than french or summer thyme, but it still tastes great. Winter thyme is extremely hardy to winter conditions. In many climates, you can harvest from this plant year round. Winter thyme also attracts beneficial insects, benefitting the whole garden. Winter thyme has dark green leaves, which look pretty when planted in contrast with a more vivid green plant such as lettuce or chives.
- Lemon or Citrus Thyme- There are several different cultivars of lemon or citrus thyme. The foliage is usually bright green with yellow edges. The flavor is extremely fresh, and the texture is softer than the other thyme varieties. As the name suggests, it adds a burst of citrus flavor to your dishes. It also gives off a pleasant lemony aroma you can smell throughout the area its planted in. These plants are not as cold tolerant as the other varieties. Growers in cold climates may still enjoy them as annuals, but they may not make it through the winter.
- Drought Tolerant Creeping Thyme- There are many varieties of this type of thyme. They are a terrific choice for xeriscaping. Creeping thyme makes a soft and fragrant ground cover. It can tolerate being walked on, so can be planted in between paving stones on walkways. When it is stepped on, it releases an extra burst of fragrance. Elfin thyme, with teeny tiny leaves, and wooly thyme, with fuzzy leaves, are some fun varieties of this type of thyme. Some creeping thyme varieties also attract beneficial insects.
Where to Plant Thyme
If you live in a very hot climate, your thyme plants will thank you for a little bit of shade. Otherwise, plant thyme in a sunny spot.
Thyme does not need a large amount of soil to grow. You can get creative with its placement for artistic purposes.
It does like to spread out every time your back is turned. Give it more space than you think you need to to keep it from strangling other plants.
Thyme doesn’t have too much trouble with pests; you can grow it on the ground without worrying about it. Of course it’s also a great container plant. It is a good choice to plant in rock walls or other features as well.
Step By Step Guide to Growing Thyme
There are many ways to bring thyme to your garden. Starting thyme from seed is probably the most difficult, and the least common. You can successfully start thyme from transplants, divisions, or cuttings. Once you have thyme plants, you can grow more plants by layering.
Once you have an established plant, you really don’t have to do much for it. Just enjoy the delicious fragrance and flavor!
Starting Thyme from Seed
The Old Farmer’s Almanac warns that thyme is difficult to germinate. It recommends against growing thyme from seed at all. If you are undeterred, do plant a extra seeds in each cell. If you would like to try to grow from seed, there is no real reason not to. Seeds are cheap, and if they fail you can still buy a plant later.
Although mature plants grow quickly, germination and sprout growth is very slow. This means you need to start your seeds two months before planting or more. This may be problematic if you live in a cool climate. The places you ordinarily use to start plants may be too cold two months before the growing season.
Sprinkle your seeds on your soil surface. Sprinkle another thin layer on top of the seeds. I recommend watering these with a spray bottle or mister. Methods that pour in too much water tend to flood out lightly buried seeds.
Since your seeds are so close to the surface, it is extra important to keep the soil from drying out. However, you don’t want to overwater either. Again, using a mister will help you to keep a balanced moisture level. Every day. Maybe twice a day. For two months.
Did I mention thyme grows extremely well from transplants, divisions and cuttings?
Transplanting Thyme
Thyme plants are easy to find at local nurseries or in seed catalogs.
If you receive plants in a cell pack, simply plant as you would any other start. Bury the plant to the soil line of your start. Fill the hole in gently. Water the plants in.
If you receive plants as a sheet of plugs, cut the earth into two inch squares with a trowel or similar tool. You do not have to be particularly meticulous about this. Bury the plant so the soil line between the plug and its new home are even. Give each little plug at least a 6 inch radius for growth. Fill the hole in gently. Water the plants in.
Recommended times for transplanting thyme are spring and fall. The summer heat can be a little bit hard on the transplants. This is a recommendation, not a hard and fast rule.
Growing Thyme from a Cutting
You can work with thyme cuttings in the spring or summer. The cuttings take awhile to root. Unless you are planning to keep your new plant indoors through the winter, it’s best not to wait until fall.
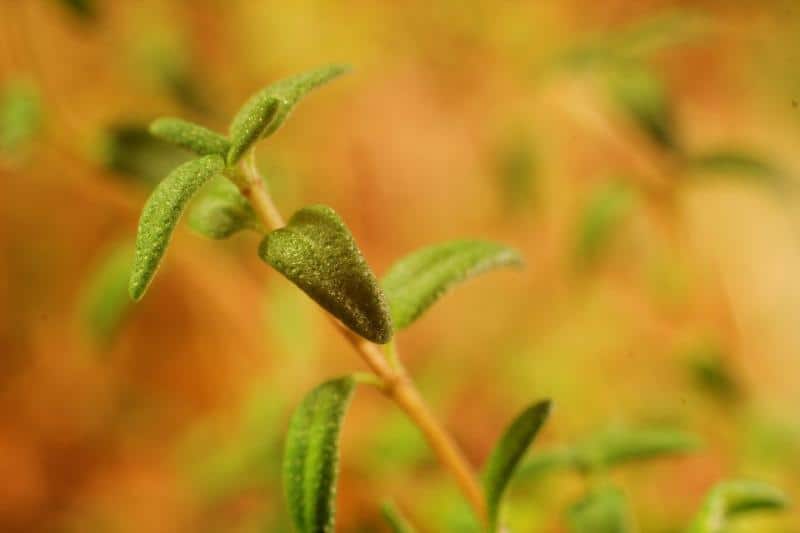
Look for a stem of new growth on the plant that does not have flowers. You will be able to distinguish new growth because the new stems are more green and flexible than the old stems. Older stems, in contrast, are more brown and woody.
Cut a section of your green stem a few inches long just below a node. A node is where the branches meet the stem. You should see little bulges next to the branches. This indicates an area with potential to develop into any part of a plant.
Strip the leaves off of the bottom one third to one half of your stem. Bury the stem in a new container up to the leaves that still remain on it. Use a nice, light loamy soil or potting mix.
The nicer you are to your cutting, the more quickly roots will develop. In the spring, find a warm place for it. In the summer, find a place that is not too hot. Keep your cutting in partial light. Keep the soil moist.
You will know your cutting is ready to plant when it starts to develop new growth.
Dividing Thyme Plants
Dividing thyme plants is easy. They recover very well from this process, although it can be scary for the gardener.
- Dig up your whole thyme plant
- Use a knife or strong scissors to cut the plant into sections
- While you are at it, cut away and discard any dead growth
- Replant the new sections, slightly deeper than they were before
- Water well
- Cut the plant back substantially to stimulate new growth
Propagating Thyme by Layering
The practice of “layering” is growing new, separate plants in situ from branches of the original plant.
- Select a long, low growing branch from one of your plants.
- Remove all growth off the branch except the leaves at the very tip.
- Make a small wound below one of the nodes, being careful not to sever the branch.
- Dig a shallow groove and lay the branch into it.
- You may need to hold the branch in place with a bent wire stake or other small tool.
- Cover the branch with soil, leaving out the little tip.
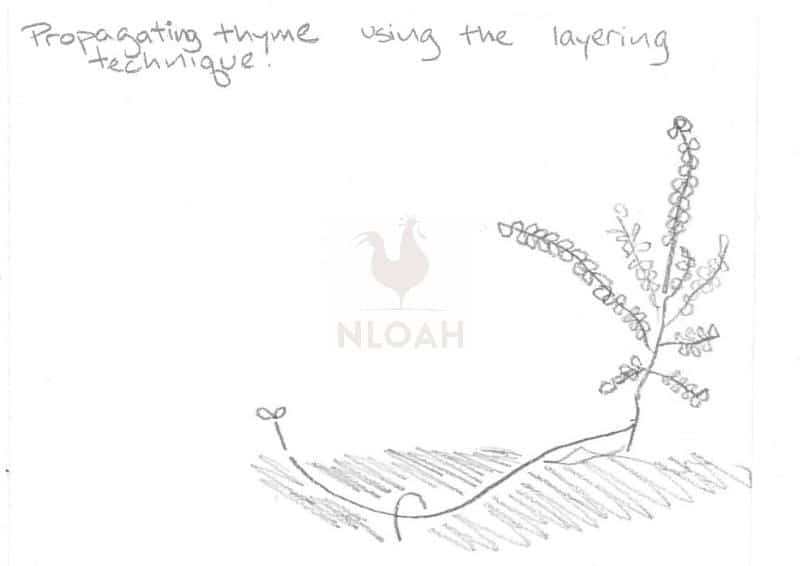
It can be tough to tell from the outside when the new plant is ready to be transplanted. The only way to really check is to carefully unbury the plant and look for roots. Personally, I would just wait until the following year.
Caring for Thyme Plants
Thyme plants are hardy to a fair amount of neglect. In fact, some people say adversity deepen’s the herb’s flavor. The plants do not need additional fertilizers once they are planted.
Plants do need to be watered right after they are transplanted, and kept moist for the following month. After that, you really can ignore them except to trim the plant.
You do want to do some strategic trimming during the growing season.
Cut the plant back in the spring to make room for new, flavorful growth.
If you notice your thyme plants’ flavor has gone downhill after a few years, consider rejuvenating them. One way to do this without spending a dime is to take cuttings from your own plants, or practice layering. The new plants will have fresher growth.
You can dig your old plants up once the new ones are established. If you are sentimental like me, you can continue to use them for landscaping. Heartless individuals can throw the old plants away!
Pinch back new thyme stems to produce bushier growth, as explained in the next section.
Pinching back Thyme Plants for Bushier Growth
As summer goes on, thyme plants can get unruly. Long branches take up more space without producing as many leaves as bushier growth. Pinch back the ends of branches that look like they want to escape.
To pinch back a plant, look carefully at the stem. You will see a section with tiny leaves attached to it. These are nodes. These areas have the potential to grow into any type of new growth.
Cut the stem as close to flush with the node as you can. This will stimulate the plant to put out a branch on either side of the cut. Plants that have been pinched back regularly are more productive because of the bushy shape they take on.
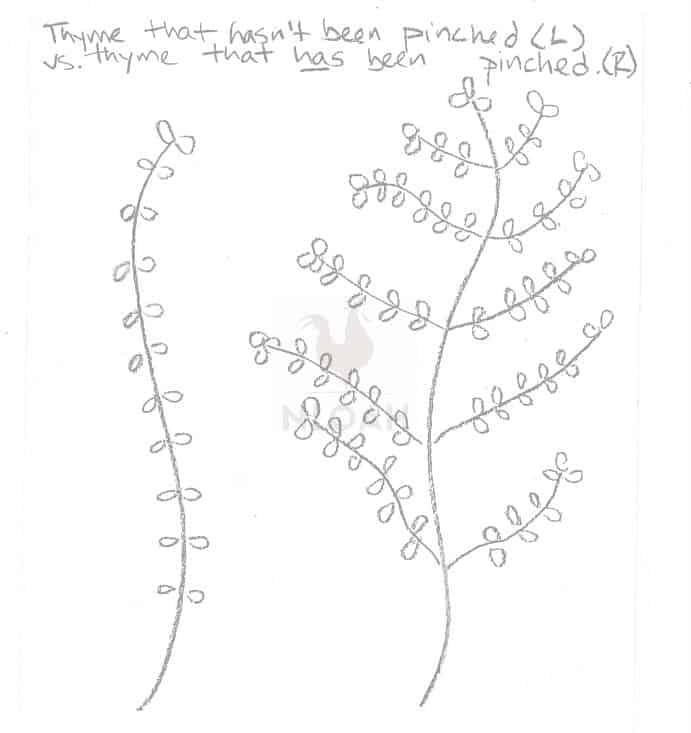
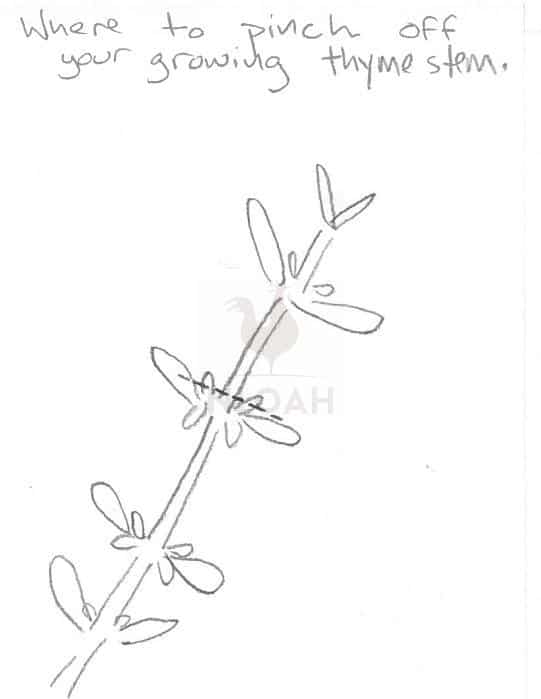
Since thyme plants are so diminutive, you might want to use a nail clipper to do the cutting instead of shears.
If your thyme plant is really out of control, just cut the whole plant back. It will start putting out new growth in no time.
Harvesting Thyme
I usually combine my herb harvesting with my herb pinching. I look for a slightly unruly stem to cut back to the node to add to my dinner.
If you would like to make dried thyme, it is best to harvest before flowering. Remember, market gardeners can not sell dried herbs.
If you want to harvest more than a few sprigs of thyme, clip off the newer stems. Those herbs have the best flavor, and it is the best way to stimulate new growth.
Putting Thyme to Bed for Winter
You don’t really have to water thyme unless you are in a year long drought. If you have been watering your thyme, stop towards the end of the growing season. This will allow the plant to prepare for winter.
If your climate is moderate, you should be able to harvest thyme all year.
If you live in a cold climate, gently mulch around the plant at the end of the growing season.
Preserving Thyme
Thyme maintains a lot of its flavor dried. It is also extremely easy to dry.
There are various methods for drying thyme.
You can hang bunches of thyme bound with twine upside down. I am not a fan of suspending bunches of herbs directly above the woodstove because I think it’s a fire hazard. Any home with a woodstove will have dry air. Your bunches will dry perfectly well if they are in the same room as the stove.
You can also spread the branches out on a hanging screen.
If you have a refrigerator, you can place sprigs of thyme in an empty jar and put the jar on a refrigerator shelf. They will dry out in there, and you are more likely to see them when you are cooking.
Once your thyme is thoroughly dried, store it in an airtight container. Keep your dried thyme in a dark place to preserve its flavor. This is how you would store any dried herb.
Remember, you may not sell home-dried herbs at farmer’s markets, but they are a nice gift.
You may find that you have fresh thyme for most of the year in the garden. If that is the case, you may not need a large quantity of dried thyme.
Cooking with Thyme
The rich aroma of thyme brings back countless memories of cooking and togetherness.
One of my favorite uses for thyme is in cooking small fish. I gut the fish, so that it will be cooked round rather than in fillets. Before cooking, I stuff the stomach cavity with whole sprigs of thyme. This fills the air with an amazing aroma. It also lightly infuses the meat.
I also add generous amounts of thyme to fish filets cooked en papillote.
I sprinkle thyme on any pasta or roasted potato dish and add it generously to wild mushroom dishes and sauces.
You may want to try this other delicious recipe for thyme:
This plant asks so little of us, and it gives us so much. I hope you enjoy having this beautiful, tiny, fragrant and flavorful bush in your garden.


Allison Sayer lives in a schoolbus on an off-grid property in the Alaskan Copper Valley. She has been part of many amazing projects. These include cooking at a remote nature center, managing a multi-family hoop house, volunteering at a chicken sanctuary, and WWOOFing on a small farm. Through her deep friendships throughout the Alaskan wilderness, she has helped many friends develop their homes and dreams. Allison is currently building up her property with the goal of starting her own microgreen farm.
Pat
November 11, 2021 at 12:56 am
Thanks for the information ,
I am going to plant my thyme and keep it indoor so it will be ready come spring.?
Great article! I loooove thyme. Anyone interested in this stuff should definitely check out the book Everyday Roots. It teaches you how to replace all the toxic chemicals in your life with healthy organic alternatives. Its completely changed my life and how I feel everyday! 🙂
Heres a great review of everday roots: http://reggiesreview.weebly.com/everyday-roots-review.html
Keep up the great content!
Thank you for the article. It was very informative. I love growing thyme. I do have one question. I transplanted a nice size thyme plant, last summer, into the corner of my asparagus bed. There is about 2 feet from my thyme to the asparagus. Do I need to move the thyme? Or can I put in a barrier about half way between the two plants? Again, thank you for the article.