Do you know how to shoe a horse or trim the hooves of livestock? No farm would (or should) be complete without horses.
During a long-term disaster- and beyond, horses will almost assuredly once again become the most advanced and readily accessible mode of transportation.
Learning how to be your own farrier will help protect the health of the horse and by extension, the wellness of your family. A horse’s health is dependent upon its feet.
A horse that goes lame or is otherwise suffering from a hoof injury, cannot be ridden, worked in the fields, used to transport wood or water, or pull a wagon.
For centuries horses roamed free or over large distances and were able to develop strong hooves and file them down naturally.
Unless your farm is located on an abundance of land with rough (but not too sharp) rocks, your horses will need to be shod at least part of the year.
If a horse is going to be ridden on the road, especially on broken pavement, it will need shoes to remain in quality health.
If the horses in your barn are going to be used for heavy farm work or pulling a wagon, the shoes will provide the extra traction and protection necessary to protect their hooves.
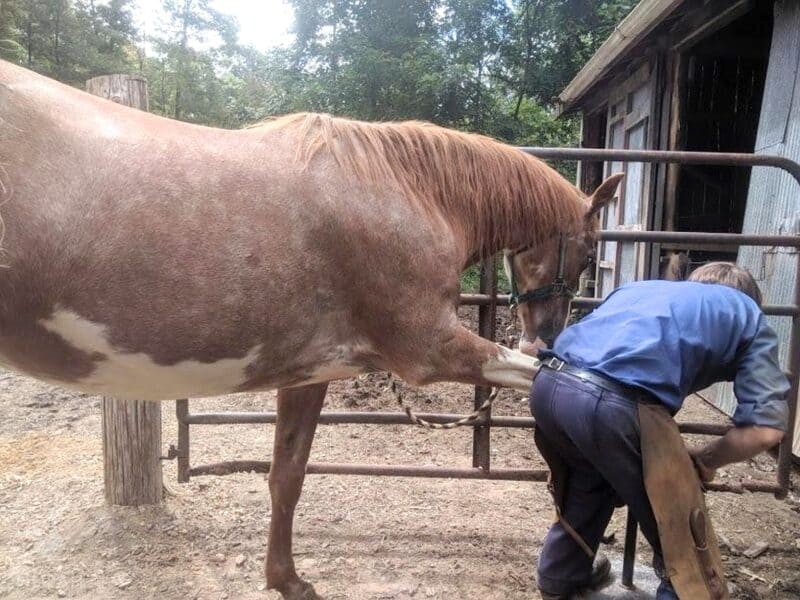
Place your tools out in an open space on level ground where the horse can be tied firmly to a gate or barn post.
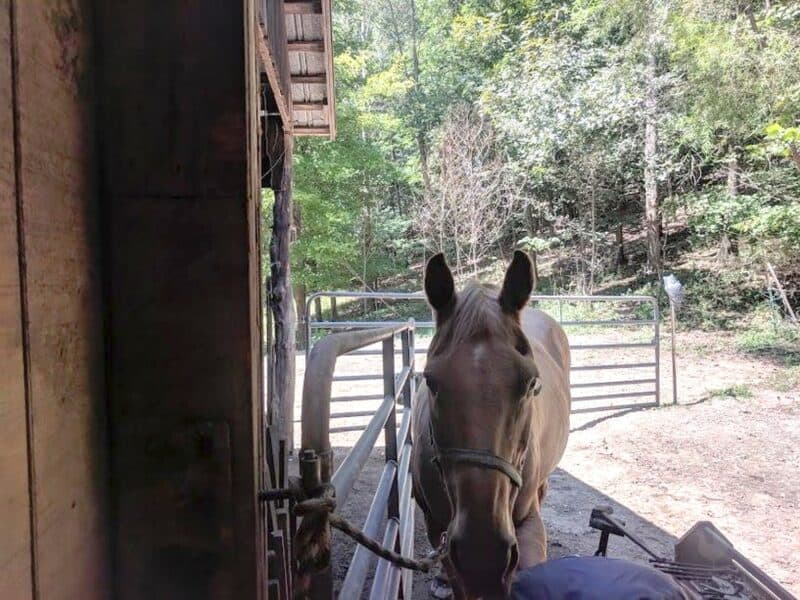
As you can see by this photo, the rest of the barnyard critters will likely be very curious about what is to happen next and sometimes get under foot if not penned away from the shoeing area:
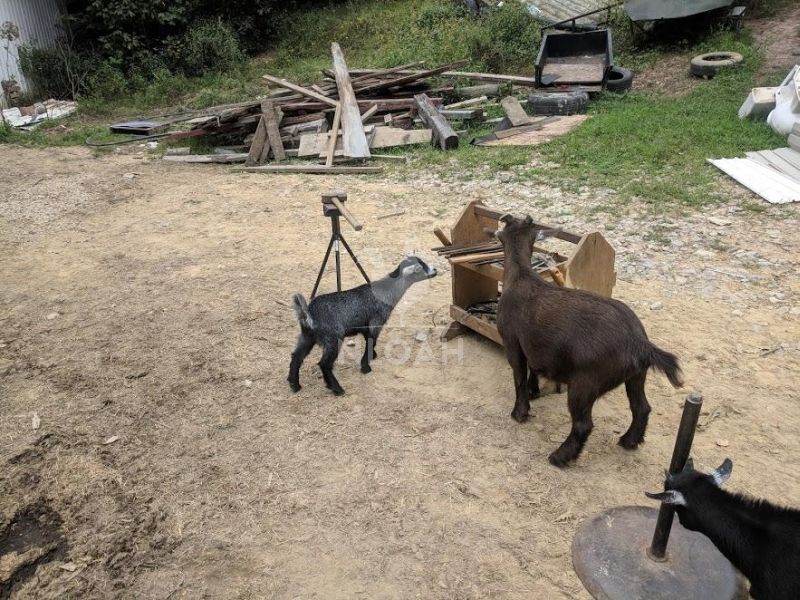
Our horses are used to the goats milling about, but it is best to remove anything or anyone from the shoeing area that can spook a high strung horse, especially if either the horse or the farrier (or both) are new to the shoeing process.
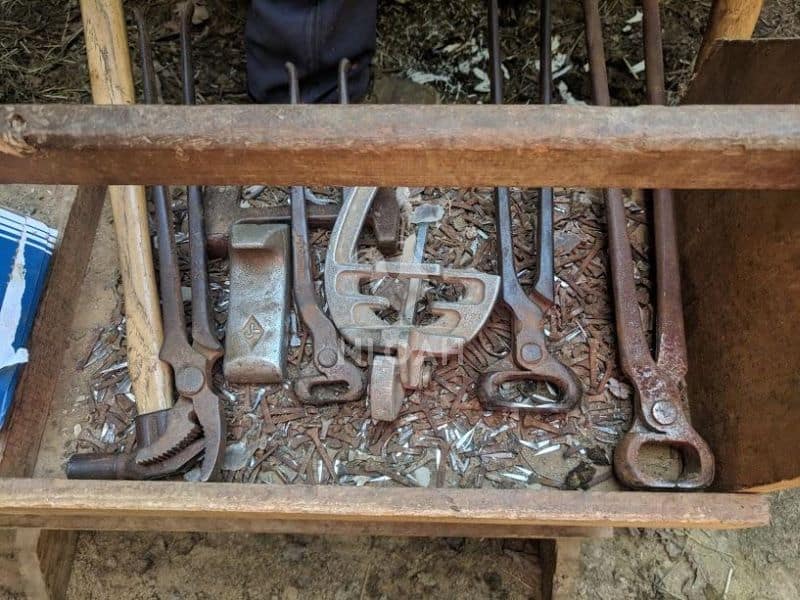
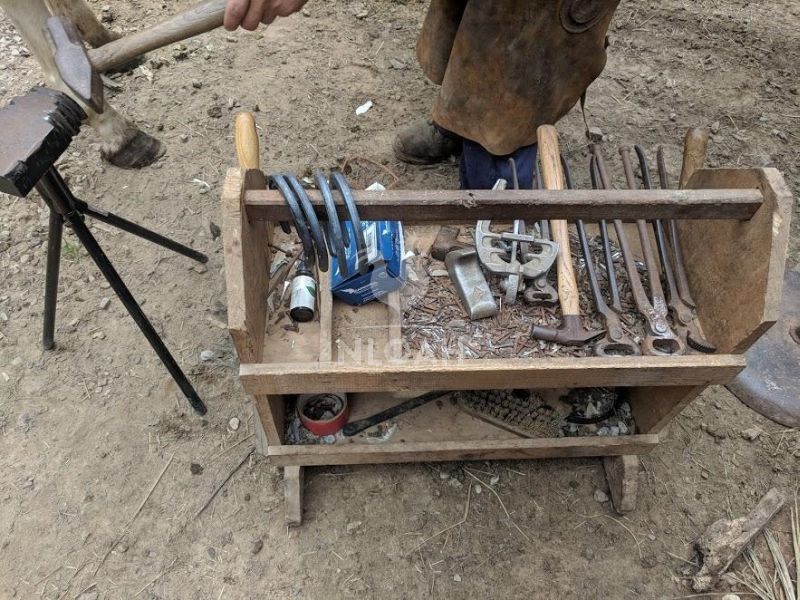
Farrier Tools
Disclosure: if you visit an external link in this post and make a purchase, I may earn a commission. Read my full earnings disclosure here.
- Clinch Block – This tool is typically comprised of solid steel, and is used for seating and clinching nails.
- Clinch Cutter – This tool is used to clean out nail holes and open clinches.
- Hoof Pick – This is used to clean out the hooves before shoeing.
- Hoof Testers – This tool is used by a farrier to test the hoof for soreness or injury. It is a 2-pronged tool that applies pressure via a pinching motion along the heel or sole of a hoof. If the horse twinges in pain or recoils against the pressure, some type of soreness is present.
- Shoe Puller – This tool resembles large pliers that are used by a farrier to remove old shoes without causing any damage to the hoof.
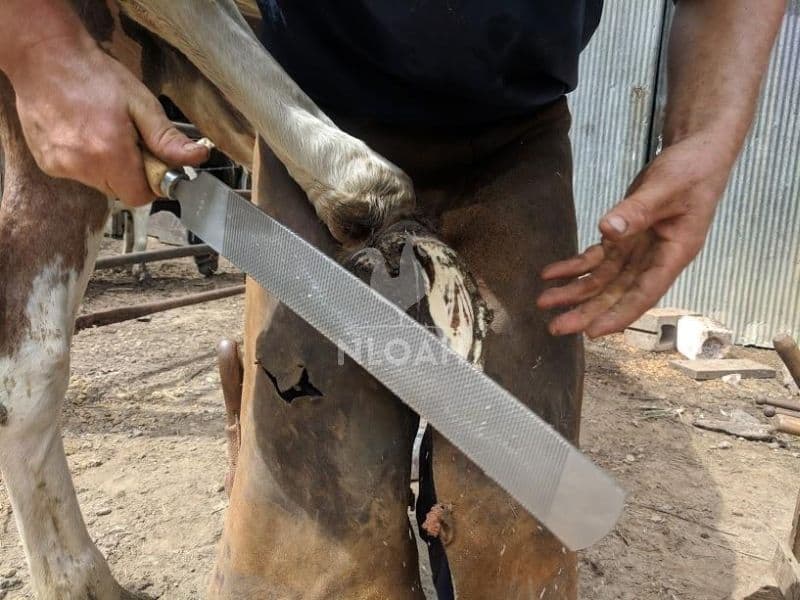
- Rasp – A rasp resembles a large and thick file. After a farrier has trimmed the hoof a rasp is used to level out as well as smooth and slightly round the edges of the hoof. After the horse is shod, the farrier will reach for the rasp again to smooth out the ends of the nails to remove any rough edges and make them as flush as possible to the hoof.
- Nippers – This nail clipper type tool is used to trim away portions of the hoof wall before shoeing, to ensure the angle and hoof is the proper length.
- Driving Hammer – This type of hammer is used to forst the nails into the tough hooves and is shaped like a claw.
- Nail Cutter – This nippers-like tool is used to cut away excess nails after the horse is shod.
- Hoof Stand – This weighted metal stands serves as a foot rest for the hoof while the horse is being shod.
- Hoof Gauge – This tools helps measure the angles of the hoof and ensure that the hoof is even on each side and hoof is in line with the pastern.
- Knives – Farriers use various types of knives (double-edged, curved, and loop)
- Anvil – This is the work surface for the shaping of the horse shoes. The steel base has a rounded horn on at least one end and has a flat surface area on top. The farrier used the horn area to place the shoe around to shape it to match the hoof.
- Forge – Forges are used (either coal or gas fired, typically) to heat up the metal on the horseshoe to allow it to be easily and more perfectly molded.
- Tongs – This 2-ended tool holds the incredibly hot horseshoes when it is taken in and out of the forge and then hammered.
- Pein Hammer – Farriers use either a cross pein or straight pein hammer (sometimes both) to make horseshoes out of raw metal.
- Rounding Hammer – This type of hammer has a convex-shaped face and, is used to shape a horseshoe after it comes out of the forge.
- Pritchel – This type of chisel if exceptionally pointy, and is used to punch holes in shoes, to widen nails, and to remove stubborn nails from old shoes that are stuck in the wall of the hoof.
Parts Of A Hoof
1. The hoof wall functions much like our fingernails: it grows and chips in the same manner. The thickness and brittleness of the hoof wall varies by horse breed and is impacted by the animal’s diet and living environment – both positively and negatively.
2. The periople is the outside of the wall that protects the moisture inside the hoof.
3. The coronary bands encircles the top of the hoof. It is a blood-rich band the hoof grows from and is akin to a human fingernail cuticle. If the coronary band is damaged significantly, it can cause the hoof wall to become deformed and the horse to go lame.

photo above: a horse’s hoof
4. The bottom or underside of the hoof is the sole. It is situated around the frog – a V-shaped portion of the sole. The frog makes contact with the surface when the horse moves and helps the blood circulate inside the foot.
5. The cleft is the middle of the frog that aids the sole of the hoof grip and flex as the horse moves.
6. The bars are situated on either side of the frog, and provide both the hoof and horse with stability and needed suspension for both the frog and wall of hoof.
7. Two bones run on either side of the front leg of the horse between the pastern joint and the knee. These are known as the splint bones, and some believe are what remains after the evolution of what might have been toes.
8. Three bones exist inside the hoof. The short pastern is the longest hoof bone. It stretches down from the long pastern bone present inside the leg of the horse. The other bone, the larger yet shorter, is the coffin bone or pedal. Inside of these two hoof bones are nerves and blood vessels. The third hoof bone is the small navicular bone.
9. Multiple ligaments and tendons run from the leg into the hoof bones. The laminae, a layer of tissue, surrounds the bones. The laminae is highly sensitive and carries blood throughout the hoof.
10. Underneath of the laminae is the digital cushion. It is a pad of rubber-ike tissues that form the horse’s heel. The digital cushion helps the horse absorb the shock that occurs when its hooves come into contact with the surface it is walking upon.
11. The horny laminae surrounds the sensitive laminae. It is a hard layer that attaches to the hoof’s outer all and has no feeling.
12. The white line separates the hoof wall and the horny laminae. It gives the farrier a clearly visible line to guide him or her when trimming the hoof and deciding on the placement and depth of nails.
How To Shoe a Horse
Step 1
Lift the hoof in a steady motion so the horse is not taken by surprise or made to feel off balance. To get a horse to lift its leg, run your hand down the leg, then squeeze gently yet firmly on the tendon that is located just above the ankle:
Step 2
Hold the hoof in place by moving your hip against the hock (the large joint on the horse’s hind leg), and the muscle above the hock known as the gaskin.
Use your knee to help pull out and prop up the hoof on a stand or between your legs. Once the horse is in this position, it is difficult for it to put its foot back down on the ground or kick:
Step 3
Use the appropriate tools, as noted above, to remove old shoes if the horse had not already “thrown” the shoes. To remove a shoe, straighten the nail clinches by bending the tips of each nail that is holding the shoe in place.
Typically, a farrier uses a a hammer and clinch cutter to accomplish this task. By working the blade on the clinch cutter under the clinch and then hitting it with a hammer to straighten it, the nail will loosen.
Close the jaw-like end of the clinch cutters around the rim of the old horseshoes and rock them back and forth until the shoe is loose enough to pull off or falls off. Sometimes a farrier uses a rasp to file away the clinches.
Step 4
Clean the hoof to remove manure, mud, and any other unwanted debris. It is recommended to wash it off to avoid injuring or startling the horse in case an injury, sore spot, thrush, or an abscess is present. Wash and then pick the hoof in a downward motion from the heel to the toe:
Using a little brush to whisk away dirt might be necessary. Be extra careful when cleaning debris around the frog of the hoof, because even a healthy frog can be very sensitive to the touch.
Step 5
Using a hoof knife or similar tool, remove the flaky portion of the bottom of the hoof. This outer layer is generally darker and harder than other sections of the hoof. The farrier must do this carefully and not go too deep or too quickly, or risk injury the horse, potentially causing it to become lame.
Step 6
Now it is time to use the nippers to trim away the excess from the hoof wall. This is the edge of the horse’s hoof. The hoof wall should extend out approximately three to three and three-quarters of an inch from the hoof hairline.
Do not cut too deeply with the hoof nippers or risk cutting into the horse’s sole and causing potentially great injury or lameness.
You should be able to clearly view a ridge between where the hoof wall stretches out paste the sole. The nippers should be able to help trim the edges in the necessary level, to help the horse maintain proper balance.
Trim the hoof from side to side and then heel to toe. An experienced farrier will be able to adjust the angle slightly if the gait of the horse causes it to wear on its hoof in an uneven manner.
Never play around with angling a hoof unless both your skills and knowledge about the horse’s gait are advanced.
Step 7
The rasp is now used to level and flatten the sole of the hoof. This prepares the hoof for the application of the horseshoe. The bottom of the hoof must be level, flat, and smooth before the farrier places the horseshoe.
If the rasp is used without due caution, uneven places on the bottom of the hoof can develop and not only make the hoof too short, but injure the frog.
Step 8
Use a knife to carefully scrape away any beveling on the hoof wall to prevent any uneven wearing or looseness between the sole of the hoof and the horseshoe.
Step 9
The hoof must be sized just like a human foot. Different breeds of horses and horses that are used for certain work tasks or recreational activities often require shoes designed specifically for the type of motion, balance, traction, and speed the activity requires.
The hind and front feet of a horse are shaped differently and will require a different size of shoe. Generally, but not always, a horse needs a smaller size shoe on the hind legs.
Step 10
Keep several different sized and shaped shoes handy on your work box so they are easy to grab quickly while the horse’s leg is up if the first set of shoes does not match the hoof as expected.
It would be unusual for a farrier not to have to pound a shoe at least slightly on the anvil to make it conform perfectly to each hoof.
The horseshoe can be bent using a forge, and possibly the anvil as well. Some farriers choose to grind shoes into the needed dimension with a grinding machine and/or rasp, and not use and anvil or a forge.
Step 11
Secure the horseshoe onto the hoof with nails. Make sure the shoe aligns exactly with the hoof so it sits against the edge of the hoof, before driving the nails:
Drive the nails into the hoof using an outward angle to the tips of the nails. Go only through the wall of the hoof and do not cause pain or potentially serious injury to the horse.
Do not ever force nails into the interior portion of the horse’s hooves. It is highly recommended to use nails that are beveled on one side so they can be better guided into the hoof wall.
Horseshoes can be glued on instead of using nails. The specific methods for application of glue and the types of shoes best suited for this process are detailed by manufacturers of both adhesives and horseshoes.
Step 12
Bend and then remove the tops of the nails once they have been driven into the hoof with your claw hammer. Bend the tip of the nail against the wall of the hoof and then twice of the tip of the nail using nippers.
Make sure to leave approximately one-eighth of the tip bent over the edge of the hole created when driving it into the hoof.
This practice helps prevent the nail from working its way out of the hole, reducing the chance of the horse being harmed by a sharp nail top, and the throwing off shoes too quickly.
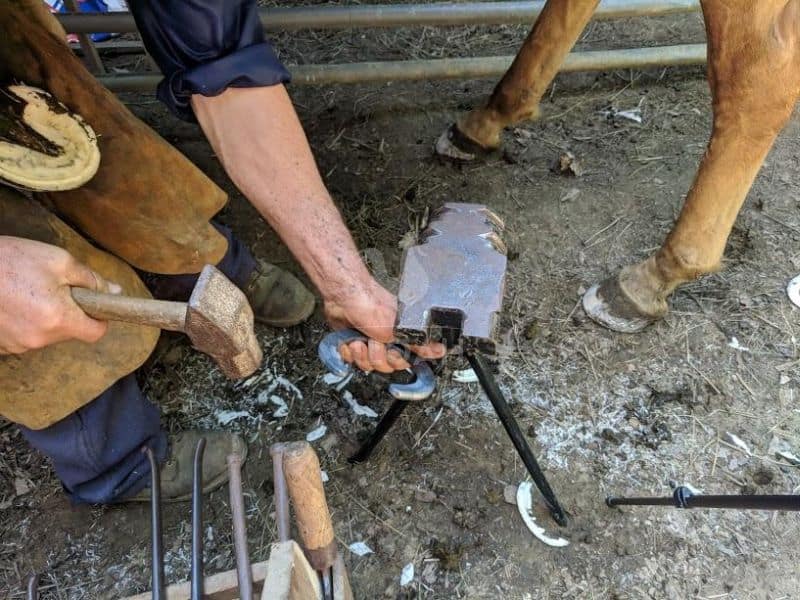
Step 13
Clinch the horseshoe nail by setting the clinch block under the outer hoof wall beneath the nail. Hit the nail head again with a hammer, while gripping onto the hoof in a firm manner to prevent the horse from moving. The nippers can also be used if you do not have a clinch block in your farrier tool box.
Step 14
Grab your rasp one more time and go over the outside of the hoof again to eliminate any rough spots and to smooth away and uneven places on the hoof.
Give the nail heads extra attention to make sure they are filed as smooth and close to the hoof wall as possible. To test your work, run a piece of cloth over the hoof wall.
Horses need to have their hooves trimmed and usually shoes replaced, about every eight weeks.
Trimming Medium Livestock Hooves
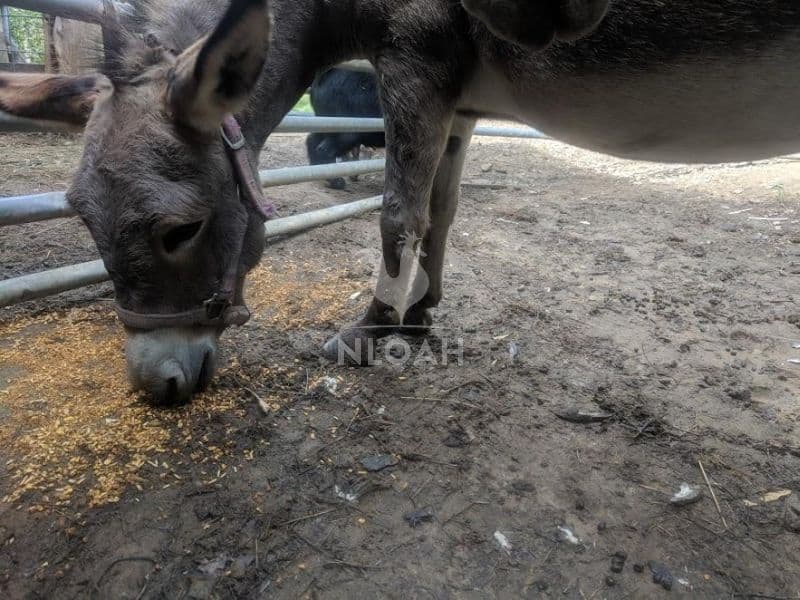
The hooves of miniature donkeys, miniature mules, ponies, and miniature horses must be trimmed regularly as well, even if they are not being shod.
Most folks trim the hooves of their goats, but our herd free ranges and has so far been able to file down their hooves naturally and without injury to their hard little split-toe hooves.
Miniature horses and ponies that are going to used for pulling carts, working the farm, or traveling on pavement really do need to be shod.
It’s not necessary to shoe miniature donkeys or mules because their hooves are far harder than those of horses.
It is possible to find horseshoes to fit standard donkeys and mules, but finding shoes to fit the smaller versions of the animal is really next to impossible.
Even though no shoes are needed for miniature donkeys, mules, as well as other small-statured equine that are not being worked or ridden/driven on pavement, they still needed trimmed about every eight weeks – six is recommended for donkeys.
You can follow the same trimming process using the same tools as noted above. There is no frog to be careful of on donkeys, but the hooves still must be cleaned and a search for broken spots or abscesses, still conducted.
These are healthy and well-trimmed miniature donkey hooves. Prior to the trimming, Blossom and Bess’s hooves were shaped like wooden dutch shoes. Donkey hooves tend to grow far more quickly than those of horses:
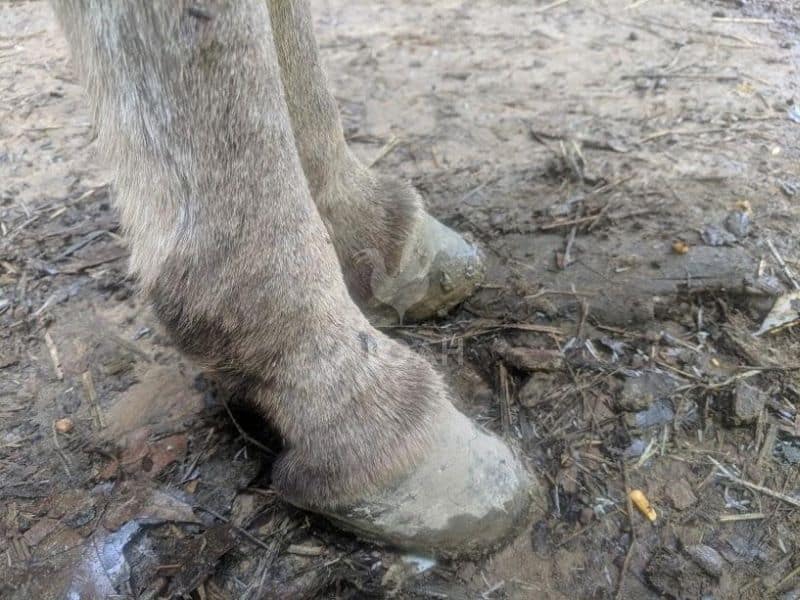
Because our miniature donkeys were rescues, their hooves were deformed and that may cause the outward angle in between trimmings.
When dealing with either large or small livestock that does not want to cooperate with the trimming process, do not give up – just summon all of your patience and slow the process down.
Do not untie the animal, keep it in place unless the threat of an injury is likely to occur because of pulling at the tied lead rope or kicking.
Simply speak calmly to the animal, pet it or rub it down, and offer a small treat to refocus its attention away from its hooves.
Sometimes the poor behavior during trimming can be due to an injury, either to the hoof itself or soreness on the leg or in the shoulder area.
It’s always best to monitor the animal closely for several days before trimming or shoeing to look for any limping or leg favoring.
If the animal has a current or past injury to a leg or other part of the torso, standing with too much pressure and weight on that leg or side of the body during trimming or shoeing can cause fear, panic, or pain – resulting in bad behavior for the farrier.

Tara lives on a 56 acres farm in the Appalachian Mountains, where she faces homesteading and farming challenges every single day, raising chickens, goats, horses, and tons of vegetables. She’s an expert in all sorts of homesteading skills such as hide tanning, doll making, tree tapping, and many more.