One of the things you start to notice after you do more and more of your own cooking, is just how inferior so many of our store-bought goods are.
The major revelation for me was trying spices I had grown and processed myself. There’s just no going back…
And while I haven’t grown my own ginger yet, I have made my own ginger powder from fresh, organic ginger root, and let me tell you something: my peach cobbler has never gotten more praise!
It got so much praise in fact that I won’t shut up about it, and now I am spreading the gospel of homemade ginger powder far and wide.
It is so easy to make, especially if you have a food dehydrator already, and the flavor is incomparable.
It’s amazing in many desserts, but also in savory dishes like stir fry and even beverages. I love it for lemon-ginger tea.
Anyway, that’s enough from me. If you want to make your own deliciously warm homemade ginger powder, keep reading.
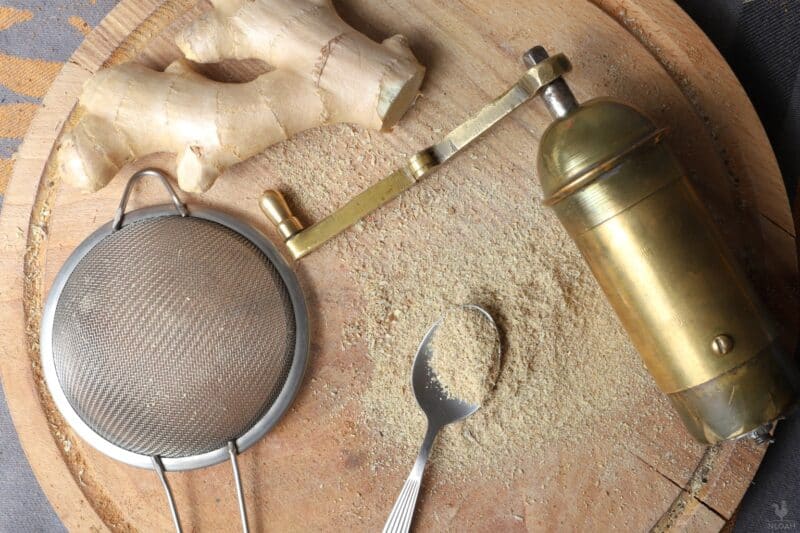
What You’ll Need
You don’t need much to make your own ginger powder at home. I highly recommend you get a food dehydrator if you haven’t invested in one already, but you can make it in your oven with a little bit of extra care. Get the following, and then go on.
1. Fresh, Young Ginger Root
To make your own ginger powder at home you’re going to need ginger root. I recommend you start with ginger root, not leftover pulp, and not ginger skin.
The root is best as it will have the best flavor, and it will also grind down into the finest possible powder.
To check if your ginger is young, try to snap off a small piece of the root; if it breaks cleanly and does not appear very stringy, you’ve got a good piece. Older pieces will work, but they aren’t as flavorful.
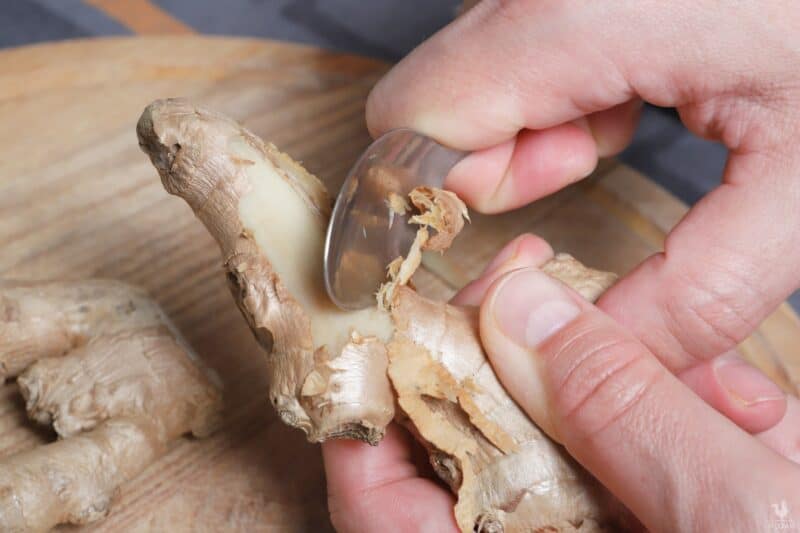
2. Spoon
For my money, a metal teaspoon is the perfect ginger peeling tool. The weird, lumpy shape of the root means it is a huge pain to try and tackle with a vegetable peeler, and using a paring knife invariably takes too much time, and you’ll lose some of that scrumptious flesh unless you’re handy with a knife.
You can use a spoon, pulling it towards yourself, to scrape the skin right off the root easily.
3. Paring Knife
For older ginger root or tough nooks and crannies you’ll still need a paring knife to get in there and get the last little bit of skin off.
You’ll also need this to slice your ginger root into super thin slices, so make sure you’ve got your sharpest and best knife for this task. As always, be careful!
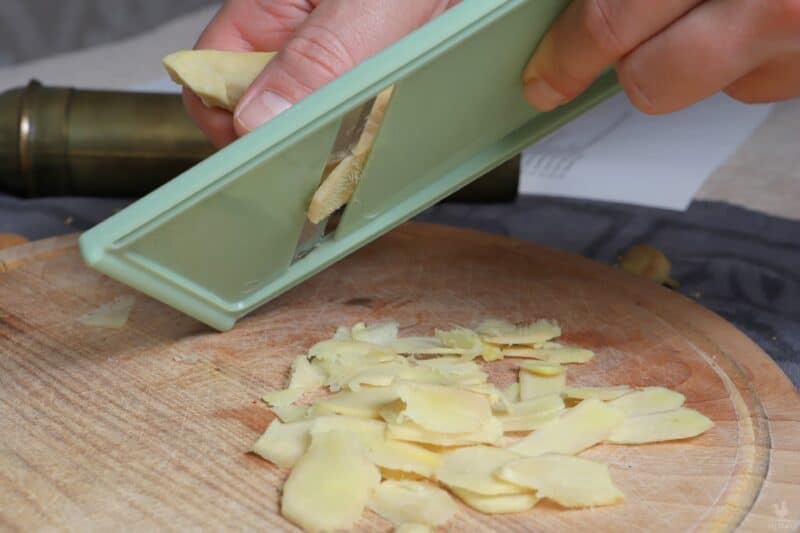
4. Mandolin Slicer
If you have one, a mandolin slicer is perfect for slicing your ginger because it will produce perfectly uniform and very thin slices.
5. Cutting Board
Just what it says. Use your favorite, clean, and completely dry cutting board.
6. Oven
If you don’t have a food dehydrator or you just don’t want to haul the thing out, you can use your oven to dry the ginger.
The trick is that most ovens won’t go anywhere near low enough for the job, meaning you’ll have to cycle it and keep an eye on it.
If your oven goes down to 175°F, you’ll be in good shape. If your oven won’t go below 250°F, think twice because you’ll probably cook the ginger and ruin it.
7. Food Dehydrator (Optional)
A food dehydrator will make quick work of drying out your ginger prior to grinding. You don’t have to have one of these for the task, but it will make things a lot easier and more consistent.
8. Coffee Grinder or Spice Grinder
you can use a coffee grinder or spice grinder to quickly and easily turn the dried ginger root into powder.
You might be able to use a high-end food processor, but they are not optimized for this task.
9. Sieve
A common kitchen sieve will be needed to finish grinding the ginger powder. You’ll filter the powder through it to ensure uniformity and consistent size, and this will reduce waste by allowing you to regrind the larger chunks.
You don’t need anything special here, just make sure it’s clean and absolutely dry.
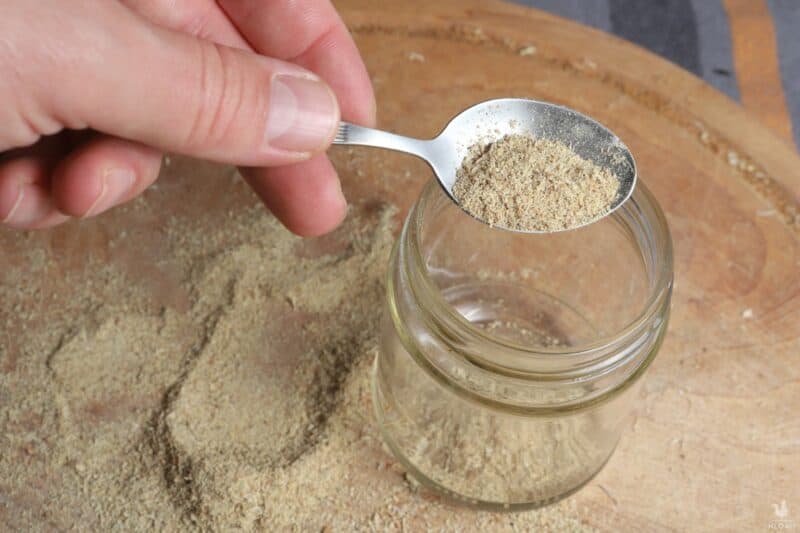
10. Glass Jar
Always store your homemade ginger powder in an airtight glass jar. This stuff is so fragrant, it has a tendency to taint plastic and I swear that plastic degrades the flavor of ginger powder.
I don’t think I can prove it scientifically, but I’ve made several batches and between storing them in a glass and plastic container I can definitely taste a difference. Again, make sure this container is absolutely clean and dry.
And that’s all you need, if you have a well-equipped kitchen you probably already have all of this stuff except the ginger. With all that ready to go, let’s move on.
Making Your Powdered Ginger, Step by Step
The following steps will easily take you through making your own powdered ginger at home. It really isn’t difficult, as all the steps are simple, you’ll just need a little patience while waiting for it to dry.
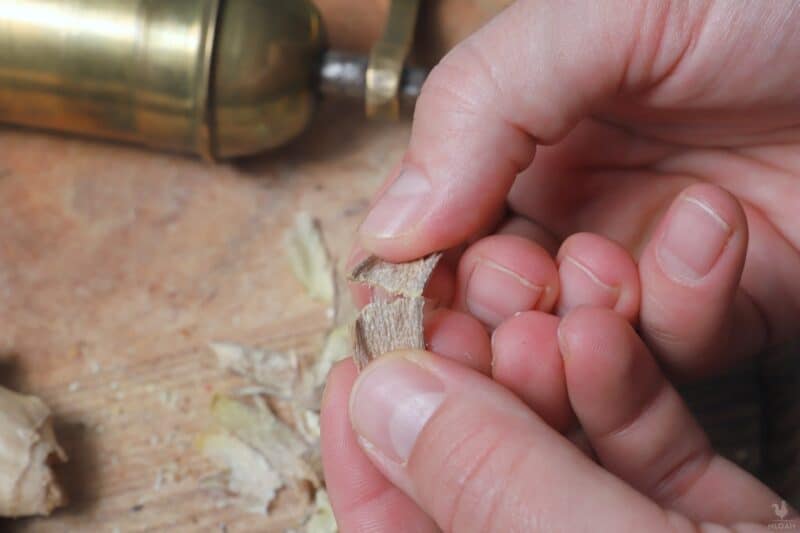
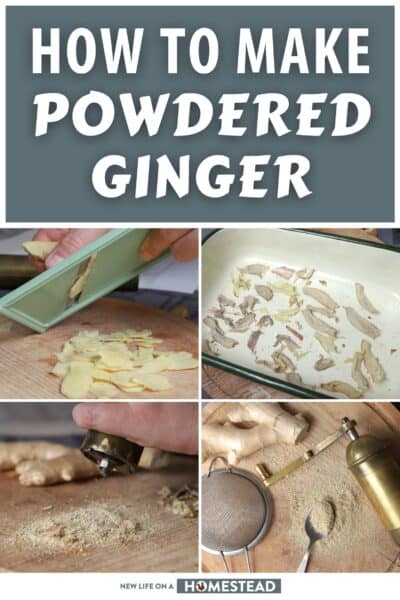
Step 1: peel ginger. Using your spoon, paring knife, or both get all of the skin off of your ginger root. Take care to avoid removing too much flesh because it will be wasted.
Step 2: preheat food dehydrator or oven. While we prepare for the next step, go on and get your food dehydrator or oven preheating. Set the food dehydrator to 100°F / 37°C or your oven to 175°F / 80°C.
Step 3: slice ginger. Time to slice your ginger as thin as you can. The ideal thickness is just a couple of millimeters, just enough so that it is barely translucent. If it helps, cut up the root first into similarly sized chunks to make the process easier.
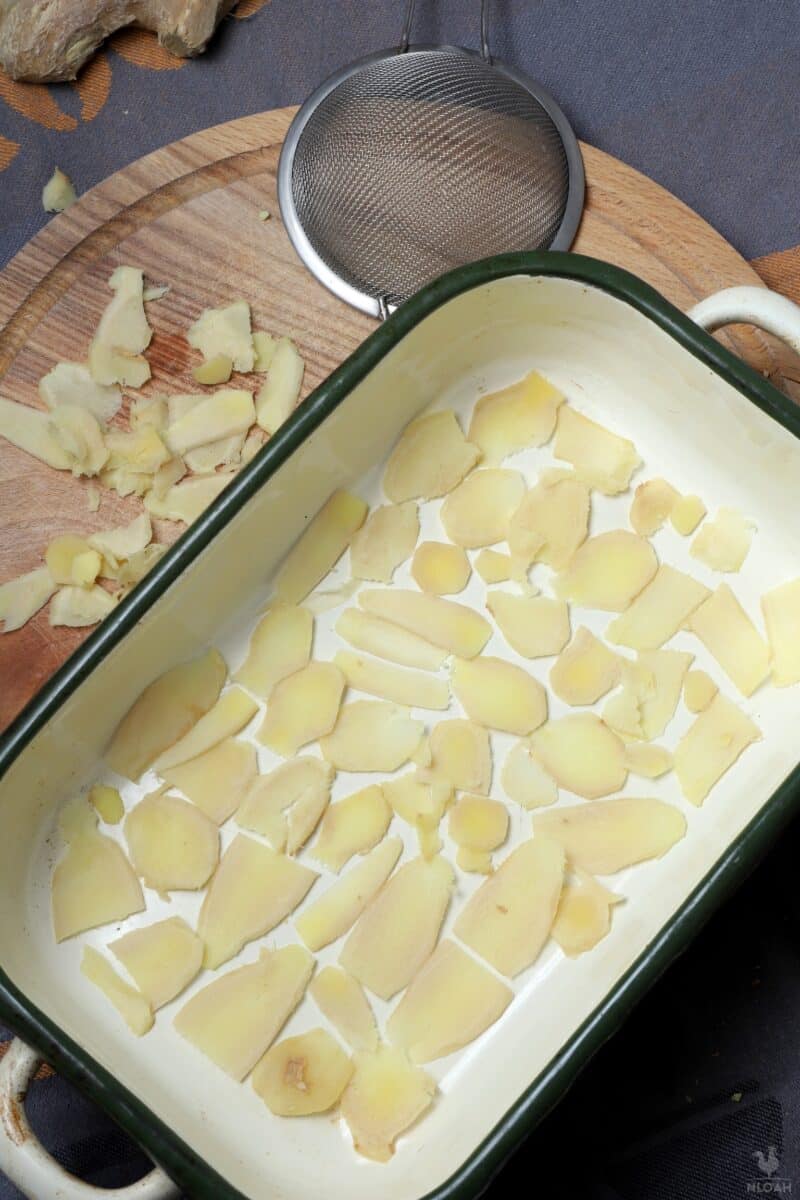
Step 4: lay slices on baking sheet. This is the tray out of your food dehydrator, or else any common baking sheet if you are using an oven.
Lay out the slices flat in a single layer, being careful not to put them edge to edge. If you put the pieces too close together or allow them to overlap, it will impede the drying process.
Step 5: dehydrate. Put your ginger slices in the dehydrator or the oven to dry them out.
In the dehydrator, they’ll need to remain anywhere between 4 and 6 hours if you have them sliced thin enough. In the oven, they’ll need anywhere from two and a half to 3 hours.
You can also dehydrate your ginger by sun-drying it. Simply place the slices on the baking sheet and cover them with mesh to keep bugs out.
Then place the tray in direct sunlight for around 8 hours on a dry, hot (90+°F) day. Bring them in at night, then repeat the next day until they are crisp as described below.
Step 6: check. If processing in the oven, you should keep the door cracked to help keep the temperature as low as possible.
Don’t let the ginger start cooking or else that’s going to ultimately ruin your ginger powder.
If your oven won’t go low enough, you might need to do the best you can and turn the heat on for a time before turning it off to keep the internal temperature reasonably low.
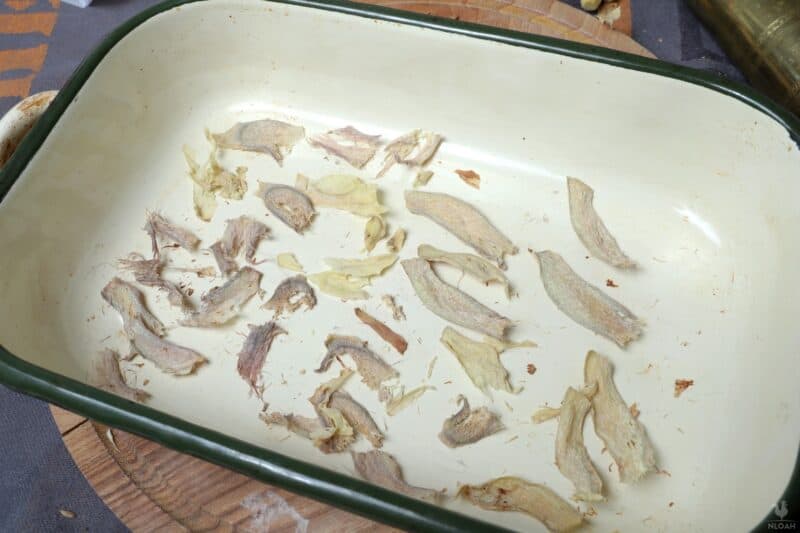
Step 7: test. After the prescribed amount of time has gone by for either method, pull out a medium-sized ginger slice and try to snap it in half. If it snaps like a piece of candy, or a chip, it is ready.
If it flexes or if it yields a bit before it finally breaks, you need to dry it longer. Maintain temperature and give them another hour or two in that case.
Step 8: when dry, allow to cool. Assuming the ginger root is fully dried and it snaps cleanly in half, you can remove it from the heat and set it aside to cool.
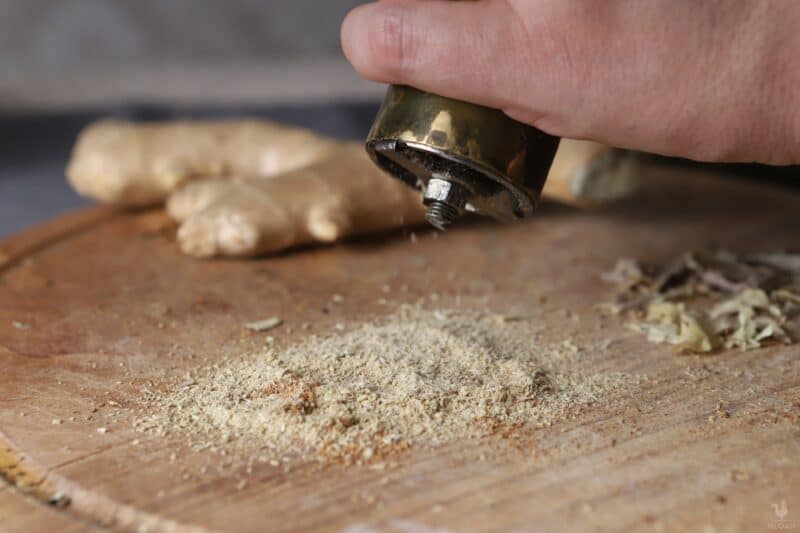
Step 9: grind. Now, load a handful of slices into your grinder being careful not to overfill it. Pulse it a few times until you see the ginger will be reduced to a powdery consistency. Remember, we are going for powder here, not granules or grains.
Step 10: sift. Pour your new garlic powder through the sieve and into your glass container or onto a plate. Then take the larger chunks that got caught and add them to the remainder of your ginger.
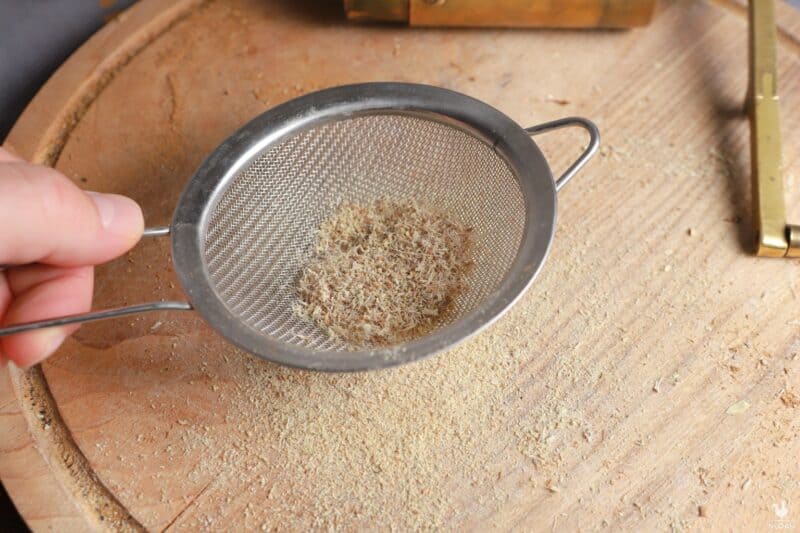
Step 11: repeat steps 9 and 10. Repeat steps 9 and 10 over and over until you have no more ginger left.
Step 12: seal and store. Once all of the dried ginger slices and leftover pieces are ground into powder it is time to tightly cap your glass jar or other container and then store your ginger.
Step 13: finished! Just that easily you got your own super fragrant and super delicious homemade ginger powder.
Your ginger powder will keep for at least 6 months if kept out of direct sunlight in a cool dark place. You can also store it in your freezer for 12 months or even longer, though you must take pains to protect it from moisture.
Helpful Hints and Tips
- Find better ginger root at specialty groceries. Don’t be surprised if the ginger root from your usual grocery store is all hard, stringy stuff. Try a health food store or an Asian supermarket to find young and extremely aromatic fresh ginger root.
- If you’re in a major rush, you can leave the skin on. If peeling your ginger is too much of a pain, you can skip peeling it. Just make sure you wash it really well and then let it totally dry out before you get back to business. But note that the finished product won’t be quite as good, and many commercial powders grind up the root skin and all, and you can tell the difference!
- Use it quickly. Ginger powder will last for a while in storage, but it loses its potency pretty quickly. If you only use your ginger periodically or for special dishes, consider making a smaller batch.
Tom has lived and worked on farms and homesteads from the Carolinas to Kentucky and beyond. He is passionate about helping people prepare for tough times by embracing lifestyles of self-sufficiency.