I don’t know about you, but I use entirely too much garlic when I’m in the kitchen. I can’t get enough of the stuff! Fresh garlic, of course, but it’s garlic powder that I reach for from time to time. And even better, it’s my own garlic powder that I’ve made at home!
I didn’t always make my own garlic powder. Most of my life I slogged on with the store-bought stuff and had no idea what I was missing.
But after a friend got me turned on to drying it out myself and grinding it up, there was no going back.
The difference is night and day, and it’s so easy it’s something that anyone can do with just a little bit of extra work.
I’ll tell you everything you need to know to make your own delicious, fragrant garlic powder at home below.
Why Make Your Own Garlic Powder?
If you’re also like me, you’re probably thinking right now, why on Earth would I make my own garlic powder? What’s the point, when I can buy the stuff at the store for pennies?
Well, let me tell you: that stuff you’re buying at the store is exactly that.
Most commercially-made garlic powders are of extremely low quality, typically made with garlic that is too old or unsatisfactory to be used for any other purposes in the food industry.
And much of the time, the garlic powder we get at the store is dried and ground up with the skins still on!
Not only is it gross, but it definitely affects the flavor of the finished product.
You ever notice how garlic powder has a distinctly unpleasant aftertaste?
And I’m not even talking about the harshness of fresh garlic; it just tastes off! That’s because it’s terrible!
But you don’t have to suffer through that garbage anymore when you follow my super simple recipe below.
When you taste the difference in your herb-roasted chicken or your breaded parmesan chicken, I know that you’ll never go back to the store-bought stuff. And best of all, I promise it is so easy to make you won’t think twice.
That’s enough of me selling it, let’s get to it.
Tools and Materials
You don’t need a whole lot to make your own homemade garlic powder. Chances are you have all of these things in your kitchen already.
- Garlic: you’ll need garlic, of course. You can use any kind of garlic you prefer, but the fresher it is the better. And, of course, you want to make sure all of the garlic you’re using to make garlic powder is wholesome and unblemished. If you have any cloves or bulbs that are starting to go bad or get soft, discard them.
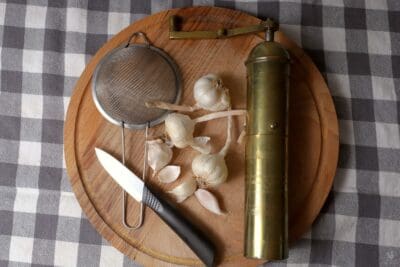
- Paring Knife: a sharp paring knife will help you process the garlic easily and slice it to a thinness that will facilitate drying. You can use a larger chef’s knife if you are comfortable with that, just to make sure it is sharp and precise!
- Cutting Board: a cutting board to slice your garlic. Use whatever your favorite is. So long as it’s clean, it doesn’t matter.
- Food Dehydrator or Oven: to turn our garlic into garlic powder we’ve got to dry it and the best way to do it is in a food dehydrator or in our oven. Either will work, though a food dehydrator is typically much more precise at the lower temperature we’ll need to dry out the garlic without cooking it.
- Baking Sheet: a common baking sheet sized to fit into your dehydrator or oven.
- Parchment Paper: to line the baking sheet.
- Food Processor or Coffee Grinder: once the garlic is dried we’ve got to turn it into powder, and by far the easiest way to do it is using a food processor or a clean coffee grinder. But I caution you if you’re going to use a grinder, because there is a non-zero chance it will smell like garlic forever after!
- Mortar and Pestle (Optional): my personal favorite way to process garlic powder into a super fine consistency is with a traditional mortar and pestle. Aside from keeping dust down, it lets me get a much finer texture which works better in most recipes. Don’t go out of your way to get one of these or spend for it if you don’t have one, but it is a nice touch for this operation.
- Sift: sifting your garlic powder will help ensure that it is of uniform size and prevent waste.
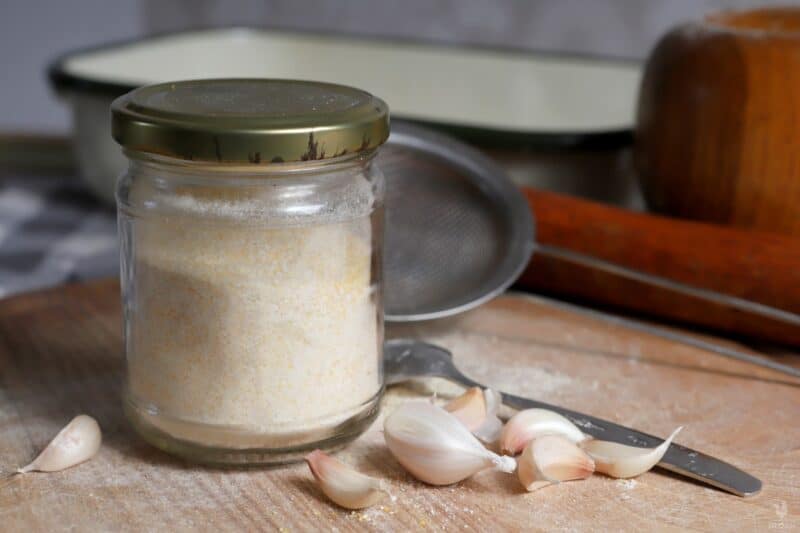
- Jars: once your garlic powder is finished you’ll need to store it in an airtight and preferably glass container or jar. It will keep for a long time and be ready to use.
And that’s absolutely all you need. Now it’s time to get down to the fun part!
Making Garlic Powder, Step by Step
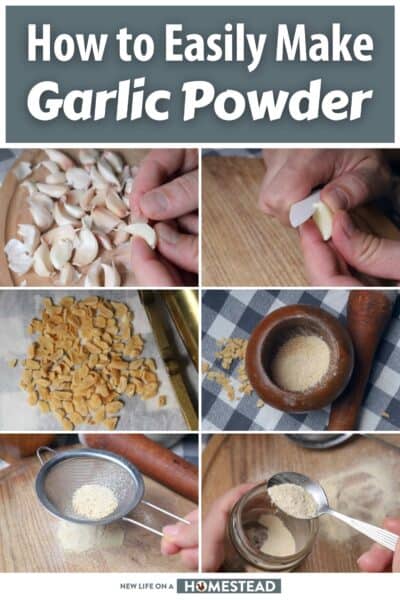
Step 1: Choose bulbs. Grab the best and freshest bulbs of garlic that you have.
You’ll need at least one whole bulb of garlic to make a decent batch of garlic powder, but if you like to have more on hand, use two, three or even more.
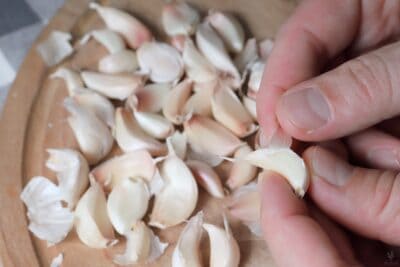
Step 2: Separate cloves. Pop each and every clove out of the bulb of garlic.
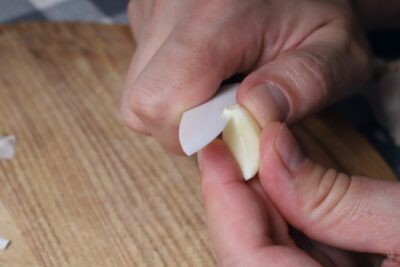
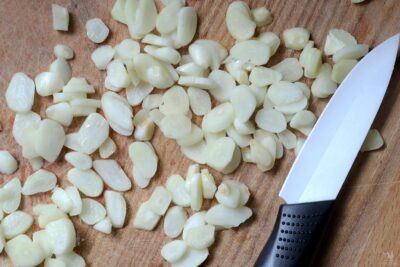
Step 3: Peel cloves. Carefully peel the papery skin off of each clove.
Note you do not want to smash the cloves with your knife or other tool; they need to stay intact for the process so you can slice them into a uniform size to ensure even drying.
Step 4: Cut root end from each clove. Those tough, woody root ends need to be removed from each clove as normal.
Slice them off carefully, being careful not to remove too much of the flavorful flesh that we want to keep.
Step 5: Slice each clove of garlic. Take your time, and uniformly slice each clove of garlic to the same thickness.
A quarter-inch thick is acceptable, but a little thinner is better because they will dry out more quickly and evenly.
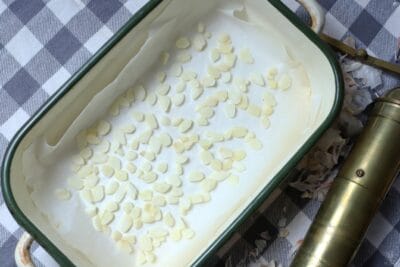
Step 6: Place garlic slices on baking sheet. Place all of the slices of garlic on your baking sheet that has been lined with parchment paper.
Don’t cram them on there; leave a little bit of space between each slice to enhance drying.
Step 7: Preheat food dehydrator or oven. If you’re using an oven, you’ll need to set it as low as it can go.
For many ovens this is around 200 °F / 93 °C, although some can do 150 °F / 65 °C. If using a food dehydrator, set it to 125 °F / 50 °C.
Step 8: Dehydrate garlic. This is a slow process. If you’re using an oven, check on your slices after about 2 hours and flip them. Continue drying them and repeat the process as needed.
In a food dehydrator, your garlic will need at least 8 hours and maybe a little longer. In an oven, it’ll go faster, expect to keep it in there for 2 hours.
Step 9: Check garlic slices for doneness. You’ll know your garlic is done when each individual slice is a golden yellow-brown color and brittle to the touch, breaking cleanly.
Step 10: Remove garlic and allow to cool. Remove your garlic from the food dehydrator or oven and set it aside for a short time to allow it to cool.

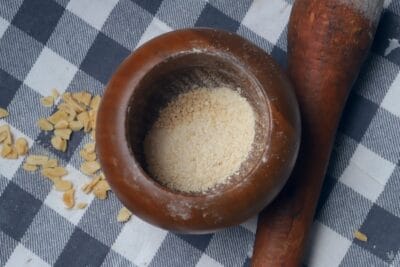
Step 11: Grind garlic. Place your garlic slices in your food processor, coffee grinder, or mortar and pestle. Don’t place so many that you overwhelm your device.
Pulse your food processor or coffee grinder and watch as the garlic starts to break down. When most of the garlic has been reduced to powder, proceed.
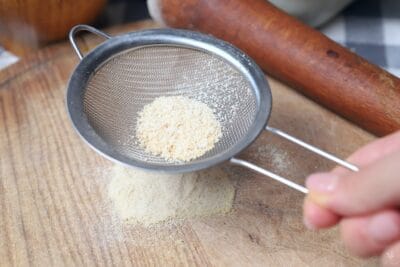
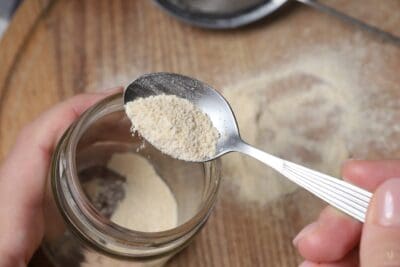
Step 12: Sift garlic. Take the batch of garlic you just processed and sifted it into a clean, dry bowl, or directly into your container depending.
Any of the larger bits and chunks that get left over you can add to the remainder of the dried slices for grinding the next batch.
Step 13: Repeat. Repeat Steps 11 and 12 until all of it is ground into a fine powder.
Step 14: Store and done! With all of your garlic safely stored in your container you are finished!
Your garlic powder, stored properly, will last at least a couple of years and possibly longer.
As long as it doesn’t get wet it won’t spoil, but if you notice it’s starting to lose its flavor or pungency it’s probably getting close to that time, and you shouldn’t hesitate to throw it out and make a fresh batch.
Tips for Keeping Your Garlic Powder Fresh
- Keep it cool. Your garlic powder will last longer if you can keep it in cool temperatures. A cooler cabinet is better than a warm pantry.
- Keep out of direct sunlight. Sunlight is also bad for your garlic powder because it will both heat it up and, in the case of a clear container, start to obliterate your garlic’s flavor. Keep it in the dark, preferably, or out of the sun at least.
Freeze it! You can freeze your garlic powder to really extend the shelf life. You can easily get four years or more out of garlic powder that’s frozen in an airtight container protected from moisture.
Tom has lived and worked on farms and homesteads from the Carolinas to Kentucky and beyond. He is passionate about helping people prepare for tough times by embracing lifestyles of self-sufficiency.