Basil is one of the most ubiquitous and most beloved kitchen herbs used around the world. It adds a sublimely sweet, fresh note to many dishes, and even better it is easy to grow yourself.

The only downside, if it has one, is that fresh basil will not keep very long at all once it has been harvested. Although it’s tempting to use it up all at once, it’s better if you can keep it fresh longer for use throughout the season or the year.
Luckily, it’s really easy to do that by freezing it. Believe it or not, frozen basil will stay safe and flavorful for months on end and be ready to use when you need it. You’ve also got several ways to do it depending on your needs. I’ll tell you about three of the best below.
Table of Contents:
Can You Freeze the Whole Leaves?
Yes, you can. It’s possible to freeze whole basil leaves if you want to for use as a garnish or for flavoring stock, soups, and sauces. No chopping or mincing required.
On the other hand, it’s just as viable to chop, mince, or puree it and freeze it if you want to go that route but you’ll generally have better results freezing whole leaves or pureed basil, not going with an “in-between” option.
Can You Freeze Anything Besides the Leaves?
You can, but I wouldn’t. Basil should be removed from the stems before freezing no matter which way you want to go about it. Leaving it on the stems can impart a bitterness or promote freezer burn which will degrade the quality and reduce flavor.
It sounds like a chore, but it really isn’t: You can cut the leaves off or pinch them off at your convenience, so it doesn’t take long.
But that out of the way, it’s time to get on to our methods…
Option 1: Quick and Easy Freeze
Your first option for freezing basil is quick and easy as the name suggests. It really doesn’t get much easier than this, and produces surprisingly good results (although it’s possible to do better if you want to invest more time upfront in preparation – see the other two methods).
What You’ll Need
Paring Knife: a paring knife can help you cut basil leaves off of the stems without damaging them. If you don’t have one or don’t want to go through it, you can pinch them off just as well.
Paper Towels: paper towels are useful for blotting and drying your basil after washing. You can let them air dry, but it will take longer.
Cookie Sheet: you need a cookie sheet, baking sheet, or similar piece of cookware for initially freezing your rinsed basil. Any size will work as long as it fits in your freezer.
Freezer-safe Container: you won’t be leaving the basil on the cookie sheet after you freeze it. Once it is completely frozen through, you can transfer it into a container for long-term storage. Freezer bags work fine, as will any kind of airtight plastic storage container. It’s your choice!
Steps
Follow these steps if you want to quickly and easily freeze basil with minimal fuss and effort
Step 1: remove leaves. Cut, snip, or pinch the leaves off of the stems, discarding the latter.

Step 2: rinse. Rinse the leaves alone thoroughly under cool water. Make sure to toss them carefully without tearing them or breaking the vein in the center. Once you’re sure they are all thoroughly rinsed, give them a good shake to remove excess water.

Step 3: dry. Lay out your basil leaves in a single layer on a cutting board or a clean counter, and then pat them dry with your paper towels.

Once you get rid of all the water that you can, give them another 30 to 40 minutes to fully dry depending on the temperature and humidity of your house.
Step 4: place on cookie sheet and freeze. Spread the basil leaves out on the cookie sheet in a single layer. Try to keep them from overlapping. Pop the cookie sheet in the freezer for about half an hour to freeze the leaves solid.

Step 5: Place basil in storage container. Take the cookie sheet out of the freezer and carefully load your basil into whatever you’re using to store it. Don’t pack them in; make sure they are light and fluffy so that they will freeze evenly and not stick together.

Step 6: Place container in freezer. Load your container into the freezer. The basil will freeze in short order, around 30 minutes.

Step 7: finished! Your basil is now frozen and ready for long-term storage.
Basil Freezes Well, But Will Darken When Frozen
One thing to keep in mind with this method, and most methods of freezing basil, is it will significantly darken or even turn black when it freezes.
This won’t necessarily hurt the flavor and, so long as you don’t let it get freezer-burned, you should have at least a few good months of storage out of it. But, it can be off-putting if you plan on using it as a garnish or if it contrasts strongly with a sauce or some other dish.
If you want your basil to remain a bright, emerald green, check out option number three on our list of methods here.
Option 2: Blanch and Freeze
A slightly more involved method from the first one, blanching and then freezing basil does two things for us: it further prevents degradation by halting the processes of decay, and keeps the basil tasting even fresher and brighter for longer.
For serious basil fanatics or busy at-home chefs, this is probably the best method if you can spare just a little more time prepping it.
What You’ll Need
Paring Knife: again, you can use a paring knife to cut the basil leaves off of the stems. You can also pinch them off.
Paper Towels: these are needed to quickly and efficiently dry off the basil once you’ve blanched it.
Saucepot: you need a sauce pot to quickly boil the basil. You don’t need a particularly big one unless you’re freezing a gargantuan batch.
Large Bowl: a large bowl to hold water for blanching is required. I prefer a metal one for safety since it’s possible to temperature shock and break a glass one if you have an accident.
Strainer Basket: a strainer basket, fryer basket or similar contraption is useful for dunking the basil and then immediately extracting it quickly and under control.
Timing is everything for this method, and leaving the basil in for even a few seconds too long when boiling can cook it and thusly ruin it for freezing. If you have to, you can use a slotted spoon but you’ll have to be quick and careful.
Water: you’ll need water for boiling in your sauce pot and water for blanching in the bowl. Be careful not to overfill either container and leave room for displacement.
Ice: a few good handfuls of ice in your bowl full of water will allow you to rapidly blanch the basil leaves when pulling them out of the boiling water.
Cookie Sheet: again, you’ll need a cookie sheet, baking sheet, or similar piece of cookware for quickly freezing your basil leaves.
Freezer-safe Container: and once more, you’ll need any freezer-safe container of your choosing to store your basil once it is completely frozen.
Steps
The following steps will tell you how to blanch and then freeze basil for even better flavor and longer life while in storage.
Step 1: fill sauce pot and bowl with water. Be sure to leave room for displacement when dunking your strainer basket. Add ice to the bowl that you’ll use for blanching. Both pots should be filled with water at this point.

Step 2: bring water to boil in sauce pot. Place the sauce pot on the stove and bring the water to a rolling boil.
Step 3: remove leaves. While your water is heating up, snip, cut, or pinch off the basil leaves from the stems and discard the stems.

Step 4: rinse. Give the basil a thorough rinse, being careful not to break it or tear it.
Step 5: Place basil in strainer basket. Load the produce into the strainer basket. Check one more time to make sure that your water level isn’t too high in your sauce pot.
Step 6: dunk basil in boiling water. Carefully lower the strainer basket into the sauce pot of boiling water. You can use a spatula of sorts to make sure the leaves are completely submerged, like so:

You want to leave it under for at least 10 seconds, but no more than 15 seconds or so. Any longer than that and it’ll begin to cook, meaning it isn’t going to freeze properly and taste good.
Step 7: remove strainer basket and dunk in bowl of ice water. Moving quickly but carefully, remove the strainer basket containing the basil and immediately immerse it in the bowl of ice water. Leave it for just a few seconds to make sure it is completely chilled.

Step 8: drain and dry basil. Remove the strainer basket from the ice water, then remove the basil from it. Spread it out on a cutting board or clean countertop and pat it dry with paper towels. Give it another 30 minutes or so after this to make sure it’s completely dry.

Step 9: Place basil on cookie sheet. Spread out the leaves on the cookie sheet in a single layer, taking care to prevent serious overlap.

Step 10: Place cookie sheet in freezer. Place the cookie sheet in the freezer and give it about 30 minutes to freeze the leaves solid.

Step 11: Place basil in freezer container. Take the sheet out of the freezer and carefully transfer the basil from the sheet to your chosen container. Be careful not to break the leaves and don’t pack them into the container. Load them in loosely for best results.

Step 12: Place container in freezer. Put the container back in the freezer for long-term storage.
Step 13: finished! You are done, and your basil will keep for at least 6 months when blanched and frozen.
Can You Freeze Basil Leaves without Blanching?
Yes, you can. It is entirely possible and effective to freeze basil leaves without blanching them, but the results won’t be as good.
Blanching prevents a degree of darkening and blackening when it’s frozen, and also significantly improves the flavor and freshness, so it’s worth doing.
If you’re in a major rush, you don’t have to.
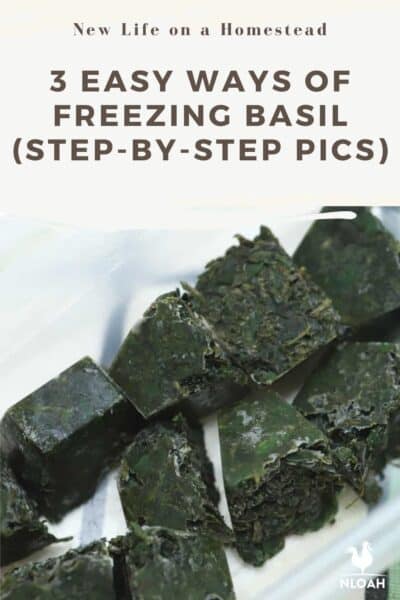
Option 3: Puree and Freeze
A great way to freeze basil is the first puree it with a little bit of olive oil and then pop it into the freezer. Although it slightly changes the flavor profile and applications, it almost entirely prevents darkening and will make the basil taste richer.
Do it right and you’ll also have pre-portioned cubes of basil to pull out and use when needed.
What You’ll Need
Food Processor: any good food processor or blender with a fine blade suitable for chopping herbs or leafy vegetables can do the job here.
Olive Oil: you’ll need to drizzle in olive oil during the blending process to both coat the basil for preparation and to lubricate it enough so that it can be rendered into a puree.
Paper Towels: once more needed to dry the basil after washing.
Freezer-safe Container: as always, you’ll need a freezer-safe container to store the basil in. Multiple Small containers work best unless you are okay with chiseling off a chunk every time you need it.
Ice Cube Tray (Optional): this is one of the best ways to store pureed basil in the freezer.
It works wonderfully to prevent a mess, and makes it easy to take out just what you need in a pre-portioned quantity. You can use any freezer-safe container, described above, but consider getting ice cube trays for the purpose.
Steps
These steps will take you through the process of pureeing your own basil and olive oil blend for freezing.
Step 1: remove leaves. Pinch the leaves off of the stems and discard the stems. No need for a knife, we’ll be wrecking the leaves in the blender soon enough.

Step 2: wash. Give the basil leaves a good, thorough rinse under cool water, making sure to toss them several times.
Step 3: dry basil. Lay out the basil on a clean cutting board or counter, and then pat it dry with paper towels.

It’s still important to dry it to remove water prior to blending with the oil for best results. Even if they seem totally dry, give them another 30 minutes or so to make sure they are completely dried out.
Step 4: load basil into food processor. Open the top of your food processor and, making sure the mincing blade is installed, load the basil. Don’t pack it in.

Step 5: pulse. Pulse the blender once or twice to roughly chop the basil.
Step 6: drizzle oil and pulse again. Drizzle in just a little bit of olive oil, then pulse a few more times to chop and coat the basil with the oil.

Step 7: puree. If you’re unsure what setting to use or how to proceed with your lender, consult the manual. Turn it on at the appropriate speed and slowly drizzle in olive oil until the basil forms a thick paste. If needed, stop and scrape down the sides before resuming.

Step 8: pour basil mixture into ice cube trays. If you’re using ice cube trays, fill up each compartment in the tray with the basil olive oil mixture before putting it in the freezer.

Give it at least an hour to freeze. Once this is done, move on to and complete step 9. If you’re not using ice cube trays, go directly to step 9.
Step 9: Place basil mixture in container. Pour out your basil mixture into your container or containers. Remember that smaller individual containers will make it easier to access and use when you need it.
If you already froze your basil into ice cubes, remove them from the tray and then load them into your containers. This is necessary to protect them from air.
Step 10: Place container in freezer. Stick the container with your basil in the freezer, double-checking to make sure that it is completely sealed.

Step 11: finished! Your basil olive oil puree is now finished, frozen, and ready for long-term storage. Expect to get at least 6 months out of it this way, and it can last for nearly a year with very good flavor.
A Couple of Quick Tips…
If Using Ice Cube Trays, Each “Cube” is About 2 Tablespoons
My favorite part about this method when done with the trays mentioned above is that my portions are already measured out for me.
If you use a standard ice cube tray, each one of those little cubes will equal about two tablespoons of basil and olive oil. That makes whipping together a recipe even easier!
Olive Oil-Infused Frozen Basil is Highly Flavorful and Stays Green!
Another thing to note about this method is that infusing the basil with olive oil prior to freezing makes it even more flavorful and keeps the basil’s color.
This can definitely help your dish look its best and especially if you’re making Italian food this flavor pairing goes together better than anything else.
Tom has lived and worked on farms and homesteads from the Carolinas to Kentucky and beyond. He is passionate about helping people prepare for tough times by embracing lifestyles of self-sufficiency.