I’m pretty sure salsa was invented by someone who had no idea what to do with all the extra tomatoes, peppers, onions, and jalapenos in his garden. Throw a few ingredients in here, a couple more there, add some spices, and voila! Tasty salsa.
I’m just kidding, of course. But when it comes right down to it, salsa has to be one of the best ways to use up all of that late-summer produce.
In addition, it’s a great staple to have in your pantry. You can use it as an appetizer or snack by serving it up with chips, or you can use it for everyone’s favorite – Taco Tuesday. It’s just so versatile and tasty, and plus, if you make your own, it’s so much better for you.
Storebought canned goods are often loaded with preservatives, extra sugar, and extra salt. You can easily bypass that by making your own salsa at home. Even if you don’t grow your own garden, you can get all of these ingredients relatively inexpensively at your local grocery store, farmers market, or nearby farmstand.
Whenever you can your own food, it’s important that you follow a recipe. In fact, although I usually advocate against using recipes in my cooking because I like to be more creative.
However, canning is one of those times when you really need to follow a recipe that is tried and true – otherwise, you risk making yourself sick.
So here’s a great recipe for you to follow to make your own homemade canned salsa, as well as the best recommendations for the produce to select…
Choosing the Right Veggies
What Kinds of Tomatoes Work Best for Canning Salsa?
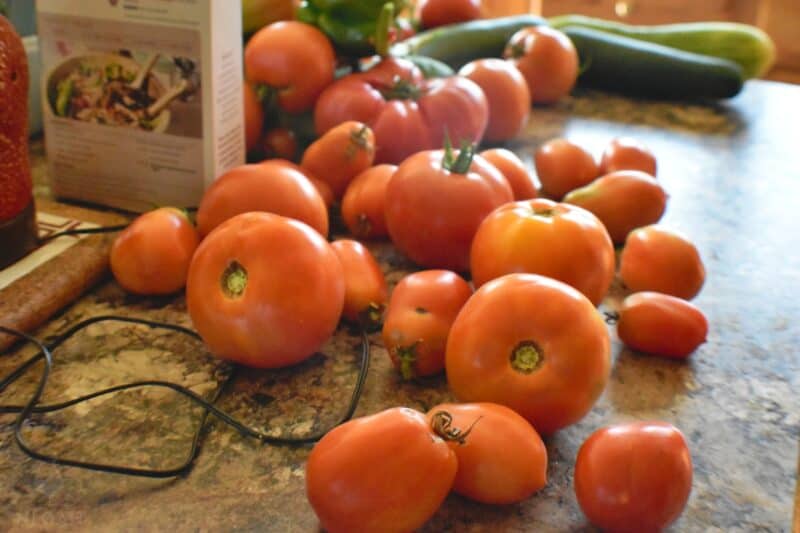
You can make just about any old kind of tomato a salsa tomato. Truth be told, you can find tomatoes in all kinds of shapes, sizes, and colors – we’ve even made a yellow salsa out of yellow grape tomatoes before, and it was delicious (albeit sweet and a little funny-looking!).
The choice is truly up to you, as it’s a matter of preference. However, the best salsa tomatoes will be the ones that are very ripe and have a ton of meat on them. Roma tomatoes will be best, but you can also use San Marzano tomatoes. I just recommend using tomatoes that are in-season and abundant – whatever you have, you can use!
Good salsa tomatoes won’t have a lot of moisture, and they also will have few seeds. Here are the best varieties to consider:
| Taxi Tomato (will give you a yellow color and sweet flavor) | Burpee’s Bush Big Boy |
| San Marzano | Red Pear |
| Better Boy | Bloody Butcher |
| Big Beef | Black Plum |
| Baby Roma | Black Sea Man |
| Cherokee Purple | Rio Grande |
| Roma | Federle |
What’s more important than selecting a certain variety of tomato is that you pick only those that are of the utmost quality. Make sure your tomatoes are totally ripe, because if they aren’t, they will be more difficult to peel, blanch, and otherwise use.
In addition, they can sometimes impart a bitter flavor to your salsa. Make sure your tomatoes are free from damage from any weather, pests, or disease – the best salsa is made from the highest-quality tomatoes.

What Peppers Work Best for Making Salsa?
The next consideration to make when you are making homemade canned salsa is what kind of peppers to use. The type of peppers you use will arguably impact the results of your final salsa more than your tomatoes will.
Peppers come in all shapes, sizes, colors, and most importantly – heats. Biting into a pepper can leave you wanting more or reaching for a glass of milk. Here are some of your options:
- Bell peppers: sweet and best for salsas with no heat at all
- Anaheim peppers: somewhat sweet with a mild smoky, spicy taste
- Poblano peppers: smoky with a mild heat
- Jalapenos: can be extremely hot or extremely sweet depending on the stage
- Serranos: hot peppers with a clean, crisp taste
- Thai chilies: very spicy but slightly fruity peppers
- Habanero: have a citrusy aftertaste – if you can sense it through the intense heat
- Carolina reaper: use with caution! These peppers are the hottest of them all
Do an internet search on your favorite type of pepper, and you’ll likely find information about all of these various types.
Think about the desired level of spiciness in your salsa before making your decision. Peppers are ranked on the SHU scale – which stands for Scoville Heat Units. This will tell you how hot a pepper is compared to others.
If you’re not sure how much spiciness you will be able to handle in your salsa, I recommend starting out milder and building your way up by adding more peppers or adding other types of spice. You can’t take out the spice, but you can always add more.
What Onions Work Best for Making Salsa?
Yellow onions tend are the most commonly used for salsa, as they are strong and sweet at the same time. Purple onions can also work, but they may discolor your salsa a bit and will have a more pungent bite.
White onions, though, are the most ideal, and most frequently used in traditional Mexican cooking. Because they are larger than yellow onions, you won’t need a ton to go around.
They are quite thin, paper skin that makes them easy to peel and since they have a sharp, astringent flavor, they’ll add a nice bite to your salsa. Plus, they are the crispiest because they have a high water content.
Adding Other Ingredients
If your salsa is too runny, you may be tempted to add a thickening agent. This is fine – but you need to be very careful about doing this.
Certain ingredients are not safe for canning (things like cream and certain vegetables, like squash, make the list) and should not be included in recipes.
However, you’ll find mixed information about thickeners. While the general consensus is that you should probably steer clear of them, other people say they are fine to use in moderation. I say skip them (more on this below).
With that said, since your salsa will be processed in a pressure canner, I veer toward the side of it’s probably ok. But use your judgment on this. Just because it works for me doesn’t mean it will be okay when you do it! Always use tested salsa recipes to make sure your chosen recipe is safe.
Instead, it might be better for you to use paste tomatoes, like Romas, or even plain old tomato paste to thicken your salsa.
Salsa should be processed in a pressure canner ideally because it contains veggies that have low acidity (pH). This can make the resulting canned food unsafe for consumption if you choose to use a boiling water bath canner.
While plain tomatoes can be processed in a water bath, any kinds of vegetables, like peppers and onions, need to be done in a pressure canner.
Now, I know you might be saying, “my grandma used to do it and she was fine!” and while that’s probably true, we know a lot more about canning safety now than we did back then, and it’s simply not worth the risk.

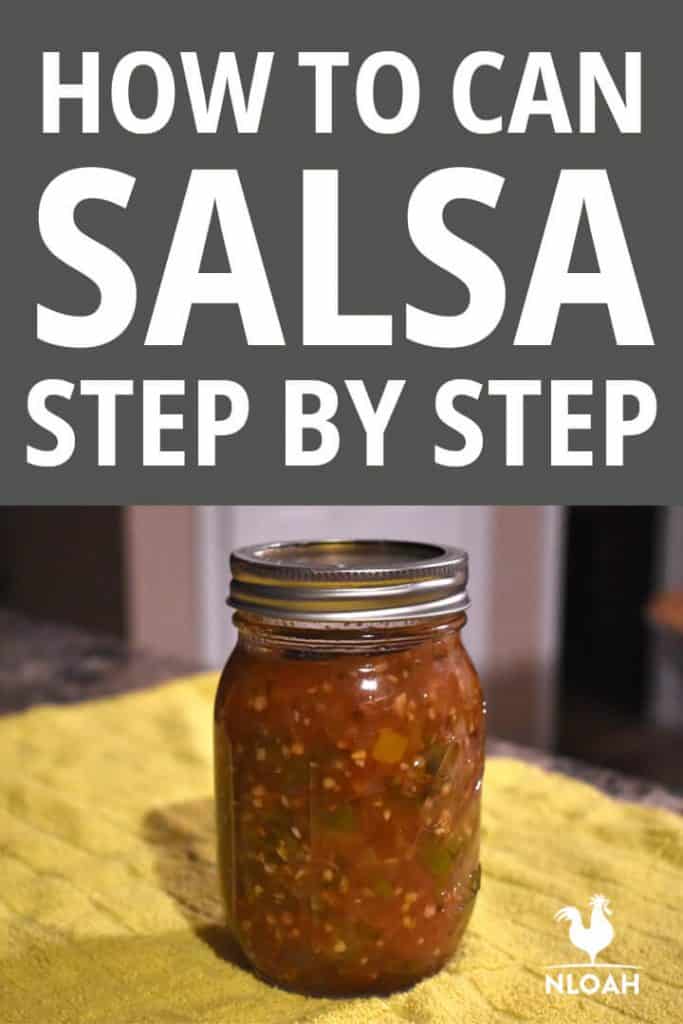
How to Can Salsa Recipe
Ingredients
- 5 lbs tomatoes preferably fresh from the garden
- 6 onions chopped
- 2 jalapeno peppers (or other peppers of your choosing), diced
- 4 cloves garlic
- ½ cup vinegar
- 2 tbsp lime juice
- hot pepper sauce or dried chili pepper to taste
- 2 Tbsp cilantro
- 2 tsp salt
Instructions
Preparing Your Tomatoes, Peppers, and Onions
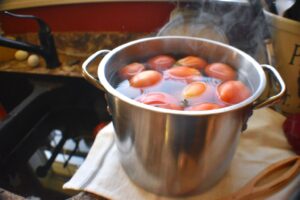
- Start by boiling your water. You will need to blanch and prepare your tomatoes before you can do anything else. Make sure you cut out any bad spots in the tomatoes as you chop them.
- Place your tomatoes gently in the boiling water and let them cook for a minute. You’ll know they are ready once the skin starts peeling off.
- Put them in an ice bath (or large saucepan of cold water) to cool, and allow them to fully cool before you start to peel – this is an easy way to get a steam burn, otherwise!
- Peel each tomato and cut it into fine pieces. If you’re like me and want to expend as little effort as possible, you can also just squeeze or press them into a stock pot.
- You will also need to cut up your peppers and onions.
- Put this large pot back over the heat. Add your other ingredients (vinegar, garlic, etc.), including your diced peppers and onions.
- Let this simmer and cook down for a bit while you prepare your jars and canners. I recommend tasting the salsa as it’s cooking to make sure it’s at the desired level of heat.
Prepare Your Jars and Canner
- If you have a helper while you’re canning, you can make quick work of these tasks, as well as the previously mentioned one. Otherwise, prepare your jars while you are getting your ingredients ready so that you aren’t just waiting around.
- Heat your jars, either by warming them in a hot water bath or by running them through the sanitizing cycle on your dishwasher. You will need to do this for your bands, too. You can reuse jars and bands for an infinite number of times – as long as there are no cracks, rust, or damages – but you will need to purchase new lids each and every time.
Fill Your Jars
- Use a funnel to carefully fill your jars with salsa. The jars must be hot and clean in order for you to do this.
- Once your jars are filled, leaving about ½ inch of headspace between the lid and the salsa, go ahead and remove any air bubbles. You can do this either by tapping it on a flat surface or you can use a bubble remover tool. Either way, make sure you remove air bubbles, because this can cause your salsa to spoil in storage.
- When you have filled your jars, go ahead and wipe the rims and sides of the jars with a clean paper towel. Make sure you’ve removed any extra food particles. This can not only dirty the inside of your canner, but it can create an unsanitary canning environment. Put your lids on the jars and screw them on tightly.
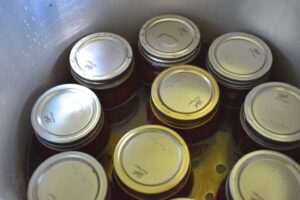
Place the Jars in the Canner
- Put your jars into the pressure canner. You can double-stack your jars if your canner has enough room for it.
- Fill with water according to the manufacturer’s directions – this will vary depending on what kind of pressure canner you have.
Process Your Jars
- Bring your canner to the ideal pressure. You will need to process it at 10 to 11 pounds, about 10 minutes for pint jars and 15 minutes for quarts.
- Let your canner get up to pressure, then set your timer to make sure you have processed your canner long enough.
- Monitor your pressure canner closely as it is heating up to the ideal pressure. It does not take long at all for the canner to exceed the optimal pressure, and at this stage, you will have, in effect, made a disaster. Don’t let your canner exceed the desired pressure, and if it does, reduce the heat immediately. If your canner loses pressure after you have started your timer, you will need to restart your timer once it gets back to the desired pressure.
Remove the Jars
- Let the jars cool in the canner if you’re worried about burning yourself. Otherwise, it’s safe to use tongs to remove the jars as soon as they are done being processed.
- Put the jars on the towel somewhere where they will not be exposed to a cool draft – this can cause the jars to crack. As they cool, you may hear occasional popping noises. This is nothing to worry about- it simply means the lids are forming a seal.
Store Your Jars
- Pressure canner’s done? Great! Whatever you do, don’t immediately remove your jars. You need to let the canner come back down to zero pressure or you will burn yourself with the steam.What I usually do is allow the canner to come back to zero and I leave the jars in there overnight to be sure. Then I won’t have to handle any hot jars or risk burning myself. Once they are cooled, I pull them out and put them into storage.
- Make sure your lids have sealed and that there is no breakage or damage to the jars.If you take your jars out of the pressure canner as soon as it’s released pressure, go ahead and let them sit for about twelve to twenty-four hours on a clean, dry towel to protect your countertops.
- Once your jars have cooled and you are sure that all the jars have a good seal, put them into your desired storage location. A cool pantry or basement is ideal, where your salsa will last for quite some time.
Notes
- I recommend wearing gloves to cut your peppers unless you are using sweet bell peppers. I’ve burned my hand cutting up jalapeno peppers before, and let me tell you, it’s not fun!
- Pressure canners get hot, and you might even hear the jars rocking and rolling in the canner while they’re being processed. This is totally fine, but it’s a good idea to check for any damages. This is also why it’s so important to bring your jars up to a warm temperature before you put hot salsa in them.
- It’s completely fine to change up some of the ingredients as long as you don’t change the ratios of the low-acid foods. For instance, you can add chile peppers or bell peppers, or you can omit the onions in favor of more peppers. Just make sure you have the exact same final number of cups to ensure that your recipe is safe for home food preservation.
- Don’t add thickeners, like flour or cornstarch, to any salsa recipe you intend to can. These thickeners make a salsa taste wonderful, but render it unsafe for canning.
- Feel free to add additional spices as you see fit, like cumin, fresh cilantro, oregano leaf, and red pepper flakes. As long as you don’t go crazy, they shouldn’t affect the safety of the recipe.
Final Tips
- This recipe will yield about four-pint jars of salsa – extrapolate your numbers either up or down to your desired quantity. When you can in a pressure canner, you can fit up to 18-pint jars in two layers – you can usually fit about seven-quart jars, by comparison.
- When you can your own salsa, it will last up to two weeks in the refrigerator without any spoilage. When stored properly in a cool, dry location unopened, salsa lasts indefinitely.
- When canning in a pressure canner, your outcomes will be affected by atmospheric pressures. Therefore, you will need to increase the amount of pressure you use. This is slightly different than in water bath canning, where you adapt your time based on the altitude.
For 1000 to 2000 feet, use a pressure of 11. For 2001 to 4000 feet, use a pressure of 12 and for 40001-6000, use 13. Altitudes of 60001 to 8000 feet should be at 14, while those higher than that should be at 15.
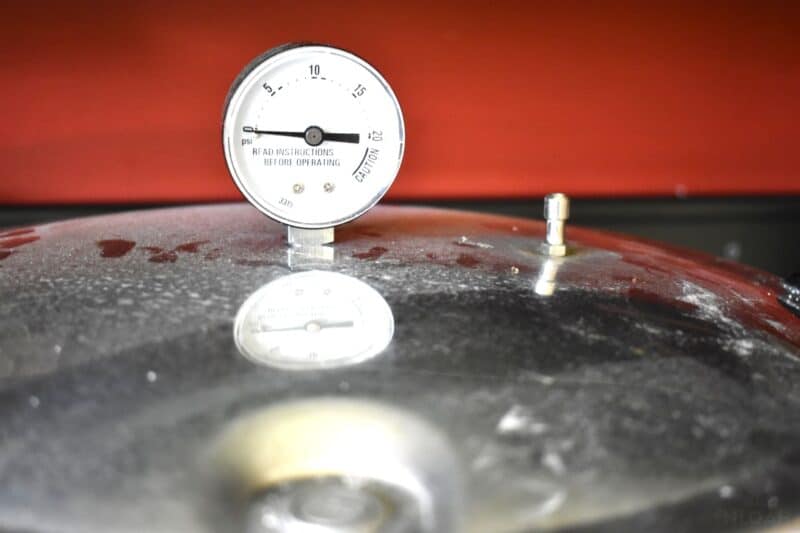
These pressures apply if you are using a dial gauge canner, if you are using a weighted gauge, you will need to keep it at 15 if you are anywhere above 1000 feet in elevation.
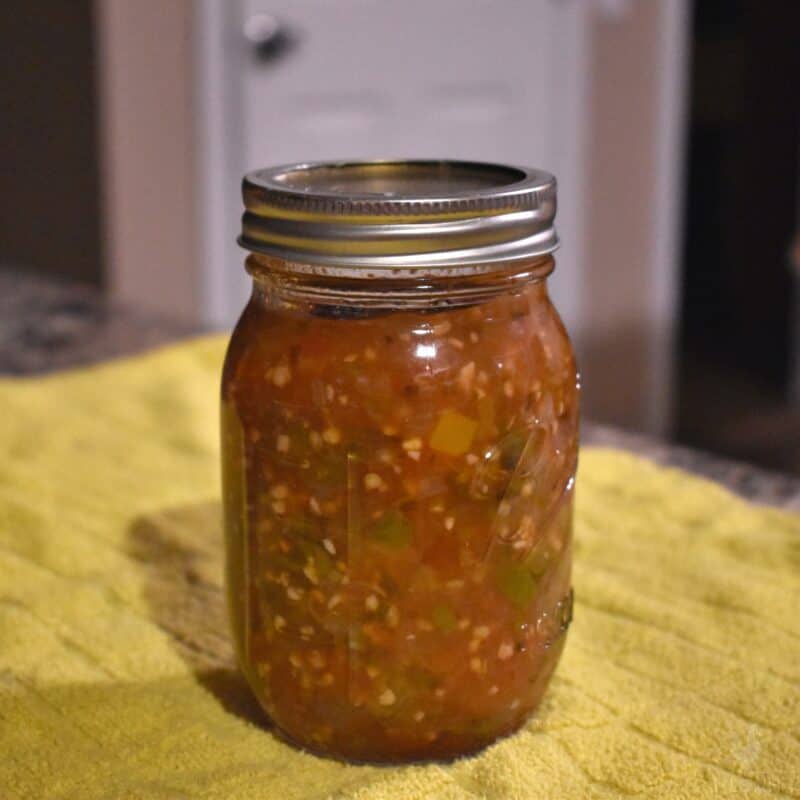
Canned salsa is something you definitely need in your pantry. Not only is it easy to make, but it’s a healthy way to use up all that summer produce. In addition, canned salsa is a favorite gift of ours to give – it’s also great for entertaining around the holidays. Whip up a batch today! Your taste buds will thank you.
Salsa Canning Questions
You should, but it’s not mandatory. The peels may give your canned salsa a somewhat bitter taste.
You should, but you don’t have to. Roasting will give the canned salsa a sweeter flavor. Roasting will also allow you to easily remove their skins.
Canned salsa should last you around 12 to 18 months if properly stored. After you open it, keep it in the fridge and be sure to eat it within 2 weeks.
Yes, you have to cook it to further reduce the chances of bacteria ending up in your final product. It’s possible not to cook it (this is the “fresh pack” method), but why take the risk?
Based on the recipe above, you’ll pressure can your salsa for 10 to 15 minutes, depending on whether you’re canning pints or quarts.
No. Only use a pressure canner that is approved for safe canning.

Rebekah is a high-school English teacher n New York, where she lives on a 22 acre homestead. She raises and grows chickens, bees, and veggies such as zucchini (among other things).
This is my family’s favorite salsa! Delicious and perfectly balanced flavor every time.
Getting ready to can another big batch!
How much, exactly, is 6 onions? My onions vary in sizes. so my 6 onions may not be the same as your 6 onions. If I wanted some onions, but not that much, how would I change out the ingredients to add more peppers if I don’t know how much I need to change out? For example; 6 onions equals 6 cups.. So if I only use 3 cups of onion, I can use 3 cups of sweet peppers.. ?? Thank you
Hi Rebeca,
Do I have to use vinegar? I use lime juice to make fresh salsa, do I have to change the my recipe?
Melinda
Can I pressure can HALF-PINT jars? Its just me and my grandson, so pint jars are too big! How long would I process half-pints? Assuming 10 minutes, like the pints????
Thanks,
Andrea
This says 6 onions is that 6 cups?
Hi Rebekah. I looked at a lot of recipes and they all call for water bath. I decide to use your site as a guide as I wanted to pressure can. I have water bathed mustard pickles with very high amounts of vinegar. These recipes are a little hard to get exact (I’m sure we don’t have to). Am I to open a jar immediately after processing and check the internal temp. Lol. How are these recipes “tested”. I have a ph meter and my salsa was around the 3.8 level and I still pressure canned it for 10 min at 12psi. I live in calgary.
Hello! The last sentence in #2 needs to be edited to change “new bands every time” to the correct “new lids every time”.
Also why are you showing jars turned upside down? This has been defined as unsafe for years!!!
Otherwise, thank you for a lovely article!
Hey,
I removed that photo, guess that’s how Rebekah does it and it works for her. Thank you for the kind words!
Dan
Thanks for removing the picture of upside down jars. “Works every time” is only safe until it doesn’t.
But as Rain noted, that sentence still needs to be edited.
>>>
The last sentence in #2 needs to be edited to change “new bands every time” to the correct “new lids every time”.
<<<