A herb spiral is one of the most clever permaculture techniques for utilizing space and allowing plants to work together in the garden.
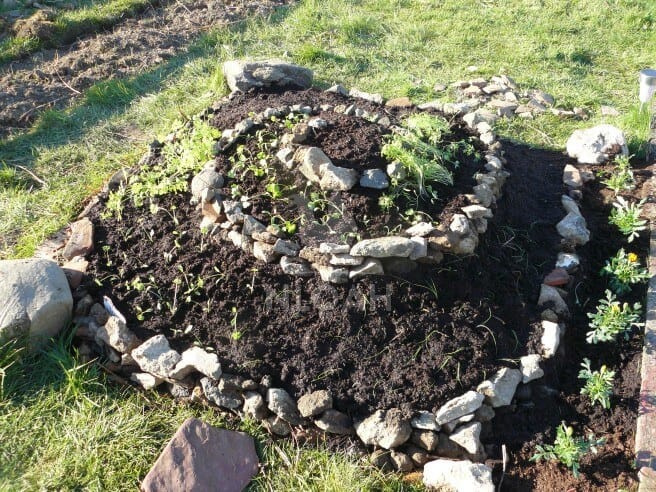
Usually located just outside the kitchen door, a herb spiral provides a menagerie of culinary and medicinal herbs, while saving space and helping with pest management in the garden.
Easy to build and fun to work with, herb spirals allow for herbal experimentation, based on some very simple principles.
The Benefits of Herb Spirals
Architecturally, the herb spiral is an example of excellent design and nature-forward engineering. While a long, thin garden bed provides ample space for a range of herbs, herb spirals play with multiple levels to take advantage of the sun’s path, water channels, and plant companions.
- Herb spirals increase surface area, while reducing the footprint – If you are limited by the size of your garden, a herb spiral neatly extends into the 3rd vertical dimension, instead of sprawling outward. This allows you to get the same planting areas as a vegetable bed, but without it taking up so much space.
- The spiral design minimizes work, making it low maintenance – The spiral design means that plants are placed depending on their water and sunlight needs, which reduces the amount of work you need to put in to take care of the plants.
- The materials help to create better growing environments – The stone used to create the spiral works using thermal mass, to absorb heat in the daytime, and insulate the soil at night.
- Herb spirals help with integrated pest management – A herb spiral produces lots of species of plants that are great attractors to beneficial insects – like pest predators and pollinators – while deterring pests (usually due to their fragrant smell). A herb spiral on a patio will keep mosquitoes away, while it also serves as a nursery for you to take cuttings, to spread around the garden for further pest management.
- Incorporated features increase wildlife habitats – The diversity of plants, as well as the pond and the rockery walls, all create unique habitats to increase wildlife in your garden.
- Companion planting on herb spirals increases yield – Herb spirals are planted with companion herbs next to each other, increasing the amount and quality of the herbs you grow through cooperative species.
Materials For a Herb Spiral
You’ll need:
- A weed mate/ ink-free cardboard
- Long stake (Over 1 meter high) and string (75cm – 1m in length)
- Compost
- Organic materials
- Rocks/Bricks
- Herb Seedlings
Designing Your Herb Spiral
Herb spirals are incredible feats of design and engineering that create self-perpetuating systems if designed correctly.
Orientation
Herbs spirals should be oriented correctly. If you’re in the Northern hemisphere, the lowest part of the herb spiral should be facing north. Most herb spirals have a small pond at the very bottom – this should be on the north side of the spiral. This is the reverse if you are in the Southern hemisphere (where the pond would be in the south).
When designing plant placement, plants in the north section will be subject to the most shade. Herbs in the south will have full sun. Herbs on the east side will have morning sun, and those on the west side will have afternoon sun.
If you consider the sunlight requirements of each of your herb species first, you can work out which quadrant they should be in.
Water Requirements
Next, you want to consider the water needs of each herb. Herbs at the top tend to like drier climates, with those that the bottom enjoying wetter feet. Think about it, when you water the herb spiral, the water will flow downward due to gravity, making the top drier than the bottom!
In this respect, after having worked out in which quadrant each herb should be, on account of their sunlight needs, now you can work out at what level they should be on, in regards to their water requirements.
Companion Planting
The last thing to consider is the arrangement of the herbs in relation to their neighbors. Ideally, you want to plant herbs next to each other that benefit each other in some way – whether that be through repelling pests, improving flavor, or improving growth.
Equally, you need to make sure you’re not planting herbs together that don’t work well with one another.
For example, rosemary doesn’t like to be planted near other herbs, except sage. Sage and rosemary have simple water and light requirements (less water, more sun), meaning they work well to be on the very top of the spiral together.
Another example would be dill and fennel. While they have similar requirements, when planted next to each other, they tend to cross-pollinate, causing hybridising.
However, take basil and chamomile. They both like relative amounts of water and full sun, and complement each other by helping to repel insects, and helping improve each others’ flavors. They both work well as mid-level, south-side herbs.
Equally, mint and cilantro both benefit from wetter, shadier areas, and they work well next to each other. This makes them ideal for the lower levels of the northern side of the herb spiral.
How to Build a Herb Spiral
1. Get all your materials together
2. Measure and outline the spiral – Do this by putting the stake in the ground and tying the string to the stake. You can use the end of the string to mark a circle, shaping it slightly to a spiral. You spiral should be no more than 2 meters in diameter, as you need to be able to reach the middle for tending and watering
3. Lay the base – You need to lay a base – either a weed mat or ink-free cardboard – to prevent weeds from coming through.
4. Put the pond in place – Place the pond on the north side. You can dig down a little, to have a slightly deeper pond if you wish.
5. Start to build the spiral – If you are using bricks and mortar, you need to build the spiral first before filling it. If you are creating a drywall finish with rocks, you may want to fill it with compost and organic matter as you go to help support the wall. The middle should be about a meter high.
6. Prep your soil – If you’d like to add organic enhancers to your soil, such as seaweed, kelp, rock minerals, worm castings, chicken manure, or other biodynamic preps, you can add these in. Mix them thoroughly to get an even spread throughout the spiral.
7. Fill the spiral – You should fill the spiral with a fine base of regular topsoil to inoculate your compost and mulch. Then add your compost and mulch on top, layering green and brown layers.
8. Plant your spiral – You can plant straight into the compost, pulling back the mulch where you intend to put your seedlings in. Some people like to direct sow, but it makes it harder to keep tabs on what’s in there.
Good Herbs for Herb Spirals
| Arnica – morning sun, well-drained soil | Basil – full sun, moist soil |
| Borage – full sun to partial shade, moist soil | Chamomile |
| Chives – sun or partial shade, moist soil | Cilantro – morning sun, well-drained soil |
| Dill – morning sun, likes water | Geranium, afternoon sun, moist soil |
| Lavender – full sun, drier soil | Lemongrass – full sun, wet feet |
| Marjoram – full sun, well-drained soil | Mint – happy in shade, loves water |
| Oregano – full sun, drier soil | Parsley – prefers shade, like moisture |
| Rosemary – likes a little shade, drier soil – only plant next to sage | Rue – full sun, drier soil |
| Sage – likes sun, diverse soil (prefers well-drained soil) | Sorrel – full sun, moist soil |
| Summer Savory | Skullcap – full sun or partial shade, moist soil |
| Tarragon – likes sunlight, drained soil | Thyme – partial shade, drier soil |
| Violas – sun to partial shade, well-drained | Watercress – full sun to shade, wet feet |
Be Careful With These Herbs
| Bee Balm – can be invasive | Comfrey – can be invasive |
| Fennel – grows quite tall and easily hybrids with dill. | Lemon balm – can be invasive |
| Mint – can be invasive |
In Summary…
Building a herb spiral is a simple yet effective method of saving space and creating biodiversity in your garden.
Cleverly using orientation and height to provide various microclimates, herb spirals allow you to grow a diverse range of herbs for culinary uses, without having to worry too much about maintenance. Remember to make sure you can always reach every part of the herb spiral, or you’ll leave plants neglected!
Be smart – use your herb spiral as a place to nurture pest-deterrent herb species, and plant the cuttings in your veggie garden to keep away pests!
If you’d like to follow some videos on how to build a herb spiral, check these out:
Be sure to pin this for later on Pinterest, and do share your thoughts on herb spirals!
Emmy Jenkins, AKA Permie Emmy, has spent many years traveling around the globe and working remotely, dipping her toes into a myriad of disciplines. Having spent several years volunteering on sustainable farms, Emmy chose to delve deeper into permaculture theory to understand the social and economic patterns often neglected in the philosophy. When she’s not planting edible gardens and frolicking the jungle, she’s consulting on projects around the world to help permaculturalists to understand regenerative ‘Fairshare’ economic patterns and to encourage People Care patterns that focus on biomimicry.