Carrots are a delicious and nutritious root vegetable that can be easily grown in a raised bed. Raised beds are ideal for carrot production because they provide good drainage and loose, friable soil that carrots need for optimal growth.
I finally decided to harvest my carrots yesterday. A frost is predicted for this weekend, so I wanted to get them out of the ground, just in case (even though they are supposed to be cold hardy).
Whether you’ve grown carrots before or not, it’s important to note that raised beds can make a big difference in your yields.
In this post, I’ll provide tips on how to grow and harvest carrots in a raised bed.
From start to finish, here’s what I did to create this gorgeous batch of carrots…
Do Carrots Grow Well in a Raised Bed?
Yes!
Carrots are a popular vegetable to grow in a home garden, and they can be very successful when grown in a raised bed. Raised beds offer several advantages for carrot cultivation, including good drainage, loose soil, and deep roots.
Raised beds also make it easier to control weeds and pests. Carrots prefer loose, sandy soil with a pH between 6.0 and 7.0.
They also need full sun and consistent moisture levels to produce high-quality roots. By growing carrots in a raised bed, you can create the perfect conditions for these finicky vegetables.
Carrots also benefit from the warmer temperatures often found in a raised bed. In general, carrots prefer full sun but will tolerate some shade.
Building Your Raised Beds
Growing carrots in a raised bed is a great way to ensure that your carrots have the space they need to grow properly. Plus, it’s a great way to keep them safe from pesky pests and animals that might try to eat them!
Here are a few tips.
Finding the Right Location
Choose a spot in your yard that gets plenty of sunlight. Carrots need full sun, at least 6 hours of sunlight per day in order to grow properly.
Decide how big you want your raised bed to be. Trace out the perimeter of your raised bed with marking paint or flags so you know where to dig.
Start digging! Once you’ve finished digging out the perimeter of your raised bed, use a shovel or rake to loosen up the soil at the bottom of the hole. This will help your carrot roots get an extra boost of air and water when they’re growing.
Add some compost or organic matter to the hole. This will give your carrots an extra boost of nutrients as they’re growing.
Be Sure to Remove Rocks, Soil Clumps, and Other Debris
Any experienced gardener will tell you that raised beds are a great way to grow healthy plants.
By removing rocks, soil clumps, and other debris from the area, you create a loose, well-drained environment that is perfect for carrot roots. In addition, raised beds allow you to control the soil type and fertility, ensuring that your carrots have all the nutrients they need to thrive.
How Far Apart to Plant Carrots in a Raised Bed
If you are planning to grow carrots in a raised bed, you will need to decide how far apart to plant them. The spacing between carrot plants will depend on the variety of carrot you are growing, as well as the size of the raised bed.
For example, if you are growing a small variety of carrot in a 4-foot by 4-foot raised bed, you should space the plants about 2 inches apart.
However, if you are growing a large variety of carrots in the same size bed, you should space the plants about 4 inches apart.
When in doubt, it is always better to err on the side of caution and plant your carrots a little further apart than you think they need to be. This will give them enough room to mature and will prevent overcrowding.
If you’re having trouble figuring out the proper spacing, you may want to purchase your carrot seeds in the form of seed tape. This will handle all the spacing for you.
Of course, you can always thin your carrots after they have been planted, too.
How Deep Should a Raised Bed Be For Carrots?
While the depth of the bed will depend on the type of carrot you are planting, a general rule of thumb is to leave about 6-8 inches of depth for the carrot roots to grow.
More important than depth is drainage.
Carrots require loose, well-drained soil in order to grow properly, so it is important to make sure that your raised bed has good drainage. You can improve drainage by adding sand or gravel to the bottom of the bed before adding soil.
Once you have determined the desired depth of your raised bed, you can begin planting your carrots.
What Kind of Soil is Best for Growing Carrots in Raised Beds?
When choosing a type of soil for your carrots, it is important to consider the following factors: drainage, nutrients, and pH level. Loamy soil is a good option because it drains well and is rich in nutrients.
However, if your soil is too sandy, your carrots may not get enough moisture. In addition, the pH level of the soil should be between 6.0 and 7.0 in order for the carrots to grow properly. If you are not sure about the pH level of your soil, you can test it with a home testing kit.
Tips for Planting Carrots
Carrots are a delicious and nutritious addition to any garden, and they’re relatively easy to grow. Here are a few tips to help you get started
Choose the Right Varieties of Carrots
With a little bit of planning, you can choose the perfect carrot for your garden.
Nantes types are typically shorter and rounder, while Danvers are longer and more tapered. Imperator carrots are even longer, and often have a deep orange color. Other popular varieties of carrots you might grow are:
- Amsterdam Forcing
- Chantenay
- Rainbow Blend
Think about what color, shape, and size you want your carrots to be, as well as your ideal maturity date.
Another consideration is the climate in which you’ll be growing the carrots.
Some varieties are better suited for cooler weather, while others can handle a bit more heat. Finally, think about when you want to harvest your carrots. Some varieties mature faster than others, so if you’re looking for an early crop, make sure to choose accordingly.
Start with Compost
If you’re planning on growing carrots in a raised bed, it’s a good idea to add compost to the soil before planting. Carrots need loose, well-drained soil in order to grow properly, and adding compost will help improve the drainage and texture of the soil.
Compost also adds essential nutrients to the soil, which will help your carrots grow strong and healthy. In addition, adding a layer of compost will help keep the roots of your carrots warm, which is important for successful germination.
In my garden, the raised bed was filled with 12 inches of “compost” from a local landscaping business. It looked more like mulch than good planting material to me.
Although I wasn’t impressed with the delivery, I planted it. It was looser than the red clay dirt we tried to sew our crops in last year, so I was hopeful.
Direct Sow Your Seeds
Carrots can be planted directly in the garden from seed or from transplants. I always recommend planting from seed. They, like most root vegetables, are finicky and quite difficult to transplant.
Carrots germinate fairly easily so there’s not really any reason to avoid direct sowing them in the garden.
If you are planting from seed, you need to sow 2-3 carrot seeds per hole in rows that are spaced 12 inches apart.
If you are transplanting, set the plants out 12 inches apart in rows that are also 12 inches apart. Carrots need full sun and well-drained soil for best growth.
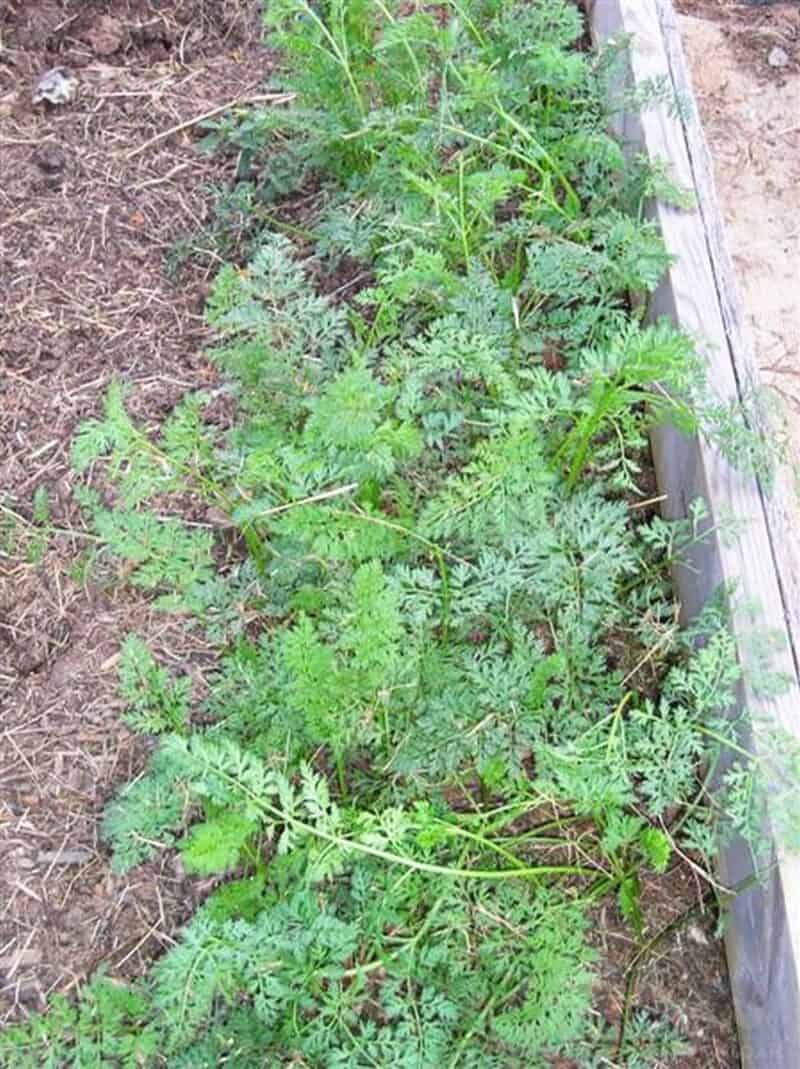
In Spring I directly sowed the carrot seeds. (Meaning, I did not start plants, or buy plants, but planted the seeds directly into the bed.
This really is the only way to grow carrots, they don’t transplant well. Carrot seeds are extremely tiny, so it’s hard to try spacing them out. Definitely don’t try planting them in a breeze!
I made a little trench in the dirt using my finger, and ran it the length of the bed, about 1/4″ deep. Then I slowly sprinkled the seeds into the groove, trying to space them out the best I could. When I’d finished planting the row, I covered it back over with loose dirt.
Mark the Rows
I marked my rows so that I knew where to expect growth to emerge. Then I watered them well. I watered a little every day for the first few days, then a couple of times a week, if it hadn’t rained.
Some people recommend placing a board over the row until the seedlings emerge, but I didn’t try this this time around.
Water Regularly
Water the carrot plants regularly, especially during dry periods. Carrots will mature in 60-70 days. Once the plants have reached 4-5 inches tall, thin them so that they are spaced 3-4 inches apart. Mulch around the plants to help retain moisture and control weeds.
How Often Should I Fertilize My Carrots?
Carrots love potassium and the best time to fertilize them is in early to late summer, when they are actively growing and beginning to form roots. A liquid fertilizer, such as compost tea or fish emulsion, is best for carrots, as it can be quickly absorbed by the roots.
For carrot plants growing in clay soils, it is also important to add organic matter like compost to the soil to improve drainage and prevent waterlogging.
Mulch Your Carrots
If you’re like most gardeners, you know that mulching is important for preventing weeds and retaining moisture in the soil. But did you know that mulching can also be beneficial for carrots?
Carrots are a root vegetable, which means they grow underground. This can make them vulnerable to soil erosion and compaction.
Mulching around carrot plants helps to protect the roots from damage and provides a consistent supply of moisture. It’s also important to choose the right type of mulch.
A light-colored mulch will reflect heat and help keep the roots cool, while a dark-colored mulch will absorb heat and help warm the soil. Either way, mulching is an easy way to give your carrots a boost.
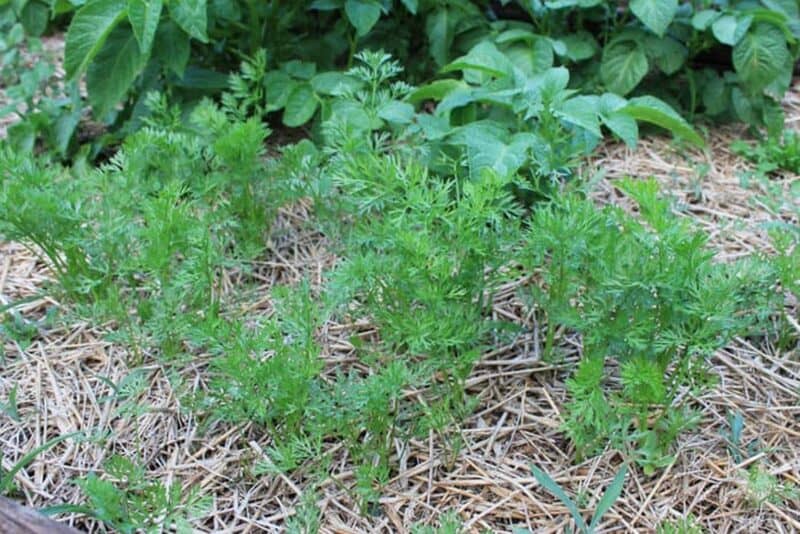
Thin the Carrots
Once the tops were well established, I thinned the carrots to between 1-2″ apart. When weeds grew up around them, I used scissors to trim them below the surface of the soil. You cannot pull weeds from among the carrots without uprooting your precious harvest as well.
Watch Out for Carrot Pests and Diseases
One of the most common problems is carrot rust flies, which lay their eggs in the Growing medium. The larvae then hatch and burrow into the roots of the carrots, causing them to become stunted and deform.
To prevent this, it is important to rotate crops regularly.
Carrot rust flies are attracted to specific kinds of plants, so by changing up what you plant in your vegetable garden, you can help to prevent an infestation.
Another thing to watch out for is fungal diseases, such as Alternaria leaf blight. This can cause the leaves of the carrot plants to turn yellow and develop brown spots. If left untreated, Alternaria leaf blight can spread quickly and kill the plant.
To prevent this, it is important to water at the base of the plant and to avoid getting water on the leaves. In addition, remove any affected leaves from the plant as soon as possible.
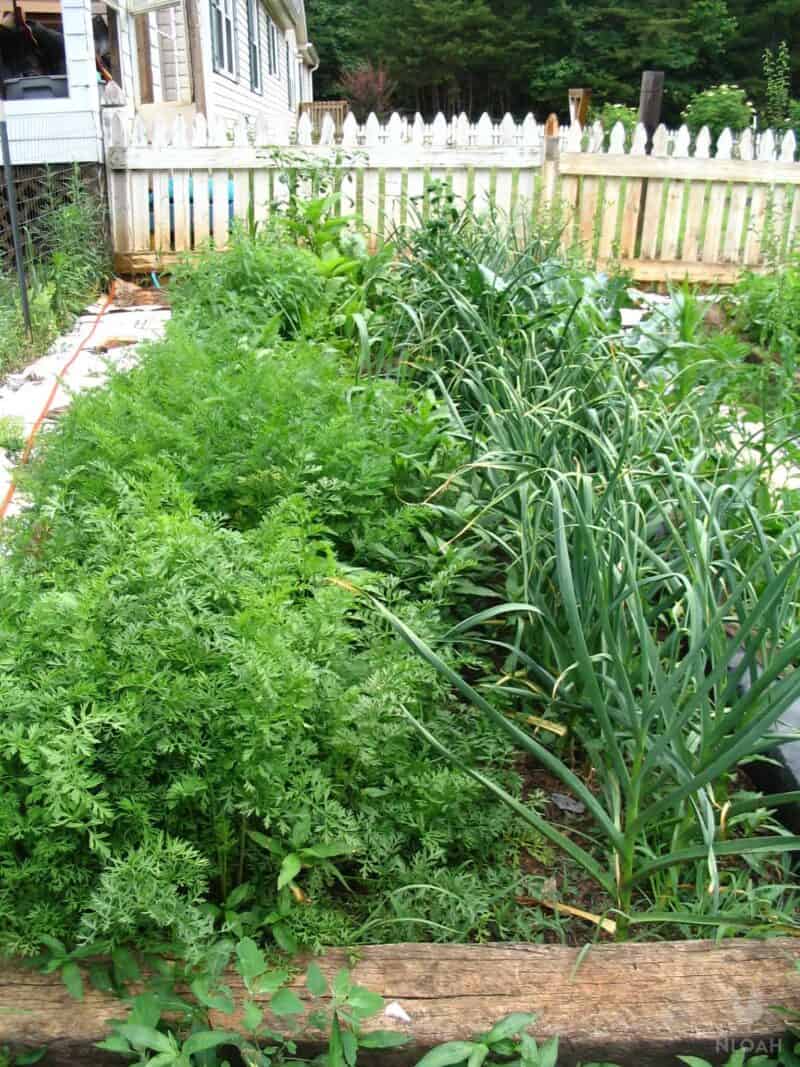
Grow Companion Plants for an Added Boost
Carrots are one of the most popular vegetables in home gardens, and for good reason. They are easy to grow and can be used in a variety of recipes. Plus, they are a great source of vitamins and minerals. However, carrots do have one major drawback: they are susceptible to pests.
One way to combat this problem is to plant companion plants alongside your carrots. Tomatoes, onions, and marigolds are all great choices. tomatoes produce a gas that repels pests, while onions release a scent that confuses them. Marigolds, meanwhile, produce a chemical that inhibits the growth of harmful fungi and bacteria.
When planted together, these crops can help to create a healthy and productive vegetable garden.
Check On Your Carrots
To check the progress of their growth, you can gently brush the dirt away from the top of the carrots to see how thick it is. Sometimes this can be misleading though.
Some of my carrots were very thin at the top, but got very fat underneath the surface of the soil. I decided just to let them grow until danger of frost.
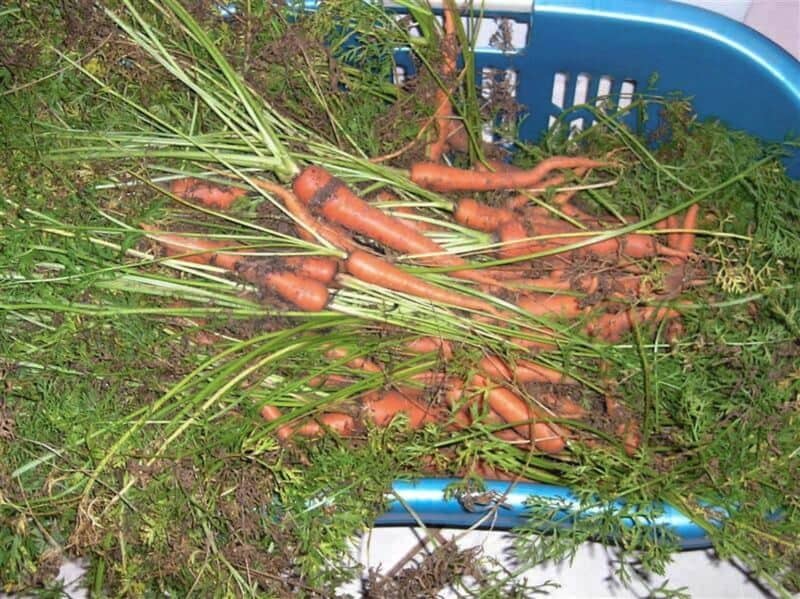
How to Harvest Carrots
Harvesting carrots is a simple process that only takes a few minutes once you know what you’re doing.
The best time to harvest carrots is in the morning after the dew has evaporated but before the sun gets too hot. This prevents the carrots from getting too dry and stressed out. Check the carrot tops to see if they’re about 6-8 inches tall. The carrots are ready for harvest when they are about ¾ of an inch in diameter.
Grab a gardening fork and insert it into the soil next to the carrot plant. Be careful not to puncture or damage the carrot itself. Gently loosen the soil around the carrot with the fork until you can easily pull it out of the ground. You may need to use your hands to help dig up larger carrots.
Once you have pulled the carrot out of the ground, shake off any excess dirt and put it in a basket or bag. Repeat this process until you have harvested all of the carrots you need.

Preserving and Storing Carrots for Later Use
There are multiple ways of preserving carrots, but storing harvested carrots in a cool (32-40°F), dark, and humid place it’s a solid start.
Do not wash carrots until you are ready to use them as washing can shorten their storage life.
If you want them to last longer, up to 2 weeks, trim off the greens and store them in a cooler filled with moist sand or sawdust. You can also store carrots in a root cellar if you have one available. Carrots can last up to 8 months when stored this way.

You can also can your carrots. They are able to be safely canned in a pressure canner.
Of course, you can also freeze them. This is a simple process that involves washing and chopping the carrots, then freezing them in an airtight container.
Frozen carrots will last for up to one year and can be used in soups, stews, or roasted as a side dish.
Often, they still have that satisfying crunch after being frozen, allowing you to continue enjoying your good harvest long into the winter months.
Final Thoughts
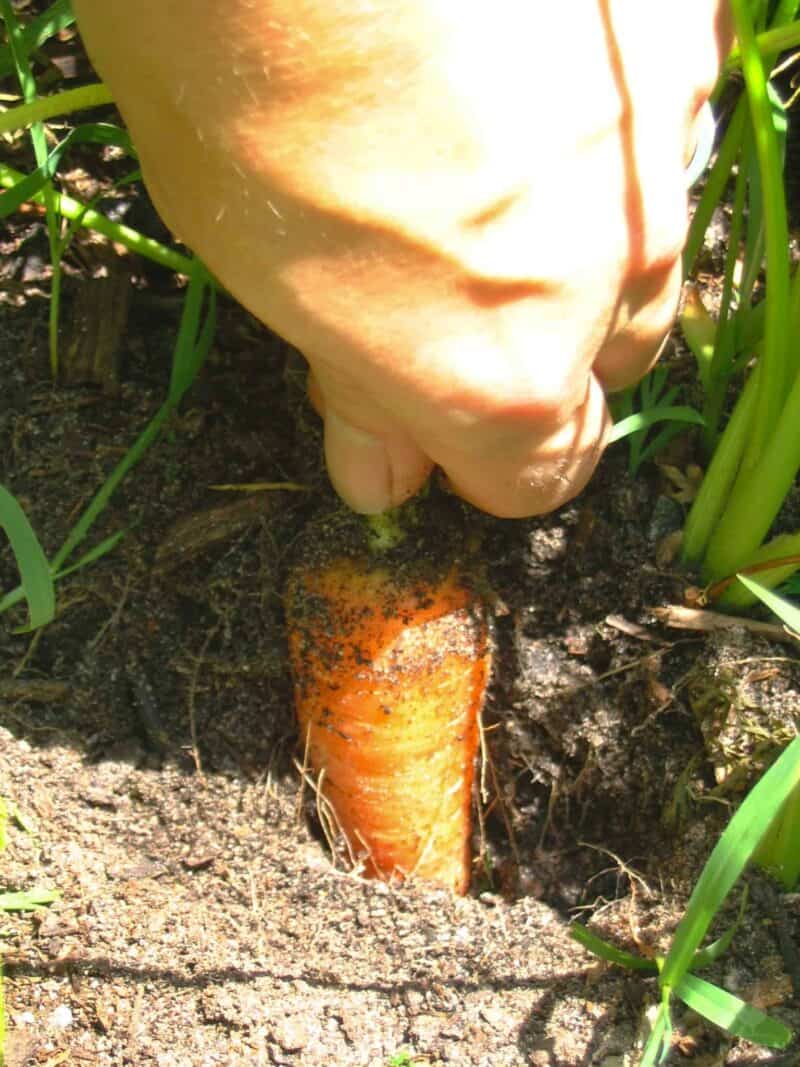
The Red Dragon carrots are looking amazing. Out of curiosity, I pulled one out today:
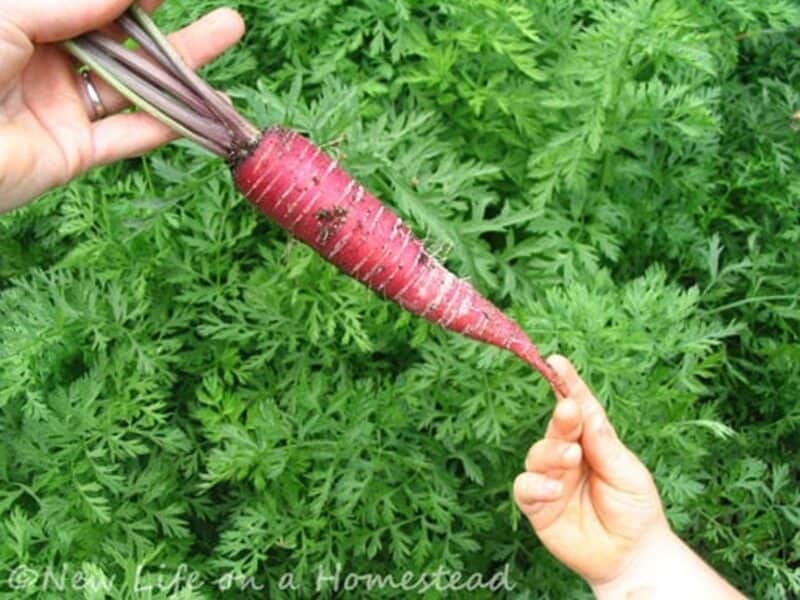
And they’re ready!! I pulled out the camera to take a photo of the first carrot harvested, and a little hand reached up to grab it before I finished taking the shot. Elias was dying to eat it!
I took it inside and washed it so that he could enjoy nibbling away. Of course then all of the kids wanted to taste it, so the carrot got passed around.
Anyways, now that they are all pulled up (a job the kids thoroughly enjoyed helping with!), and scrubbed clean, I have to decide what to do with them.
I think I’d like to experiment with dehydrating the carrots for later use in soups and stews. Of course, we’ll enjoy some fresh food as well!
I’m so anxious for Spring again! There’s SO much more I want to plant this year.
What about you? With these tips, you’ll be able to grow and harvest your own carrots right at home! Homegrown carrots are not only delicious but also super healthy for you. So get out there and get started on your very own carrot patch today!

A city girl learning to homestead on an acre of land in the country. Wife and homeschooling mother of four. Enjoying life, and everything that has to do with self sufficient living.
So I read through your information on carrots in raised beds. I love the information and the fact you are getting the word out to raise your gardening. I especially love that people can do this in a yard on a postage stamp.
For carrots, though I would recommend that you mellow up your compost with peat to loosen the soil or you could use light sand. Carrots need a loose soil mass to grow straight and larger.
Nantees do really well in beds, you can try some of the other Nantee varieties. I might recoment that you try some Heirloom breeds.
Thank you so much for your advice, Steven! 🙂
I’m a new follower of your blog, and those carrots still look good! In the past, I’ve used an old salt shaker to put my tiny seeds in, such as carrots or radishes. It makes it easier to spread the seeds apart.
Hello growing carrots in a raised bed is a great idea as it can help reduce the threat of the carrot fly. I would just comment that by looking at your carrots I would say that the soil you used was too rich or had a lot od stone/ pebble in it. More information on this can be found here it also has information on storing carrots
Thanks! That is some interesting information.
Around here, in Indiana, it works well for us to cover the carrot bed with about a foot of straw right before the ground gets cold enough to freeze. This will prevent the ground from freezing and you can go out throughout the winter, move over a little straw, and dig up a few carrots when you want them. It’s okay if the tops die from light frosts before you cover them, as long as you cover before the ground is cold enough to start freezing. We also do this with potatoes and had potatoes last winter until March when we ran out. Without a root cellar, we just don’t have the proper conditions to store harvested root vegetables without them getting either too cold or too hot (garage gets too cold, basement is too warm–we’ve tried both), so this method is a really great alternative. We also grow mangels to feed the chickens and will also try this method with them this winter so we can continue feeding the chickens some produce through the winter. We also grew sunflowers and harvested the heads of seeds–these are stored in the garage for chicken treats throughout the winter. Just a couple of ideas maybe someone else can use, too. 🙂
Chickens love pumpkin and squash, as long as it hasn’t been frozen. Just a thought.
I read that leaving carrots in for a frost makes the carrots sweeter. I’ve had a hard time keeping my carrots from drying out even if I put them in sand for winter storage. A web site I checked also recommended not washing the carrot before storage.
A farmer at my market seconded the board idea. It keeps the seeds from blowing away while it germinates.
Now basil, on the other hand, dies at the mere mention of frost.
Seems to me I remember reading that leaving them longer than recommended for the variety does change the flavor… I’d love to know your experience though. 🙂 Our carrots never grow. Only the long spindly root. Interesting that you grew yours in mostly compost. That’s what we’ve done and thought that was part of the problem… maybe needing more sand or something. I think we’re changing our whole soil composition this next year. Maybe something will grow for us. 🙂
So glad that you shared. I believe I gave up on my carrots too early this year. I was wondering how high are your raised bed boxes. Mine are six inches however I was reading that for crops like carrots, it is best to raise the bed an additional 5 inches for a 12 inch deep box. I might just try that next year with one small box to see if it increases the quality and yield.
And I so appreciate Holly’s suggestion of mixing sand with those fine seeds. I’ll try that next year as well!
Blessings …
My parents neighbor is a seasoned gardener and canner, and he told me to mix my seeds that are as small as carrot seeds with a little sand and then spread….I found that this was also good with lettuce too…He also recommended using this method with radishes too…. It seemed to work great for us this year….
Hi there, Kendra! I thought I’d stop by to say hello! Miss you on FB, but I understand why you left. Totally got it! I enjoy getting your blog posts in my e-mail. 🙂
I loved the pictures of the carrots! Some of them are so silly looking! We’ve had some like that! Our carrots didn’t do too well this year. We had plenty of tomatoes and some green beans and cucumbers but other than that our garden was a big disappointment. Oh well…there’s next year!
Take care!
Hugs,
Carmen 🙂
oh also! I forgot you asked:
I probably have too expensive of a camera for what you are needing/looking for, but mine is a Nikon. I have owned both Nikon and Cannon and enjoy them both! You will definatly want to save up for a SLR camera though, that is probably what you will be wanting. The Nikon D40 series is a good one, that is the line mine is in and I really like it! I love that mine can take mulipule pictures per second…so if you can find one that can take a few images/frames per second. (which is helpful too if like me you enjoy natural lighting=less blurry pictures, etc)
I’m not sure if this helps, but I do hope you find something perfect!!
Blessings,
Tarena
Thanks Tarena! Your photos always come out in such great quality! I have a cheepo digital camera from Walmart. It’s slow to snap a shot, won’t focus half the time, and doesn’t allow good lighting at all. I’d LOVE to have a nice camera, especially to take pics of the kids. I could never afford one myself, but maybe if I put one on my Christmas list my family will pitch in on one!! Ya never know 🙂 Thanks for your help!
When I am sewing small seeds like carrots or lettuce, I mix in a little soil and then sew it in. It helps to distribute the seeds a little. I have heard of people using sand but I don’t have any handy, loose soil works just fine.
Looks great!!!
Our harvest this year wasn’t the greatest, but it was a very bad year for this area (so I was glad to know it wasn’t me!!) and a mole found my lovely garden and came back often to enjoy our tasty carrots! haha!
oh well…it was a great learning experiance! (oh! and I started my seeds indoors and transplanted them…although it took for.ev.er.! )
Thanks for your comments on my blog!
Talk to you soon,
tarena