If you haven’t made kale chips, or apple fruit leather, or apple chips, you’re really missing out! These dried foods are delicious, long-lasting, and very useful to have around the homestead. They are light and easy to pack if you’re going to be outdoors for a long time. Dried kale and apples are great snacks to pack in lunches, too.
Dehydrating foods like kale and apples is a great alternative to canning. Once they’re dried, they retain nearly all of their nutrients. And unlike many canning recipes, the chips and fruit leather don’t require large amounts of sugar or salt, which you may not have on hand. And it’s always good to have a variety of nutritious preserved foods on your homestead once winter weather sets in.
Both are super cheap to obtain. If you’re not growing kale in your garden already, you should be. It’s a hardy green that survives well into winter weather and frost. And apples are inexpensive no matter where you live. You can usually buy a bag of them for under $4.00 at the supermarket year round..
Dehydrating kale and apples is also one of the best ways to overcome the drawback these foods both have in common: their blandness. Let’s face it, it’s not hard to get sick of eating apples and kale all the time, right? Well, you’re in luck. It is super easy to prepare these foods in your dehydrator or oven, and make some really great snacks. So what are you waiting for? Get ready to dry some kale and apples on your homestead today!
Going With Kale Chips
Kale Chips are a great, healthy alternative to that greasy bag of potato chips. After all, kale is one of the most nutrient dense foods on the planet. This leafy green vegetable is loaded with vitamins and minerals, and surprisingly high in protein, too. Also, like most other dehydrated foods, kale will retain almost all of those nutrients after you dry it out. So let’s gather everything you need to make some delicious kale chips.
Ingredients And Equipment
Here’s what you need to dry your kale into some tasty green chips:
- 3-4 heads of fresh kale, washed
- 3 tablespoons olive oil
- 1 teaspoon salt
- 1 clove of diced garlic
There are many ways to make kale chips. I am particularly fond of garlic in homemade snacks like these. There also happens to be a ton of it growing in my garden too, so I always have it on hand. If garlic isn’t your thing, no worries; just substitute it with something else.
In fact, once you’re comfortable making these delicious chips, you should try making them with all of your favorite herbs and spices.
You’ll need a mixing bowl to combine all of your ingredients. A sharp knife or scissors to cut the kale will also be useful as well. Finally, you’ll need to use either your dehydrator or an oven to dry your chips. If you do use an oven, you’ll need at least 3 cookie sheets, too.
We’ll discuss how to prepare these chips in an oven as well as a dehydrator, since preparation differs slightly depending on the method you choose.
Kale Chips In The Dehydrator
Dehydrators are great for making kale chips! Here is how to turn your dehydrator into a kale chip-making machine in four easy steps.
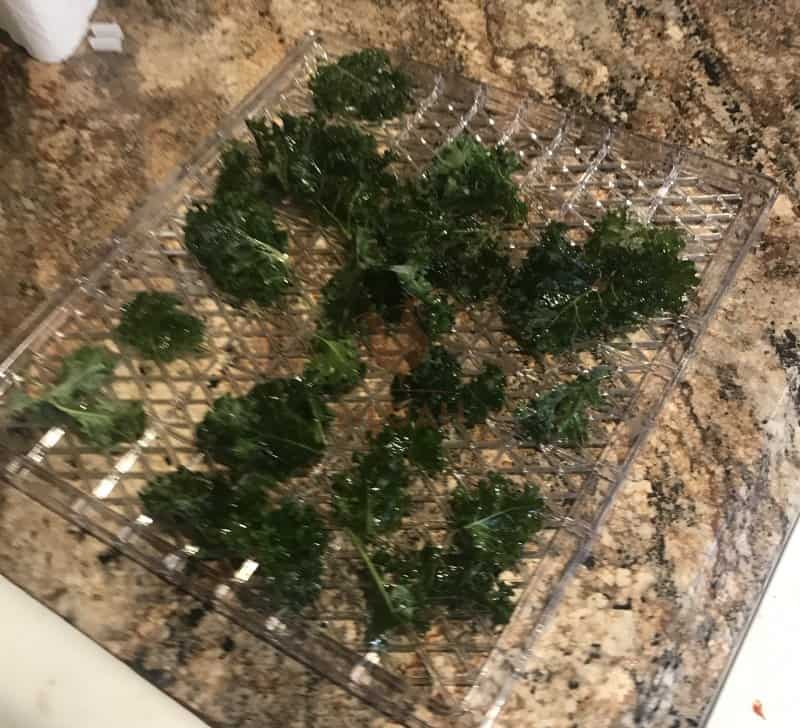
- Preparing The Kale Greens. The first thing you need to do when making kale chips is to remove the stems. The central stem on kale leaves is hard, and doesn’t really dry well. Using your knife or scissors, carefully cut the thin, leafy greens off of each stem. Ideally, you’ll want pieces of greens that are at least twice the size of potato chips, since they’ll shrink as they dry. Once the greens are removed, discard the stems.
- Prepare Your Spice Mixture. Combine the oil, salt, and garlic in your mixing bowl, and mix thoroughly.
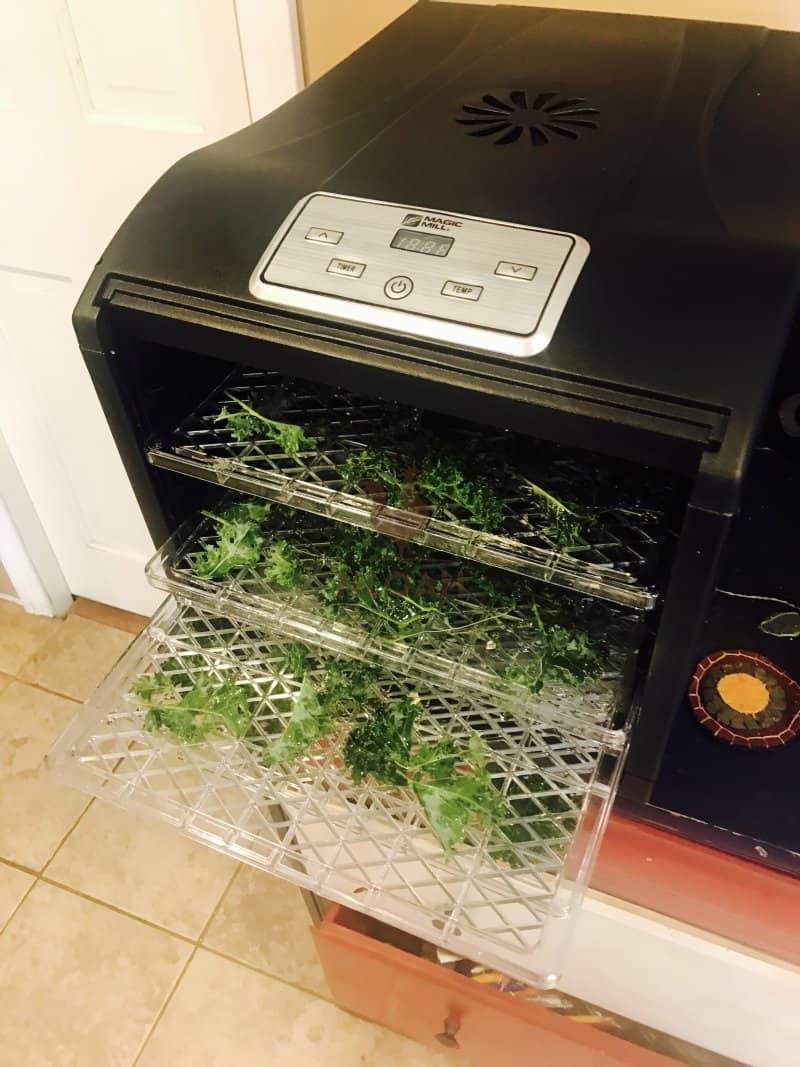
- Mix It Up! Place your kale greens into your mixing bowl, one small batch at a time. You will want to make sure all of the leaves get thoroughly covered in your spice mixture. After mixing each batch of the greens, carefully place them on your dehydrator trays, leaving space between the leaves.
- Load And Dry. Once your trays are filled, load them into your dehydrator. Program your dehydrator to dry at 112 degrees Fahrenheit for 12-14 hours.
Every dehydrator is different, so you’ll need to check on your kale chips while they’re drying. It may take more or less time until they’re ready. The chips are ready when they are completely dry, with no moisture present inside or outside the chip. They should be crunchy when you bite into them.
Kale chips are super popular, so unsurprisingly there are many videos out there of people making them. Here is a great one, with a pretty unique spice recipe:
Kale Chips In The Oven
If you don’t have a dehydrator yet, no worries (although you really should get a dehydrator, they’re a great resource for homesteaders and preppers), you can also make them in your oven. They come out just as good, too.
You’ll need at least two large cookie sheets to make kale chips in an oven. And an oven, of course! The kale green and mixture preparation is largely the same. Just follow these easy steps to get your oven to churn out some delicious kale chips today.
- Prepare Your Oven. Preheat your oven at 350 degrees.
- Prepare Your Spice Mixture. Combine your spices as described previously.
- Mix Your Greens And Spices. Follow the same procedures as described previously. However, as one batch of greens is mixed, place them on the cookie sheets.
- Bake your kale greens for ten minutes at 350 degrees. Remove the cookie sheets from the oven, then flip each kale chip over, and return them to the oven for an additional ten minutes. After ten minutes, remove them from the heat, and they are ready to serve.
As with the dehydrator, you’ll want to check your kale chips occasionally while in the oven. They may need to bake longer or shorter; once the chips are thoroughly dry and crispy, they are ready.
If you want to watch a great video of someone baking fresh kale chips like these in a oven, you can check out this one here:
Enjoying Your Kale Chips
Kale chips are the ultimate guilt-free snack. Use them in place of potato chips or other junk foods whenever you get the chance. Try dipping your kale chips in a balsamic vinegar and oil mixture as an appetizer. Serve them alongside your home made hard cider or dandelion wine. They are a great complement to nearly any main course you are preparing, too.
Like their potato chip counterparts, kale chips are fragile and don’t store very well. You should plan to eat them as soon as possible. They have a tendency to absorb moisture if you leave them in open air, which spoils their texture. They are also prone to break apart if left for too long.
You can these treats safe for a little while, however. Secure them in small plastic containers when you’re packing school lunches, or getting ready for a foray to the outdoors. You can also keep them a few days in a sealed mason jar or plastic container until you’re ready to eat them.
Kale chips are a delicious snack, and yet another reason to love this nutrient-rich super food. And let’s face it, besides being unhealthy, standard junk food snacks are expensive, too. If you have your own supply of kale via your garden, your kale chips can end up saving you some serious money in the long run.
Dry Those Apples!
Apples are one of the most readily available fruits out there. Go to any supermarket, farmers market, or roadside, stand, and chances are you’ll find apples. If you’re a homesteader, you should probably have a few apple trees in your aspiring orchard, too.
Apples are common and inexpensive, but they’re also sort of bland. You’ve probably thrown away your share of apples that went rotten in your home before anyone ate them, right? My kids often complain about how often I buy the cheap bag of apples every time I head to tour local Costco.
Fortunately, apples are tailor made for drying. You can dehydrate this fruit staple to make a wide variety of snacks. We’ll talk about two of the most popular dried apple snacks here: apple chips and apple fruit leather. Both are delicious treats that everyone from kids to adults will love.
Disclosure: if you visit an external link in this post and make a purchase, I may earn a commission. Read my full earnings disclosure here.
Besides being delicious and economical, dried apple snacks can last for a long time, too. They will stay fresh for days or weeks in open air, and much, much longer if you refrigerate or freeze them. Dried apple snacks are also great candidates for vacuum sealing.
So are you ready to turn those boring old apples into something everyone in your home enjoys?
Apple Fruit Leather
Fruit leather is basically a dried sheet of fruit puree. It is a delicious treat, much like those fruit rollup snacks that are a staple of school lunches and soccer game snacks. You can store it for the long haul, or pack it with you when you head to the field in pursuit of fish and game. And like fruit rollups, it makes a great lunchtime snack, too.
Apple fruit leather is a great use of this versatile food. Everyone loves it, it lasts a long time, and it lets you salvage old apples that are rapidly becoming overripe. So let’s look at how to make apple fruit leather in a dehydrator, as well as in your oven.
Making Apple Fruit Leather
Dehydrators are great for making fruit leather. Whatever model you own, nearly all modern dehydrators are designed to help you easily make batches of fruit leather on demand. You can also make this dried treat in your oven as well. Here is what you’ll need to make apple fruit leather in your kitchen today:
- 4 cups of chopped apples
- 2 tablespoons of sugar, or three tablespoons of maple syrup, or a similar amount of honey (optional)
- 1 teaspoon of olive oil
You’ll need a blender or food processor to puree the apples, and a spatula to spread out the fruit puree. You’ll also need a basting brush or small paintbrush to spread out the oil on your dehydrator trays. If you use your oven to make fruit leather, you’ll need at least two cookie sheets, and some wax paper.
You can experiment with different ingredients in your fruit leather. While apple is good all on its own, it’s also a great base to make an even tastier snack.
Adding small amounts of another fruit, such as blackberries, can give your fruit leather a great taste and prettier color. You can also try spices, such as cinnamon or vanilla, to give apple fruit leather a bit more zest, too.
Apple Fruit Leather in the Dehydrator
Apple fruit leather is relatively straightforward to make in a dehydrator. You can prepare this tasty snack in three easy steps:
- Making The Puree. Place your apples and sugar or maple syrup into your blender/fruit processor. Mix the ingredients thoroughly, until it all has a smooth, creamy consistency.
- Prepare The Trays. Use your basting or paint brush to carefully coat your dehydrating trays with oil. This will make it easier to separate your fruit leather once it is completely dried. Once you’ve applied the oil. Use your spatula to spread out the puree thinly across the trays. Aim for about 1/8 puree thickness on each tray you use.
- Load and Dry. Once your puree is on the trays, load them up into your dehydrator. Set the temperature for 158 degrees Fahrenheit, and then let them dry for six to nine hours. Once your fruit leather is done drying, it is ready to serve.
Every dehydrator is a bit different. Much like the kale chips, the key is to make sure that your fruit leather is completely dry. If it is still a tad moist, leave it in the dehydrator until it is totally dried out.
Here’s a great video you can watch to learn more about preparing fruit leather in a dehydrator:
Fruit Leather In The Oven
You can make fruit leather in your oven, too. You’ll need at least two of those large cookie sheets mentioned earlier to prepare it, along with wax paper to line the sheets with. Follow the instructions for preparing the puree above, and then proceed as follows:
- Prepare Your Oven. Preheat your oven to 190 degrees Fahrenheit.
- Prepare The Puree. Place the wax paper out on your cookie sheets. Spread out the puree evenly, with about 1/8 inch thickness.
- Bake The Fruit Leather. Place the trays in the oven, and bake them for four hours, checking on them regularly. Once the fruit leather is completely dry, it is ready to serve.
Do you want to learn more about making fruit leather in your oven before you give it a try? Check out this video here:
Enjoy That Fruit Leather
Once you’ve made your fruit leather, it’s time to enjoy it! You can cut it up to strips, and then roll it into wax paper, so it’s easy to save and serve. Fruit leather is the ultimate easy snack food. Throw it into the kids’ lunches, or pack it with you on those long trips out to the field.
It’s a long-lasting snack, too. Once you’ve wrapped your fruit leather up, it will last one to two weeks at room temperature. It is best to put it in airtight containers or Ziploc bags. Your fruit leather will last much, much longer if you refrigerate or freeze it.
Apple Chips
Fruit leather isn’t the only thing apples are good for. You can also use them to make tasty apple chips. You’ve probably bought apple chips in the store; they’re often mixed in with nuts and other dried fruits to make trail mixes. Well, lucky for you, you can make apple chips right at home, too!
Apple Chips In The Dehydrator
Apple chips are about as simple as it gets when it comes to dried fruit. They have only one ingredient: apples! Since apple chips can be stored for a long time, it is best to make as many as possible.
My dehydrator can dry about one pound of apple chips in a single batch. Are you ready to make some apple chips now? Here is how you do it.
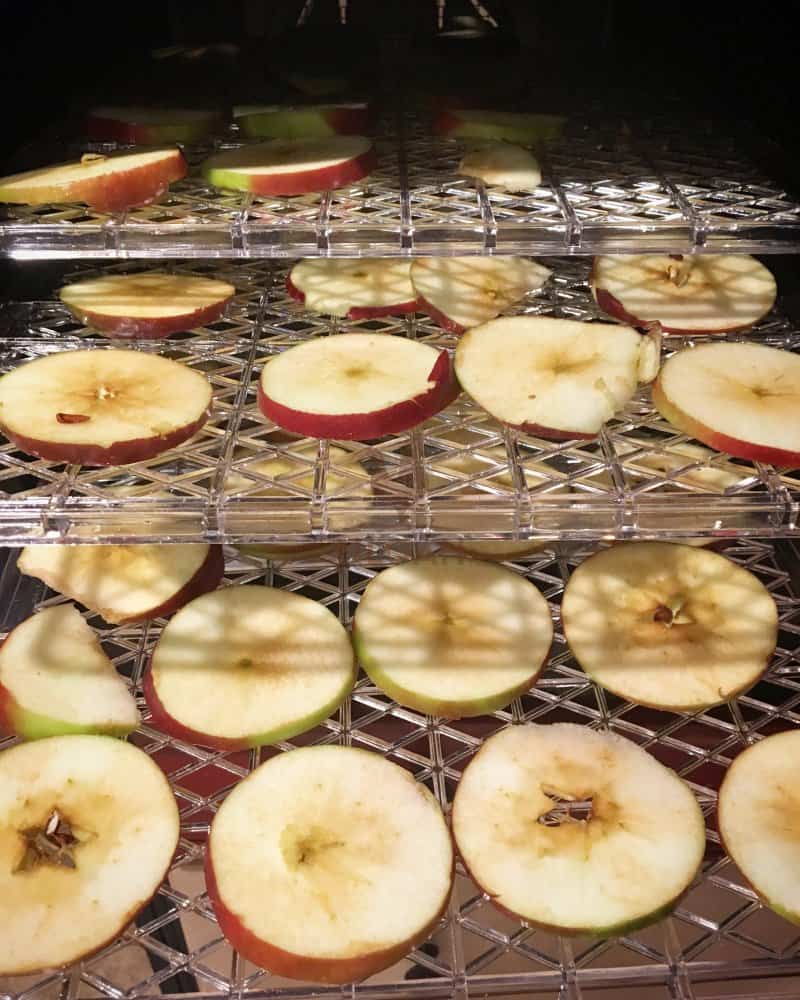
- Prepare Your Apples. Slice your apples as thin as possible. Although you don’t have to core them, you can do so easily if you have a standard apple corer and peeler. You end up drying your apples into nice little rings, which may people find appealing. Once your apples are sliced, place them on your dehydrator trays.
- Load and Dry. Once you’ve filled your dehydrator trays, load the machine, and set it for 140 degrees Fahrenheit. Let them dry for five to six hours, or until completely dehydrated.
Here’s a great video showcasing apple chip preparation in a standard dehydrator:
Apple Chips In the Oven
Making apple chips in the oven is relatively easy, too. You’ll need cookie sheets to place your apples on, and either wax paper or a little bit of oil to place on the pan.
- Prepare Your Oven. Pre-heat your oven to 200 degrees
- Prepare Your Cookie Sheets. Place the wax paper or oil on your cookie sheets, then load up your apples on them.
- Bake Those Chips. Place the cookie sheets in the oven, and bake them for two hours. At the two-hour mark, remove them, flip all of the chips, and then return them to the oven for another two hours. Once the chips are completely dry and hardened, they are done.
The apple chips may be done sooner or later than the allotted time. It is important to check on them regularly, especially after they’ve baked for some time. The key to great apple chips is to ensure they are as dry and hard as possible.
Like fruit leather, you can spice up your apple chips as well. Some people like to coat the sliced apples with spices, such as cinnamon, prior to placing them in the dehydrator or oven.
Other people soak them for a few minutes in lemon juice prior to cooking for additional flavor as well. You should try making them different ways, and find an apple chip recipe you like. Keep in mind that adding liquids to mix may lengthen the time it takes them to dry, though.
You can watch this video to get a better handle on drying apple chips in your oven:
Eat Those Apple Chips Up!
Apple chips are a long-lasting dried food. They are great school snacks, or to take with you on a hike into the woods. Mix them with nuts and other dried fruit to make a terrific rail mix of your own. You can also use them as a garnish in salads or soups, or add them to your cereal in the morning as well.
Enjoy Dried Kale And Apples All Year Long!
Kale and apples are the perfect foods to dry. They are readily available, cheap, nutritious, and easy to dry in many different ways.
And while they may be a bit boring as everyday foods, they are superstars when you dry them in your dehydrator or oven. So give your mason jars and pressure cooker a break, and make these tasty dried foods today!
When Tom Harkins is not busy doing emergency repairs to his 200 year-old New England home, he tries to send all of his time gardening, home brewing, foraging, and taking care of his ever-growing flock of chickens, turkey and geese.
Excellent how to article, Tom. I season apple chips with cinnamon and a tiny bit of sugar. I tried using blue agave nectar in place of the sugar but that just didn’t turn out well.
Thank you Ray, we are glad you liked it! I always toss a little bit of cinnamon and sugar onto my apple chips as well – it definitely makes them extra yummy! I make a lot of dry muffin mixes with apple chips, put them in vacuum-sealed Mason jars, and give them as gifts as Christmas.