Out of all the risk factors attended to a survival situation, statistically one of the most common is simple exposure.
Exposure to the elements, and specifically cold temperatures, routinely claims lives in the wild and also in residential settings, and hypothermia can strike with surprising speed even when you think you’ll be okay.
Accordingly, being prepared to fight cold weather when the electrical grid is down and other fuel supplies are unavailable or exhausted is a huge consideration for anyone living anywhere except the balmiest climates.
One clever improvisation that could keep you alive and at least make your stay indoors or out a little more comfortable is a terracotta clay pot heater.
Using nothing more than a candle and a few garden-variety clay pots it is possible to craft and effective and simple radiant heater that can help keep you warm using nothing more than common candles.
I’ll tell you all about how they work, how to make one, and how to safely use one below…
What is a Terracotta Pot Heater?
A terracotta pot heater is exactly what the name says it is: it is a heater, made from terracotta clay pots!
Specifically, it is a type of radiant heater, a heater that works by slowly but steadily emanating heat from its surface area as opposed to a convection heater or the oldest of heat sources an open flame.
The basic design is old, very old, and though the one we are going to make today is a relatively recent improvisation the principles behind why they work and what they are best used for have been known for a very long time.
The idea is simple: a couple of pots are nestled together, a smaller one nested inside a larger one, and the clay material of the pots and the air trapped between them is heated via an open flame, invariably a candle.
As the clay heats up, it will release the heat into the surrounding room or space slowly and steadily compared to simply letting the candle burn on its own uncovered.
This can help keep a space a little bit warmer over time.
Can a Terracotta Pot Heater Really Heat a Room?
Yes, they can. However, I preface this with a caveat that terracotta pot heaters are effective in direct proportion to how many candles you have burning under them and for how long you can burn them.
In all cases, they’re nowhere near as good as a fireplace, a roaring campfire, an electric heater, a propane heater or anything like that.
Now, I will also warn you that plenty of astute scientists and general physics nerds will be quick to chime in about thermodynamics and the conservation of energy and blah, blah, blah.
I can’t speak to all that, and while I’m not calling these people liars or asserting that they don’t know what they’re talking about, we have plenty of practical experience that shows us these heaters do work and they do serve a purpose.
More importantly, heaters of this kind are still used in this very day, right here in America, to help heat the homes and shelters of crushingly poor people that cannot afford electricity, gas or even firewood. There is a reason the design has stuck around and is so well known…
I could go on but I won’t, and will say only this before we do: this is a good design to know, and it is definitely something you should have in your prepper’s bag of tricks.
Can You Use Any Pots with this Design?
No. In fact, you want to use a very specific kind of pot. You want to use unglazed, unfinished, unpainted terracotta clay pots that are entirely dry.
You don’t want to use glazed clay pots because they won’t heat up evenly, and the glazing will actually impede the transmission of heat.
You definitely don’t want to use any kind of plastic bucket because they will melt or dangerously sag and potentially cause a fire.
You could theoretically use a metal bucket, but depending on the finish of the metal heating it could release dangerous gases, so I say that’s a no-go.
Don’t try to innovate in this regard: stick to unglazed, dry, plain terracotta clay pots and your heater will work like a charm.
Assembling Your Own Terracotta Clay Pot Heater
All right, time to get on to the business of actually assembling our clay pot heater. But before we go, take the time to review the parts list below.
I know this might seem like a suspicious amount of components for what it’s supposed to be a simple, improvised heater but I promise it is a cinch to assemble, quick and easy.
Also, you will soon see why these parts are needed and I’ll explain the benefits over trying to jury rig them together using a piece of scrap between the pots.
Of course, you can do that, but it’s not ideal.
Ensure that all pots are dry and free of grease, oil or other substances it could catch fire. Wet pots or pots that are cracked or damaged are likely to break when heated up!
Homemade DIY Terracotta Pot
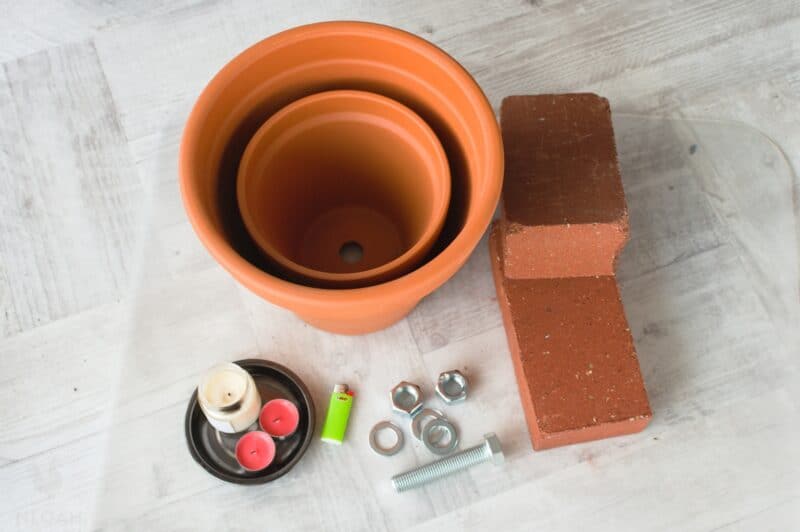
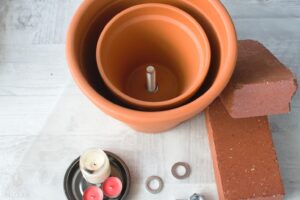
Ingredients
- 1-3 pieces candles depending on how much heat you want to generate
- 1 piece 12-inch diameter terracotta pot unglazed
- 1 piece 10-inch diameter terracotta pot unglazed
- 1 piece metal container small, to place candles inside. Should be smaller diameter than large pot.
- 1 piece fire-resistant mat or tile to set heater on
- 2 pieces small clay flower pots or two bricks of equal size
- 1 piece threaded bolt approximately 6 inches long (must fit through holes in bottom of clay pots), or a threated bar
- 2 pieces nuts 3 nuts if using a threated bar instead of a threaded bolt
- 3 pieces washers 4 washers if using a threated bar instead of a threaded bolt
Instructions
- Place heat-proof mat or tile where you want heater located.
- Beginning with your larger pot, insert the threated bar with one bolt and washer (or threated bolt without a bolt and washer) through the hole in the bottom with the threaded part of the bolt sticking out inside the pot.
- Place a washer on the bolt inside the pot then secure with a nut.
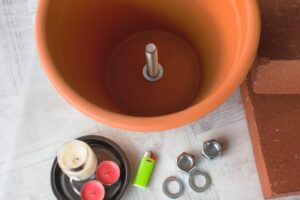
- Place another nut on top of this washer. Hand tighten until snug. This will create a gap between the pots and hold a volume of heated air, increasing efficiency.
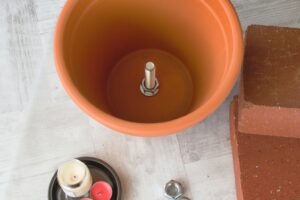
- Top the stack with another washer.
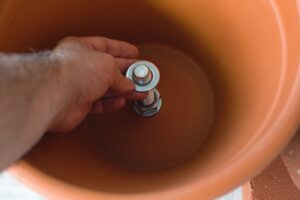
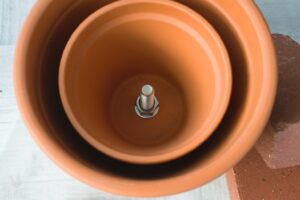
- Place your smaller pot inside the first one, threading the bolt through the hole in the bottom as before.
- Place last washer on threads inside smaller pot, and then fasten with nut finger tight only. You only want the whole assembly to be snug enough to handle and move without it falling apart but do not over tighten or pots will crack or shatter.
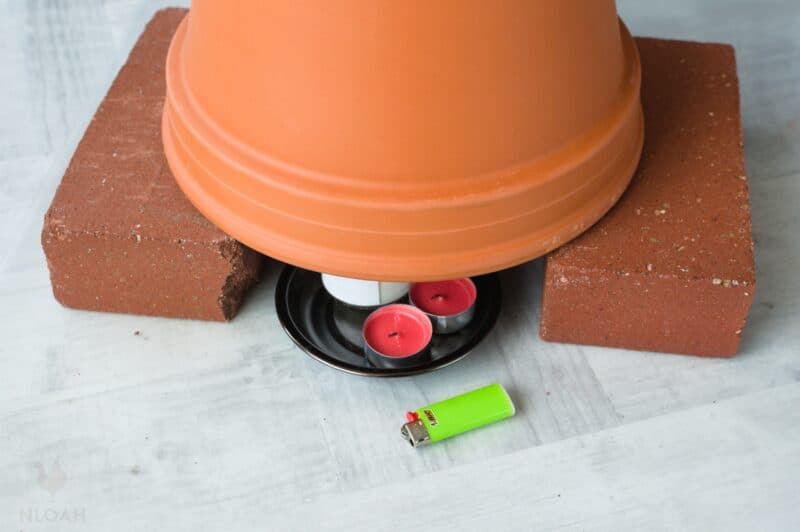
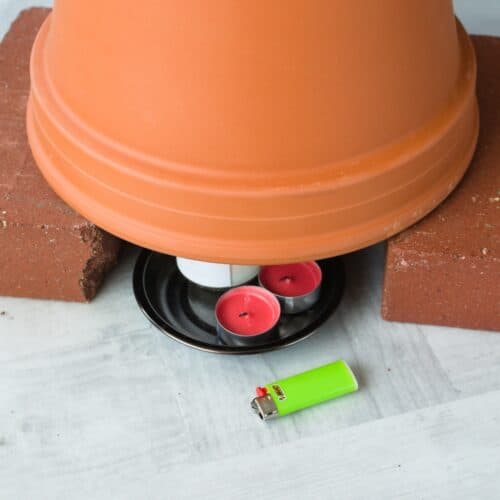
- Set up smaller flower pots or bricks in position, spaced to support rim of largest pot when upside down.
- Place candle or candles inside metal can or other container and position between bricks or flower pots.
- Light candles and then position heater assembly above candles resting on bricks or small flower pots.
And that is it. Note that it will take a while for the pots to heat up and then start radiating the heat out into the room.
Also, the reason why you want to use washers when assembling the pots is not only to provide a more stable connection but to help seal up those little holes and prevent air loss through the top. The better the seal, the better your heater will work.
Where Should you put your Heater for Best Effect?
As mentioned up above, this heater isn’t going to keep a large room toasty warm on a freezing day with blizzard conditions outside.
But it can provide you with some comforting heat if you are close to it, and it can definitely heat up a much smaller space in a meaningful way.
This is an ideal heater to use in a small bedroom, tent or other cozy space because it will steadily help to heat up the air in the room and also heat you up via direct radiant heat.
What Candles Should You Use with Your Heater?
You can use any candles you want to with your heater, but better, longer-lasting candles are a better option.
Moving your heater can be tricky once the pots get hot, so if your candles are short enough to fit completely inside the metal can at the bottom, that can allow you to easily pull them out and replace or extinguish them.
Smaller pillar candles are ideal for this, but you can use tealights for the purpose. Remember that burning more candles will definitely heat up the air quicker, but you’ll be going through your heater fuel faster as well.
Don’t discount the value of using this heater with even a single candle. You might be surprised at how hot the pots can get!
If there’s one kind of candle you definitely shouldn’t use, though, it is the tall tapered candles.
They are so tall they are likely to contact the sides or top of the inner pot, and this makes removing them for replacement or extinguishing a huge pain in the butt.
Safety First!
This is a really simple heater design compared to any of the modern field stoves and campsite heaters you can buy in stores, but that doesn’t mean you can treat it with kid gloves.
In fact, you should have gloves handy in order to deal with it! The clay pots will get very hot, and touching them with exposed skin could give you serious Burns, as could the candles below so do be careful.
Obviously, you should never use this heater any place where it would present a clear and present fire hazard.
You must still be very careful not to start an accidental fire as that is something you can probably ill afford under the circumstances.
Lastly, most folks don’t give any thought to carbon monoxide build-up from candles but it is still a factor.
Anything that burns will release carbon monoxide, and during particularly inefficient burns more carbon monoxide will be released.
Chances are, it’s nothing you’ll have to worry about inside even a modestly sized room, but you should make allowances for ventilation or periodically allow fresh air into the room just to be safe and be particularly cautious if you’re using this heater inside a tent or other truly small space.
Frequently Asked Questions
Yes, clay pot heaters really do work, but don’t expect to warm up anything but their immediate space.
Built correctly, warm air is trapped inside and in between the pots heating them up and allowing the pots to radiate heat that would otherwise be wasted near the ceiling.
Yes. The pots themselves do not produce carbon monoxide, but the candles that make the heater function do. Not much, but something to be aware of!
Always use unglazed, dry pots. Glazed, painted or other finished pots won’t work as well and they are also more likely to break or shatter when heated up.
Tom has lived and worked on farms and homesteads from the Carolinas to Kentucky and beyond. He is passionate about helping people prepare for tough times by embracing lifestyles of self-sufficiency.