Homesteading and homeschooling are not synonyms, but the two concepts sure fit together well. Even if you are not homeschooling, you can still make some simple, nearly free, and heirloom-style learning supplies to help your little ones bolster their academic progress.
Teaching or reinforcing the building blocks can be daunting for someone who does not have a background in education. My daughter wanted to homeschool her children but wasn’t very confident about her qualifications to do so.
As a former educator, I assured her that learning absolutely did not need to take place seated at a desk or using ditto sheets – that should be a rarity and not commonplace.
Children are not naturally inclined to sit still in a seat for hours on end quietly working and regurgitating information. They have to be conditioned to do so, and that can often be a frustrating endeavor – as well as an unnecessary one.
If you think back to a professional training you have attended I am sure you will recall how excruciating it was to mirror the sitting in a desk quietly scenario for even half a day.
These simple hands-on homemade learning supplies and activities are NOT designed for a child sitting still in a seat. They are geared to be engaging and interactive, and to make learning the intriguing and exciting adventure that it should be.
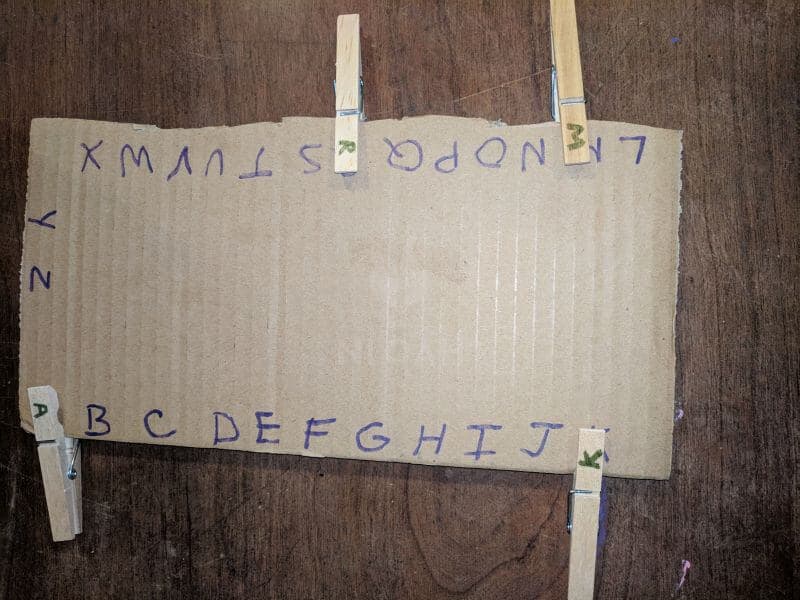
What Are Clip It Boards?
These clipboards are often used for preschool through third-grade age students, but can easily be adapted for older elementary age children as well.
You can make matching colors, shapes, numbers, and alphabet clip it boards, matching lower and upper case letter clip it boards, math problem boards. Science classification boards, sight word boards, the way you design the boards is limited only by your own imagination.

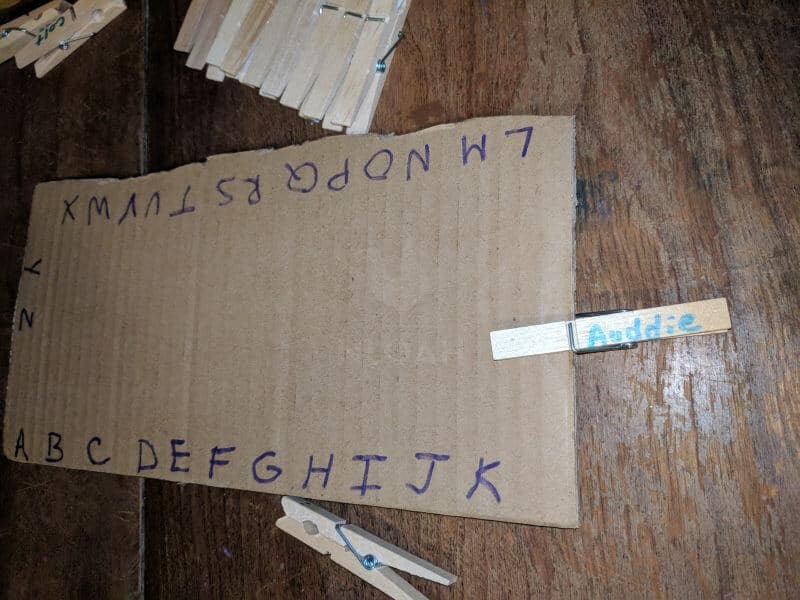
Three year old Auddie and two year old Ariyah and busy working on their clip it boards first thing in the morning. It was the first activity they wanted to do, and the girls kept busy with them until they smelled bacon coming off the griddle for breakfast.
If you are a homesteading homeschooling parent, consider using clip it boards as a morning basket or quite – independent activity at the start of the day.
If using the clip it boards for a morning basket homeschooling activity or putting them with a group of items you have laid out to work on during the day, put each child’s name on a clothespin.
This will allow each child to easily identify which board is the one they are supposed to work and can begin doing so independently.
Decorating Clip It Boards
Children love clip it boards even when they are made from merely plain cardboard. But, if you want to adorn them for added interest, you can cover them with decorative contact paper, allow the children to use stamp and ink pads to decorate their own, or glue a picture the child colored to the middle of the board and then cover the entire thing with clear contact paper to preserve it.
The object is not to make a clip it board that looks polished and mass produced, but something your particular child will love – and even had a hand in designing.

How to Make Clip It Boards
- Scrounge up from around the house or buy wood clothespins – the kind that snap not the slide in type.
- Cut a piece of cardboard to your chosen size. It should be something the child can lift, and turn, and otherwise manipulate easily. Since my grandchildren are all preschool age, I simply cut the flat off of a cardboard box and use it. I most often use a rectangular board, but cutting the cardboard into a pie shape can work really well, also and varies the game board shape for added interest over time.
- You can use a marker or paint pen to divide up the cardboard clip it board into section if you would like. Using divider lines is highly recommended if you are going to be doing match problems, science classifications, or gluing pictures onto the board. If you are simply going to use the clip it board to match numbers, colors, shapes, or letters, there is not as much of a need for divider lines, and using them can make it look too busy and confusing for young children.
- Using a marker or paint pen to write or draw the number, letter, word, etc. onto the clipping end of the paper clip. If you are matching something longer or more complicated, consider printing it out on label paper or regular computer paper and then covering it with clear contact paper (available at most Dollar Tree stores for $1) to laminate it.
- Write, draw, or label the cardboard piece to match or correspond with the clothespin that will be clipped to it.. If you are gluing pictures to the clipboard board, I also recommend using clear contact paper to laminate them.
Clip It Board Learning Activities
Numbers – You can match the numbers on the clothespin to the same number on the board. You can also put dots on a second set of clothespins to teach counting and use the same clip it board to play.
Letters – If matching the alphabet, I recommended putting all upper case letters on the board and then writing the uppercase letters on the clothespin on one side for beginning learners and lowercase on the underside in a different color marker so the learning game can grow with them once they have mastered simple letter recognition.
Shapes – You can have the children match the shape on the clothespin to the shape on the clip it board when they are preschool age, and then reuse the shapes board by making a second set of clothespins with the name of the shape spelled out for young elementary age children to use.
Colors – If you are homeschooling children of multiple age, having an independent learning activity to keep toddlers busy, help them feel included in the learning lesson, and deter them from snatching at the game pieces older children are using, make a color matching clip it board.
On both the clothespin and the board make circles or squares in each color for the little ones to match. You can also adapt this game for preschool children by making shapes in different colors so the child has to concentrate more deeply to match the purple square to the purple clothespin with the same shape and color.
If working with early elementary school children, use the basic toddler clip it board and make a second set of clothespins with the name of the color spelled out in black ink to match.
Animal Families – Print or draw a momma or momma and poppa animal and glue it on a clip it board after covering it with clear contact paper. Print a photo of a baby animal from the same family, cover it in clear contact paper, and glue it to a clothespin.
You can adapt this game for early elementary children by making a second set of clothespins with the name of the animal written directly on the clothespin or a label.
Upper elementary school children can learn the scientific classification of the animal by using this same basic board and labeling or writing the scientific classification of the animal on the clothespin.
Math Problems – On this clip it board you should use divider lines to divider lines. Write math problems on clip it boards and then write the answers on the clothespins.
You can do simple math problems for young children to advanced problems for upper elementary to junior high children. You can also make smaller “Find The Factors” boards that have one number written large and inside of a square in the middle.
Above, below, and on the sides of the number will be divider lines to place a single number inside. Clothespins are clipped onto every number around the border that is a factor of the large number.
Words – Draw or print a picture of simple three and four letter words to put on the clip it board. Cover any printed picture with clear contact paper to make it last longer before gluing or stapling it onto the board.
Write each word onto the clothespin or print it on a label to affix to the clothespin. If making the clip it board for older children, type the definition of vocabulary words, cover it with clear contact paper, and glue or staple it to the board.
You could also hand write the definition of the vocabulary words directly onto the board. I highly recommend using different colored ink and divider lines to make each vocabulary section distinctive and easier to discern. Write the word onto the clothespins for matching.
This activity might seem a bit simple for older children, but they will love the diversionary method of studying their vocabulary words and case race siblings or even parents, to see who can match all of the sections to the words first.
Save the clip it boards even after the children have moved onto new vocabulary words, and have an “exam” each month or every three months to reinforce their memory of the word and its meaning.
Spelling – When making this kind of clip it board you will need to make multiple smaller boards that can be used individually. Draw or place a clear contact paper covered picture of what each spelling word represents on the board.
On one set of clothespins, write the entire word for the children to match to the board. On another set, write all of the letters the child will need to complete each individual spelling word board so they can clip each letter in the right order to the picture board to spell the word.
This activity can also be adapted for practice work on blends and rhyming words. This is also a fun way to teach children how to spell the days of the week and months of the year, and then put the individual boards in order.
History – Draw or affix a clear contact covered historical place, event, or person on the clip it board. Write or label the clothespin with the name, era, or trivia fact that corresponds with the historical reference.
You can adapt this activity for younger children by using community workers and basic local identification symbols. You can also make a clipboard that has lines drawn upon it to make a timeline.
Emotions – Take a photo of your child or family member making a face that shows them sad, happy, angry, excited, etc. cover it in clear contact paper, and affix it to the board.
Write or label each clothespin with the word that corresponds with the emotion being shown in each photo.
Senses – Make a set of clothespins with the words “hear, see, taste, touch, and smell” on them. You can also draw or label the clothespins with symbols instead of words for non-readers, like an ear, hand, etc. Take photos, draw, or print pictures and cover them in clear contact paper and place them on the board.
Measuring – Clothespins are not very long, but you can do up to three inches in measurements, with half, fourths, etc. marked between the inches you measure and mark on them.
Draw divider lines on the clip it board. In-between each divider line measure and draw a straight line to a specific length that corresponds with the ones you drew on the clothespins.
When teaching measurements you can also make a clip it board that helps children learn how to measure using measuring cups and measuring spoons.
You will need a larger clip board for this type of activity because drawn or printed pictures of measuring cups and measuring spoons will need to be placed on the board and a designated amount colored in or written on the kitchen measuring tool. The clothespin should have the amount written on it: 1 cup, ⅓ of a cup, 1 ½ teaspoon etc.
Geometry – Draw various angles in-between divider lines on the clip it board. Write the name of the angle on the clothespins for older children to match.
Patterns – After drawing divider lines on the clip it board, use different colored markers to create a patterns of three, four, or five shapes. For younger children, keep each pattern set simple, and do not repeat it with only a slight variation in color or shape.
For older children, make the patterns as similar as possible to increase difficulty. On the clothespins, mirror each pattern drawn on the board for matching.
Seasons – The simplest version of this clip it board works best when a pie shaped one is used. Draw or put a printed picture that has been covered in clear contact paper on the clip it board.
You can also cut shapes out of felt to create a 2D touch, and feel seasonal scene and hot glue them onto the cardboard. On the clothespins, write the name of each season for the child to match. I recommend using divider lines for this activity.
Using this same board, print out pictures that you cover with clear contact paper and glue them to the clothespins. The pictures should be images or symbols related to holidays, food, clothing and footwear worn, etc. during the season for the children to match. I typically make five clothespins to match each season.
Months – This board follows the same concept as the season one above but works best on a longer rectangular shaped clip it board. Write the name of each month in a divided section.
Next, print or draw pictures on paper that correspond to holidays, clothing, and weather that occurs during each month to match. Cover the pictures with clear contact paper.
Sequencing – Make a clip it board with divider lines. Inside of each line, write a number, beginning with 1, and going as far as it suits your planned activity. On the clothespins, place pictures that have been printed or drawn and covered in clear contact paper.
You could use photos that demonstrate the life cycle of a chicken, frog, flower, the food chain, planting from seed to harvest, etc. The sequencing clip it board can also be used to retell a story the children have read or been read if you make or print images that correspond with the story.
Weather – Make a pie-shaped clip it board with dividers. The number of dividers will depend upon how many types of weather patterns you want to add. Draw or affix pictures of the types of weather you want to teach the children about to the clip it board after covering them in clear contact paper.
On the clothespins, write the name of the type of weather. You can (and probably will want to) write the names of any precipitation being shown, as well as the word son.
Have the children clip the clothespin with the corresponding weather word or words to the proper section. You could also use the days of the week clothespins with this learning activity so the children can track the weather patterns of the week.
If you have chalkboard paint, cover one of the clothespins with it. Once it is thoroughly dried, allow the children to check the thermometer to see the temperature and then write it on the chalkboard clothespin to place next to day of the week clothespin that was added.
Food Groups – Make a clipboard with divider lines drawn to separate spots for each food group. A pie shaped clipboard works really well with this learning activity.
Draw or print photos of food from each food group and cover them in clear contact paper. Affix the food group images to the clothespins with hot glue. I made five food images for each food group for the children to match to the board in the proper spot.
Self-Management – Make a clipboard for each child so they can independently track their daily “to do” list or activities on their own. Make divider lines in-between each section.
You can draw or print images or take photos of the child doing the activity to cover in clear contact paper, and place on the clip it board. If there is a specific time the child is supposed to accomplish a task, write the time in the section to reinforce not only self-governance, but time telling skills as well.
There is no need to put anything the clothespins for this activity, they are being used like a checkmark on a list, but you could allow the children to decorate them just for fun.
Here is an example of a self-management clip it board that I made for a 3-year-old granddaughter:
Brush Teeth | Eat Breakfast | Feed and Water the Chickens | Feed The Goats | Story Time | Math Time | Lunch | Letter Time | Forest School | Dinner | Clean Up | Brush Teeth | Story Time | Bed Time
Head To Head – If you have children that are close in age, you can make a clip it board large enough that each can work on different sides at the same time – racing to see who can complete their task accurately in the quickest time.
Final Words
Clipboards do not need to be fancy works of art. Sure, the fancier you get with your displays on the cardboard the more appealing this hands-on homemade learning game will be, but even basic game boards can hold a child’s attention for extended play.
While clothespin clipboards are typically made out of cardboard, if you are inspired and eager to make one right now but are fresh out of cardboard, do not despair.
In a pinch, you can make a clothespin game using a sturdy paper plate, poster board, cardstock paper and even individual game boards using an index card.


Tara lives on a 56 acres farm in the Appalachian Mountains, where she faces homesteading and farming challenges every single day, raising chickens, goats, horses, and tons of vegetables. She’s an expert in all sorts of homesteading skills such as hide tanning, doll making, tree tapping, and many more.
Great, and simple ideas, Tara! Reminds me of the old flash cards and blocks my parents made us when I was young, some 60+ years ago. Good teaching doesnt have to be expensive. Think of all the billions of dollars thrown at schools, today, and how kids are getting dumber. If it was really about teaching kids, your ideas are better! Maybe we should give each ‘teacher’ a supply of ‘ideas,’ and let them use their own imagination of how to teach. Sadly, they’d probably have no clue. It’s not more dollars that teach kids. It’s teachers with imaginations, and critical thinking skills, who put kids first. Kids back a couple generations ago, actually had to calculate crop plantings and yields, hectares and bushels, in their heads, or on the barn door. And dairy farmers had to track their individual cows’ productions, on the barn wall. Women made homemade clothes for the family, so had to calculate how much fabric to get for each sized person’s outfit. It wasnt just a guessing game. Kids these days are too coddled and plugged in to some gadget doing it all for them, and have no clue how to think for themselves. Great job, Tara!!