If you’re a homesteader looking to fill up your pantry with preserved foods, dilled carrots are one of your best bets! These pickles taste delicious.
Carrots are also plentiful all year round at the grocery store, and are inexpensive as well. Jars of bright orange dilled carrots will help add variety to your canned goods too, and cheer you up on a cold winter’s day. You can use them in a variety of recipes too, from unique sandwiches to a delicious, infused vodka!
Dilled carrots are also extremely easy to make, so if you have access to a supply of carrots, you can line the shelves of your pantry really quick with these tasty pickles whenever you feel like it. Let’s take a look at what it takes to make and preserve these pickles, so you can enjoy them all year long.
Gathering The Equipment
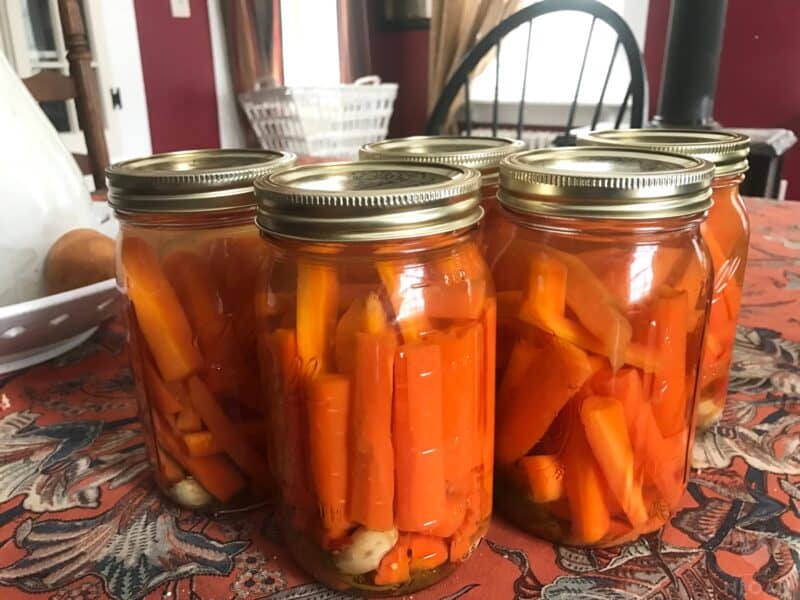
The recipe we will discuss today will enable you to make seven quarts of dilled carrots. When you’re done with the recipe, you’ll have nearly two gallons’ worth of dilled carrot pickles that you can store in your pantry at room temperature for up to one year.
Here is all of the equipment and ingredients you’ll need to start making your own dilled carrots.
Equipment For Canning Dilled Carrots
Disclosure: if you visit an external link in this post and make a purchase, I may earn a commission. Read my full earnings disclosure here.
- Boiling Water Canner. You’ll use a very large pot called a boiling water canner to sterilize your canning jars, then preserve your tasty dilled carrots.
- Canner Rack. In order to get your jars in and out of the boiling water canner, you’ll rest them on a metal frame with handles called a canner rack. The handles sit above the water line in the canner, making it easier to safely remove all of the jars at once. Note: Most boiling water canners come with their own rack.
- Seven 1-Quart Canning Jars, With Lids And Rings. Try to get the wide mouth jars if possible for this recipe. These jars are easier to pack, and it is also easier to remove the dilled carrots later, when you want to eat them! Also, you can re-use these jars later to make cucumber pickles, which don’t fit as well into standard quart canning jars.
- One Very Large Saucepan And One Small Pot. You will need the very large saucepan for preparing your pickling juice, and you’ll sterilize your lids by boiling them in the small pot.
- Potato Peeler. You will need a potato peeler to remove and discard all of your carrots’ skin for this recipe.
- Knife and Cutting Board. You will need a sharp knife and a cutting board to help cut all of your carrots into two-inch spears
- One Colander Bowl. The colander will allow you to wash off your carrots prior to packing them into the 1-quart jars.
- You will use a small funnel to assist with packing carrots, spices, and pickling juice into your canning jars.
- You will use a ladle to transfer the pickling juice from the saucepan to your jars.
- Large Spoon. The spoon will help stir your pickling mixture.
- Large Towel. After you process your canning jars, you will place them in a quiet, draft-free corner, and cover them for 24 hours with this towel.
- Small Towel. You’ll use a small towel to wipe off your jars and lids; this will help ensure you get a good vacuum seal, and will be able to store the crunchy dill pickles at room temperature for up to a year.
- You will need something to help keep track of time (boiling times, canning processing times, etc.) while you make and preserve your pickles.
Optional Canning Equipment
There are additional items you might want to have on hand as well. While they are not essential, they can help make the entire canning process easier.
- Magnetic Lid Wand. A magnetic lid wand helps you grab hot jar lids and move them where you want them, all without contaminating them with your hands.
- Jar Lifters. A jar lifter is basically a set of wide pincers that enable you to grab hot canning jars and move them into and out of places that are too hot to touch. These are great to have when positioning jars in and out of the boiling water canner.
- Labels And Markers. If you can on a regular basis, it is a good idea to label your canning jars, and put a date on when you processed them. Canning jar labels will help ensure that you know exactly what is in each can. If you write the canning dates on them as well, you will know when a canned food is in danger of expiring.
- Outdoor Gas Cooker. If you plan to can foods on a regular basis, it is a good idea to invest in an outdoor gas cooker. These burners run on the same propane tanks you use with your outdoor grill.
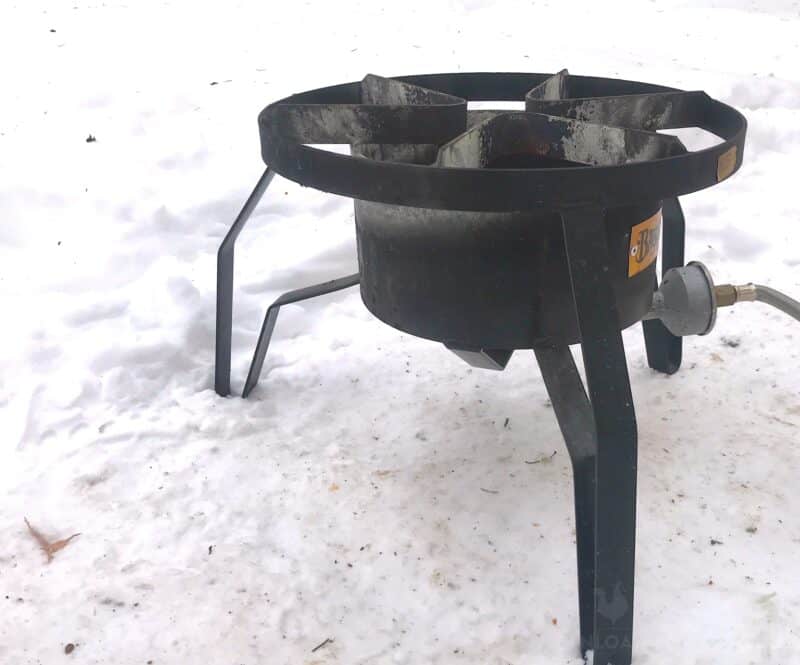
An outdoor gas cooker will enable you to bring the water in your boiling water canner to a rolling boil more rapidly than most indoor stoves can; it also helps cut down on the inevitable mess in your kitchen as well.
NOTE: Follow all safety direction when using your gas cooker, and ALWAYS USE IT OUTDOORS.
All of the essential and optional items are easy to find at hardware and home goods stores. You can also shop for them online as well.
You will want to make certain all of your canning equipment is as clean as possible prior to using it. Use a good sanitizer, such as Star San, to clean all of your equipment prior to beginning the canning process.
Assembling The Ingredients
This recipe makes about seven 1-quart jars of delicious dilled carrots. This is a relatively simple recipe, with only a few ingredients. Here’s what you’ll need to be enjoying these bright orange pickles in a few short days:
- 10 pounds of Carrots. Most grocery stores sell 5-pound bags of carrots; two of these will do the trick.
- 1 Cup of Pickling or Canning Salt.
- 12 Cups of White Vinegar. A one-gallon jug of standard white vinegar is perfect for this recipe.
- 14 Heads of Fresh Dill. The dill heads help to give your carrots their distinct flavor. NOTE: If fresh dill heads are not available, you can substitute them with seven teaspoons of dill seeds.
- 7 Teaspoons of Hot Pepper Flakes.
- 4 Cups of Water
- 7 Garlic Cloves, Peeled and Halved.
If you are a new or inexperienced canner, follow this ingredient list and the preparation directions carefully. Once you are more knowledgeable and confident about preserving foods, you’ll be able to try preparing dilled carrots in different ways.
You should also try to find some good sources about home preserving, including books on the subject, and government websites as well.
Do you have all of your equipment and ingredients? Great! Let’s make some dilled carrots!
Step 1. Sterilize Your Jars, Lids, and Equipment.
It’s important to ensure that all of your equipment is sanitized. Remember, you’re preserving these dilled carrots so that they can be stored at room temperature for up to a year. Ensuring that you don’t inadvertently introduce bacteria in to your jars is critical.
Thoroughly wash all of your canning equipment, jars, and lids prior to use. It is a good idea to use a good sanitizing chemical, such as Star San, during this process to make all of your equipment as sanitized as possible.
Once you’re done washing everything, fill your boiling water canner with water. Then, place your empty canning jars on the canning rack, and lower them into your boiling canner. Make sure the jars are completely submerged in the canner, and then boil them for at least ten minutes.
Simultaneously, place your canning lids in the small pot, cover them in water, and boil them for at least ten minutes as well, turning the burner down to low heat when complete.
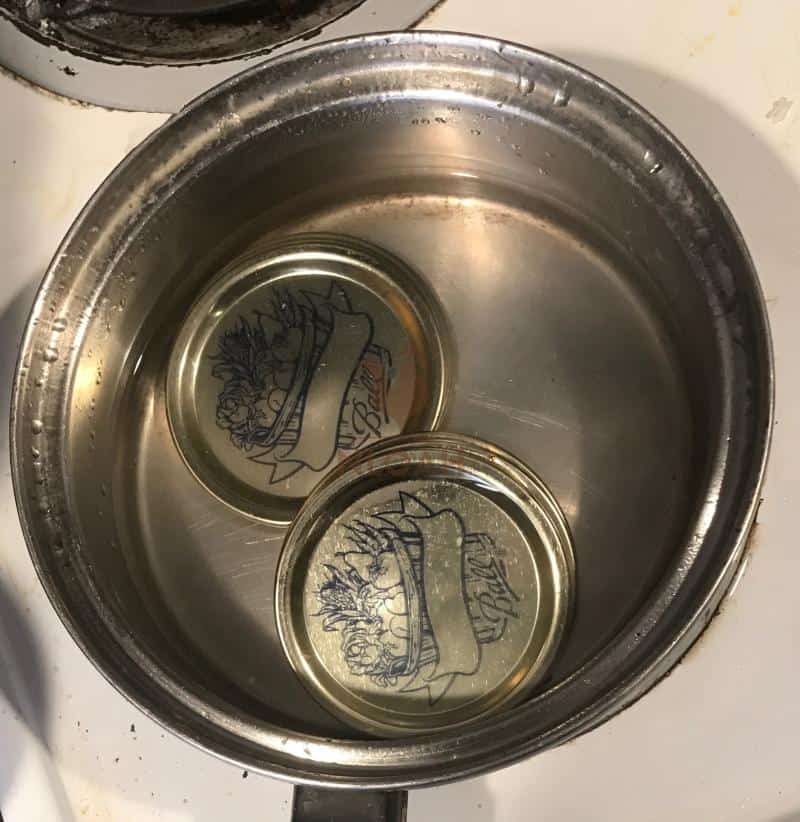
Photo: Use the small pot to boil and sterilize your canning jar lids.
Remove your jars from the canner once they’ve been sterilized, and set them aside to dry out. Use caution when removing the canning jars; you don’t want a jar of scalding hot water to tip and spill on your foot. Leave the canning jar lids in the pot, and don*t remove them until the jars are packed and you’re ready to seal them.
Step 2. Preparing The Garlic.
Take your seven garlic cloves and peel them; ensure the peel is completely removed. Once they’re peeled, cut each clove in half. Put the cloves in your colander, wash them thoroughly, then place two clove halves in each of your 7-quart jars.
Step 3. Add The Dill and Hot Pepper Flakes.
Place two dill heads in each canning jar; if you were unable to obtain fresh dill, substitute it with one teaspoon of dill seeds in each jar instead. Then, add one teaspoon of your hot pepper flakes to each canning jar as well.
Step 3. Preparing And Adding The Carrots.
Using your knife, cut the tops off of all the carrots. Then, using the potato peller, remove all of the carrots’ skins. Inspect the peeled carrots closely; discard any carrots that appear soft, rotted, or show any discoloration. Quarter your whole carrots lengthwise, then cut the quartered carrots all into 2.5-inch spears.

Photo: Peel your carrots, then cut them into 2.5 inch spears like these here.
Wash the carrots in your colander bowl, and then fill all seven of your canning jars with the carrots. When you are done, each jar should be packed with carrots, and 1/2 –inch of headspace should remain in each jar.
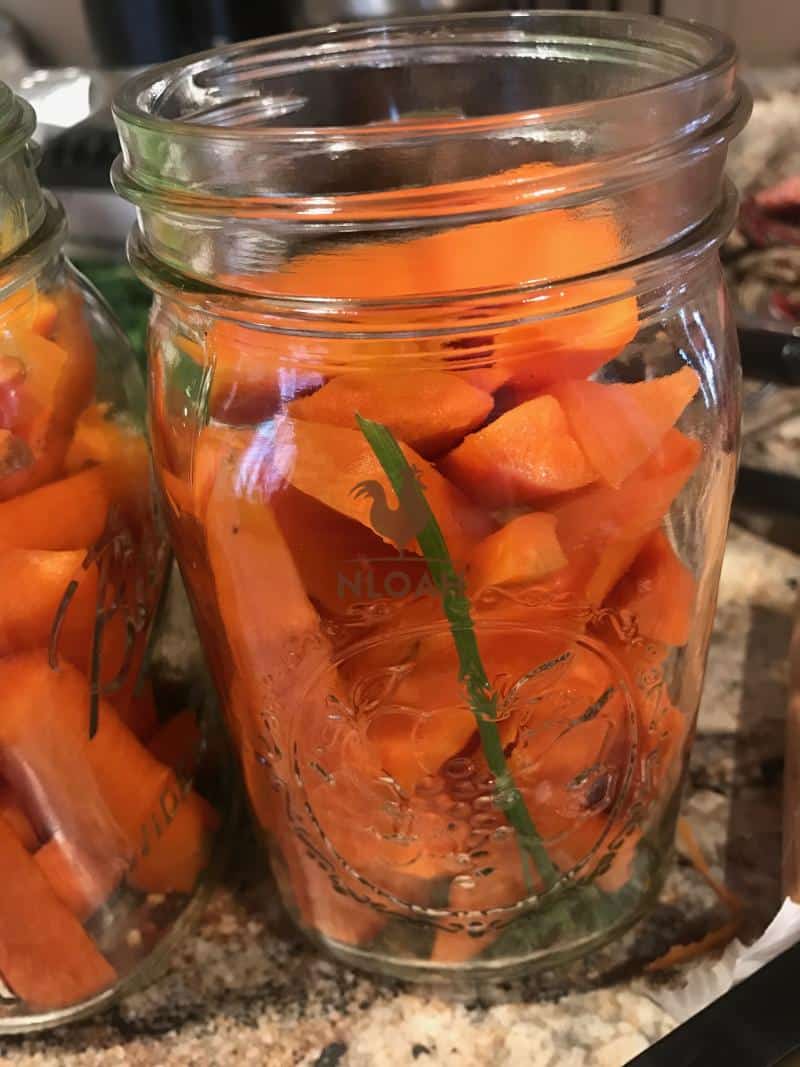
Photo: A canning jar packed with carrot spears. Notice the dill weed in the jar as well.
Step 5. Preparing The Pickling Solution
In the very large saucepan, combine 4 cups of water, 12 cups of white vinegar, and 1 cup of pickling salt. Bring the mixture to a boil, then reduce heat and let it simmer stirring until the salt completely dissolves.
Step 7. Packing And Closing The Jars
Your pickling solution is the last ingredient you need to add to your canning jars. Using your ladle, carefully fill each jar with the pickling solution, leaving ½ inch of headspace. Again, move your funnel from jar to jar as you add the pickling juice; this will make the process less messy, and ensure none of your pickling juice goes to waste.
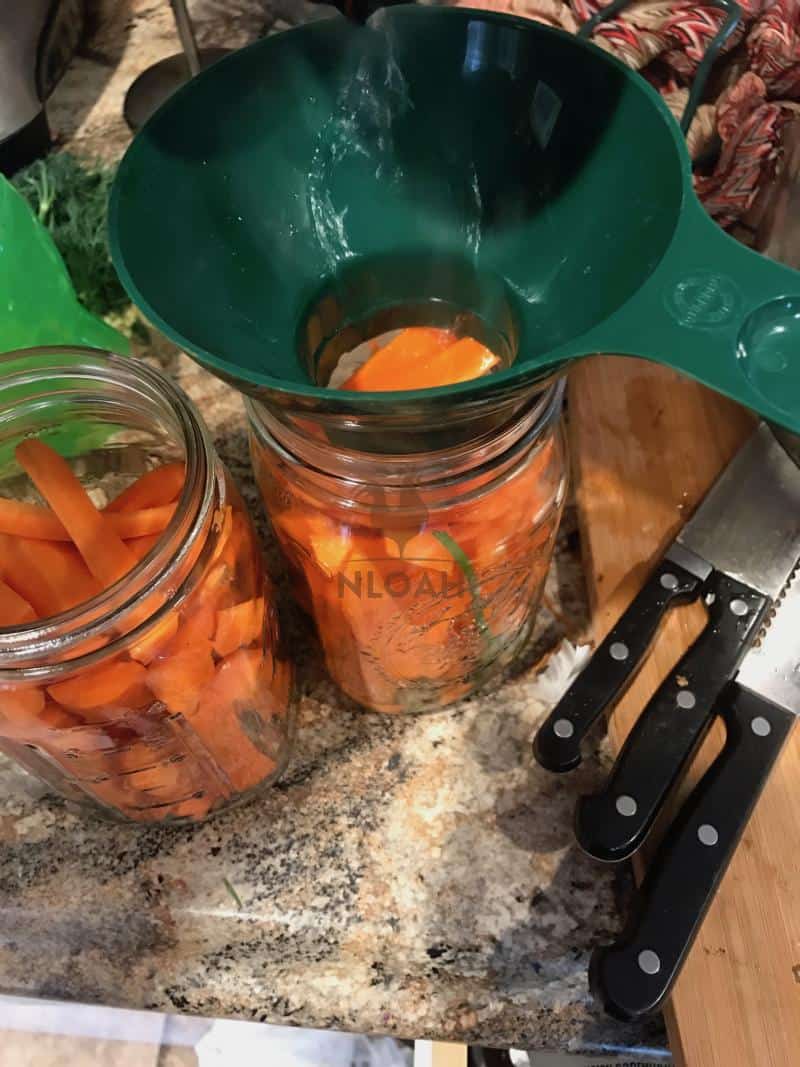
Photo: Ladling pickle juice into the canning jars.
Once all of your jars are filled, use your small towel to wipe off the rims of your canning jars; ensure you remove any water, juice or other materials, since they can affect the sealing process later on. Use your magnetic wand to grab each of the sterilized lids, and place them, one at a time, on your seven 1-quart canning jars.
Grab the first ring and screw it on to the first jar carefully, until you meet slight resistance. Make sure the lid is aligned properly on the top of the jar as you are screwing the ring onto the lid. The ring is sufficiently screwed on when it is “finger tight.” Repeat this process with each jar until all of them have rings screwed on.
You may wind up with more or less than 7 filled 1-quart jars, depending on the size of carrots you started with. However, only move on to the next step with jars that are completely filled with carrots and pickling juice. If you have any remaining juice or carrots that cannot fill an entire jar, refrigerate and use them like any other perishable vegetable.
Step 8: Processing the Jars
Once you have placed all of the lids on your filled jars, it is time to process them. Heat processing is a method of preserving otherwise perishable foods, so that you can consume them at a later date.
There are two components to this when it comes to canning, both of which are accomplished by boiling your 1-quart glass jars: first, the boiling destroys any harmful microorganisms in the jars; next, boiling the jars, with their metal lids, help creates an airtight seal. After successful processing, your dilled carrots can be stored in your cupboard or pantry fat room temperature for up to one year.
To process your jars, place all of them on your canner rack. Then, carefully place the rack back into your boiling water canner. Be careful, the water may still be very hot from when you sterilized the jars earlier.
Make sure that the jars are upright; use your jar lifter to set any jars straight that inadvertently tip over. Also, ensure that there is at least one inch of water covering all of the jars’ lids inside the canner; add additional water if there is not enough.
Once your canner is filled, set the heat to high. Bring the water inside to a rolling boil, and let it boil covered for ten minutes. After ten minutes, turn off the heat, remove the lid from the canner, and let everything sit for at least five minutes to cool down a bit.
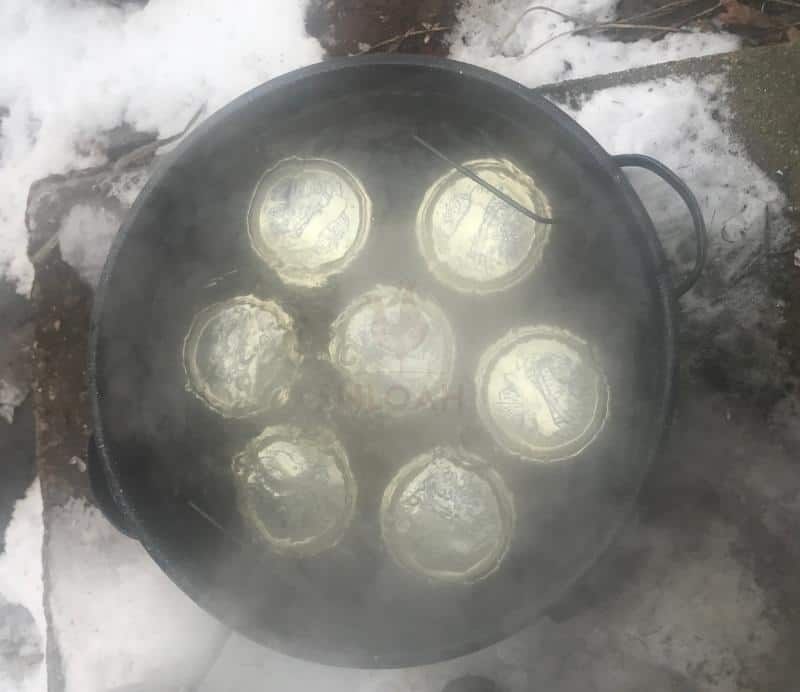
Photo: Packed canning jars getting ready to boil!
Step 9: Cooling and Inspecting the Jars
After the jars have cooled for five minutes, carefully remove the canning rack with the jars from the boiler. Using your jar lifter or small towel, move each jar to a cool dry place, away from any drafts. Place all of your jars together, and then cover with the large towel. Let the jars sit like this for at least twenty-four hours.
At this point, you will likely begin hearing loud “POPS” from some of the jars; this is a good sign, indicating that a lid has inverted downward and the jar has successfully sealed.
After twenty-four hours, remove the towel, and inspect each of the jars for a vacuum seal. A sealed lid will be concave (curving downward into the jar). To check further that each jar sealed, press lightly down on the center of the lid; it should have no “give” in it. Any jar that has not vacuum-sealed effectively will allow you to press it down significantly, like the “Home” button on a smartphone.
Here’s a great video showing how to check to thoroughly ensure your canning jars have a good seal:
If you find a jar that has not sealed successfully, you can attempt to repeat the processing techniques described in Step 5. However, it is likely that you have a defective lid; it may be better to just refrigerate this particular jar, and consume it immediately.
All of the jars that vacuum-sealed successfully can be stored at room temperature in a cupboard or pantry for up to one year. Keep in mind that once you break a seal and open a jar, it must either be consumed immediately or refrigerated. You cannot seal the jar back up and store it at room temperature once it’s been opened.
Enjoying Your Dilled Carrots
It will be hard to keep your friends and family from simply opening jar after jar of these pickles and eating them up! Lucky for you, they are really easy to prepare, so just can more if your family raids the pantry! However, there are many ways to enjoy dilled carrots. Here are a few ways you can get the most out of these tasty pickles.
School Snack
Dilled carrots are delicious and super healthy, so they make great school snacks. Simply load up a Ziploc bag with 8-10 dilled carrot spears, seal them up, and place the bag in with other lunch items. Your kids will thank you!
Dilled Carrot Bánh mì
Bánh mì are traditional Vietnamese sandwiches. Pickled carrots are a key ingredient in many Vietnamese dishes, including bánh mì.
Dilled Carrot And Hummus Sandwich
Your dilled carrots really pair up great with hummus to make a killer sandwich! On two slices of your favorite bread, spread about a tablespoon of quality hummus out on each slice. Using a knife, slice your dilled carrot spears into thin, 1/2 –inch shards, then spread them across the hummus.
Add a cheese like feta, some greens or sprouts, and drizzle some virgin olive oil onto one of the slices, place them together, and voila! You are on your way to a memorable lunch!
Dilled Carrot Relish
Your dilled carrots, combined with pickled Vietnamese radishes, or daikon, can make a delicious relish you can use on your favorite meat dishes. Simply take your dilled carrots, add them to pickled daikon, and dice them up by hand or in a food processor.
Dilled Carrot Infused Vodka
Pickle-infused vodkas are all the rage these days, and your home made dilled carrots can help you make a memorable liqueur. In a large mason jar, add two cups of quality vodka and ½-cup of your dilled carrot pickle juice. Pack the jar with your dilled carrots until it is full, then cover it and place the mixture in the refrigerator.
Let the pickles and juice infuse for about ten days, then pour the juice through a strainer into a decanter or some other container. Discard your leftover pickles. Now, you have dilled carrot infused vodka you can use to a make a great Bloody Mary, or your other favorite vodka drinks.
Closing Thoughts
Carrots are delicious, cheap and easy to pickle, so you should fill your pantry shelves with jars of them. Opening a bright orange jar of pickled carrots in the middle of winter will cheer everyone up; a Bloody Mary with dilled carrot infused vodka will make you even happier, too.
And since carrots are always available, you can make these pickles whenever you want. So go to the grocery store, and buy everything you need to make dilled carrots today!
When Tom Harkins is not busy doing emergency repairs to his 200 year-old New England home, he tries to send all of his time gardening, home brewing, foraging, and taking care of his ever-growing flock of chickens, turkey and geese.
You have a huge mistake in here. You never boil the single use lids before processing as they are made with plastisol which can be preheated to 180 degrees, but if they are boiled the seal is actually destroyed and won’t work properly when put on the jar. It is brought to the higher temperature when on the jar to create the seal. Please refer to freshpreserving.com, canning 101 page on the manufacterer’s website for proper instructions. Sorry to come on strong but this is dangerously inaccurate.