All homesteaders should learn how to make and enjoy dandelion wine. Dandelion wine is hard to find, unless you make it yourself. Fortunately, it is very simple to brew at home. No matter how big or small your homestead is, it is easy to gather enough dandelions up to make this delightful beverage. And dandelion wine epitomizes the homesteading experience: it is a rare treat made from a common plant, that most Americans consider a nuisance!
This article will reveal the origins of dandelion wine, and discuss its appearance in history as well as popular culture. We’ll also discuss why making dandelion wine is a perfect fit for the homesteading ethos. Finally, we’ll show how anyone, from a novice home brewer to a seasoned winemaker, can make a delicious batch of dandelion wine this spring.
Ancient Origins
The late naturalist Euell Gibbons once remarked that dandelion wine sounded like a half-cocked idea from the 1920s to circumvent Prohibition. However, this wine has been around for a very long time.
Dandelion wine is often reported to be of Celtic origin. If that is true, then people have been enjoying this drink since the early beginnings of civilization. In any case, Europeans have enjoyed dandelion wine for hundreds of years.
In the late 18th and 19th centuries, it was often considered impolite for European ladies of “good character” to drink alcohol in public. However, since dandelions were viewed as a medicinal herb (the dandelion’s scientific name, taraxacum oficinale, literally translates as “the official remedy for disorders”), exceptions were made for the “therapeutic” dandelion wine.
European settlers are said to have brought dandelions to the New World. If this is true, no doubt part of the reason they carried this herb across the sea to new lands was to make dandelion wine. However this useful plant arrived here, dandelion wine soon caught on in America.
An American Tradition
Throughout most of the 19th and early 20th Centuries, Americans revered dandelions as a useful herb. Grassy fields turning yellow with dandelion blooms signaled the beginning of spring. People gathered the young leaves and crowns of dandelions, and enjoyed them in soups and salads. Other Americans dug up and roasted the long, finger-shaped dandelion root, roasted and ground it up, and made a tasty coffee substitute. And of course, people made delicious dandelion wine.
The great American author Ray Bradbury even titled one of his most famous novels Dandelion Wine. In the book, Bradbury described dandelion wine as a metaphor for all the joy and beauty of summer: “Dandelion wine. The words were summer on the tongue. The wine was summer caught and stoppered.”
This wine’s appearance in a bestselling novel, and in many American songs and poems throughout the 19th and 20th centuries, are a testament to its popularity. Immigrant newcomers, as well as farming families who’d been turning American soil for five generations, had dandelion wine in common; each spring, old American families and new ones took time to gather the beautiful yellow flowers, and make this delicious wine.
But then the tradition seemed to die overnight.
From Treasured Herb To Troublesome Weed
As America became busier and busier, our backyards changed. We got rid of the chicken coop, and bought our eggs and poultry at the supermarket. Our gardens became lawns. And the dandelion, once an invaluable resource, became an invasive pest that we tried to eradicate at all costs.
There were heavily marketed herbicides designed specifically to make dandelions wither and die in your lawn, while keeping your beautiful (but largely useless) grass intact. Some homeowners’ associations in tonier neighborhoods even penalized homeowners who didn’t work hard enough to kill the dandelions in their lawns.
The pendulum had swung pretty far away from the days this herb was treasured. But now, it’s time to take the dandelion back!
Dandelion Wine, A Homesteader’s Staple
All homesteaders should also be home brewers; brewing allows you to make the most of the vegetables, fruit, and flowers you produce each year, and turn them into something useful. And if you are going to make your own alcohol, there is no better place to start than with dandelion wine.
Dandelions are a forgotten herb that most Americans label as an annoying pest. Turning something most people regard useless into a thing of value is a quintessential homesteading skill. Making a delicious wine out of something that your neighbors scoff at, or spray herbicides to remove, is also quite satisfying as well.
Making dandelion wine from start to finish is a communal event, too. It takes a lot of dandelions (more on that later) to make a one-gallon batch of dandelion wine. You’re going to need to enlist your family and friends this spring to start gathering those golden blooms. Picking thousands of dandelions by yourself is a chore. Doing it with friends and family is a party!
Finally, one of the most gratifying aspects of homesteading is enjoying the fruits of your labors. Dandelion wine is a delicious, unique beverage. Enjoying a glass of your own dandelion wine, in your cozy home on a cold winter’s day, is an extremely satisfying pastime. Summer caught and stoppered, indeed!
So, hopefully your appetite is whetted for some dandelion wine. Read on, and learn how to make this tasty beverage in your own home.
Starting Out: Ingredients And Equipment
Dandelion wine has been around for hundreds, if not thousands of years; not surprisingly, there are dozens of dandelion wine recipes out there. This is a basic tried and true one that can help you make a delicious one-gallon batch of homemade dandelion wine. As you become a more confident wine maker, I recommend you experiment with other recipes, until you find the one you like the best.
Home brewing is also an activity that can range from old school to high tech. The equipment and instructions discussed here are intended to help first time and novice home brewers make dandelion wine. Again, as you become more comfortable and adventurous with making beers and wines in your home, you can always opt to expand your equipment and technique.
Dandelion Wine Ingredients
- One gallon of clean dandelion flower heads. Dandelion wine is made from the plant’s golden flower petals. You will need one gallon of flower heads to make each gallon of dandelion wine. The best way to measure your haul when gathering dandelions is to use one-gallon Ziploc bags; once you’ve filled one of those bags with dandelion heads, you’re in business.
- 1 Packet of Wine Yeast. Wine yeast is the one of the few home brewing specialty items you’ll want to get to make this wine. A wine yeast will help ensure that your wine comes out tasting great. Fortunately, wine yeasts are inexpensive. If there isn’t a home brewing store nearby, you can always order some online. I have found that champagne yeast in dandelion wine help produce a nice, dry flavor, somewhat like a pinot grigio. However, by all means experiment with yeasts, until you find one that works for you.
- 3 Pounds of white sugar. Sugar is what the yeast will consume to transform your dandelion concoction into a delicious wine. Standard white sugar is inexpensive and perfect for this wine. If you want to save money, buy your white sugar in bulk, and then use a scale as you add the required amount to each of your homemade wines.
- 1 Orange. Orange zest and juice will add acid to your wine, and will also impart a citrus flavor.
- 2 gallons of spring or well water. Buy spring water from a store, or use well water if it’s available when you make homemade wines like this. Doing so ensures that there is nothing in your water that can harm the yeast, or otherwise add “off” flavors to your wine.
Wine Making Equipment
Here is the equipment you will need to make your very first gallon of homemade dandelion wine. Again, this is a very simple list for a first time wine maker; as you become more experienced, and want to invest in more equipment, by all means experiment with what’s out there.
- Large stainless steel pot with lid. You’ll need a pot that can hold at least one-and a half gallons of water, so that you can mix all of your ingredients in it.
- Large stainless steel spoon. While boiling your ingredients, you will need a large spoon to stir them regularly. You will also use the spoon to stir your dandelion wine mixture in the fermenting bucket
- A grater will let you zest your orange.
- Fermenting Bucket. A fermenting bucket, often called a primary fermenter, is simply a food-safe bucket with a lid and airlock. Your dandelion wine mixture will sit in your primary for ten days, before you move it to a gallon jug (sometimes called a secondary fermenter) to complete the fermentation process. You can buy fermenting buckets from at any home brewing store, or order them online.
- Two 1-gallon wine jugs. You will use each of these jugs to finish off your wine’s fermentation, and to store and serve your wine when it is complete. You can buy these jugs from home brew stores; however, many people simply recycle them after drinking a gallon wines like Gallo, which come in gallon jugs. Save at least one screw top, you’ll want it when your wine is ready to serve.
- Airlocks and stoppers. During fermentation, you need to allow gases like carbon dioxide to escape, and prevent unwanted contaminants from entering and spoiling your wine. Airlocks and stoppers are the best way to do this. Once again, these items are cheap and readily available at home brew stores and
- 7 feet of ¼ inch vinyl tubing. You can buy this tubing cheaply at most hardware stores, or order it online. You will use it to siphon your wine from one fermenter to the next during fermentation.
- Colander bowl. You can use the colander bowl to wash off your dandelions after they’ve been picked.
- Cheesecloth and a strainer. A cheesecloth and strainer will help you extract the liquid that you’ll ferment to make dandelion wine.
- Ziploc Bags. I’ve found that gallon Ziploc bags are great for gathering dandelions. Give all of your dandelion pickers a bag, and then use a “master bag” to collect all of the picked dandelions in. Once the primary bag is filled up, you know you are ready to make some dandelion wine.
Tip: There are few specialty items listed in this recipe that you probably don’t have on hand in your kitchen: wine yeast, fermenting buckets, cheesecloth, airlocks, stoppers, and tubing. Make sure you secure all of these items and have them on hand prior to making your dandelion wine.
Once you have them, and the dandelions are blooming, it is time to make some dandelion wine!
Dandelion Wine, Step By Step
1. Gather The Dandelions
The first thing you’ll need to do when this wine is obviously gather the dandelions. The only part of the dandelion you use in dandelion wine is the yellow flower head; the green stems are bitter tasting and can impart a bad flavor in the wine, so you’ll want to remove them as you go about gathering the flower heads.
While dandelions bloom throughout the warmer weather, the best time to harvest them for wine is in early spring. Then, the flowers bloom en masse, and many people claim this is when they have their best aroma and flavor. In warmer climates, the flowers bloom in mid to late march; as you go further north, the ‘big bloom” may come later.
The best thing to do is watch any close-cropped grassy field as spring weather starts. When you see a field full of dandelions, you know it is time to get picking!
You should pick where you know. DO NOT pick dandelions if you don’t know if they are clean and safe. Many parks and public areas spray herbicides and pesticides on their fields, you will want to avoid those places. Try to avoid picking dandelions near roadsides as well, since automobile exhaust and other chemicals can ruin their flavor. A few decent sized, organic backyards are enough space to find one gallon of safe dandelions ripe for the pickin’ in spring!
Once you’ve found a good spot to pick dandelions, get your picking team together, hand out the plastic bags, and put them to work. You should try to pick your dandelions in early to mid morning on a sunny day, when they are at peak bloom. Instruct your pickers to pick the flower heads off of the plants and put them in their bags. They should try to avoid getting plant stems, blades of grass, and other contaminants in the bag as much as possible. However, you’ll end up with some of these things in your bags. Remove as many of them as possible later on, when you are cleaning off the flowers.
As your pickers gather the dandelion heads, continue to consolidate them in your “master” Ziploc bag. Once that bag is full, you are ready to go home and make some dandelion wine!
You can check out this video here for some quick tips on gathering dandelions:
2. Clean and Pluck the Dandelions.
You should begin making your dandelion wine as soon as possible if you want to preserve their terrific flavor. Place the flower heads in your colander bowl, and rinse them thoroughly under cold tap water. Remove any grass blades, leaves, or anything else you find in the batch you picked.
Once you’ve removed all of the leaves, stems, grass and anything else, take all of your dandelion heads from the colander as well. Then, flower head by flower head, go ahead and pluck out all of the yellow petals from the green parts of the flower. Place the petals back into the colander, and discard the stems. Try to remove as many green parts from the flower as possible, since they can give your wine a bitter taste.
Once you’ve separated the yellow petals, you are ready to move on.
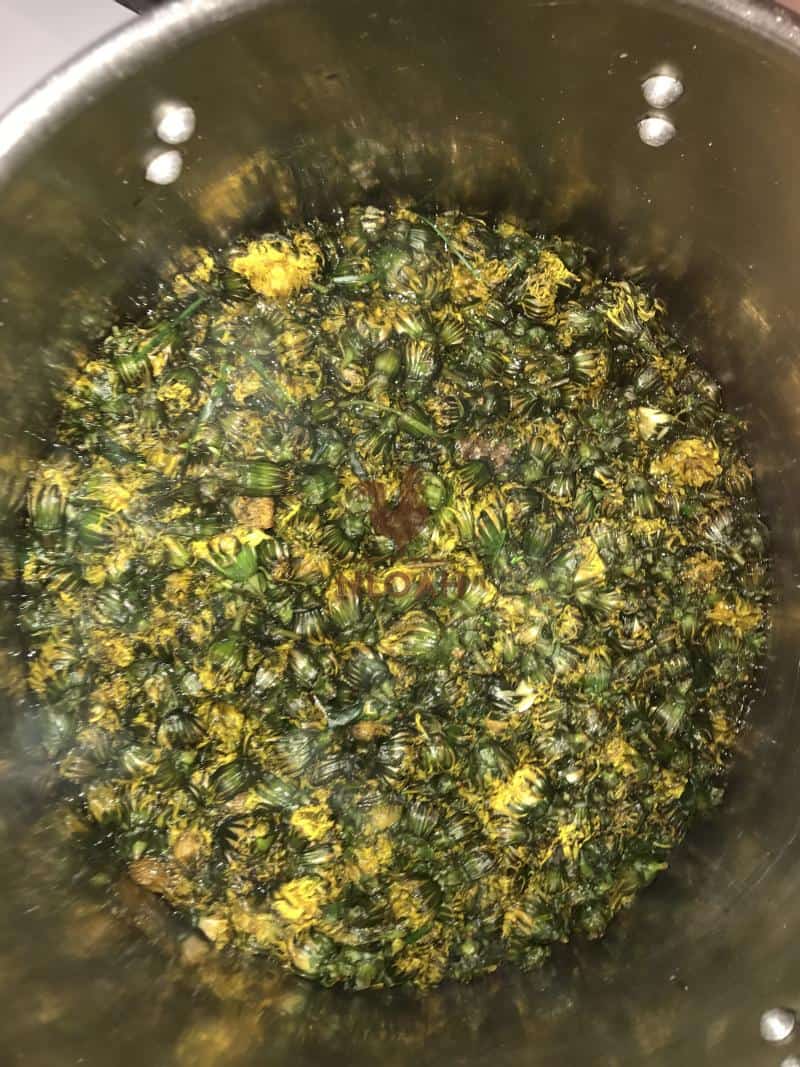
3. Boil the Mixture.
Place the dandelion petals into your large stainless steel pot on your oven. Add one quart of water to the pot, and bring this mixture to a rolling boil. Once the mixture starts boiling, turn off the stove, put the lid on the pot, and let this entire mixture steep for two hours.
After two hours, add three more quarts of water and the sugar to the pot, bring it to a boil once again, and stir until the sugar has completely dissolved. Once the sugar has dissolved, put the lid back on the pot, turn the heat off, and allow the entire mixture to cool for two to three hours, or until the mixture is no longer “burning hot.”
4. Into the Fermenting Bucket.
Once the pot has cooled, use your strainer and cheesecloth to carefully pour and strain the mixture from the pot into your fermenting bucket. You want to capture as much of the flower petal material in your cheesecloth and strainer, leaving only liquid in your fermenting bucket. Some petals will inevitably end up in there, however, so do not worry. Pouring and straining is difficult to do by yourself, so try to enlist a family member or friend to help you.
Once you’ve poured the lukewarm liquid into the fermenting bucket, use your grater to zest your orange. You will want to grate a thin layer of the orange’s peel, ensuring as little of the bitter, lighter colored material within the peel is removed. Once you’ve grated your orange, add the zest to the fermenting bucket. Then, cut your orange in half, and squeeze the juice from both halves into the bucket as well.
Finally, once you’ve strained your liquid and added your orange zest and juice, it is time to add the yeast. Make sure that the mixture is room temperature; if the liquid is too hot, it can kill your yeast. Tear open the packet of yeast, and add the yeast powder to the mixture. Stir the entire mixture thoroughly with your clean, stainless steel spoon. Then, add the bucket’s cover and an airlock.
Keep this mixture in the fermenting bucket for ten days. Each evening, carefully remove the lid and, using your clean, stainless steel spoon, stir the mixture gently. Then replace the bucket’s cover. You should detect a yeasty smell in your mixture, and the water in the airlock should start bubbling after a few days; this indicates the mixture is fermenting.
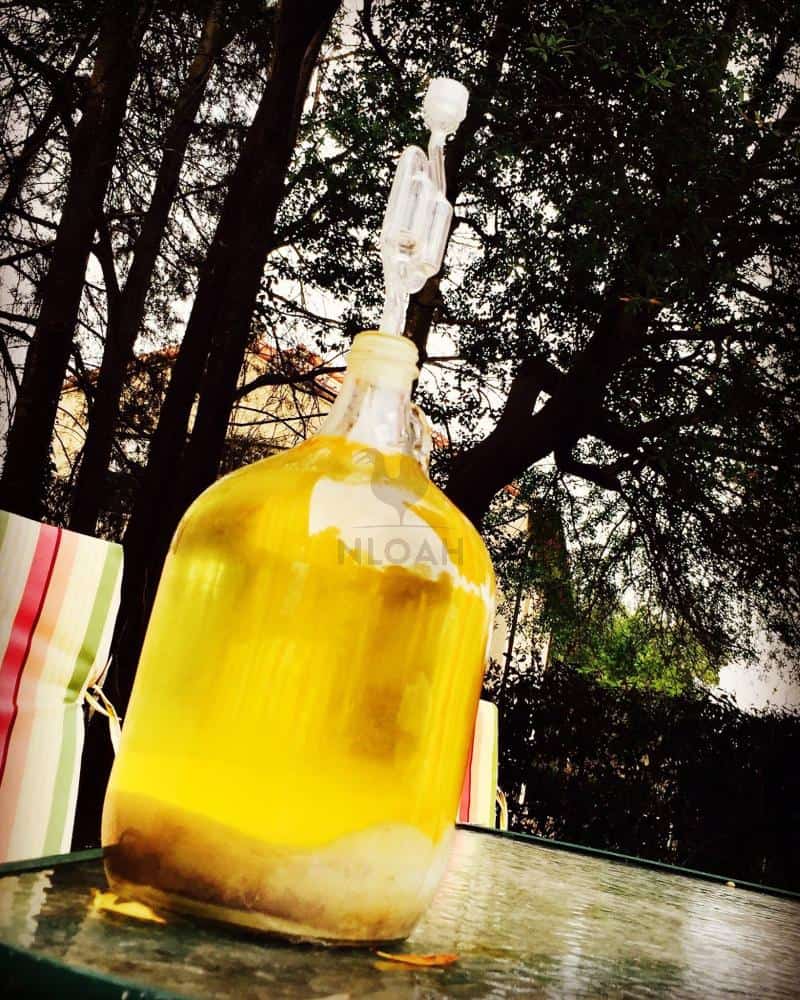
5. Into The Glass Jug.
After ten days in the fermenting bucket, it is time to move your liquid into what is called secondary fermentation. During secondary fermentation, the yeast will eat the remaining sugars and slowly die off, until fermentation stops. The mixture will clear, and the acid in the mixture, along with the aging process, will add flavor to the mixture. It will also become clearer. Your mixture is slowly turning into wine!
To transfer your liquid to a jug, remove the lid from your fermentation bucket. Get your gallon jug, your tubing, your other airlock, and your second jug of water. Make sure the jug, tubing, and airlocks are completely clean.
Siphon the liquid from the bucket into the jug. Make sure that the jug is filled up until one inch from its opening. Add spring water to your jug if required to get to the one-inch mark. Place your stopper and airlock on the jug, and then store it in a cool, dark place, like a basement or closet.
Check on the jug occasionally. As the yeast devours all of the sugar, it should bubble less and less. The liquid will probably be cloudy, mustard yellow at first; over time, you will see sediment form at the bottom of the jug, and the liquid will become clearer. Let the jug sit as is for eight weeks.
6. “Racking” Your Wine
You need to get your aging wine off of the sediment that has gathered at the bottom of the jug; this can ruin the wine’s flavor. You also want to make your wine as clear as possible, so its appearance is aesthetically pleasing when you go to drink it as well. So now, you are going to rack it.
Racking wine is simply moving it from one container to another, to help improve the clarity and flavor of the wine. To rack your wine, you are going to need your second jug, your tubing, and spring water. Make sure that the new jug and tubing are very clean before you proceed.
Carefully move your full jug to a higher position, taking care not to stir up the sediment at the bottom of the jug. If the sediment moves around and clouds the wine, wait an hour or so until it settles again. Siphon the wine from the old jug to the new jug (placed in a lower position so gravity helps the siphoning process). Keep the suction away from the bottom of the old jug, so you do not draw in any unwanted sediment. Once you can no longer draw any liquid without drawing sediment, stop the siphon. Top off the new jug with water, place the airlock on it, and store it.
At this point, let your wine set for another six to eight months. If you want to, you can rack your wine one more time after two or three months; this will aid in further clarifying it. If the wine continues to produce a great deal of sediment, you definitely should rack it a third time.
You can watch this video to see an example of a winemaker racking his dandelion wine:
7. Ready For Prime Time.
After six to eight months, siphon a small amount of your wine into a glass. If it tastes finished, you are ready to enjoy your dandelion wine. If it needs more time to age, top off the jug with spring water, replace the airlock, and let it sit for another eight weeks. Your dandelion wine should be semi-sweet. It should look like a white wine, and smell like dandelions. If it tastes and smells like that, you are in business! Remove the airlock, replace it with the screw on cap, and get ready to enjoy your dandelion wine.
You can watch a detailed video that takes you through the entire process of brewing dandelion wine here:
Enjoying Your Dandelion Wine.
Dandelion wine has a unique flavor and bouquet. However, it is also similar to most white wines, and can be a great complement to seafood, chicken, or salad dishes. It is also great on its own as well, or served as a dessert wine.
Enjoy a glass of dandelion wine on those cold days of winter, preferably with the friends and family who got down on their hands and and knees to pick all of the flower heads with you. There is no better wine to enjoy with friends while you are waiting for the warm days of spring to return.
Parting Thoughts
Dandelion wine is a homesteader’s staple. It is easy to make from ingredients that are readily available. Making wine from something that most people dismiss as an annoying weed is what homesteading is all about, too.
So get ready for the dandelion bloom this spring. Gather your friends, hand out the bags, and start picking as the days get warmer. Then, get home and make some dandelion wine. Everyone will thank you when they are enjoying a delicious glass of that dandelion wine next winter, waiting for the spring and summer weather to come back.
When Tom Harkins is not busy doing emergency repairs to his 200 year-old New England home, he tries to send all of his time gardening, home brewing, foraging, and taking care of his ever-growing flock of chickens, turkey and geese.