I’m a homestead author, jack of most trades, and a mushroom forager. I learned about safe mushrooms to forage around a decade ago and haven’t put on the breaks yet.
One of the biggest challenges has been how to enjoy them all year. But I’ve finally found a solution: canning!
I’m not talking about the flavorless, white fungi you get in the grocery store. I’m talking big, meaty wild mushrooms.
Finding, positively identifying, and preserving the forest’s bounty can be surprisingly easy. Give me a few minutes to show you how!
Wild Foraging Mushrooms
Ok. First a disclaimer. Never consume a new mushroom that an expert hasn’t positively identified for you. While I’ll talk about one with no poisonous look-alikes, there is still the potential for the novice to make a misidentification.
To be brutally honest, there are a few mushrooms that will melt your liver in a week. If you’re lucky, you’ll get one that only makes you wish you weren’t alive anymore. Always have an expert identify them for you.
Scared sufficiently? Good. Let’s keep going.
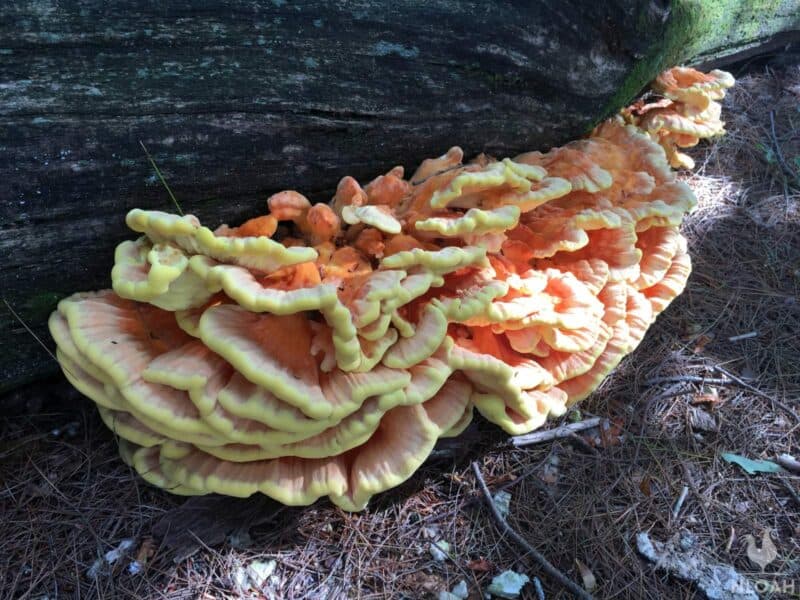
Chicken Of The Woods
For this recipe, you will need a few pounds of chicken in the woods. Laetiporus Sulphureous.
Honestly, this is a great beginner mushroom. It has a distinct appearance, grows in a restricted environment, has identifiable features, and has no poisonous look-alikes.
Chicken Of The Woods (I’ll call them chickens) are bright yellow to orange polypores that grow in shelf-like structures. Unlike traditional “stem and cap” mushrooms, chickens have no stem, and the polypore nomenclature describes the underside of the shelves.
Looking at the bottom of a chicken you will see many, many small pores as opposed to gills or ridges of a “traditional” mushroom.
The name is derived from their texture. Young chickens have a similar mouthfeel to a perfectly cooked chicken cutlet. This texture yields to a more stringy consistency near the base of the shelves.
A cluster of chickens will be a series of shelves growing stacked on each other, sometimes containing 20 or 30 individual shelves.
As for the environment, chickens grow mostly on dead oak, cherry, and occasionally pines. If they grow out of the ground, there is bound to be an old oak stump nearby.
Regarding identifiable features, the top of the cap is bright yellow to orange and the pore surface is either white or yellow.
The yellow influences their other common name – sulfur shelf. Look at the bottom of the cap for the pores. There should be no gills or ridges. The surface should be smooth and spongy.
Always have an expert positively identify your findings. While there are no poisonous look-alikes, there are a few mushrooms that, to the novice, may have similar colors or features.
Once you get to know basic mushroom identification you will realize how different these “look-alikes” actually are.
First are jack-o’-lanterns. These are orange, but that’s where the similarities end. They have ridges, are traditional cap and stem mushrooms, and they will land you in the hospital.
Chanterelles are also orange, but have ridges and are cap and stem mushrooms. They are also my favorite to find and eat.

Finally, there is hen of the woods. These are edible, also have pores, have shelves, but they are brown, not orange. They are also delicious.
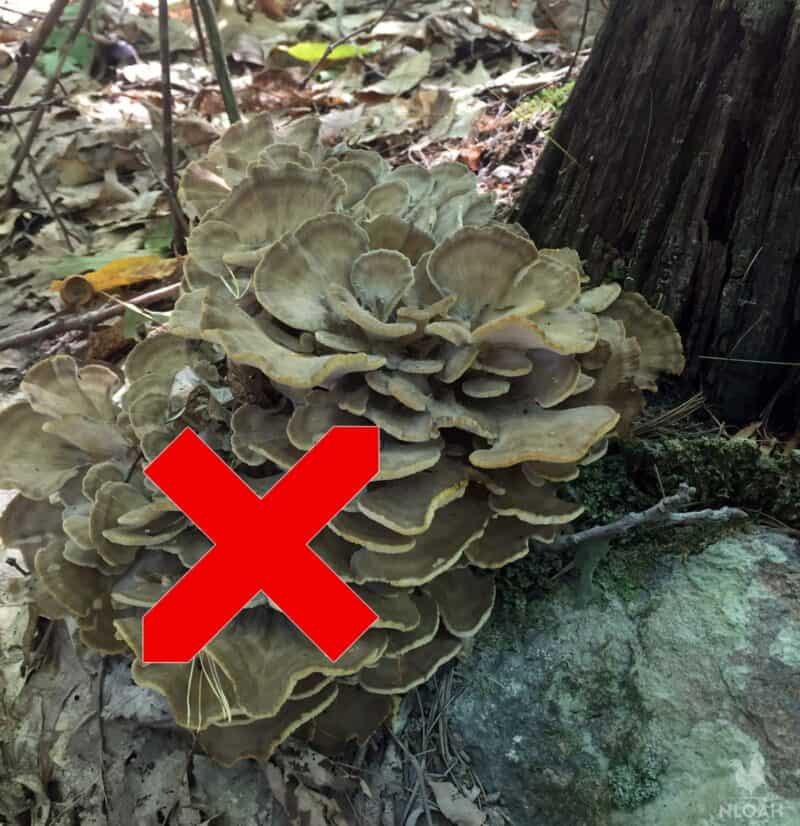
One last warning. While I’ve listed out, three vaguely similar mushrooms in which two are edible, always seek the advice of an expert.
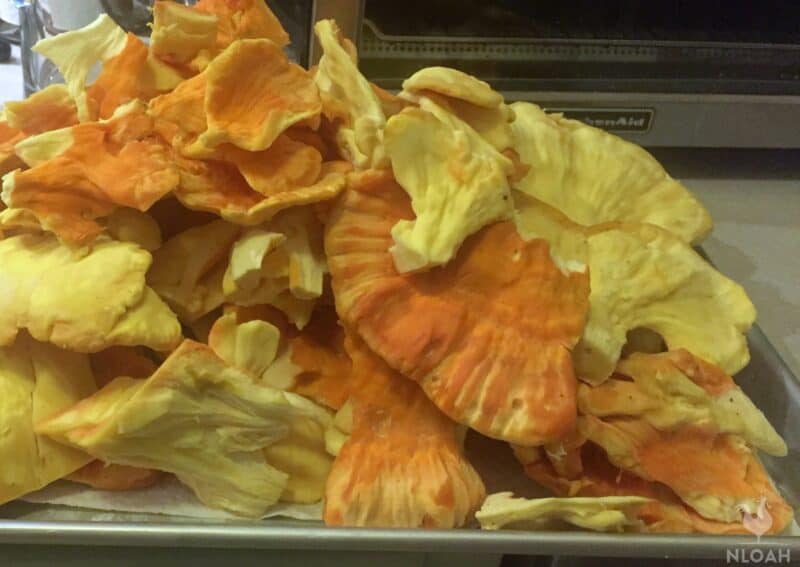
What Do Chickens Taste Like?
Chicken mushrooms, on their own, are delicious. The youngest mushrooms have a mild flavor and firm texture. The flavor is definitely ‘shroomy with a hint of either chicken or seafood (crab and lobster), especially when cooked in lots of butter.
The texture is seriously similar to chicken. The youngest pieces are soft, yielding, and spongy, just like a perfectly cooked chicken cutlet. Older pieces have a bit more sinew, more like an over-cooked chicken breast or canned chicken breast.
As you will be canning your mushrooms, they will take on the flavor of the brine and spices you use, while making their own delicate contribution.
Water-Bath Canning And Equipment
I’m going to assume that if you’re this far down the preparedness path, you are familiar with the basics of canning. That is, you’re considering walking miles through the woods, picking a wild fungus, schlepping it home, and canning it. Therefore you probably know your way around a canner.
If not, here’s the 10,000-foot view. Water-bath canning is simply boiling a sealed jar of food. The boiling time brings the food to a temperature sufficient to kill most bacteria. Bacteria growth is further inhibited by the canning brine.
Finally, as science teaches us, heated air expands. Because of this, some of the air in the jar escapes. When it cools, the lid seals up, creating a minor vacuum in the jar. This seals out oxygen and prevents further spoilage.
Water-bath canning is reserved for high-acid foods. When the food itself is not below a pH of 4.6, we use a brine of vinegar and salt.
The recipe included below is specifically designed to bring the mushrooms down to a safe pH, while the boiling time brings the mushrooms up to a safe temperature. The combination allows us to enjoy our mushrooms all year long!
Disclosure: if you visit an external link in this post and make a purchase, I may earn a commission. Read my full earnings disclosure here.
Now that we know the how, let’s look at the what.
Water-bath canning uses some very simple equipment. First, you need a pot. I highly recommend a canner that comes with a jar rack.
Manufacturers size these canners specifically to fit several quart or pint jars. Most cooking pots aren’t sized correctly and you’ll have quite a bit of wasted space.
Second, the rack keeps the jars off the bottom of the pot and avoids uneven heating. Canners are cheap enough that it’s worth the minor investment to get the correct pot.
Next, you will need a few tools. These are convenience items and while not 100% necessary, they will save you burned fingers and dropped jars.
Your toolset should include a funnel for filling your jars with less mess, a jar lifter to get hot jars in and out of the canner, and a lid lifter for getting hot lids and rings out of their own boiling pot.
That’s it for equipment. Let’s get back to the mushrooms.
Preparing Your Chicken Of The Woods
Canner? Check.
Positively identified mushrooms? Check.
Excitement over filling up your pantry? Check.
The thing about mushrooms is that they live in the non-sterile, living, breathing forest. Critters and other flora live there too. Unlike the coddled and pristine button mushrooms that come in the black plastic grocery boxes, Chickens of the Woods have lived a good life.
The good life comes with some preparation. Unless you find the unicorn of all mushrooms, yours will need some cleaning.
First, trim away the tough sinewy base of the shelves. For this recipe, you want the outer and softer portions. Next brush, scrape, and wash off any bark, dirt, or leaves.
Chickens that are harvested on or near the ground will often grow around and engulf weeds, sticks, and other items. Cut these out.
Next look for critters. Inspect your chickens for holes or small piles of dust. These signs will lead to insects. You can usually cut away the sections the insects are burrowing in.
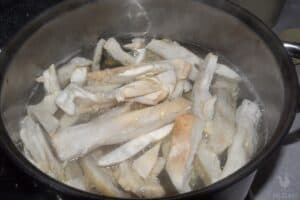
Finally, cut or tear your chickens into small pieces. Large but thin sections are ok. For pieces that are over ¾” thick, I’ll slice them into ½” strips. You want to maintain a thickness that is less than ¾”. This allows the heat to fully penetrate and cook your mushrooms during canning.
Of Spices And Brine
While I love mushrooms in their purest form, spices can bring out the best in any food. This is no different with Chicken Of The Woods.
The spices I recommend for this recipe are thyme, garlic, and bay leaves. First, thyme forms a synergy with mushrooms. I’m not sure what it is about this herb, but thyme compliments mushrooms like no other spice.
Garlic… Because… Garlic…
What is a brine or pickling recipe without it? One or two cloves per jar and you’re set.
Finally, bay leaves. They add a certain background note to this recipe. I’ve forgotten it once or twice and the final product just isn’t the same.
Your brine flavors the mushrooms, but it also contributes to food safety. As mushrooms are mostly water, this recipe targets a pH of 4.2 rather than the normal 4.6. Don’t vary from the ratios included here.
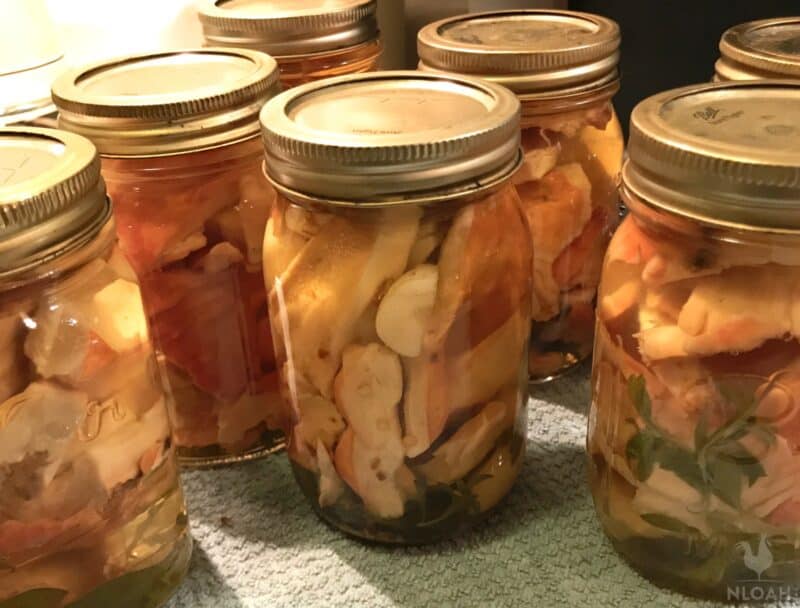
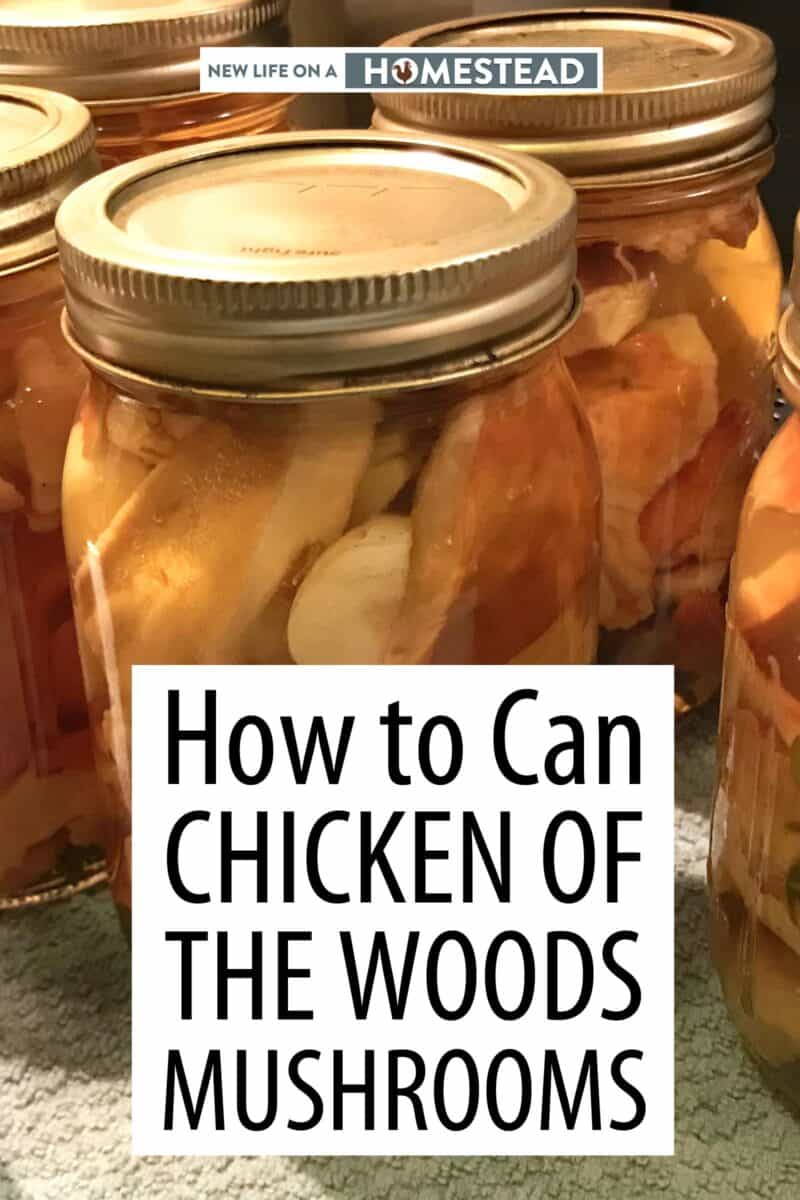
Canned Chicken Of The Woods Recipe
Ingredients
- 4 pounds positively identified Chicken Of The Woods mushrooms cleaned and cut up
- 12 cups water
- 4 cups white vinegar
- 6 tsp canning salt
- 8-16 cloves garlic
- 8 sprigs thyme
- 8 dried bay leaves
Instructions
- Wash your jars and keep them warm.
- Add rings and lids to a pot, cover with water and bring to a boil.
- Fill your canner with warm water according to the directions.
- Fill a stockpot with the water, vinegar, salt and bring to a boil.
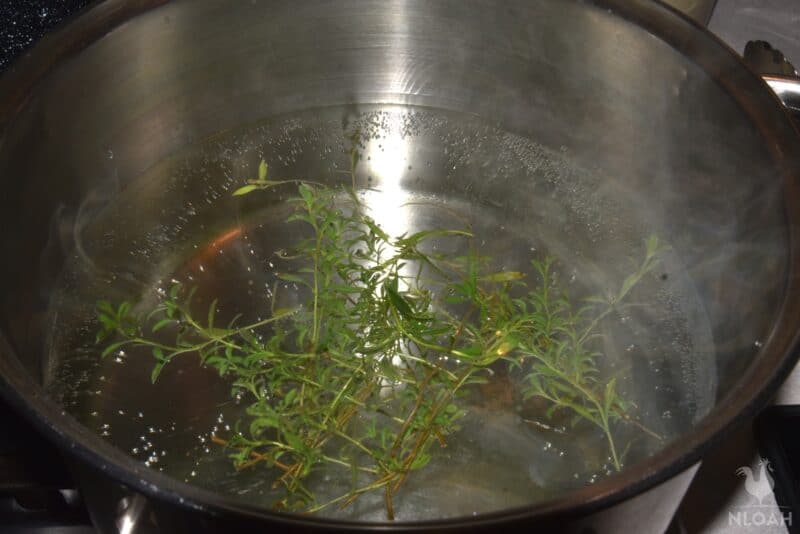
- Add the garlic, thyme, and bay leaves.
- Boil for 5 minutes.
- Remove the thyme and place one or two sprigs in each jar.
- Remove the bay leaves and discard.
- Add the mushrooms, and return to a simmer for 5 more minutes.
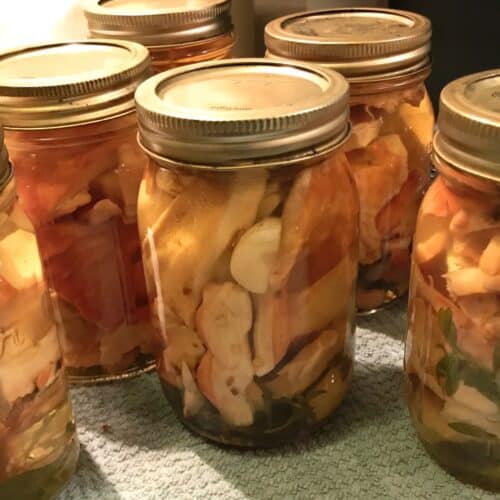
- Pack each jar with mushrooms and 1 or 2 cloves of garlic. Leave a little over ½” headspace.
- Add hot brine to each jar, maintaining ½” headspace.
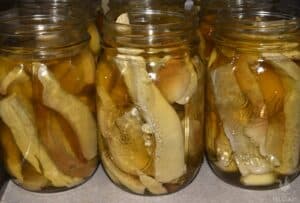
- Clean off the rim with a paper towel dampened with vinegar.
- Add lids and rings. Center the lids on the jars. Finger tighten the rings – don’t crank down on them.
- Add jars to the canner.
- Make sure the jars are covered with about 1” of water (add more hot water if necessary).
- Turn the heat on high.
- Bring the canner to a boil.
- Process the jars for 15 minutes.
- Turn off the heat and remove the canner lid.
- Remove the jars.
- Allow the jars to cool and come to room temperature. Listen for the “ping” of the lids sealing.
- Test the lids to make sure they have dimpled and no longer flex.
- Once cooled, remove the rings and give the jars a quick rinse.
- Label and date each jar.
Notes
- Wash and rinse the jars before use.
- Always have your mushrooms positively identified by an expert – I know I sound like a broken record but the last thing you need is a melted liver.

M. I. Grey is an expert in food processing and preservation (including canning), but also an avid forager. He’s also passionate about anything preparedness, and used to work as a security expert.
Do you happen to have any recipe ideas using these canned mushroom?
Does this make the mushroom pickled? How do you use them after canning?
Jackie
The names comes from the color of the pore surface. It can be a bright sulfur yellow.
I have found no evidence of them actually containing sulfur or a derivative.
That being said always check with an expert when it comes to allergies. I would look around for a local expert mycologists and pose the question to them.
You said that this mushroom has the Latin name of “Laetiporus Sulphureous”. Does this mean it has some Sulfur type of ingredient in it? You see I am terribly allergic to Sulfa, Sulfates, Sulfites and Sulfonamides and I am Leary of eating anything with the suffix Sulf in it. It only takes one time to eat something that can cause me real health problems.