It’s time to make some delicious apple butter!
If you’re lucky, you’ll be picking a few bushels right on your homestead; however, even if you don’t have your own apple trees (yet!), fresh apples are abundant at farmers markets and pick-your-own orchards this time of year. So how can you take advantage of a good apple harvest this fall?
Sure, you can eat them to your heart’s content, or dehydrate them, or press a few bushels into cider. But how about making some apple butter? Apple butter is a delicious treat, one that is rarely available in your local supermarket. This tasty fruit butter can liven up a slice of breakfast toast, or transform a boring lunch sandwich. Fall is a great time to make it too, since ripe apples are everywhere. And if you preserve your apple butter this fall, in canning jars, your family and you will be able to enjoy it all year long.
Let’s look at how to make delicious apple butter in your kitchen, step by step.
What Are Fruit Butters Anyway?
Fruit butters are often lost in the shuffle when it comes to all the different types of preserves out there. They are creamy spreads made primarily out of fruit; their consistency is similar to that of butter, hence the name.
They are great additions to your homestead’s pantry, since their unique texture makes them quite different than jams and jellies. Additionally, since they are hardly ever available at grocery stores, they are a great item to sell at your local farmers market.
Harder fruits, like apples, pears, and peaches, are great candidates for fruit butter. They are readily available and inexpensive, so you’ll be able to can them in bulk, and fill your pantry with these fruit butters whenever they’re in season.
Using different varieties of the same fruits can give your fruit butters vastly different flavors, too, so no jar ever has to taste the same.
Now that you know what fruit butters are, it’s time to can some of apple butter of your very own.
Apple Butter Ingredients
Here are all the ingredients you will need to make eight 8-ounce jars of apple butter:
- 6 Pounds of Peeled, Cored, and Quartered Apples. Keep in mind that six pounds of apples will weigh considerably less after they are cored and peeled (which we will talk about later); ensure you account for this, and buy a pound or two extra of fresh apples. This is where an optional scale comes in handy, too.
- 2 Cups of Sweet Apple Cider. The cider will help impart even more flavor to your delicious fruit butter. Try to buy organic apple cider with no additives or preservatives if you can.
- 3 Cups of Granulated Sugar
- 1½ Teaspoon of Ground Cinnamon
- ½ Teaspoon of Ground Cloves
Always try to find the best, freshest apples available; pick them yourself if you are able. Avoid fruits that are soft or rotten. When you start making apple and other fruit butters, experiment with different varieties of the same type of fruit. Different fruit varieties can impart vastly different flavors to your fruit butters, so find the ones you like best.
Now, let’s look at the equipment you’ll need in your kitchen to make and store your apple butter.
Equipment
You’ll be canning your apple butter to preserve it in mason jars; after you complete all the steps here, you’ll be able to store those jars of apple butter at room temperature for up to one year. If you are already using boiling water canning techniques to preserve other foods, like pickles, you have most of the equipment you need to make apple butter. There are a few additional items that save you time when you make fruit butters, so consider buying them when you can.
Disclosure: if you visit an external link in this post and make a purchase, I may earn a commission. Read my full earnings disclosure here.
Here is the all the equipment you will need to make and store your own apple butter:
- Boiling Water Canner. A boiling water canner is a pot large enough to fit a canning rack and all of your canning jars in; you’ll use it to prepare your canning jars for use, and to boil and preserve your jars of apple butter. While any pot that jars will fit into will suffice, try to purchase one specifically made for canning; they typically come with other accessories, such as a canning rack. Your boiling water canner must have a lid as well.
- Canner Rack. The canner rack is a wire metal frame that sits inside your boiling water canner. It separates your jars from direct stove heat at the bottom of the pot, and allows the boiling water to circulate around all of the jars, aiding in food preservation. DO NOT use the canner rack to insert or remove jars from hot water in the pot; use your jar lifter instead.
- Eight to Ten 8-ounce Canning Jars, With Lids And Rings. You’ll pack all of your apple butter into these jars, preserve them in your boiling water canner, and then store the fruit butter in the jars for up to a year.
- Two Large Saucepans, and One Small Saucepan. You will use one saucepan to boil your apples to soften them up for the recipe. You will use the second saucepan to cook all of the ingredients in this recipe and make your apple butter. You will use the small saucepan to simmer your jar lids.
- Food Processor or Food Mill. In order to make your apple butter, you will need to puree your fruit mixture. If you plan to can fruits and vegetables on a regular basis, a good food processor is definitely worth the investment. A good food mill will also suffice for this task.
- Cutting Board and Knife. Use the cutting board and knife to quarter all of your apples.
- One Colander Bowl. The colander will allow you to wash and strain your apples after you peel, core, and quarter them.
- Canning Spatula. Packing your jars with apple butter can be a bit tricky; a plastic canning spatula will allow you to pack the butter tightly into the jars, and help you remove any air pockets that initially form while packing them.
- Canning Funnel. Apple butter is really sticky, and it will get everywhere if you’re not careful! A canning funnel will fit snugly over your jars, and help minimize the mess you make when you transfer apple butter into them.
- Magnetic Lid Wand. Thanks to the little magnet at the tip, a magnetic lid wand will help you maneuver your jar lids around, and let you place them where they need to be without ever touching them.
- Jar Lifters. It can be challenging to work with packed jars when you are canning. Jar lifters are a set of scissor-like tongs that you can use to grasp your jars and move them around. The jar lifters will make it easier to place and remove packed jars from your boiling water canner.
- You will use a ladle to transfer your apple butter from the saucepan to the jars.
- Large Spoon. Apple butter takes time to boil down to the proper consistency, and you will use your large spoon to stir it constantly while it is boiling.
- Large Towel. It is always a good idea to gently cover your processed canning jars with a large towel for 24 hours, and ensure they seal properly.
- Small Towel. Apple butter, as indicated earlier, can be messy. You’ll need a small towel or cloth to wipe off the rims of jars as you’re packing them all. Wiping the rims will help ensure that the lids rest properly on them, so that they will seal.
- Make sure you have a timer (you can use the one on your stove, or your smartphone) to keep track of how long everything is boiling at various steps of this recipe.
Optional Canning Equipment
There are additional items you might want to have on hand as well. While they are not essential, they can help make the entire canning process easier, and also save you a great deal of time.

photo above: an apple peeler will save you time and effort when you decide to make your apple butter.
- Apple Peeler. For this recipe, you’ll have to peel over six pounds of apples. You can use a standard potato peeler, but it is tedious, and takes a long time. Another option is to purchase and use an apple peeler. A good apple peeler can take the skin off of an apple in a few seconds; many peelers will simultaneously remove the apple core as well. All of this will cut way down on the time it takes to make your apple butter.
- Kitchen Scale. This recipe calls for six pounds of peeled, cored, quartered apples. It is difficult to account for how much your fresh apples will weigh after you prepare them. A good kitchen scale will help take the guesswork out of this, so you use the exact amount of apples the recipe calls for.
- Outdoor Gas Cooker. It takes some kitchen stoves a long time to bring a large boiling water canner to a rolling boil. If this is the case for you, one option is to purchase an outdoor gas cooker. This is a large burner that hooks up to the standard propane tanks that your outdoor grill uses. Outdoor gas cookers can get a large pot of water boiling in a manner of minutes, and will save you time when you’re canning. Remember to follow all safety instructions with your outdoor gas cooker, and NEVER USE IT INDOORS.
- Labels And Markers. You should get in the habit of labeling everything you can; you should, as a minimum, mark what each jar contains, and when you processed it. This will ensure that you always know what’s in the jars your opening, and that you get rid of any jars that have sat in your pantry for too long.
Now that you have all of the equipment and ingredients for this recipe, it is time to make some delicious apple butter!
1. Preparing the Jars
Wash all of the jars you’ll need for this recipe in hot, soapy water, then rinse them, and place them in the boiling water canner. Cover them in water, and then bring the water to a simmer; you do not need to boil them. Keep them in the hot water until right when you’re ready to use them.
Set the jar screw bands aside; they do not have to be heated or treated. Place all of the jar lids you use for this recipe in the small saucepan and bring them to a simmer (do not boil them) over medium heat, then lower the heat. Leave the lids in the hot water as well until you are ready to use them.
2. Coring, Peeling and Quartering the Apples
Inspect all of the apples you intend to use to make your apple butter. Remove any apples with brown or soft spots, or that otherwise don’t look fresh. Then, peel them all, and remove the cores. You’ll really appreciate your apple peeler at this point if you have one!
Here is a great video of an apple peeler in action:
Once you have peeled and cored your apples, cut them into quarters on your cutting board, placing them in the colander bowl as you cut them. Inspect them one last time, ensuring that all the apples you’ll use to make your fruit butter are fresh and crisp. Rinse your apples in the colander under cool water once you are done.
3. Boiling Your Apples
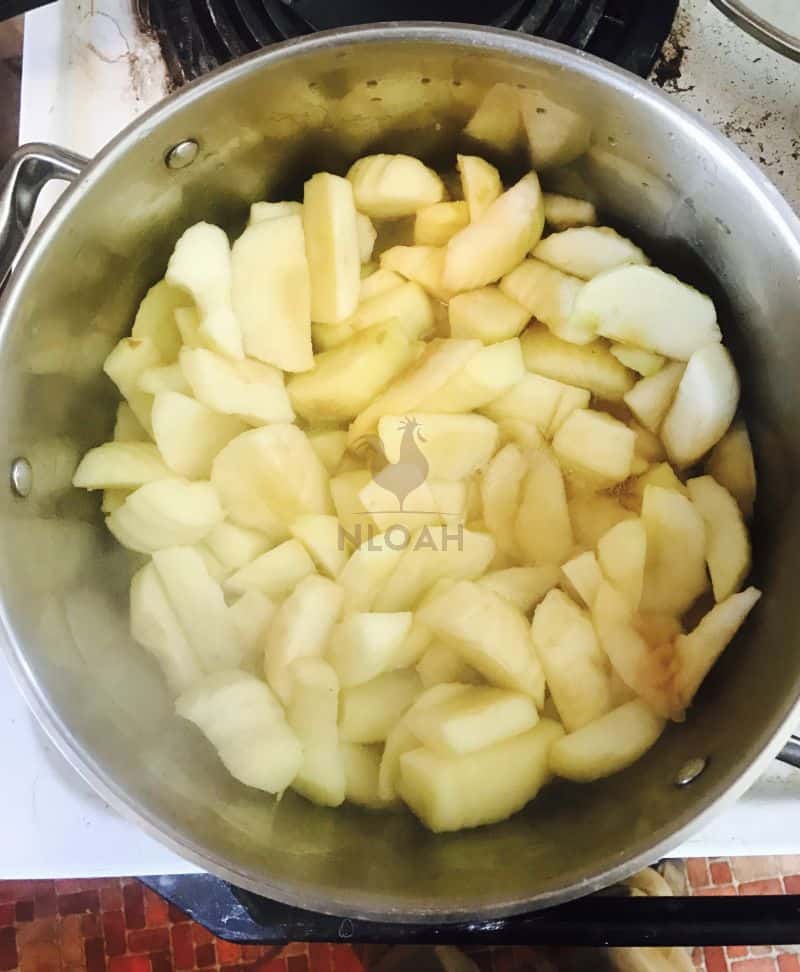
photo above: Boiling the apples and cider to prepare them for the food processor.
Once you’re done peeling, coring, quartering and washing your apples, place them all in the large saucepan, and add in the cider as well.
Bring the mixture to a boil over medium high heat, then reduce the heat, and boil the mixture gently for about thirty minutes. Stir the mixture gently from time to time, and remove it from heat once the apples are soft.
4. Puree the Apple Mixture
After you’re done boiling your apple mixture in the saucepan, transfer it, in batches to your food processor or food mill. Using the metal blade in one of these devices, puree the mixture, batch by batch. Get the mixture to a uniform texture, but ensure you do not liquefy it.
To produce eight 8-ounce jars of apple butter, you will need approximately twelve cups of the apple puree. As you puree each batch of your apple mixture, transfer the completed batches to the second saucepan.
5. Cook Your Apple Butter
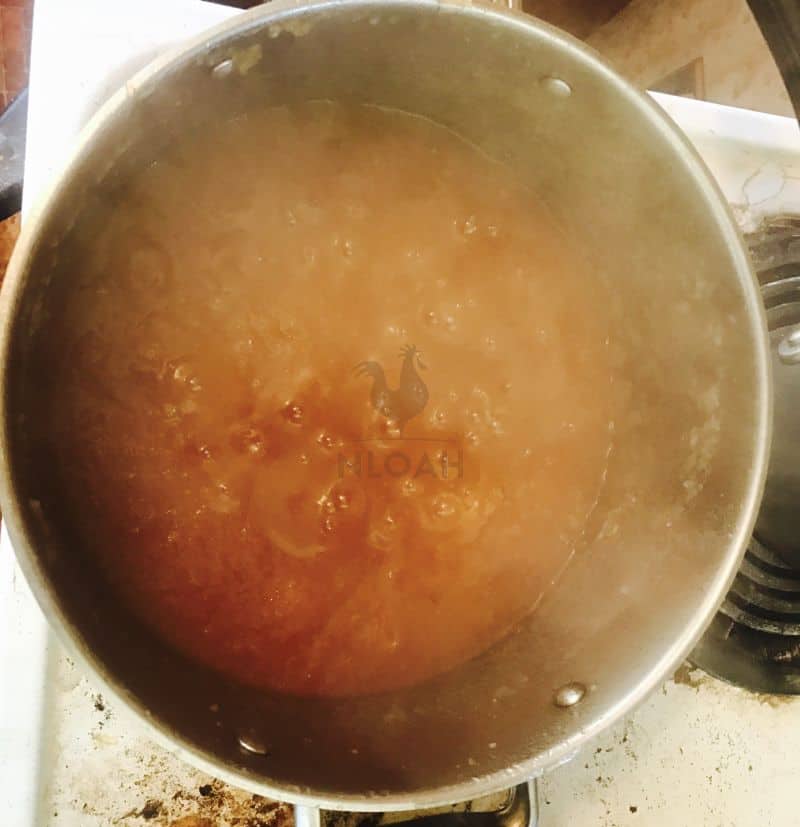
photo above: monitor your apple butter closely while cooking it, so you do not scorch it.
Add the sugar, cinnamon, and cloves to the apple puree in the saucepan, and use your spoon to stir them all together and dissolve the sugar. Place the saucepan over medium to high heat on your stove, stirring your mixture frequently. Once it boils, reduce heat and boil the mixture gently.
Stir your apple butter mixture frequently; failing to do so can cause it to scorch, and ruin it. Continue to observe the mixture as it thickens. The apple butter is sufficiently cooked when the apple butter holds its shape on an inverted (upside-down) spoon.
Here is a short video demonstrating the spoon test for a batch of apple butter:
Once your apple butter mixture is sufficiently cooked, and passes the spoon test, remove the saucepan from heat.
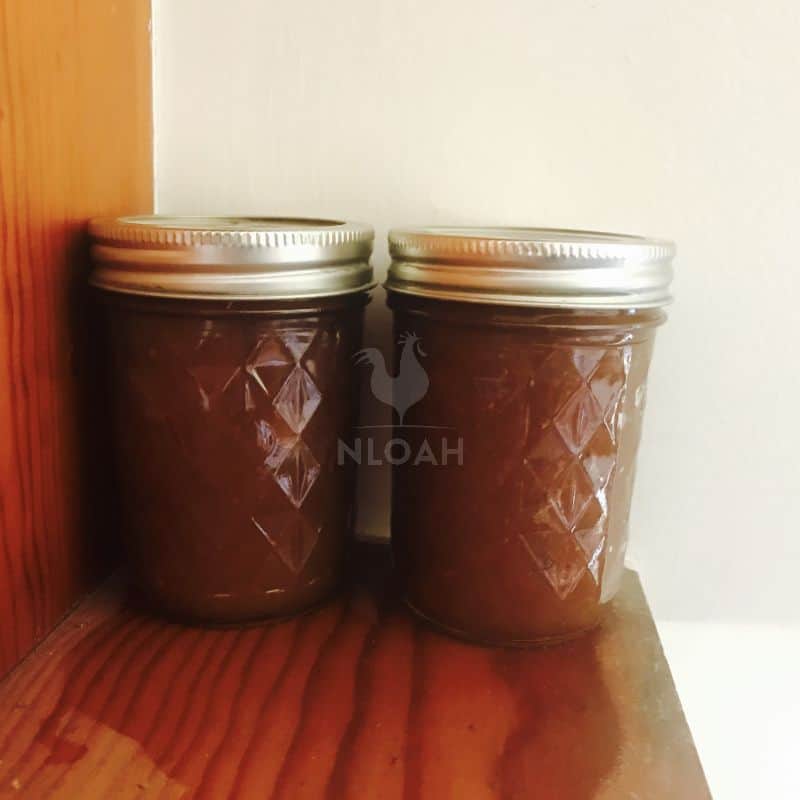
6. Pack the Jars
Using your jar lifter, remove all of your jars from the boiling water canner, and place them together in an area with sufficient space to work; a clear counter or tabletop will usually suffice. Place your funnel on your first jar, and, using your ladle, transfer the apple butter from the saucepan to the jar. Make sure you leave approximately ¼ inch of jar headspace in the jar. Repeat this process with each of your canning jars.
It is important to remove any dead space, or air pockets, that may form in the jars as you are packing them. Once you have finished with your initial packing of the jars, use your canning spatula to pack down the apple butter tighter, removing any air pockets. It may be necessary to ladle in more apple butter after you’ve removed the air pockets to get the jar back to ¼ inch of headspace.
Only proceed to the additional steps of this recipe with jars that are properly packed, with ¼ inch of headspace; refrigerate any additional apple butter that remains, and use it as soon as possible.
Once all of the jars are sufficiently packed, use your small towel to wipe off all of the jar rims. The rims need to be clean, or they will not allow the lids seal properly. Once you’ve wiped down the rims, use your magnetic wand to pick up a lid, and place it center mass on a jar.
Then, thread a screw band down on the jar until you meet resistance, and it is “hand tight.” You do not want to tighten the screw bands too much. Repeat this process with all of your jars, until they all have a lid and a screw band.
7. Process the Jars
Now it is time to heat process your jars. Boiling the packed jars will help to destroy any harmful bacteria in the jars (along with the high acid content of the apple butter); boiling them will also create a vacuum seal with the jar lids, and make it safe to store the jars at room temperature for up to a year.
Using the jar lifter, carefully place all of the packed jars one by one into the boiling water canner. Make sure that they are completely under water. Replace the lid, and bring the pot to a boil under high heat. Let the packed jars boil for ten minutes, then remove the lid, turn the burner off, and let the boiling water canner set for an additional five minutes to cool off a bit.
After five minutes, use your jar lifter to carefully remove your jars from the canner, and set them in a cool place. Remember, the water is still very hot in the canner, so make sure you do not accidentally spill any on yourself or your helpers.
Place the jars in a quiet place with no drafts, and cover them with a towel for twenty-four hours. You will likely hear little “pop” sounds from the jars as they cool off; this is a good sign, indicating that the jars are sealing.
After twenty-four hours, remove the towel, and inspect the jar lids to ensure they have a vacuum seal. First however, remove the screw bands; once you have boiled your jars, they are no longer necessary. Wash them with soapy water, then rinse and store them for later use.
If your jar lids have properly sealed they will curve downward, and there will be little to no “give” to them when you press down on them. If the jar did not seal, it is not safe to store at room temperature. Refrigerate it and consume the contents immediately.
Here is a great video demonstrating how to test for a properly sealed jar:
Properly sealed jars can be stored at room temperature for up to one year. Store them in a cool, dry place, like a pantry or basement. Remember, once you open a jar, you cannot re-seal it; any apple butter remaining in an opened jar must be refrigerated and eaten as soon as possible.
Enjoying Your Apple Butter
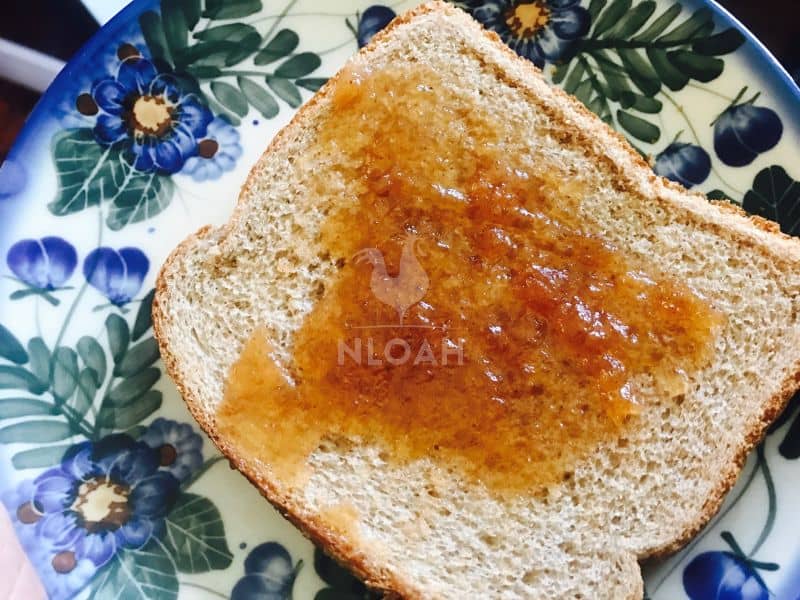
Apple butter is a really delicious fruit preserve, It is also quite useful. Spread some across some toast in the morning if you want to add some intense fruit flavor to your breakfast.
You can also put it on your bagel, too; apple butter tastes great when it is combined with some cream cheese. And when you go to make sandwiches for lunch, try substituting apple butter with jam, and pair it with some peanut butter or hazelnut spread.
Apple butter is also great if you want to make you very own homemade “cookie sandwiches.
Simply spread it on one homemade cookie, and then use its stickiness to attach the second cookie; once you’re done, you’ve got a real treat in front of you! You can also do this on a larger scale and use your apple butter as a tasty filling for a layer cake.
Finally, you should try to use your apple butter to complement and improve the dishes you prepare for dinner, too. Use it to glaze roast pork, or as a dip for your ham; a dash of apple butter alongside spicy mustard can help turn your meat dishes into something special.
You can also add a dab of it to a baked potato; pair it with some of your very own homemade sour cream and you’ll turn an otherwise boring potato into the highlight of a meal.
Parting Thoughts
Apple butter is delicious and easy to make. Since it is hard to find in stores, a few jars of your homemade apple butter will be a real treat for your family, too. So don’t miss your opportunity this fall; head out to the orchard, pick a few bushels of apples, and make enough apple butter to last through next autumn!

When Tom Harkins is not busy doing emergency repairs to his 200 year-old New England home, he tries to send all of his time gardening, home brewing, foraging, and taking care of his ever-growing flock of chickens, turkey and geese.
I used this recipe to make a batch for my daughter and grandkids that love apple butter. This is an easy recipe, but for people new to canning it might sound hard.( I’ve canned for 40+ years) Thank you for taking the time to explain all the steps so anybody could make a delicious batch of apple butter!!
what if I’ve filled my jars and tightened them hand tight and not canned them, and when I press the seals, they’ve sealed, is this airtight or will I still have to can them?
Yes. The heat processing kills any microbes that may be present.
It is not necessary to peel or core the apples if you use a food mill. Just quarter them and cook them, the food mill will remove all the seeds, core and peel.
Every year for Christmas I would get a jar of homemade apple butter from my grandma. It was the first gift I would open so I could have toast and apple butter for breakfast. She gave me her recipe before she passed away.