
Out of all the unwanted and unexpected messes you might have to deal with in and around your home, one of the very worst and most dreaded is mold. Specifically, black mold! This nasty fungus has achieved boogeyman status over the past couple of decades because of its propensity to make people sick, sometimes terribly so.

Anywhere that building materials like drywall, carpet, and other surfaces have gotten wet, anywhere that even stays humid or damp, this stuff can sprout and grow quickly.
You could go from a minor outbreak to a full-blown infestation, and before you know it, your whole family could be under the weather.
You don’t need to panic, you don’t necessarily need to tear out walls, and you don’t need to sell your home. But you do need to know how to eliminate this stuff. Below is your black mold survival and cleaning guide to help you deal with it.
Black Mold: What it Is, and What it Isn’t
We need to clear up a misconception about black mold before we get into it. Lots of different molds are black, and many kinds of black mold can be irritating or harmful.
But when we talk about black mold with a capital B, the really feared kind, we are talking about Stachybotrys chartarum.
Although it does occur in nature, it is most commonly found in human habitation, particularly because it grows so readily and quickly on cellulose-rich building materials. Drywall, wallpaper, and similar firm but porous surfaces are its favorite habitats.
Any place that’s wet, previously water-damaged, or moist with very little sunlight and sustained humidity is all but certain to host this stuff given enough time.
If you’ve ever dealt with flood damage inside your home or the aftermath of a major spill like a dishwasher, washing machine, or hot water heater failure and suffered mold infestation in the aftermath, it was likely this stuff.
Black Mold is Harmful!
All molds can be irritating, even harmful, to human health, but make no mistake that black mold is one of the very worst. It’s notorious for causing sneezing, coughing, irritation of the eyes and mucous membranes, and intensifying asthma symptoms.
Black mold can, in certain cases, also produce mycotoxins that can cause serious neurological issues and major respiratory distress, potentially even death in people who are already sick, very young or old, or immunocompromised.
Some people are also sensitive or even outright allergic to the stuff, and will suffer greatly by coming into contact with any amount of its spores. Even if you know you aren’t allergic to it, it’s still really bad for you, so you must take proper precautions when dealing with it.
Just as importantly, don’t kick this can down the road: although it’s supposed to grow slowly compared to other types of mold, once black mold is established, it will spread readily and constantly over time.
PPE is a Must
As mentioned, black mold is no joke when it comes to health hazards, so you must suit up with the appropriate personal protective equipment before you tackle remediation.
Consider the following items mandatory, and if you aren’t willing or able to use them, just call the pros and let them handle it.
- Respirator: This will prevent mold spores and other debris in the air from entering your lungs. Sometimes black mold can cause direct infection, mycosis, which can turn life-threatening.
- Cleaning Gloves: This stuff is nasty, and even a few live mold spores can cause another colony to pop up elsewhere. Reduce the spread of mold and prevent allergic reactions on your skin by wearing good cleaning gloves.
- Goggles / Face Shield: You don’t want this stuff getting in your eyes or on your face, and just as importantly, you definitely don’t want the harsh chemicals you’ll be using to get in your eyes.
- Oversuit: I strongly recommend you wear a lightweight disposable oversuit while you work. Anything that you can take off and dispose of, taking the mold contamination with it, is a big advantage.
- Old Clothes: Oversuit or not, I urge you to wear old clothes that you don’t care about getting rid of for this job. When you’re done, take them off, bag them up, and throw them away along with the rest of the contaminated material.
Needed Tools and Supplies
You don’t need much to do a good job of mold remediation unless you’re talking about proper demolition. Gather the following:
Buckets: Buckets are useful for rinsing brushes and wetting your rags, something you’ll be doing constantly.
I prefer to have several large 5-gallon buckets on hand for anything but the smallest jobs: one that holds my fresh cleaning solution, one that holds plain rinse water, and an empty one to hold tools I’m done with and other stuff.
Spray Bottle / Garden Sprayer: You’ll be spraying your chosen mold-killing solution over and over again during this job. A spray bottle is good for small tasks or in tight spaces, while a garden sprayer will help make short work of large areas without wearing you out.
Brushes: A variety of stiff, plastic bristle brushes that can hold up to various cleaning chemicals is the order of the day here. If you’re working in close confines or trying to get mold out of grout, a small detail brush like a toothbrush is useful.
Extension Handle: If mold is high up on your siding or other walls, an extension handle that is compatible with your brush will definitely come in handy. It’s also useful for scrubbing down floors without being on your hands and knees.
Rags: Self-explanatory. You’ll use these for scrubbing, mopping on your cleaning solution, and drying damp or wet surfaces. Get a bunch; you’re going to need them.
Mop: If you’re cleaning mold off of hard floors, a mop comes in handy.
Heavy Duty Trash Bags: Anything that is being removed or used for mold remediation must be bagged and sealed tightly to prevent spores from getting out.
Plastic Sheeting: Plastic sheeting, also known as painter’s plastic, will be used to protect surfaces that aren’t mold-contaminated as well as to seal off the rooms you’re working in so the mold doesn’t spread in the air.
Scraper: A scraper tool of some kind, be it a paint scraper, 5-in-1 tool, or something similar, is useful for scraping away compromised material that is heavily infested with mold, or larger deposits of the stuff from the surface.
Air Purifier (Recommended): It isn’t a must-have, but in my experience, it really comes in handy when you’re working inside your home.
Setting up a purifier in the room you’re working in will help capture the mold particles that invariably get kicked up into the air, reducing spread and helping to prevent sickness.
Cleaning Solutions
There are lots of options out there when it comes to mold killers and removers, DIY or otherwise. But I’ve got a good bit of experience dealing with black mold from my days of fix-and-flip real estate work.
For my money, I will only use the following to ensure success:
Mold Killer and Stain Remover: Specialized mold killer and mold stain remover chemicals really do work wonderfully.
One of my favorites is made by RMR, which uses ammonia-based ingredients to utterly destroy mold. The downside to using these products is expense and the fact that they tend to be quite harsh, necessitating extra protective measures.
Bleach: Don’t listen to the haters: bleach kills mold dead, dead, dead, and not just on hard surfaces. Bleach can wick into softer surfaces too and destroy mold at its source.
The downside, obviously, is that it will discolor absolutely everything. But if cleaning up the mold is the prime objective, it works great, is cheap and readily available. Just make sure you have good ventilation, wear a respirator, and protect your eyes from splashes.
Cleaning Vinegar: Cleaning vinegar, which has a higher concentration of acid compared to your usual kitchen vinegars, is surprisingly effective against black mold.
Dish Soap: For light mold infestations on hard, non-porous surfaces, dish soap and plenty of elbow grease along with a brush might be all you need to get rid of it.
Dish soap also comes in handy as a surfactant that will help vinegar or bleach cling to vertical surfaces so it can work continually on mold infestations.
Caution: Never Mix Cleaning Agents!
One last thing before we get started, and this is really important: never, ever mix cleaning chemicals together under any circumstances!
Never mix mold cleaner with bleach, bleach with vinegar, or any other combination in an attempt to get greater mold-killing power. What you’ll wind up getting is poison gas.
You need to pay attention to be especially careful if you switch from one kind of mold killer to another because those chemicals could still be reactive locked in the surface you’re working on.
Even when it comes to soap, make sure that your dish soap does not contain anything that might react with the bleach or vinegar.
If you’re in doubt, don’t do it, and stick to a single chemical only! That’s it for the warnings, time to tackle this stuff.
Getting Rid of Black Mold, Step by Step
Step 1: Suit Up. Before you even approach the area with the mold in it, put on your protective equipment: respirator, gloves, old clothes, and oversuit if you’re using it.
It’s important that you do this now because as soon as the mold is disturbed, especially when it’s wet, it will scatter its spores into the air and that means all over you.
Step 2: Contain Affected Area. Next, seal off the room you are working in if it can be sealed off. Turn off the air conditioner or heat as appropriate. Close up vents.
Hang your plastic sheeting over the door using painter’s tape, and put a sheet on each side of the door, overlapping, to make a kind of airlock.
Again, this will prevent the spores from drifting elsewhere and starting a new outbreak or making family members sick.
Step 3: Ensure Ventilation. If you have any way to improve ventilation in the room, besides the HVAC system, now’s the time.
Open windows, set up your air purifier, and set up a fan near the window blowing out if you have one. Do not have the fan blowing on the mold while you are cleaning!
Step 4: Scrape Away or Remove Large Mold Deposits. Now it’s time to start getting rid of that mold. If you have large, puffy deposits of mold that can be scraped away, do so using your scraping tool.
Compromised wallboard that is mushy can be chiseled out or picked out. Basically, mechanically remove all of the mold that you possibly can before you start scrubbing.
Work carefully and smoothly, trying not to kick up dust or spores into the air. Bag all debris and contaminated material in a trash bag or bucket with the lid on it.
Step 5: Treat Affected Areas. No matter how much mold you remove, some will likely be left in the substrate of whatever material you’re cleaning, especially porous materials like carpet, drywall, wood, and so forth. Wet these areas down using your chosen cleaning solution.
If you’re using bleach or vinegar, let it sit on the mold for at least 30 minutes, rewetting the area as needed. If you’re using a commercial mold-killing and stain removal solution, follow the manufacturer’s instructions precisely. If you’re using borax, simply leave it on until you can easily scrape everything off.
Remember: do not mix chemicals, no matter what!
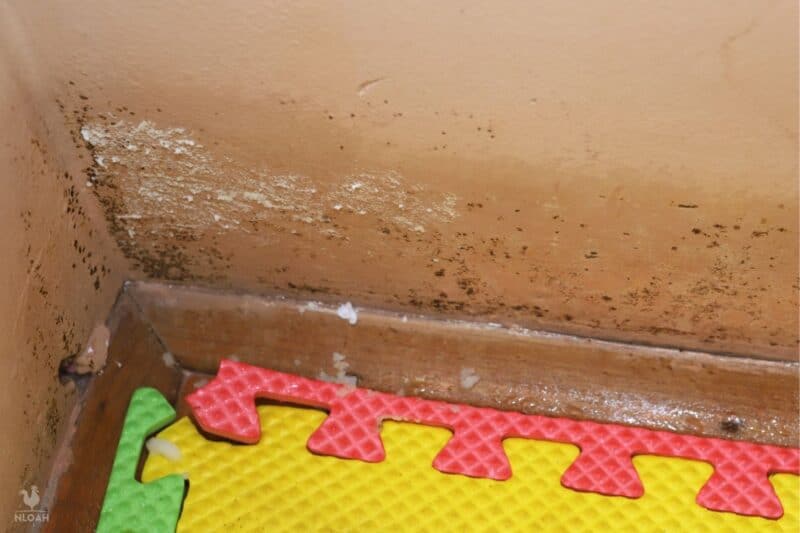
Step 6: Scrub. Scrub the treated areas with a brush, stopping periodically to rinse the brush in a bucket of water. If mold keeps coming off or you notice the infestation visibly shrinking, use a little bit more of your cleaning solution and keep scrubbing until it’s all gone.
On hard, durable surfaces like tile, grout, and so forth, scrub as much as you need to.
On surfaces like drywall, plaster, and so forth, try to be as gentle as you can and minimize the use of solution so you don’t compromise the material: for seriously infested materials like that, you’re probably better off just removing and replacing rather than trying to clean…
Step 7: Rinse. Once the mold patch seems eliminated, rinse the area you were just scrubbing using fresh, clean water and clean rags, taking care to blot up as much of the cleaning solution as you can.
Again, work methodically and make sure you wipe down any areas where splashes or drips might have gotten to reduce the possibility that mold could establish itself there.
Step 8: Dry Thoroughly. Whatever surface you are working on, take the time to thoroughly dry the area using clean, dry cloths. If all of the cleaning in the space is done, you can direct a fan onto it to help dry it out.
Step 9: Dispose of Waste. Make sure all of your waste materials, including rags, removed wallpaper, drywall, other coverings, and so forth, are securely bagged and tied off.
Remove them and yourself from the area where you were cleaning and outside of your home or living area and then remove your oversuit and your clothes if necessary. Bag them too.
Dispose of everything in the trash.
Step 10: Keep Check. If all goes well, you will have knocked out the mold infestation in one shot. But don’t be surprised if you see it reappear, especially on surfaces like drywall, flooring, and so forth.
Check back regularly and look for darkening or spread. If you see it, jump back in and clean it again before it fully reestablishes itself.
Step 11: Done! It’s nasty work dealing with black mold, but achievable!
Keeping Mold from Coming Back
As always, the very best cure is prevention, and that certainly applies when dealing with black mold.
If you are living in a space where removal and remediation were necessary in the past, you need to stay on guard about preventing resurgence. The following procedures will help you do just that…
Clean Often: Stay on top of cleaning, especially in mold-prone areas. If your wooden floor had a bad mold infestation in the past, keep it clean and fresh. Bathrooms, basements, and other damp areas are prime real estate for black mold and should be cleaned regularly.
Reduce Humidity: Humidity is ever the friend of mold, and black mold in particular.
Reducing humidity in your home by whatever means possible will go a long way towards preventing those little random colonies that pop up here and there. Use a dehumidifier or improve ventilation in the home to help.
Stop Leaks and Water Ingress: I hope this will be obvious, but you can’t let leaks go. Any area that gets wet and stays that way, especially when it’s in the dark, will become host to mold in just days, or even hours.
Likewise, areas that regularly get wet from water that you track or splash into the home should also be kept dry if at all possible.
Service and Clean HVAC and Ducts: One of the sneakiest hiding places for black mold that gives it free rein over your house is in your HVAC system and ducts.
Even small colonies that get set up on intakes, grills, and other components can shower the interior of your home with invisible spores in time.
Stay on top of inspecting and cleaning your system, or have professionals do it at least once a year. This is especially critical if you live in a wet or humid environment.

Get your gift and learn things like:
- how to make this really quick pest spray
- how to prevent egg waste
- two cheap automation devices that will make your life easier
Tom has lived and worked on farms and homesteads from the Carolinas to Kentucky and beyond. He is passionate about helping people prepare for tough times by embracing lifestyles of self-sufficiency.
Hi Tom,
I need help with a question the internet doesn’t address, and prefer talking to real humans anyway! I have a neglected raised bed that I decided to resurrect. It is overrun by a very pretty weed with a full head of feathery white blossoms and lots of lush green leaves. Working barehanded I started pulling them – the bottom half of the plant is coarse and woody. The root is a clump of thin rootlets not too deep. I used the lower stem and root to bolster the sides of my compost heap, and the flowery green tender top section as a layer over the top of the compost pile. Then I got curious about what the plant was – it turns out to be White Snake Root which is famously poisonous. Cattle ate it out on the early prairie settlements. Families drinking the cow’s milk were poisoned, as well as those eating the butter and cheese made from the milk. So now I have it all over my compost heap, and the question is, does the poison pass into compost, then into my garden, and then into me and the family? So far, I haven’t found anything that says
“do not compost” – it will spread milk fever directly to your garden crops and your family will be poisoned! Any guidance on this? Much appreciated – Matthew