Today my husband and I picked a couple of bushels of pears from Jerry’s mother’s gorgeously loaded pear tree. I think they are Kieffers.
This was definitely a good year for pears! I wish so badly that I’d brought my camera to take a picture of the tree. The limbs were so heavy with fruit they just sagged to the ground under all of that weight.
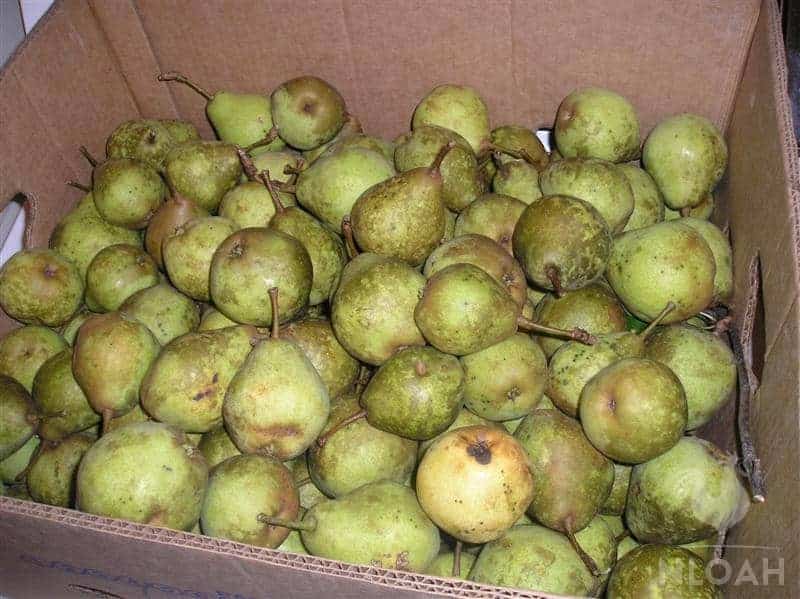
We didn’t get to pick very long before the mosquitoes got too bad and we had to stop picking for the night, but there is still a ton more to harvest another day. They are still green, but pears are best picked before they ripen.
How to Tell When Pears Are Ready to Harvest
Pears are fruits grown in temperate climates, also known as “pome.” They taste great when eaten raw – as long as they are ripe and actually ready to be harvested. Pears are in season from August through October in most places, though you can often find them in stores year-round.
To know when a pear is ready for picking, lift the pear (while still attached to the tree) to a horizontal position. If the stem easily breaks loose, then it’s ready. If the pear does not snap off easily from its branch, then leave it alone for a few more days.
If it is ready to be harvested, just tip or twist the stem of the fruit. Do this gently! Rotate the pear about a quarter turn. Again, if it comes off easily, that means the pear is ready to be pulled.
You can pull the pears if there’s a little bit of resistance during this process, too, but I don’t recommend it. The pears won’t have the best flavor or texture.
Look for pears that are firm and with minimal bruising for the best quality fruit. Avoid those with torn spots or any exposed flesh, too.
Besides that, it can sometimes be tough to tell whether a fruit is ripe because the different varieties show different signs. Some pears, like Bartletts, change color as they become ripe, changing from green to yellow, but other types, like d’Anjou pears, don’t.
How to Ripen Pears: 5 Tips
Need to ripen your pears? Follow these tips for super sweet, super juicy, super ripe pears each and every time.
Understand How Pears Ripen
Pears are unique fruits in that, unlike others (such as apples), they do not ripen properly when they are left on the tree. They should be picked unripe and then allowed to ripen OFF the tree. Unripe pears are the ones you should be harvesting.
If you leave a pear on a tree, it will over-ripen from the inside out. The center will become soft and rotten while the outside remains hard. Probably not the effect you’re going for!
Therefore, you need to pick a pear when it is mature – not necessarily ripe – so that you can ripen it properly.
Watch them Closely
Once they’ve been picked, pears need to be closely watched during the ripening stage. It is recommended that the pears are cooled for a day or two at 30*, and then allowed to finish ripening at 65*-75* for about 5 days. You can hasten this ripening by placing the pears in a paper bag with a ripe banana or apple.
Did you know that many commercial pears (the kind you would buy at the store) are put into cold storage right after they are harvested?
This gives the growers more time to get the harvest to market and also slows the ripening process. It’s not something you should do with storebought pears (which is why you shouldn’t put pears you buy at the grocery store in the refrigerator).
If you’re harvesting your OWN pears from your OWN trees, you can put them in colder temperatures. Briefly cooling down your pears in the fridge can help improve the flavor of your peers but it isn’t necessary if you don’t have space. You can allow them to ripen at room temperature, as I mentioned above.
Ripening Pears Quickly
You can hasten the ripening by placing the pears in a brown paper bag with a ripe banana or apple (just like you would tomatoes). These fruits release ethylene gas, which can dramatically speed up the ripening process. You can always just stick the pears on the kitchen counter near the fruit bowl, too.
Check the pears daily – they should ripen in one to three days. However, if any of the fruit overripe and spoils in the meantime (including the bananas or apples), it can cause the rest of the fruit to go bad very quickly.
It’s not a bad idea to write the date on the paper bag so you don’t lose track!
Avoid refrigerating the pear until it reaches maximum ripeness. Once it does, it’s fine to stick it in the fridge to help it stay at the optimal level of ripeness for a while.
When you store them, avoid stacking them on top of each other. This can lead to bruising.
Some people recommend this tip for ripening pairs combined with another one – putting the pear in the microwave first. Before you put the pear in the paper bag, stick it in the microwave for 10 to 15 seconds.
I haven’t tried this method, but I suppose it’s worth a try!
Varieties of Pears and Their Exceptions
The rules we talk about in this article apply to all types of pears except one – the Asian pear. Asian pears ripen on the tree. You can eat them immediately after you’ve harvested them and you don’t need to wait or follow any other ripening techniques.
Not all pears ripen at exactly the same speed either. Bartlett pears need to be chilled for two to three days while Comice and Bosc pears need to be chilled for up to six weeks.
Store in a Root Cellar
Like apples, pears can be stored in a root cellar. The cold temperatures here will help ripen your pears and preserve them for a bit longer than if they were stored in the refrigerator. Just make sure you wrap each pair individually in newspaper, then store it in a wooden box. Only store unblemished fruits.
How to Preserve Pears
Once your pear is ripe, eat it within a couple of days. The best-tasting pears are meant to be eaten as soon as they become ripe – so don’t wait too long to chow down!
If you don’t think you’ll be able to eat the pears right away, you might want to do something else with them. Canned pears and pear jelly are both absolutely delicious – and you can always freeze your extra pears, too.
Canning pears in light syrup is a great way to keep them juicy. You can even add tasty spices like cloves or cinnamon! Pears can even be dehydrated – just make sure you do something with them before they all go bad.
How to Tell When a Pear is Ripe
You’ll know when the pear is just right for eating by gently pressing your thumb into the pear’s flesh a little below the stem. If the fruit feels soft, it’s ready. If it’s still hard, and doesn’t easily indent under gentle pressure, then it needs more time to ripen.
Before you eat your pears, be sure to wash them well. Use cold drinking water and use a soft-bristled produce scrub to gently scrub the exterior of the pear. Be extra attentive to the indentations at the top of the stem and the bottom of the pear.
It only takes a few seconds, but doing this will ensure that you get rid of any pesticides, dirt, and bacteria. Even if you’re planning on peeling the pear, it’s a good idea to wash it first.
Then, all that’s left to do is enjoy! Whether you enjoy your pears by themselves, in a smoothie, or in a cake or pie, these tips should help you savor them to the fullest.
updated 12/09/2021 by Rebekah Pierce

A city girl learning to homestead on an acre of land in the country. Wife and homeschooling mother of four. Enjoying life, and everything that has to do with self sufficient living.
Kendra do you have a recipe for rosemary pear preserves,it is a grandmothers recipe
Hi Jan,
I haven’t tried it yet, but here’s a recipe that might be what you’re looking for: http://www.livingthecountrylife.com/country-life/food/rosemary-pear-preserves/
No net yet but I did put a fake owl in the tree last year. It only keep the birds out of my yard and my fig is on that side of the yard so that wasn’t a complete waste of time, the squarrels were not intimadated:(
I too have a bartlett and never get to eat any of them, here outside Houston Tx. Unfortunatly I also have a lot of hungry squirrels that eat holes in them and if I knew I could pick them early I would have. Thanks so much and if somebody has any ideas how to run off these pests I would be so grateful. Last years they began eating my oranges and they never did that before! I have a fake owl in the vegetable garden and that seems to keep them away from there. Help!
Oh no, Jimmie! Sounds like you’ve got problems over there. Have you tried throwing a lightweight bird netting over your trees yet?
We put a strip of aluminum around the trunk, cut a hole in the bottom for air, not one squirrel got in the tree. We had another one we cut down because the squirrels wouldn’t stay out of it . They take one bite and they drop . They are a big pain . The aluminum was too slippery for them to climb tree , will take it off till next year .
kendra, I just tried a new recipe it is in the water bath as I type and I really like the taste now, I’m sure it will be even better once it sits in the jars for a couple of weeks, it is for pear relish. If you like chow chow with your beans and greens you will like this stuff. I got this recipe from a little old lady.
one peck of pears, 5 large onions, 5 green bell peppers, 5 red bell peppers, 3 hot peppers or more if you like hotter, 1 tbsp salt, 5 cups vinegar, 5 cups sugar, I cut everything up in the food processor then put everything in a kettle and bring to a boil turn down and simmer for about 30 minutes, then pack jars and proccess in a hot water bath for 15 minutes. This stuff is so pretty in a jar it looks like confetti, very festive.
Thanks Leslie!!
Kendra the first batch I made was with slightly green pears, I just had to cook it longer to get it translucent. It also helps if you cut them in the food processor, to cut down on the cooking time. I would use my potatoe masher to help break up the pears when they are cooking and to see when the mixture is cooked down enough. I keep a spoon in ice water and dip out some of the mixture when it gets as thick as I like I pack it and hot water bath it.
I have made 48 half pints of pear honey this year, it does take a lot of sugar but it makes a very nice spread much the color and tast of honey. It is 8 cups of finely chopped pears, 10 cups of sugar, sorry i know a lot of sugar, 2 tbs lemon juice and on large can of crushed pineapple, I use the kind in juice not heavy syrup. Bring it to a boil and melt all of the sugar then turn down and cook for 45 min. to a hour. I had to cook mine a little longer to thicken up enough. You want the pears to be translucent they kind of melt away. The fill jars and process for 15 minutes. I like to use a potato masher to make sure it is all broken up. It tastes sooooo good on a hot biscuit. I will be using these for Christmas gifts. One batch makes about 12 half pints.
Thanks for the recipe, Leslie! Do you use really ripe pears, or are they slightly green at all??
Pear honey. Brandied Pears. My Mother always shreaded them (grated), froze them or used them freshly shreaded to make shreaded pear pie. Works with apples too. Really good.
P.S.–Pear butter is really good. I haven’t made any myself yet, but hope to make and can some this year.
We have two Bartlett pear trees, but they are later-ripening, autumn ones. They are usually ready to pick late September or early October. Thanks for the information! Last year we got busy and waited just slightly late to pick and we did end up with many of them having a gritty texture.
“Summer and autumn pears are gathered before they are fully ripe, while they are still green, but snap off when lifted. If left to ripen and turn yellow on the tree, the sugars will turn to starch crystals and the pear will have a gritty texture inside.”
We make “pear sauce”. Just like apple sauce, but with pears. I have 3 little girls, and they love it!
My mom dehydrates pears just to put in pie. It’s quite good.
I just can the quartered pears in a light syrup.
Fruit throughout the year for us (I currently have 360+ lbs of produce in my den ripening and waiting for me to attack this weekend – including 180 of Bartletts).
One neato tip I got last year was to use a melon ball dealie to scoop out the seed casing/part after you pull out the stringy parts. Works like a charm, even if you’re improvising and using your little round measuring teaspoon. Also works great for getting extra stringy stuff out, too. Looks much neater/nicer with halves or quarters in the jar than if you’d attacked with a knife. 😀
You could dehydrate them and chop them up into muffins, granola and pancakes this winter….and just canning them in a syrup would be nice too (eaten with cottage cheese – yum!).
They look like keiffers to me. To preserve them they need to be green. the ripened version won’t hold up and turn to mush.
Angie,
You know, you may be right. They do look more like Keiffers, now that you mention it.
Thank you for posting this! My neighbor has 2 pear trees & 2 apple trees & they said we could have all we want. The pears are falling off the trees into the road! I’m thinking we may go pick them on Friday. Thanks!
We put a large piece of aluminum duck work around trunk, not too tight. Left a air hole at the bottom, we had no squirrels this year .last year they would take one bite and they would fall, we had none left.