When you’re researching permaculture techniques, swales often rise to the top of the pile. Simply put, swales are rainwater harvesting devices that work by shaping the earth.
The word ‘swale’ has often been used to talk about a diversion channel for water. In permaculture, the term ‘swale’ is used to refer to both on-contour swales and off-contour swales (diversion channels). When on contour, swales are used to harvest rainwater, while off-contour swales are used to divert water to another place.
However, is it appropriate for you to have a swale in your garden? And if so, why and how? And what even is a swale? Well, let’s dive right in.
What Are Swales?
As we already mentioned, swales are used to harvest and manipulate rainwater in your garden. By placing swales on gentle slopes, we can use the gravitational force to move and capture the run-off water.
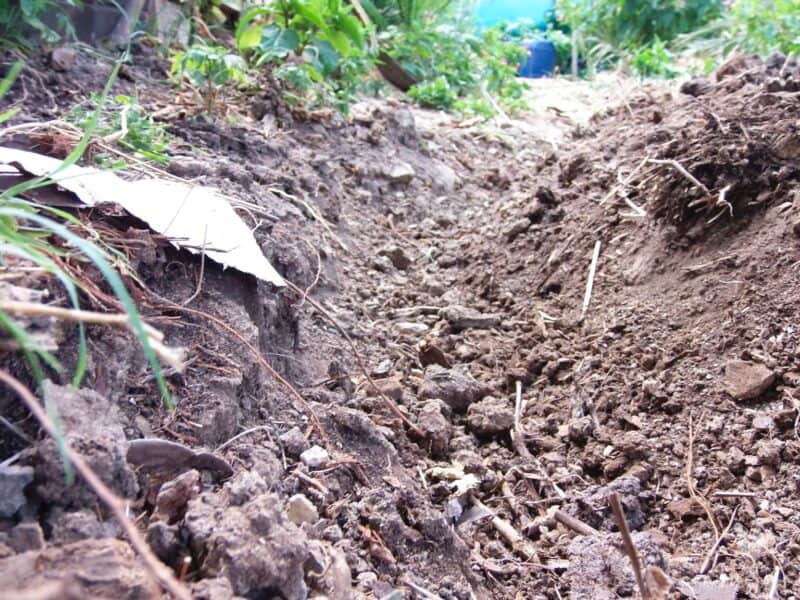
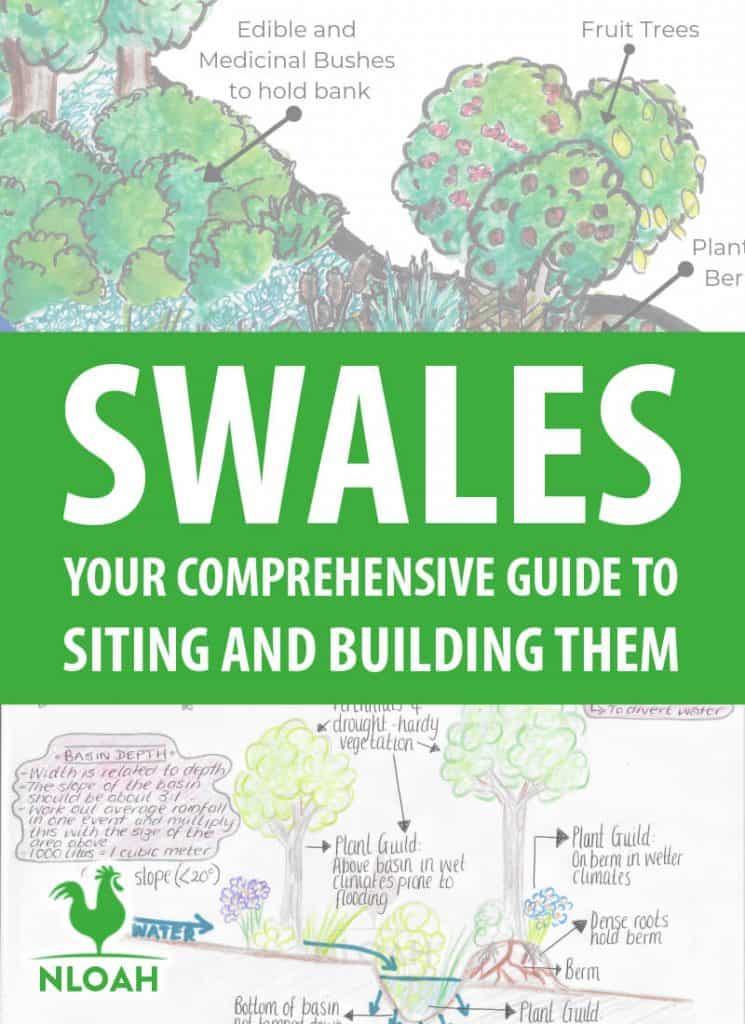
Aesthetically, they first appear like long ditches, with mounds on the low side. However, when planted over time, they disappear under a thicket of foliage.
From above – when first dug – a diversion swale or off-contour swale would look like a meandering channel zigzagging down a hill, with a mound on the outer edge. An on-contour swale or bio-swale would look like a boomerang hugging the shape of the hillside, with a ditch closest to the hill and mound on the outer edge.
Essentially, swales are trenches dug into shallow slopes. The excavated soil is mounted on the outer side of the slope, so that as water travels down the hill, it is captured in the trench, and cannot overlap the mound.
How Do Swales Work?
If the swale is on-contour – the water will stop in the ditch, spread along its width, and then sink into the soil. If the swale is off-contour, it will be diverted along the channel slowly.
On-Contour Swales
When it rains, we get run-off of water. This water will travel through our land, obeying gravity by the easiest path – running from source to mouth. This watershed is an opportunity for us to harvest rainwater and feed our plants with it – instead of always reaching for the hose.
On-contour swales are an on-the-spot rainwater harvesting mechanism on the one hand – and a broad spectrum technique on the other. They work on a simple 3-process system of: Slow, Spread, and Sink.
In a direct sense, we place swales on gentle slopes to catch the rainwater running down the slope. As rainwater travels by gravity, it speeds up, doing more damage.
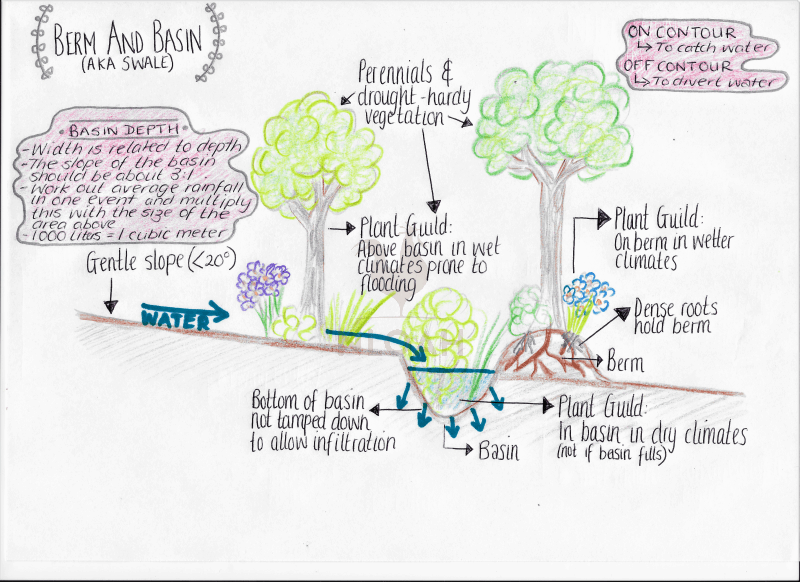
By placing our swales higher up the slopes – or staggered down a hill – we catch the slow-moving rainwater in troughs called ‘basins’. The ‘berm’ on the parallel edge prevents the rainwater from further running down the hill.
The wide troughs or basins dug horizontally across hillsides are leveled flat with the contour of the land – so that the collected rainwater spreads evenly throughout the whole basin. This prevents water from collecting in spots that are steeper above than others – instead distributing the water equally across the hillside.
Next, we need to sink the collected rainwater – standing water is never a good idea. It either evaporates or becomes a stagnant breeding ground for mosquitoes.
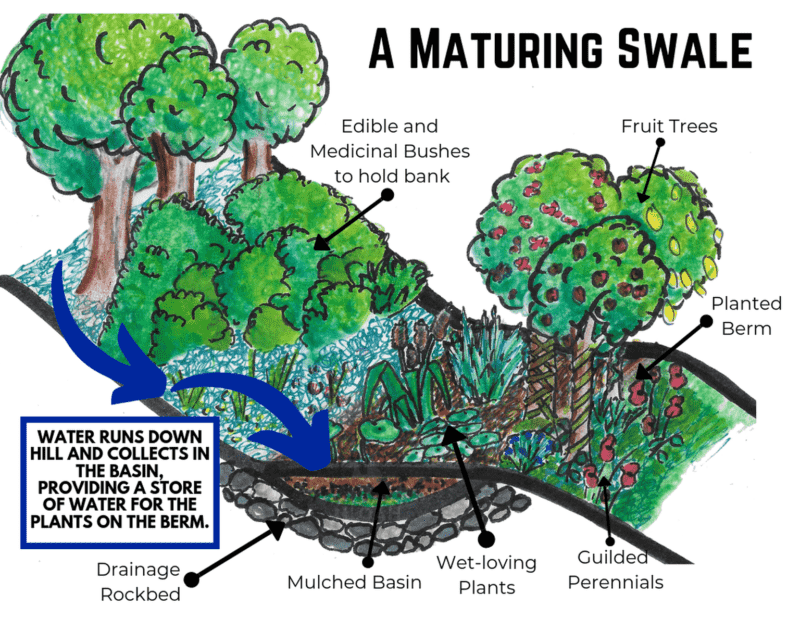
In order to help the water sink into the ground, we provide absorbent planting beds. The beds simultaneously provide edible and medicinal crops, which benefit from the run-off water and topsoil nutrients.
By planting this area using a Forest Gardening pattern, the trees and plants we place here will anchor the mounded berm with their roots.
In order to sink the water, we mulch the basin and plant water-loving plants. We sink the water further by planting the berm with fruit trees and perennial crops – whose roots also help to secure the berm’s edge of the hillside.
The continual process of slowing, spreading, and sinking the water has the long-term effect of raising the water table on the property – reducing your need to water so often.
Simply put, on-contour swales work by harvesting rainwater on a gentle slope in order to prevent water wastage and potential run-off damage. While doing this, they simultaneously collect nutrients, provide yield, raise the water table, and prevent erosion.
Off-Contour Swales or Diversion Swales
Diversion swales do what they say on the tin – they divert water from one place to the next.
Instead of being built on contour, diversion swales are built at gentle sloping angles perpendicular to the hillside, running down it. Their purpose is to transport excess water to a more needy area of your garden – say from the edge of a driveway to a duck pond.
Diversion swales work by providing an easy route for water to travel down, leveraging gravity to move the water along. Rather than shedding quickly down a hill and stripping topsoil nutrients with eroding run-off, the rainwater follows a controlled channel.
In this scenario, erosion is slowed down as the diversion swale only has a slope of about 1%. This stops high levels of friction from fast-traveling water – which also lets sediment fall out of suspension.
The low-grade slope also enables water to sink in as it goes, while providing a controlled flow of water that doesn’t damage plants or habitats at the other end.
Similarly to the on-contour swales, hardy perennials on the berms help to hold the edge, while taking advantage of the extra water. In other scenarios, the berms are used as pathways down the hill.
Why Build Swales?
There’s a multitude of reasons to use swales in your garden.
Whether you’re interested in improving your drainage systems, adding elements of permaculture design, or even in building a convenient rain garden, swales serve many purposes.
In combining all the functions a swale can serve, you’ll find this multifaceted rainwater harvesting tool brings myriad benefits to your garden.
Swales Prevent Erosion
As a rainwater harvesting mechanism, swales deal with water, which has a wave formation. Permaculture is highly concerned with natural patterns in understanding the way nature moves and the effect of that movement – in order to mimic these patterns to create more effective systems (both in our gardens and in our lives).
Like sound, water moves in a wave, pushing what’s in front of it with the function of creating disturbance.
When we consider sound, this function is positive, as the wave patterns allow vibrations to nudge particles and carry sound in a very effective way.
However, that same wave pattern formed by water on our landscapes pushes particles of soil down the slopes of our land, in as an equally an effective way. This causes soil erosion as the water sweeps through and carries away loose topsoil.
This means that all the work you’ve done to provide nutrients to your topsoil gets washed away with the run-off. Not only is this a waste of time on your part, it also means that your soil is being stripped of nutrients, running off further down the watershed. Where the soil is taken away, your beds are left lacking nutrients.
Even more dramatically, unchecked erosion can seriously manipulate your landscape. Water will flow with gravity, taking the path of least resistance.
This means rainfall will always run down the steepest slope in your garden, with the least obstacles. This will eventually lead to the water wearing away your garden, causing a drop-off or channels running through the land.
By using swales, we can slow down the fast run-off, which prevents friction from scarring the land and reduces the force of water pushing soil away.
Swales will then spread this water out to places that need it more. Diversion swales may divert it to vegetable gardens or animal watering stations. On-contour swales will spread it along the flat contour, and then it will sink into the ground slowly – raising the water table and feeding the crops planted within it.
Swales Catch and Store Water
Water is a precious resource and utilizing every drop that lands on your garden will help you to grow luscious crops through passive capture – reducing the amount you actively water.
On-contour swales are cut into a shallow hillside following the horizontal contour of the land. By doing this, you have a level base in the basin of the swale. This means that when water travels down the hillside, it runs into the basin and immediately spreads the width of the flat wide basin.
The result is that you spread the run-off across the garden and allow it to sink slowly into the ground, raising the water table – providing your plants with more access to water without watering them. This stops the water from running down the hillside and straight off your property – allowing you to capitalize on the energies that run through your site.
Swales Can Divert Water
Swales that are not built on contour are used to divert water to another place. Diversion swales are used in areas with a lot of run-off that can’t be easily absorbed in the surrounding area – often from non-permeable surfaces like driveways or roofs.
By building a diversion swale, you can channel rainfall toward a more appropriate source to sink the water – such as a vegetable patch or bird bath.
Swales Are A Growing Mechanism
Swales are a great way to reforest large-scale areas, but can also be used to grow crops and small fruit trees on your land.
Now consider this. When water washes across a landscape, it takes soil with it, causing erosion. When we work hard to feed our gardens, heavy rainfall can wash nutrients downhill.
Swales will serve to catch these nutrients. As the water washes downhill, it collects in the basin, slows down, and spreads along the hillside. The nutrients fall out of suspension of the water as it slows down and settles. This makes swales areas of highly concentrated nutrients.
By planting on the mound side of the swale, we can grow pretty much anything that enjoys loose, well-drained, nutrient-rich soil – like fruit trees, berry bushes, herbs, and flowers. In the basin, we can plant wet-footed and water-loving plants like reeds, lemongrass, and comfrey.
A little tip – swales are a great place for integrated pest management zones. Plant perennials that draw insects away from your home and veggie patches in these areas.
Swales Prevent Bogs and Floods
Perhaps you have spots in your garden that collect rainwater. These can be havens for mosquitoes to breed in the summer, and can cause frost spots in the winter. With very heavy rainfall, we can also experience flooding.
Swales help to dissipate water by moving it either by diversion channel, or by spreading and sinking water just above the problem area.
The foliage and vegetation we plant on our swales also help to suck water up. You’ll find that areas that experience extreme flooding tend to have less foliage, whereas those dense with roots, humus, and mulch will hold and soak up water.
Swales Create Edge
The principle of ‘edge’ is extremely poignant in permaculture, and is a useful technique to add to your arsenal when gardening. Edge refers to the point where two boundaries meet, resulting in a unique fusion of the two scapes – for example, where the edge of a pond meets the land.
As we are trying to create resilience in our gardens using biodiversity, maximizing edge helps us to increase the types of plants we can grow in our gardens, further increasing biodiversity and yield.
When water runs off the land, if we capture this water in on-contour swales, we create pockets of highly nutrient areas with more water than usual. This enables us to plant crops we wouldn’t usually be able to plant here. We can create small nooks of forests on our mounds and wet-footed areas in our basins.
You’ll find an increase of birds who like to hunt in the open and hide in the trees, and a rise in amphibians who like to live in wetter areas. These animals will also help with integrated pest control.
How to Build On-Contour Swales
1. Plan Your Area
You don’t want a swale too close to a house or building – at least 10 meters away. You want to mark out the site just above the problem area.
You will need a laser level or an A-Frame and a level. If you’re using an A-Frame, mark the start and then move along the hillside horizontally with the A-frame, twisting it back and forth and staking next to the legs..
If you are looking uphill, you start with the left leg of the A-frame against your original stake. Put the A-frame parallel to the hillside and adjust until the level is balanced.
Put a stake or marker next to the right leg of the A-frame. From here, you swivel the A-frame on its right leg, horizontally across the landscape, marking as you go.
Next, you need to tie a string to all the stakes, as this will show the line along which you need to dig, and will help to show you how straight it is.
2. Dig the Basin
Next, you need to dig out the basin. Technically, there are no hard and fast rules about the depth of the basin, however, it’s smart to consider the amount of rainfall you have and the area which will shed run-off.
An easy calculation would look like this:
The highest volume of rainfall for one event (on average) in your area is 50mm.
There is a driveway above your swale measuring 10m x 10 m = 100sqm
The rainfall during that event on that driveway would be 100 sqm x 50mm = 5000 liters (5 cubic meters).
Dig your swale 6 meters length along the hillside, 2 meters wide, and 50cm deep downward, and you’ll have enough space for 6 cubic meters of water.
But how do you dig a swale?
First off, you need a pick axe, hoe, and shovel.
Use the pickaxe to break up the soil. This will make the whole affair a great deal easier. Once the area is measured, start from the back of the swale and work to the front, picking at the soil and dragging it forward. The pickaxe will allow you to dig deeper into the soil quicker, loosening it as you go.
Next, use the shovel to dig out the picked soil and place it on the downside of the basin – to form the mound or berm. Remember to tamp this down as you go so that the berm is solid.
As you dig downwards, make sure the slope is no steeper than 1:3 on the inside of the basin or the sides will start to fall in.
As you get to the bottom of your swale, you want to level it out. You can use the hoe to move the soil to equalize it and to cut the bed a little smoother.
The bottom of your basin needs to be flat so water can spread evenly across it. Some people like to put a rocky layer here in order to help drainage.
3. Craft an Overflow
Never forget the overflow otherwise you’ll experience flooding in a heavy rainfall event. The overflow channels should be toward the edges of the basin and should be placed about 3 quarters of the way up the basin.
They should cut through the berm or mound, and divert to another place where excess water can be drained – ideally a second swale a little further down.
4. Build the Berm
The berm is the raised part of the swale. Its purpose is to prevent rainwater from spilling down the hill – while also serving as a landscaping bed to place crops and trees.
But how do you build a berm?
The mound or berm should be on the outer hillside of your swale – downhill from the basin.
As you are digging out the swale, you place the excavated soil on the downhill side of the basin. This starts to form a mound as you go – the dug-out part being the basin, and the mound being the berm.
However, it is important that your berm doesn’t fall down from rain or wind – while also making sure it acts as a solid planting bed. To do this, you need to tamp down the bed from the top. You can do this by walking over the top and stomping on the mound until it has a flat top – ideal for planting!
The slope of the berms (and also the basins) should never be steeper than 1:3 otherwise it will start to cave in.
IMPORTANT!– DO NOT make a Hugelkultur berm. You may find plans for these online but they are NOT a good idea. Structurally, the logs at the bottom rot, creating loamy organic material. While great for anchoring roots to explore – this softer organic matter will slip and slide when wet, causing a miniature landslide.
5. Mulch and Plant
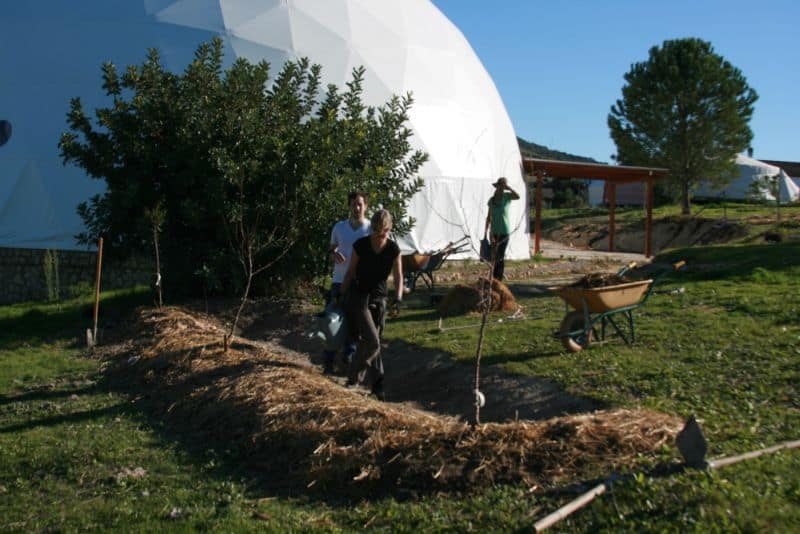
You want to plant your swales as this not only makes them multi-purpose food/rainwater harvesting systems – it also assists the swale with retaining water as the flora will lock the moisture into their roots and foliage.
Make sure you sheet mulch the berm and the basin before planting.
On the berm, you’ll want to plant fruit trees and berry bushes both as edible crops and to help hold the berm with their roots. You can plant herbaceous plants up here, herbs, flowers, and climbers. You’ll find you can create small tree guilds using forest gardening principles to create a 7-layer forest right on your berms.
In the basin, you’ll need hardy plants that like water. If they are low-level, you may have to think about species that like shade as the mound can block out the sun.
How to Build a Diversion Swale
1. Plan the Area
When you’re diverting water, you want it to move slowly as this allows it a chance to sink into the ground, as well as preventing it from dragging lots of sediment or destroying the structure of the channel.
In this sense, you want to plan your diversion swale to slope of around 1%. This means for every 1 meter the channel goes down vertically, it should go 100 meters across horizontally.
The best way to achieve this gentle slope is to zigzag down and along the hillside. You need to work out where your run-off is sourced and where you want to channel it to (needs to be below the source).
Next you mark out the zigzag line down the hill from the source to the channel, putting markers every few feet. It is easier to do this with two people. You can use the contour lines on a map to help you know the distance you’re going downward. Tie string around the stakes.
2. Dig Out The Channel
As with the on-contour swales, dig the channel out and place the excavated soil downhill to form a berm to stop the water from sloshing over.
Unlike the on-contour swale, the diversion swale doesn’t need to be so wide, as the water is not collecting. However, try to retain some depth and keep the bottom flat. This prevents debris from settling and clogging the bottom of the channel.
4. Build The Berm
As before, tamp down the berm and make sure you don’t have a slope of more than 1:3. Think about having something of a walkway so you can reach the plants to harvest.
5. Plant and Mulch the Berm
With a diversion channel, you can plant the basin if you like, but it will mean less water traveling to your end destination. If your goal is just to dissipate water, with the veggie garden being the end spot if there is too much water – then plant it. If you’re using the channel to feed the veggie garden specifically, don’t mulch or plant.
When NOT to Swale
Many permaculturists and backyard gardeners have been duped into believing that swales are a panacea. WRONG.
Swales should be combined with a series of rainwater harvesting techniques, and should only be used in appropriate scenarios.
Do Use Swales If:
- The slope is 3 – 15%
- The soil is compact or has a shallow bedrock
- The water table is high or the area is prone to flooding
- You want less management of plants and would like to grow perennials
- The area of land is early in forest succession (small weeds, no big mature trees)
Do Not Use Swales If:
- The slope is less than 5% or more than 15%
- The soil is fertile and well-drained
- You would like to grow annuals there
- You have mature forest land there
In Summary…
Swales are an exceptionally effective rainwater harvesting device to divert or capture rainwater on slopes between 3 and 15%.
Multifunctional techniques for harnessing water and nutrients, swales not only serve to spread water and prevent runoff wastage, they also provide new ‘edge’ areas where we form unique ecosystems – allowing us to plant tree guilds using forest gardening techniques for diverse yields.
However, swales are not always the appropriate answer. There are a plethora of rainwater harvesting techniques suitable for all occasions.
If you have a very sloped area, consider terracing to capture water, while French Drains serve as a solid rainwater harvesting method for flatter areas located next to impermeable surfaces.
All in all, swales are pretty easy to erect, even if the labor feels a little intensive. Swales – while effective on their own – make for an incredibly efficient system when placed down your watershed in a herringbone pattern connected by diversion swales, so consider reducing the size and implementing more than one to evenly spread water through your whole garden.
But always make sure your site meets the ‘dos’ and ‘don’ts checklist to ensure a swale is an appropriate earthwork for your rainwater harvesting.
Swales FAQ
While both are designed to manage water runoff, drainage, and erosion, a ditch is a linear, excavated channel that is typically deeper and narrower than a swale. Ditches can be used to transport stormwater and agricultural runoff, often with minimal regard to the surrounding ecosystem, while swales are designed to optimize the infiltration of water back into the ground.
The distance between each drainage swale will largely depend on the specific property’s needs, its topography, local climate, and soil type. Generally, swales can be installed along contour lines, or at intervals ranging from 50-200 feet apart.
While the ideal slope can vary from area to area, a general rule of thumb is to maintain a minimum slope of 0.5-2% along the swale to ensure water flow and prevent ponding. Keep in mind that a lower slope will retain water and promote infiltration, while a steeper slope will promote conveyance downstream.
Yes. A gravel base can improve water infiltration rates by providing more open pore spaces for water to drain into, offer greater structural stability, reduce erosion, and also support plant growth on top.

Emmy Jenkins, AKA Permie Emmy, has spent many years traveling around the globe and working remotely, dipping her toes into a myriad of disciplines. Having spent several years volunteering on sustainable farms, Emmy chose to delve deeper into permaculture theory to understand the social and economic patterns often neglected in the philosophy. When she’s not planting edible gardens and frolicking the jungle, she’s consulting on projects around the world to help permaculturalists to understand regenerative ‘Fairshare’ economic patterns and to encourage People Care patterns that focus on biomimicry.
Needs more consideration at scale, in the tropics , arid environments or where grazing animals are involved. Animals are important in the landscape for horizontal gene transport to maximise soil and plant diversity, to improve quorum effect. Ref Jena Long term trials etc.
See other systems approaches keyline http://tcpermaculture.com/site/2015/05/04/an-introduction-to-keyline/, natural sequence farming, syntropics and Holistic Grazing Management.