In permaculture, it is often thought that ‘planting your water’ is the first step to success. While you may have great soil and a super smart design, if you are neglecting the water flow through your site, you are not only wasting this precious hydration resource, but putting your garden in danger of losing the nutrients you put into your soil and the chance of higher yields.
Rainwater harvesting can help prevent soil erosion while helping you to capture and store rainwater to reduce the need to irrigate your garden. In turn you’ll find yourself saving on water bills and electricity bills associated with pumping water, while seeing your garden flourish and bloom with very little assistance from you; lightening your own workload and helping to raise the water table to assist the surrounding environment.
What is Rainwater Harvesting and Why Do It?
Water is a precious resource, giving life to everything on the planet, including ourselves. One of the key issues currently facing the world is the wide-scale pollution of water resources, causing illness, disease, and mutation worldwide. Not only that, the process of acquiring drinking water is becoming hugely problematic to the world.
Not only are groundwater resources depleting at an unprecedented rate, manmade dams cause such disturbance to the pattern of the ecosystem, that they are becoming unsustainable.
Coupled with the process of cleaning and purifying this water, the whole industry is highly pollutive and energy intensive. While moves are being made to desalinate seawater using solar power, this seems somewhat drastic when we aren’t efficiently or effectively using the very resource that some of us are lucky to have.
On a more basic level, when we consider that the water that comes from our faucets is usually drinkable, it seems somewhat of a waste to use this precious resource to water our gardens — especially since plants are one of the greatest filterers of water.
Equally, rainwater is drinkable with a little cleaning and can help us to save money on our water bills, reduce our workloads, preserve this very scarce resource. Like using the sun’s solar energy on our sites, cycling water through the site is a great way to create a more automatic self-running system.
Rainwater harvesting is an umbrella term that covers a myriad of techniques used to capture rainwater and spread it throughout the site, utilizing it for drinking, cooking, washing, watering the plants, and in some cases creating hydro-energy. While many people are familiar with rainwater tanks, harvesting methods are far more diverse than this, making rainwater a multi-functional element in the intelligent permaculture design of your site.
Brad Lancaster’s 8 Rules of Rainwater Harvesting
While harvesting rainwater can be served by a whole host of techniques, there are certain principles to follow that help you to understand which technique is most relevant, where to start, and how to progress through the site to create an efficiently networked system of rainwater harvesting methods.
That way you can implement a variety of earthworks or rainwater elements that allow this one function (capturing rainwater) to be served by several interconnected elements that work together to create a resilient network.
Who is Brad Lancaster?
Permaculture teacher, designer, and consultant, Brad Lancaster is a rainwater and water management specialist. He co-founded Desert Harvesters, a non-profit to help with water management for land regeneration.
Most famously, Lancaster wrote the revered guidebook to rainwater harvesting. A 3-volume series, Rainwater Harvesting for the Drylands and Beyond uses Lancaster’s 1/8th of an acre property to help demonstrate what rainwater harvesting is, how it can be used, and an array of best practices.
Volume 1 looks closely at why we should manage water on our sites, with a brief overview of strategies and assessment techniques. The second volume delves into the strategies in a more in-depth manner, focusing on earthworks (building with the earth), and the third book looks at cistern systems and tanks.
His series is undoubtedly the most comprehensive look at rainwater harvesting techniques and sets the precedent for sustainable water collection and usage. It is perhaps one of the greatest resources to get you started with rainwater harvesting.
The 8 Principles of Rainwater Harvesting
1. Begin with Long and Thoughtful Observation
As with all permaculture endeavors, observation is key to understanding what is happening on your site and how to improve it. Take a look at the water flow using all your senses. Run outside when it rains and follow the water to see the paths it takes, where it collects, and where is runs away too quickly.
Find out areas where it erodes the land or causes quagmires that may increase mosquito populations. Identify areas where the water infiltrates the land and where impervious surfaces cause it run away. Figure out what works and what doesn’t. This is your starting point.
2. Start at the Top and Work Down
The idea of the second principle is to begin at the top of your watershed and work your way down. You are looking for the highest point on the property. This can usually be done by looking at contour maps of your own site; if not you may have to walk the site and find the spots where the water runs away. By starting at the top, you have less volume and speed to work with. If you start at the bottom, you’re trying to work with all the water collected on its way down and this is far harder.
3. Start Small and Simple
We are often inclined to design with grandiose ideas in mind. Working on the ‘human-scale’ (what can be done by one person by hand) enables you to think of smaller solutions that can help to deal with your watershed from the get go.
Lancaster makes an important point that ‘One thousand small strategies are far more effective than one big one when you are trying to infiltrate water into the soil.’ This is because 1000 smaller strategies are easier to manage and do yourself, while also creating resilience through diversity. It also means that as you change the land, you can recognize the effect of these changes quite quickly. One big strategy that’s wrong could monumentally wreak havoc with your landscape.
4. Spread and Infiltrate
When water is left to run-off the land, it will find the path of least resistance. It will travel down every slop in all directions to form channels of water through the site. Like streams and rivers, these channels will carve the way into the land, causing scars and eroding the soil as it goes.
The velocity with which is travels off the site means it doesn’t have time to sink into the soil. The idea of rainwater harvesting is to encourage the water to infiltrate the soil in as many places as possible on the site. This enables your plants to have a constant water resource to draw from. In this sense, we want to divert the water around the site, spreading its usefulness, while also creating means for it to be absorbed.
5. Always Plan for Overflow
While we can calculate the amount of water that each element can deal with, there may be a time that it rains far more heavily than you planned for. These extra-heavy rains could cause beds to wash away as well as leading to soil erosion and a loss of resources. In this sense, every rainwater harvesting element that you design should plan for where the water will go if it overflows.
6. Maximize Living, Organic Groundcover
Groundcover refers to small, generally shallow-rooted plants that are low to the ground while covering the soil. Many gardeners tend to use clovers as groundcovers as their high nitrogen content will improve the soil. These groundcover plants will also hold water in the soil and prevent erosive run-off by creating a living sponge.
7. Stack Functions to Maximize Beneficial Relationships and Efficiency
Like all elements in a permaculture system, rainwater harvesting elements should be multi-functional to ensure that efficiency is created through beneficial relationships. For example, berms (explained below) can serve as pathways around the garden, while groundcover crops can be edible and increase nitrogen in the soil, while also insulating the ground. Ponds can be turned into aquaculture systems and bio-swimming pools, while infiltration basins can provide extra beds to plant food and medicine.
8. Continually Reassess the Feedback Loops
It is important that we do not just implement a technique and walk away. In order to develop a complex and self-perpetuating system, we need to monitor how they affect the environment to discover both positive and negative feedback. In doing this, we can either change or adapt what we have created, while also being able to define the next clear steps to improve the system.
How to Assess Your Rainwater Harvesting Potential
Rainwater harvesting changes dramatically depending on your climate, the topology of your land, and the surfaces which you have on your site. Understanding how to utilize all these things will help you make the most of the rainfall you have to play with.
1. Know Your Watershed
A watershed is the total amount of land that water, sediment, and dissolved materials that flow through by gravity. In the grand scale, this could be the journey taken from a mountain spring head through rivers and to the ocean.
For you and your property, your watershed starts with the highest point and looks at where water and its dissolved components flow through the site and out again. Bigger watersheds such as those from mountain to ocean are made up of smaller subwatersheds; your property is included as one of these.
Within your own property, you will have even smaller subwatersheds. These could be the journey from rainfall on to your roof, down on to your driveway, and under a fence. Perhaps you have a hill and the rain falls down on to the hill and meanders down your garden and collects in a pond. These are also smaller watersheds.
Your first step is to understand the watersheds on your property; where does water come from (rainfall or run-off from another property), where does it go to, how fast does it flow, how much volume is there, and what surface does it run over?
2. Map the Flow
You can create a topographic map for this by placing arrows (bigger arrows demonstrate bigger volumes of waterflow) on a plan view map of your property. Accessing a map with contour lines will help you to see this, but also walking your property in the rain to follow the water and looking for signs of erosion (channels carved into soil etc) are also great ways to find out how water travels through your site.
Make sure to note where the water flows in, how much flows through, and where is leaves. Include the features that already exist on your site such as buildings, because these alter the way the water flows.
3. Calculate the Rainfall
This is a little mathematical but is very necessary to understand how much water flows on to your property and therefore how much you have at your disposal. For some of the earthworks techniques, you will need to know the rainfall to understand how deep to dig the basins to accommodate for this.
Rainfall Volumes
The rainfall volume is the amount of rain that falls on a potential catchment area in a given year. It is an average amount based on the most recent annual figures, but you must always plan for more (or less) just in case.
To work out the average annual rainfall in gallons, take the square footage of the catchment area and multiple this by the average rainfall in feet. Multiply this number by 7.48 (this is the number of gallons per square foot). For example, a 10×10 foot roof will give 100 square feet. If your rainfall in 2 feet, this will equal 200 square feet of rain — multiplied by 7.48 equals 1497 gallons of water per year.
Metric measurements are slightly easier. The catchment area in square meters multiplied by the average rainfall in millimeters equals the average annual rainfall in liters.
4. Work out the Runoff
Next you need to apply these calculations to your own site. While a certain amount of rainfall may fall on your roof, the material of which your roof is made will affect the amount of water that can be collected from that roof as some will be absorbed. This means there will be a higher volume of water that runs off as opposed to grass or sand that absorbs a lot of water.
You want to calculate the amount of water that will run off each site to work out how to best capture this water and use it throughout the site. For impervious surfaces like roofs and driveways, there will be a high amount of water running off; this is ideal for redirecting to gardens through gravity or collecting in tanks.
Make sure that you measure the amount of runoff that you are potentially losing as well as considering the unutilized rainfall coming on to your land from other properties around you. For example, if your neighbor’s property is located on higher ground than yours, you’ll be experiencing run-on to your site which is bonus water for you to utilize.
Runoff Volumes
Runoff volumes refer to the amount of water that you’ll be able to draw from a certain surface.
The amount of runoff that is absorbed is referred to as the ‘runoff coefficient’. These can be looked up but here are a few of the most used:
- Bare Earth – 0.35-0.55
- Grass – 0.10-0.25
- Sand – 0.30-0.50
- Asphalt and Concrete – 0.80-0.90
- Metal – 0.95
In each case, this refers to how impervious the surface is, with the coefficient showing how much of the water will runoff unabsorbed. For metal, for example, 0.95 or 95% of the rainfall will run off.
To calculate this, take your average rainfall in gallons or liters, and multiple it by the runoff coefficient.
5. Think About Your Water Needs
Consider your water budget. This means thinking about how you use water in your home and how that rainwater can substitute the water being pulled into the site. For example, perhaps you are watering your garden with a hose. How much of that can be substituted by running rainwater from your roof runoff through a gravity-fed irrigation system? Are there ways for you to divert rainfall to create a gravity-fed shower on your property?
Consider your greywater as well. Blackwater is sewage water from toilets; this is not safely useable on a site. However, used water from washing machines (that have used natural soap) and from showers can be pumped out of the house to be fed into garden beds. Plants can filter this water so it is not harmful to them, and also this helps to cycle that water through the site, lowering the strain on your water budget.
Once you have worked out the areas that need the most water, you can begin to design where you can draw rainwater from and how you can best use it.
Rainwater Harvesting Techniques
The idea is to create a network of rainwater harvesting techniques that complement the topology of your site. By having multiple techniques, you’ll have a more resilient system with higher catchment levels. Equally, if one earthwork becomes overwhelmed, you can divert the water around the site to other rainwater earthworks in order to spread the water and increase the yield.
Sheet Mulching and Wise Plant Choices
It is imperative to first talk about how important mulching and planting is to rainwater harvesting.
Firstly, sheet mulching creates a soft sponge that absorbs water and uses it to create highly nutrient soil that can fee the plants. Sheet mulching effectively serves as a rainwater storage mechanism for your plants. It also helps to prevent weeds from popping up, draining the water resources, while insulating the soil from hot sun or fast winds which can evaporate water from the soil.
The plants that you choose can make or break your water budget. Using drought hardy trees and perennials will mean that you need far less water and won’t steal water from thirsty annuals. Try as best you can to use native plants and those that need far less water.
Equally, vegetation helps to break up the soil, preventing it from becoming too compact. This allows water to infiltrate the soil more easily.
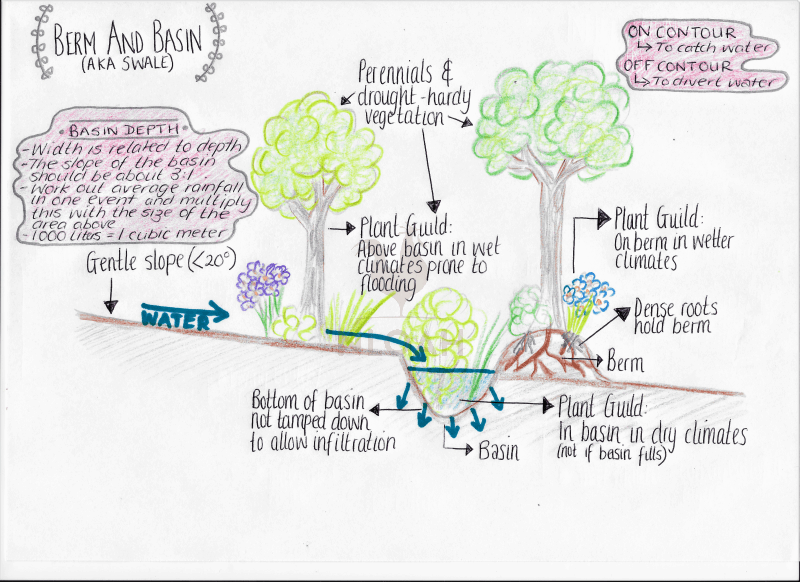
photo above: berm and basin diagram
Berm and Basin (Swale)
Berm and Basins are often referred to as swales. Swales can be a confusing term because it can be used to refer to basins or channels cut into land, both on contour or off contour (sometimes the term is used to refer to different forms of guttering). In this sense, the term ‘berm and basin’ is a little clearer.
Berm and basins are used on slopes of up to 33%; never on flat land. They consist of a basin cut into the land, with the removed land placed on the downhill side of the basin, forming a solid raised lump, called a berm. These structures occur perpendicular to the slope (on contour) so that water traveling downwards goes into the basin, is forced to spread along the basin, and sinks into the soil.
Sometimes you will see berm and basins that snake along the shaped edge of a contour, capturing water all along the edge of a hillside. Alternatively, ‘boomerang berms’ can be placed to wrap around the downhill edge of certain planting guilds or trees, encouraging water to collect for these plantings (often seen on hillside orchards).
photo courtesy of https://treeyopermacultureedu.wordpress.com
Berm and basins are always cut on contour, perpendicular to the hillside, when looking to capture and harvest rainwater. This is important to understand. This means that the bottom of the basin should always be level. If it isn’t level, the water will drain away with gravity.
The depth of the basin directly relates to your highest rainfall event each year. Look on the calendar for the month with the highest rainfall and plan the depth of the basin on this. The height of the berm should always be planned to be higher than you need, to prevent it from eroding too quickly or being breached in a big storm. Equally, in sandy soils, make sure to make the berm thicker than would usually be advised. Make sure to compact your berms, but not your basins. Do this by tamping them down so they are solid. They can then be used as pathways around the site as well.
You want to plant your basins and how you do this depends on your climate. For drier climates, you can plant straight into the basins as this has the highest concentration of water. If you have a wetter climate, you may consider planting above the basins so that the plants don’t become flooded in heavy rains or on top of the berms. By planting on top of the berms, you don’t drown the plants and you also create strength as the root structures will strengthen the berm, holding it together.
Always plan for overflow, by creating a diversion channel to the next water harvesting earthwork further down the watershed, just in case the basin overflows.
There are such things as diversion swales as well which are berm and basin mechanisms which are not on contour. This type of swale is used to move water around the site from harvesting mechanism to harvesting mechanism. For example, your overflow from a berm and basin may have a diversion swale cut to divert the water downward to the next berm and basin or to a pond.
Terraces
Terraces are used on steeper slopes where berm and basins would not be appropriate. When we have very steep slopes on our sites, this causes rainwater to run-off at speed, collecting increasing in volume and velocity as it goes. This causes soil to erode as the rainwater takes the soil with it. This means any work you’ve done to improve the soil will just get washed away, until it is eventually bare rock beneath.
photo courtesy of https://treeyopermacultureedu.wordpress.com
Before building any terraces, understand that this is the method that needs to most caution. If done incorrectly, this can cause huge landslides and can be very destructive. Equally, it is very labor-intensive and time-consuming, so it is usually reserved for smaller areas or places that really need these slopes for planting. In this respect, terraces should be confined to areas with a slope of less than 50%. Also, be aware of the composition of your soil. If you have a heavy sublayer of clay, this will act as a slick causing landslides.
Terraces are a series of steps cut into the slope on contour with the land. This means cutting each step along a contour line, perpendicular to the slope. This creates level flat steps that enable the water to slow, stop, spread, and sink into the soil. You will need to build a berm on the edge of the terrace to prevent immediate overspill. If you have a retaining wall, you can build this a little higher to create the barrier.
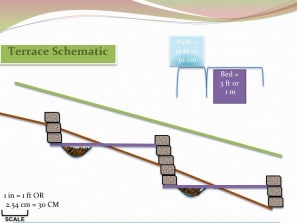
photo courtesy of https://treeyopermacultureedu.wordpress.com
Gradual steps don’t need retaining walls, but larger steps on more angled slopes will need retaining walls to prevent the earth from moving downward.
Terraces are very disturbing to the land meaning it takes a long time for them to revegetate. The strength of terraces is increased by this revegetation so encouraging this to happen as quickly as possible is important. You can do this by sheet mulching the terraces to improve the soil and planting stabilizing perennials and low-water use trees within it. You can plant moss and other vegetation in the retaining rock walls to help strengthen them as well and to create extra vertical yields.
Be aware that any beds you create on this may need to be accessed. While a berm edge may double up as a pathway, wider terraces may need to have a pathway in the middle of them so all plants can be reached.
Make sure to create an overflow in your berm’s retaining wall edge. This is a little cut out of channel that allows water to flow through to the next terrace in the event that it starts to overflow. This stops plants from drowning, helps to prevent landslides from occurring, and will keep the retaining wall or berm from degrading.
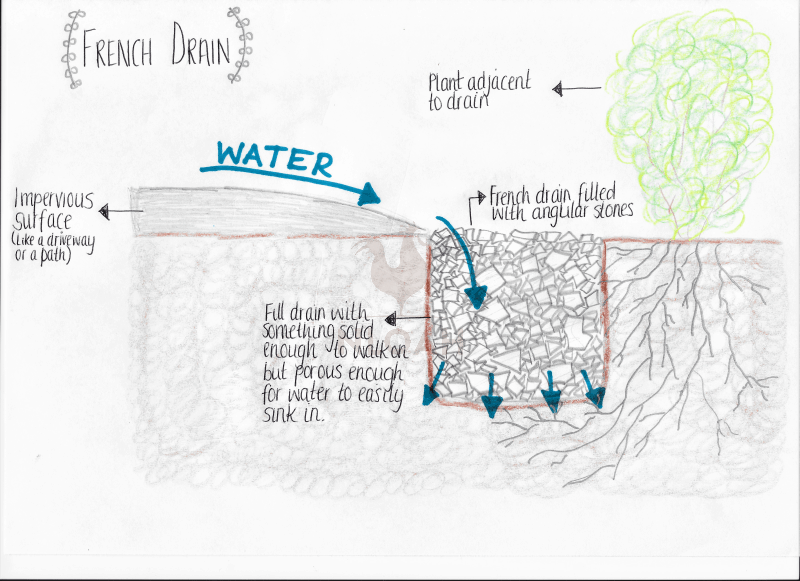
above: french drain diagram
French Drain
A French drain is an open trench filled with porous material like small angular gravel, bark, or pumice stone. The materials that fill French drains have a lot of air space in between so that water can sink in at a rapid rate, while the drain itself is still a stable surface to walk on.
These are best placed next to impervious surfaces like pathways and driveways, to capture the rainwater that runs off. If you are creating the driveway or pathway, make sure to slightly convex the driveway so the middle is the highest part, angle it to French drains on either side, or slope it slightly to a French drain on one side. You’ll often see French drains along the side of housing where the roof runs off and the guttering may overflow. You can also position French drains on gently sloping land if you do not want the obstruction of a berm.
Plants can be placed adjacent to the French drains to encourage deeper irrigation.
Be aware that in some cases, you may need permits for French drains. See the Frequently Asked Questions section below regarding this.
Infiltration Basin
Infiltration basins are used on flat or gentle slopes. They are primarily used for irrigating trees or groups of plantings.
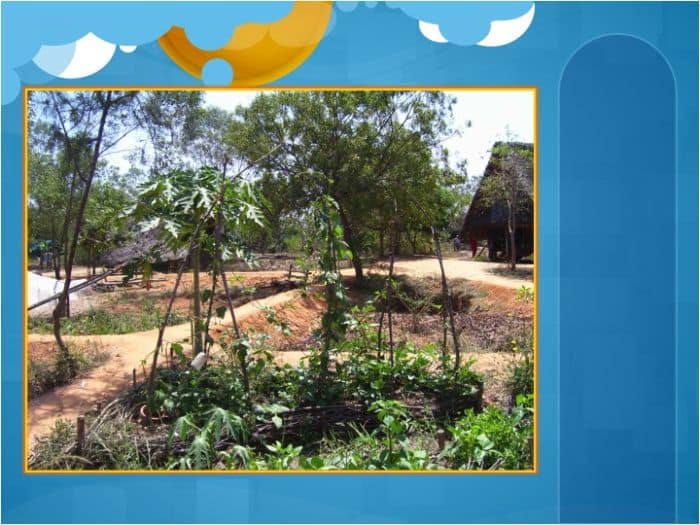
photo courtesy of https://treeyopermacultureedu.wordpress.com
They are shallow level-bottomed depressions that surround an anchor plant, usually a mature tree. Leave a small area around the base of the tree and dig shallow depressions. These can go well beyond the canopy of the tree or can be smaller, but ideally, they want to be around 1.5 times the size of the canopy.
Don’t dig down more than 2 feet as you want the water to be able to infiltrate within 12 hours to avoid mosquitoes and other pests from settling in. The soil dug out from the basin can be placed on the downhill side of the tree to create a berm if the located on a slope. Alternatively, and more appropriately if you’re planting on flat land, the soil can be placed to create pathways, so water drains off them and to the infiltration basins, keeping the roadways dry and the trees irrigated. Dig the basin with sloped sides to encourage water to flow into the basin.
The basins are then filled with sheet mulch. This leaf-drop from the tree will also serve a similar purpose here, increasing the absorption rate and improving the soil. Plants are then planted into these infiltration basins.
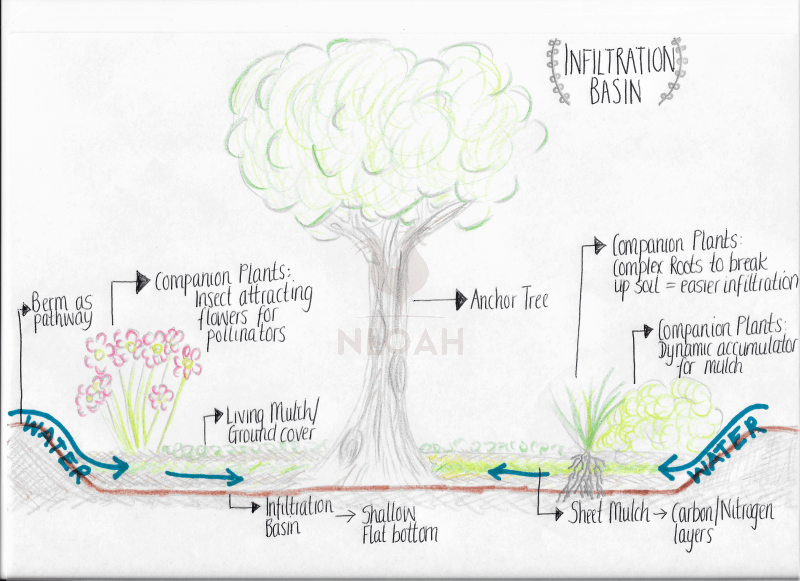
above: infiltration basin diagram
Infiltration basins can also be used where you have a greywater pipe leaving the house. The pipe can feed directly into the basin to provide a constant use for greywater.
Sunken Beds
Sunken garden beds are typically used in areas with little rainfall. However, sunken garden beds can be used alongside raised beds in climates with extreme amounts of rainfall in order to manage the rainfall more effectively.
Simply, these garden beds should be cut on contour if appearing on a slope or should at least go perpendicular to the direction of the watershed. The sunken beds are created by digging downward into the soil, which is then piled adjacently to form a raised bed next to the sunken beds. The sunken beds are filled with mulch and planted.
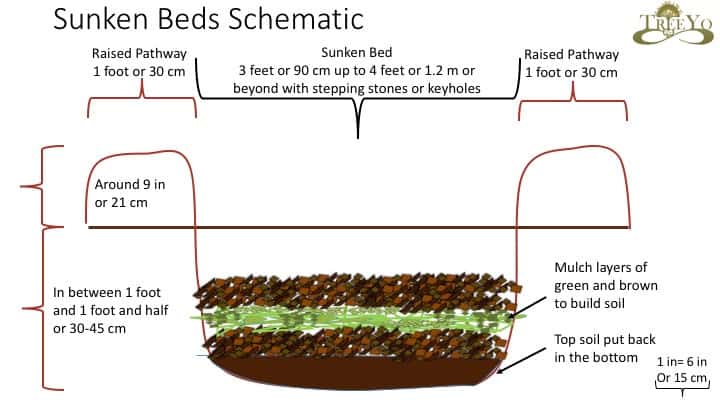
photo courtesy of https://treeyopermacultureedu.wordpress.com
By having sunken beds, the rainwater can collect into these, rolling off the raised beds (which can also just serve as pathways if you have very little rainfall).
For countries with a wetter season part of the year and drier seasons for the other parts, plants should be put into the raised beds in the wetter seasons. The water will drain into the sunken beds to stop the plants from becoming saturated in wet seasons. The mulch in the sunken beds will hold the water, so that come dry season, the beds will have held water in the soil from the wetter seasons. This is a great example of a rainwater saving mechanism that works to manage rainwater in both extremes to serve all year round.
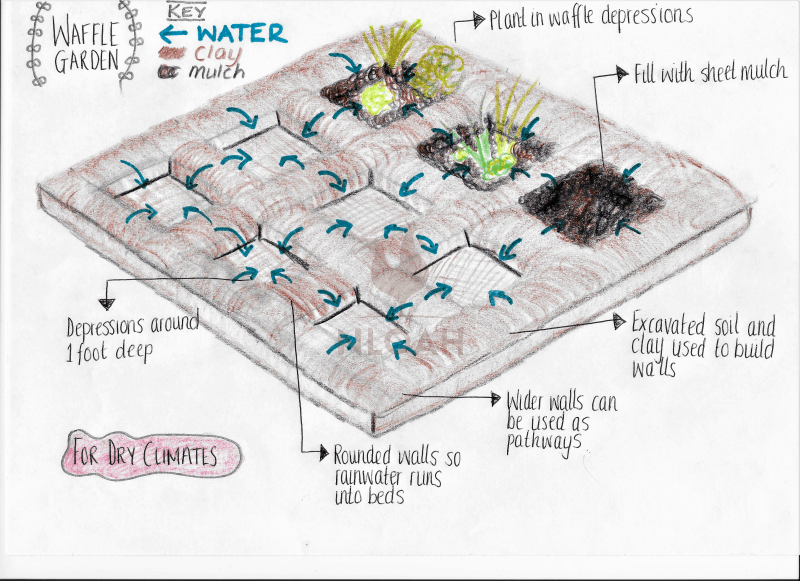
above: waffle garden diagram
Waffle Gardens
Waffle gardens tend to be saved for areas with much drier climates as this method can become problematic in very rainy climates as the beds become saturated. Equally, they work best in desert areas where the temperature tends to drop low at night as the walls in between the waffles keep the soil insulated and keep the plants from freezing. This was a popular Native American method for growing plants in desert.
You want to cut squares into the ground that are between 2-3 feet by 2-3 feet. They can vary in depth but they tend to be around half a foot to a foot in depth. The distance between them can vary depending on what you intend to use the waffle walls for. If you’re looking to create pathways in between the beds, you’ll want the walls to be around 1.5 feet thick. Otherwise they can be slightly thinner. In between each waffle square, you’re build clay walls to increase the sturdiness as well as working as sources of thermal mass to insulate the plants and the soil.
As you will need to source the clay, it makes most sense to dig waffle gardens in areas with high clay content as you can use the clay from inside the hole. Some Native Americans would make adobe bricks for this purpose instead of building clay/cob walls.
Once the waffles are built, you need to sheet mulch the inside of the waffles to create good quality soil. As this breaks down, you can plant into it. Most people tend to build their mulch up to two-thirds of the waffle depth as this allows water to run off the raised walls and into the soil but allows for the accumulation of more mulch over time to improve the soil without creating a raised bed.
Rainwater Harvesting FAQ
There are most likely a whole range of questions you have regarding how to start rainwater harvesting. Here are a few answers and where to look for more information.
Where can I find resources to help me learn more?
Firstly, Brad Lancaster’s trilogy ‘Rainwater Harvesting for the Drylands and Beyond’ is basically a primer of everything you ever need to know regarding what you need to do, why you need to do it, and how to go about doing it.
The Permaculture Earthworks Handbook also as some great tips but doesn’t go into as much detail.
It is advisable to consider your own climate and to search for resources that help with rainwater harvesting in your particular climate. The Permaculture Research Institute’s forum is an extremely helpful place to ask questions about this.
Will rainwater harvesting increase my mosquito population?
If done properly, this shouldn’t be a concern. While mosquitoes breed in water, increasing the population, the idea of rainwater harvesting is not to let water sit stagnant on your site. This is not conducive to growing anything or quality.
The system you design should always keep water cycling and infiltrating. One of the reasons to build overflow systems into your designs is so that any water that is backing up can be moved on to the next rainwater harvesting mechanism to be dealt with. As noted above, all rainwater harvesting should plan for rainwater to infiltrate the soil within 12 hours. If this isn’t happening, you’ll end up with more mosquitoes, so try to look at the feedback in the system and find ways to remedy this; perhaps diverting excess water earlier.
Do I need tanks to harvest rainwater?
No, you don’t need tanks if you are harvesting rainwater for the garden alone. The sheet mulch and plants act as their own tanks, holding the water in the high-quality soil. Sometimes people put ponds into their gardens to act as natural tanks, with aquaculture thriving inside to keep these ponds alive as moving ecosystems. That said, some people like to store water if they have extreme climates, such as the tropics. That way they have a water supply from the rainy season and a water source once dry season comes.
If you were to be drinking and bathing with rainwater, you would need to consider some kind of storage tanks.
Do I need to filter the water before using it?
This article refers more toward rainwater being harvested for the garden instead of for drinking. When we harvest rainwater for drinking, it doesn’t necessarily always have to be filtered as rainwater evaporates and is distilled within this process. However, when it falls on to our roofs to be collected, it often brings sediment with it.
In these cases, people tend to implement first flush systems and rainwater filters into their piping systems to help clean the water.
However, when the water is used for a garden, it already has a filter mechanism: the plants. The plants will filter the water that is pumped into the garden. Of course, you need to be careful with collecting rainwater from highly pollutive surfaces, such as tire roofs and driveways saturated in care oil, as this can still runoff your site and pollute downstream supplies. However, when collected in the soil, plants will filter it. This is why it is possible for greywater harvesting to work.
Are there any laws that stop me from harvesting rainwater?
It is true that some states have strict rainwater harvesting laws. These are most usually relevant in places where they are struggling for water. However, these laws refer to rainwater harvesting in tanks not using earthworks such as these. You can find recent regulations by state on the National Conference of State Legislatures website.
Aside from this, the International Building Code does recommend avoiding infiltration systems within 10 feet of any building. This is to prevent the water from eroding the foundations of buildings and causing them to weaken.
The International Residence Code allows water tanks without a permit of up to 5000 gallons where the height doesn’t exceed the width more than 2:1.
Be aware that the construction of French drains can sometimes need a permit from the Environmental Protection Agency as the can be classed as a type of stormwater drain. Equally, remember that when water is running of driveways, for example, there may be pollutants in the water such as car oil. This will then be introduced to your watershed. In some cases, this may mean you need a Discharge permit.
If I harvest rainwater, won’t I deplete the downstream supply?
In short, no. In fact, it helps to improve the health of the land as it raises the water table. By using these methods, you are creating spongy soil that allows rainwater to absorb into it quickly and be released into plants over weeks and months, which creates a forest effect. This helps to repair the hydrological cycle through transpiration and microclimate changes that come from the planting of vegetation.
These methods reduce the amount of runoff which therefore reduces the soil erosion which is damaging to our landscapes. A rushing river that comes due to an eroded hillside is not as good as meandering stream whereby everything in the watershed above its flourishing. These methods do not deplete the supply chain, they simple slow it down, making more use of the resources before they reach the end destination.
Harvesting rainwater for your garden is one of the first and most important steps in a successful permaculture garden. Not only does it reduce your inputs and costs, it also helps to create a self-sustaining system that helps the surrounding environment flourish.
This list is by no means exhaustive but covers the basic principles. Many of the more advanced and complex techniques are expansions of these ideas. With that in mind, once you have implemented a few small and steady methods for rainwater harvesting, you can begin to get more creative by looking at the feedback loops and understanding the behavior of your own site.
With careful planning and observation, you can lead your garden to the level of Brad Lancaster’s, where there is little to no external input needed at all to sustain the garden’s water needs. And of course, on a wider scale, by reducing your need to water the garden, you reduce you water utility bill, the electricity needed to pump the water, and the wastefulness of eroded soil that needs replacing when your watershed runs offsite.

Emmy Jenkins, AKA Permie Emmy, has spent many years traveling around the globe and working remotely, dipping her toes into a myriad of disciplines. Having spent several years volunteering on sustainable farms, Emmy chose to delve deeper into permaculture theory to understand the social and economic patterns often neglected in the philosophy. When she’s not planting edible gardens and frolicking the jungle, she’s consulting on projects around the world to help permaculturalists to understand regenerative ‘Fairshare’ economic patterns and to encourage People Care patterns that focus on biomimicry.
Terrific in-depth article! We are in the planning stages for our new homestead and I want to incorporate as much of these methods as I can. I’ve heard of the rainwater harvesting book by Brad Lancaster, you’ve convinced me I need a copy to study.