Candles have lit the world for centuries. Even today, without candles, a storm, blackout or any other unexpected interruption of power will leave us in the dark. Flashlights and electric lanterns are great, but batteries are expensive and degrade over time. In some parts of the world, candles are still used as the primary source of light. Keeping several candles in handy around the house will help you be prepared for that unexpected blackout.
For homesteaders, candles can add both appeal and a nice scent to your home, and candle making is a fun project that can be a family activity. If you become proficient, there’s even the potential to turn it into a business. The great thing about is that you don’t need expensive equipment, materials or any advanced skills.
Why Make Your Own Candles
Taking on DIY candle making is certainly worth your while and here’s why:
DIY Candles are easy to make
Our time is so limited these days and balancing leisure with work and household chores can be complicated. In such a fast-paced world, candle making is perfect because it takes very little time to accomplish. All there really is to candle making is melting and pouring wax into a mold of your choice. Candle making is actually easier than baking a cake!
You know what goes into your candle
Most commercial candles are made from cheap inorganic material and chemicals that may be harmful to us. Choosing to work with organic wax, scents, and colors will certainly improve the quality of your candles, and the air in your home.
For example, candles made from paraffin wax release carcinogenic chemicals into the air when burned. Olive oil, on the other hand, actually purifies the air. The choice here seems pretty obvious to me! See the section below on candle waxes, colors and scents for more.
They make great, inexpensive gifts
Spoil your family and friends with candles by your own hands. A gift that a friend or family member actually made is often cherished, and shows that you took the time and energy to create a gift for them.
These days, a gift only takes a few clicks of a mouse to order. The art of a truly thoughtful gift has been nearly lost, but a handmade candle will certainly prove that the art of thoughtful giving is still alive and well!
Types of Candles
Candles come in a wide variety of shapes, sizes and scents. A few are:
Pillar candles
These do not require a container to hold the wax as they are free standing, typically a cylinder or rectangular shape, hence the name.
The wax used to make these candles needs to melt slowly to ensure that they can stand up without crumpling. Both paraffin and beeswax can be used for pillar candles. Most candles sold in stores are pillar candles.
Container candles
Container candles can be made from any type of wax. As their name suggests, they are poured in and then lit inside their containers, one common type being a bottle or mason jar. They can be made using wax that melts quickly, as the container will support the wax.
Votive candles
Votive candles are made of votive wax, which is a blend of paraffin and soy wax. The main advantage of soy wax is it has a lower melting point than beeswax, and will maintain its shape when molded, so there is no need to put it into a container. It has the cost benefits of paraffin and the sturdiness of beeswax.
Types of Wax
The main ingredient in making candles is wax. The main types of wax are:
Bees Wax
Beeswax, as you may have guessed, is made by honeybees.
Paraffin Wax
Paraffin wax is made by a process known dewaxing. Dewaxing is the removal of light oil lubricating stocks.
Soy Wax
Soy wax is made from soy oil, which in turn comes from the processing of soybeans. The process of making soy wax from oil is known as hydrogenation.
Non-wax Candles
That’s right, not all candles are made of wax.
Vegetable Shortening
Vegetable shortening can be used to make candles. It is made from the fat in vegetables by a chemical process that forms it into a solid white block of shortening. This shortening can be melted and molded into candles.
Lamp Oil
Lamp oil has been used for centuries, and needs no introduction. It doesn’t hurt to stash a few bottles for long-term power outages that could last days or even weeks.
Equipment Needed
Disclosure: if you visit an external link in this post and make a purchase, I may earn a commission. Read my full earnings disclosure here.
You will need the following equipment to make candles.
- Scissors
- Thermometer
- Scale
- Mittens
- Tongs
- Glue gun
- Old coffee cans, or similar container
- Towels
- Newspaper
- Double-boiler
- Old pan
- Matches
- Apron
This list is not exhaustive and each type of candle has its own requirements.
Safety Precautions
It’s extremely important to follow safety procedures when making or burning candles. The hot wax and sharp utensils could be a hazard to both you and your home.
- Since you will be working with hot liquids and open flame, it is important to work in an area far away from other flammable items.
- Ensure you wear protective clothing. A long-sleeve shirt and gloves help ensure that you will not be burned by hot wax. Wearing closed-toe shoes is also advisable.
- Ensure your hair is protected. Hair is very flammable especially if you use certain hair products.
- Keep a fire extinguisher handy in case wax spills over onto the stove.
- Protect your working surface by placing an old cloth or layered newspaper over it. Wax stains can be a pain to remove!
- Always wear oven mitts or use tongs when handling hot candle molds.
- When you finish enjoying a candle, never forget to extinguish it before going to bed. In the US alone, candles cause an estimated 15,000 house fires, 150 deaths and 1,200 injuries every year.
- Ensure that your candles are placed on level surfaces in such a way to ensure that they won’t be knocked, tip or fall over.
Scented Candles
Today, there is a huge number of scents available, nearly anything you can think of (and more than a few you can’t!) because you can actually mix and match to create new ones. Below are a few suggestions:
Mix #1:
- One part Lavender
- One part Spring rain
- One part Vanilla
Mix #2:
- One part apple
- One part grapefruit
Mix #3:
- 1 part lavender
- One part baby powder
Mix #4:
- One part Jasmine
- One part cherry blossom
- One part sandalwood
- One part honey
- One part vanilla
Mix #5:
- 2 parts Georgia peach
- One part spring rain
Feel free to experiment and make your own scents, just make sure you only buy high-quality ingredients.
Colors and Decorations
Most wax will come in standard colors of either white or yellow. Dying your candles using coloring can give them added visual appeal. Similar to scents, colors can also be mixed however you wish.
Adding ribbons and cards to them will turn them from a simple light source into a beautiful housewarming gift or ornament.
Some materials I suggest you use to decorate are:
- Glitter
- Ribbons
- String
- Cards
- Printed pictures
Here is a great video with some great suggestions:
Below we’ll look at some actual DIY candle projects. Feel free to give them your own spin as you gain experience.
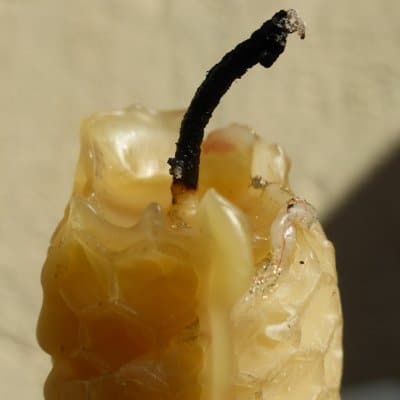
#1. Beeswax Candles
When people think of DIY candles, they usually think of beeswax, because most candles were made from it before paraffin was available. It has the advantage of having a nice aroma of its own, and burns for an extended time.
You may want to know that, unlike paraffin candles, beeswax also purifies the air by reducing dust and mold as it burns. Be careful working with beeswax, though, because beeswax is very flammable: if it spills onto your hot stove burner, it could start a large fire.
You will need
- 1 lb. pure beeswax
- Half pint canning jars (or candle mold)
- Empty coffee can or similar metal container
- Double boiler
- No. 4 braided wick
- ½ cup of coconut oil
- Bamboo skewers
Instructions:
- Place the beeswax into a metal container (such as a coffee can) and place it in a pot. Add just enough water to the pot to boil, ensuring that none of the water could boil over into the container with your wax.
- Bring water to the boil, and wait until the beeswax melts. Stir regularly.
- Cut your wicks a few inches longer than your jars are tall. Glue the wick to the jar bottom and pour a thin layer of beeswax to hold it in place. Ensure that your wax cools for about 5 minutes before you pour it into the jar or mold.
- Once you fill your jar or mold with wax, trim your wick to about ½ an inch above the surface.
- When you first light your candles allow them to burn for about 3 hours so that the top surface can melt. Check if the candle is flickering or smoking too much. If this occurs, trim the wick slightly.
Here is a video that explains making beeswax candles:
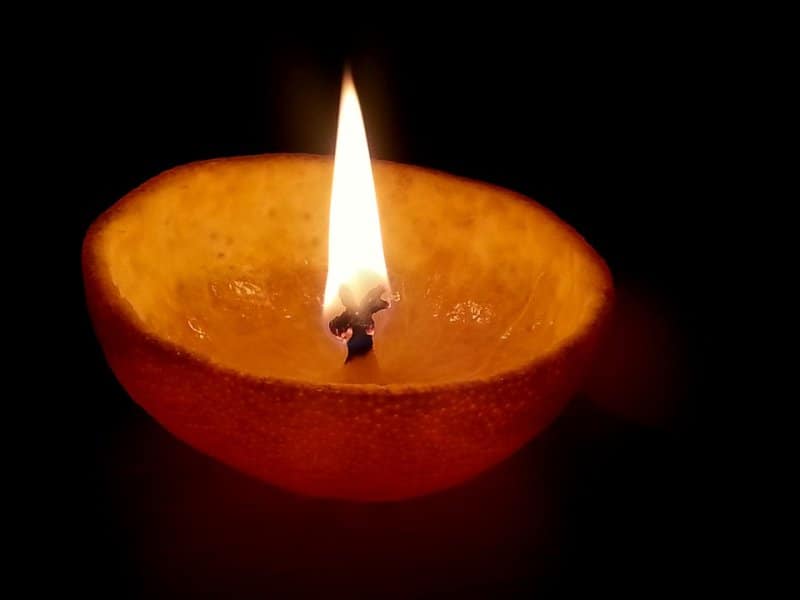
#2. Orange Oil Lamps
Oranges, as well as other fruits, can be turned into beautiful candles. This is great when you are out camping and you forgot to bring a flashlight, or just want a cheery little candle. This nifty candle uses olive oil and the orange’s stem as a wick to give you about 6 to 8 hours of light. Not bad for a little orange!
You will need
- Orange
- Olive oil
- Lighter
Instructions
- Cut your orange in half and carefully separate the fruit from the skin. You need to ensure that the stem remains attached to the orange.
- Pour olive oil onto both the stem and into the orange peel. Allow it to soak for 30 to 45 minutes.
- Use your lighter to light the stem, which acts like a wick for our candle. Be patient, as it may take up to 1 minute to light.
- Note that the stem will last for about 6 to 8 hours, at most
Here is a video of how to do it:
#3. Ice Candles
Really?! Yes, you read it right; Candles can be made from ice! This is proof that in the candle making-world, anything is possible!
You will need
- Mold (an empty milk carton will suffice)
- Small pieces of ice (appx ½ inch blocks)
- Wax
- Candle
- Candle scent and color (optional)
Instructions
- Ensure the container using is clean and that it’s stable when placed on a level surface.
- Set your candle in the middle of your milk carton.
- Melt wax until it is liquid (which happens at about 200F).
- Pack your container with ice, and then pour wax into the container.
- After pouring in your wax, set it aside to cool for 1 hour.
- When the wax is completely cool pour out the melted ice water and cut open the carton.
- The result is a beautifully intricate candle made from the spaces that have been left by the melted ice.
More on making ice candles
#4. French Vanilla Candles
This is one of my favorite DIY candles because of the aroma. I love the smell of coffee as well as vanilla.
You will need
- Old teacups or bowls
- Candle wax (I like to use soy in this case)
- Candle Wicks
- Vanilla beans
- Coffee beans
Instructions
- Melt your wax in a double boiler or microwave.
- Glue your candlewick to the bottom of the bowl or teacup. You can also choose to hold it in place while you pour a thin layer of wax to hold it in place.
- Add some coffee and vanilla beans to every 1 inch of wax you add. Stir them so that they’re evenly distributed
- If I do decide to use a jar I normally decorate it with ribbons or printed, custom notes and glue this to the jar.
You can also make a freestanding candle by pouring the wax into a candle mold instead of a jar.
#5. Cocktail candles
These candles look lovely around a bar area and are a great gift. You can make them look like cocktails or any other shape you desire.
You will need
- Candle wax
- Double-boiler
- Candle color dye
- Candle scent (Use whatever scent you want, I chose vanilla as an example)
- Candlewick
- Chopstick
- Cocktail Glass
- Cocktail umbrella
Instructions
- Melt your wax in a double-boiler or microwave.
- Add a dye color of your choice and mix. Add a scent of your choice and mix again. Pour into your cocktail glass.
- Glue your candlewick to the bottom of the glass.
- Place a chopstick across the rim of the glass and tie your wick to this to hold it in place while you pour your wax.
- Use several colors depending on the type of drink you are trying to depict.
Here is a video below demonstrating how this is made
Another interesting type is the beer glass candle:
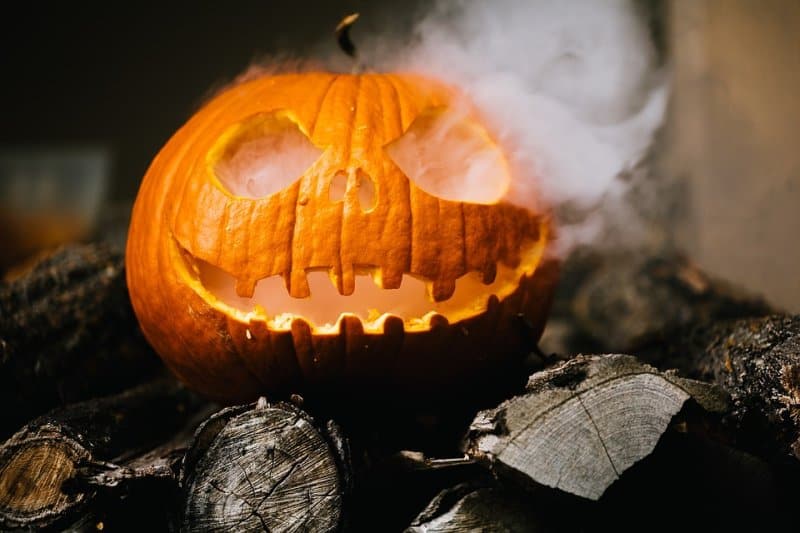
#6. Pumpkin candles
Pumpkin candles smell great! What better aroma for autumn? This candle can be made out of any type of natural wax, and are also a wonderful gift in the fall. Of course, what better candle could there be for making a jack-o’-lantern? Making the candle smell like the pumpkin is just a bonus!
You will need
- Pumpkin Spice
- Mason jars
- Candlewick
- Double boiler
- Vanilla candle wax
- Glue gun
Instructions
- Glue the wick to the bottom of the jar using a hot glue gun.
- Melt the candle wax in either a metal can or an empty coffee can.
- Pour about 1 inch of wax in the jar, then sprinkle a generous amount of pumpkin spice to this and mix. Let it rest for about 30 minutes to hold your wick in place.
- Pour the remainder of your melted wax and mix with pumpkin spice. Leave about ½ an inch of wick above the surface.
- Once the candle hardens, sprinkle some extra pumpkin spice on the surface of the candle for extra aroma.
- Decorate the outside of the jar in any way that you want. You can also put the candle inside a pumpkin for a perfect fall jack-o’-lantern!
Here is a video that demonstrates how these are made:
#7. Olive Oil Candles
Olive oil candles are very practical for blackouts, or to keep in your emergency kit. They are easy to make, though olive oil could be somewhat expensive depending what brand you use. A cheap alternative is lamp oil. While you may expect oil to produce smoke when burning, olive oil, used in a candle, does not.
You can also add in any scent of your choice.
You will need
- Glass Jar (Squatty style half-pint)
- Olive oil
- Lantern or 2 Wick
- Paper clips
Instructions
- Cut your wick a few inches long and tie the paper clip tightly around it. Make sure that your wick does not fall into the oil as this could lead to a fire. While securing your wick is of utmost importance, ensure that you can still pull your wick through the wire to extend the burn length when needed.
- Bend the wire and make a hook that will clip to the jar. I like tying a piece of string around the rim of the jar to ensure my hook is tightly secured for safety.
- Add olive oil to the jar leaving about a half inch above where your hook is tied for burning. Making the wick too long will prevent it from properly soaking up the oil, preventing your candle from burning.
Here is a video explaining how to make these candles:
#8. Crayon Candles
If you need an excuse to get rid of your preschooler’s crayons, you found it. Instead of letting your kids wreak havoc on your walls, why not direct their energy towards candle making? I am sure your kids will find it interesting, too.
Ingredients
- Old crayons
- Glass
- Paper cups
- Wick
- Knife
- Microwave
- Candle mold
Instructions
- Peel off the paper from the outside of the crayons by either soaking them in water or using a sharp knife.
- Fill a paper cup with wax and microwave for 1 minute to get the wax soft. Use a stick to mix the wax and then return it to the microwave for 30 seconds or until it is fully melted.
- Break the crayons into pieces. Fill the cup with the broken crayon pieces and place it back in the microwave.
- Microwave the contents of the cup for 2 minutes, and stir every 30 seconds until you have an even color. Use one crayon per color you would like. Pour the first layer of wax into the mold and let it to dry for 30 seconds.
- You can make multi-colored candles by pouring a different color on top of another. Make sure each layer dries for at least 30 minutes before you pour the next one.
#9. Soy Candles
Soy candles are nice because they’re not sticky and they can easily be washed off most surfaces. This is definitely not the case with the commercial paraffin candles. Soy wax is similar to olive oil as it burns clean, not producing much smoke.
You can use soy as an ingredient for all sorts of candles of any shape, size, color or style.
To make soy candles we will simply melt soy wax and fill a mason jars.
You will need
- Mason jars
- Wick
- Soy candle wax
- Scent and color (if so desired)
Instructions
- Cut your wick, leaving it 2 inches taller than your jar, long enough not to fall back into the hot wax.
- Melt your soy candle wax in your double-boiler or microwave. I prefer using a microwave because it takes less than 2 minutes to melt the wax.
- Let your wax cool for 5 minutes before you add any color or scent.
- Before you pour the wax, ensure that your wick is out of the way. Fill the jar, adding different color layers if desired.
- Let the candle cool for 1 to 2 hours before lighting. You can decorate the jar to make a personalized gift!
The eye-opening video below will help you better understand the process:
#10. Floating Citronella Candles
Not only do these candles look great, but they also repel summertime bugs and mosquitoes!
You will need
- Glass bowl or jar
- Floating candle
- Tart candle mold
- 20 drops of citronella oil
- 20 drops of lemongrass oil
- 1 tablespoon hazel
Instructions
- Add water to your jar or bowl. Pour lemongrass, citronella oil and hazel into the water and stir.
- Melt paraffin wax until it is a liquid.
- Attach the wick using a wick sticker to allow it to detach easily from the bottom of the tart mold.
- Pour the wax into tart molds.
- Leave overnight, and then carefully remove from mold.
- Since your candles will be outdoors, ensure your wick burns inside the glass so it is not snuffed out by the wind.
Here is a video below showing you how to make these floating candles:
#11. Seashell Candles
Seashells are not only beautiful, but they make excellent natural candle-holders. Instead of using a jar for your candles use seashells to enhance the beauty and décor of your home.
You will need
- Seashells
- Bleach
- Water
- Double boiler
- Wax
- Wick
Instructions
- Clean your seashells by making a weak bleach solution and soaking them for 1 hour. Remove your seashells from the water and leave them in the sun to dry for 30 minutes or longer.
- Stick your wick to the bottom of the seashell while your wax melts using the double-boiler.
- Let the wax cool for 5 minutes and add scent and color if desired.
- Pour the wax into the seashell leaving ½ inch of the wick to light.
- Let the wax completely cool off before first use.
#12. Survival Candles
These candles are protected from the wind to a certain degree, perfect for when you have an emergency and are stuck outside.
You will need
- Paraffin wax with a high melting point
- Silicon spray (Mold release agent)
- Candle mold
- Bucket of water
- Oven mitts
- Tongs
- Candle dye (If desired)
Instructions:
- Fill a metal bucket with water.
- Melt the candle wax in the double–boiler and pour into the mold.
- Immerse your mold in water, making sure no water enters the mold cavity itself. You can keep your mold steady in the water by placing a heavy dinner plate over it. Make sure to hold the mold with a tong while wearing mittens because it’s very hot.
- Let it cool for about 30 minutes and remove from water.
- Let it cool for one hour. Check to see that at least half of the walls of the candle have hardened before attempting to remove it from the mold.
- Using a vegetable peeler, level the top of your candle.
- Place any other smaller pillar or votive candle inside the hurricane walls.
Here is a video showing you how:
#13. Cinnamon Stick Candles
Another great smelling and great looking candle, and made from festive cinnamon sticks.
You will need:
- Cinnamon sticks
- Candle mold
- Wick
- Scent and color if desired
- Glue gun
- Scissors
Instructions:
- Using soy, paraffin or beeswax, mold a candle using any of the methods described in this article.
- Using a glue gun, affix your cinnamon sticks to the side of the candles.
- Trim the cinnamon sticks so that they are the same length as your candle.
- You can use a string or ribbon to attach a card or note to your candle.
Here is a great video explaining how this is done:
#14. (Candles from Leftover Fat
Last but not least! Check out Kendra’s step-by-step article here.
Have you ever made your own candles? Share a link or even a photo using the comments box below.
I used to love making candles as a child. I would love to begin doing it again; we just don’t burn candles very often. However, NO candle smells as good as a homemade candle! Or, at least that’s what I think 🙂