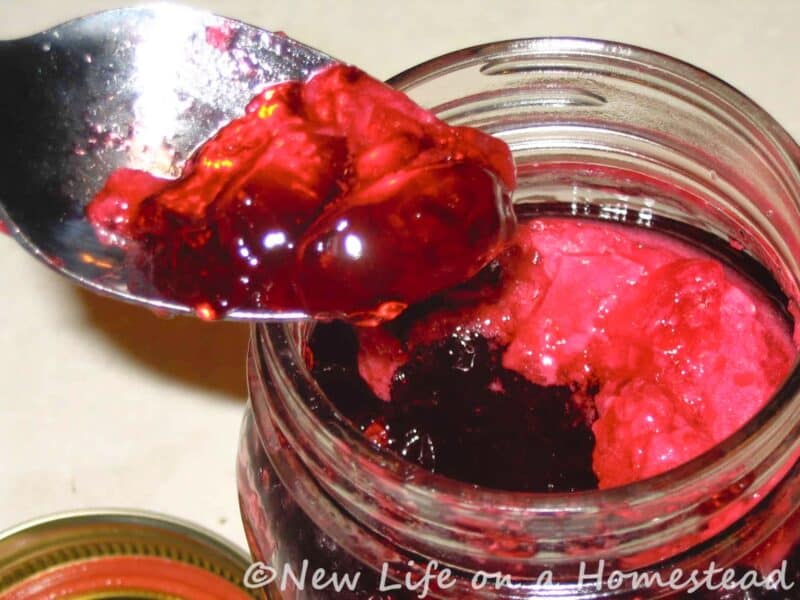
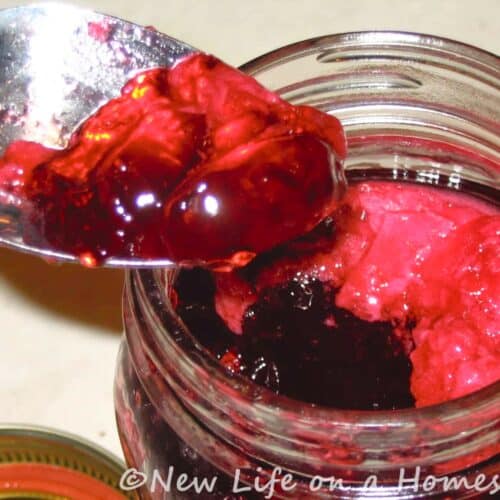
I seriously have a new favorite jelly. It’s just the right balance between sweet and tangy. And I could eat it out of the jar with a spoon.
It probably tastes even better to me because every one of these raspberries came from our own bushes. I picked them at their peak, and froze them to be used at my convenience.
There’s a reason I made jelly rather than jam, however. And I must warn you, it’s much less glamorous than I’d like to admit. Jam is usually a better use of the berries, because there isn’t anything leftover to discard.
With jelly you strain out the pulp and seeds and only use the juice of the berries, so there’s a lot left over. If the raspberries you are working with have gritty seeds, you may prefer to make jelly over jam.
(If you’re wondering what the difference is between homemade raspberry jelly, red raspberry preserves, and raspberry jam, it’s just that jam has whole fruit while jelly is made from strained fruit juice – preserves have large chunks of fruit.)
Our berries didn’t have gritty seeds in them… but they did have worms.
I know. I told you it wasn’t glamorous. It is, however, real life. At least there was extra protein in the pulp for the chickens to enjoy. (Always look on the bright side!)
If you remember, back in September I shared that I was having trouble with the Spotted Wing Drosophila, the larva of which were the worms in my berries.
I hated to waste all of those beautiful berries on account of a few little worms. So yeah, I froze them anyway.
When I thawed the berries and saw the little worms floating around in the juice, it was immediately apparent to me that there was no way to pick them out. Thus, the jelly.
Thanks to the tight knit of a jelly bag, it is possible to strain out all of that lovely juice without any of the worms getting into your jars. Worm guts? Maybe. But let’s not go there.
How to Use Raspberry Jelly
Raspberry jelly is a delicious and versatile topping that can be used in many different ways.
For example, it’s great when spread on toast and even better if paired with peanut butter. If you’re looking to get a little more creative, there are plenty of other options.
You can pour it over pancakes for added sweetness, or use it as an ice cream topping in the fridge or freezer!
Here’s How To Make a Delicious Seedless Raspberry Jelly
Later in this post, I’ll give you the quick, nuts and bolts recipe for how to make your own jelly. But here’s the more detailed version to help walk you through everything I am doing and why.
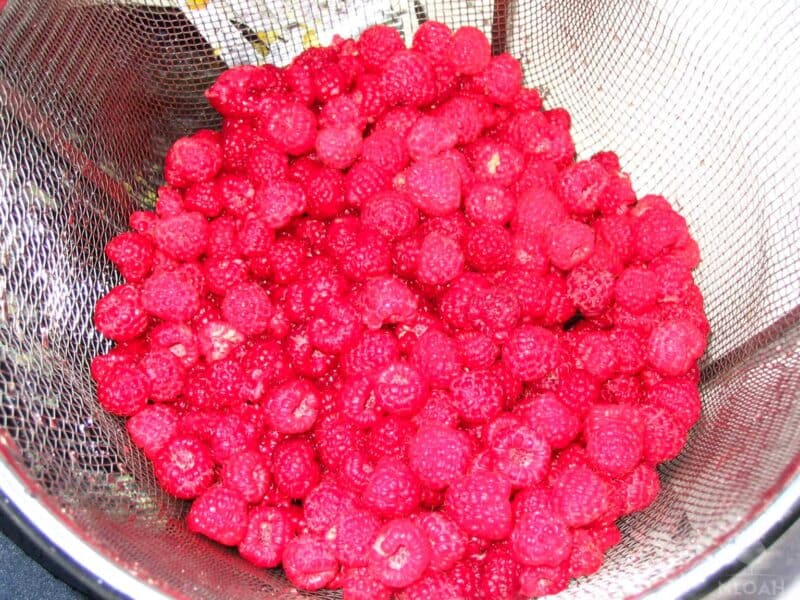
Step 1: Wash and Drain the Berries
If you are working with fresh berries, wash and drain them well before getting started. If you’re using frozen berries, hopefully they were washed before they were frozen. Make sure to remove any stems and rotten berries.
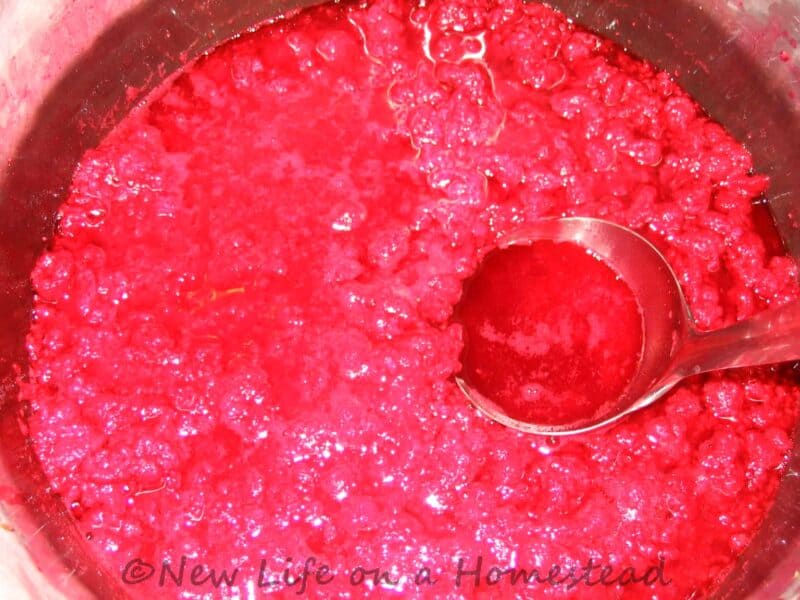
Step 2: Warm the Berries
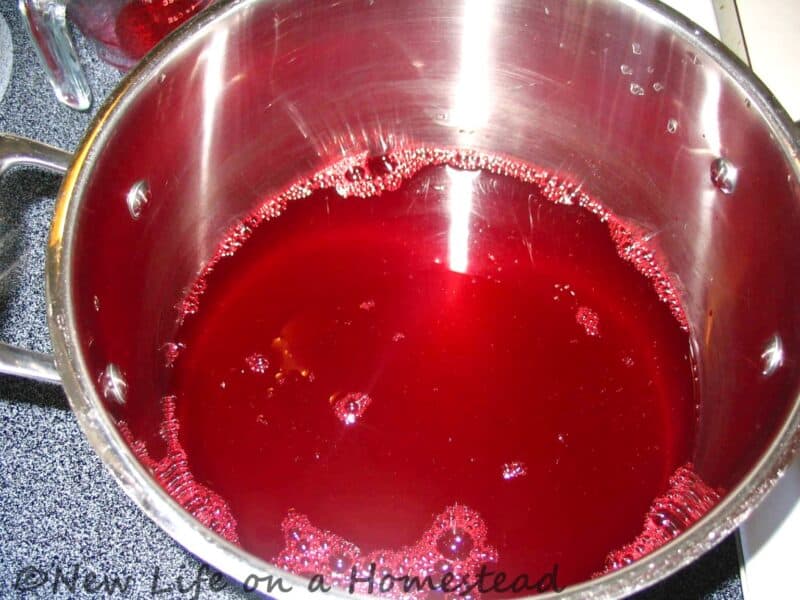
Dump the berries into a large stainless steel pot, warm them over low heat, and crush the berries using a potato masher or something similar. The more you crush, the more juice you’ll get.
You don’t want to cook them, just barely warm them to help draw out the juice. You might even turn the heat completely off once they’ve been warmed a little. Do not add cold water.
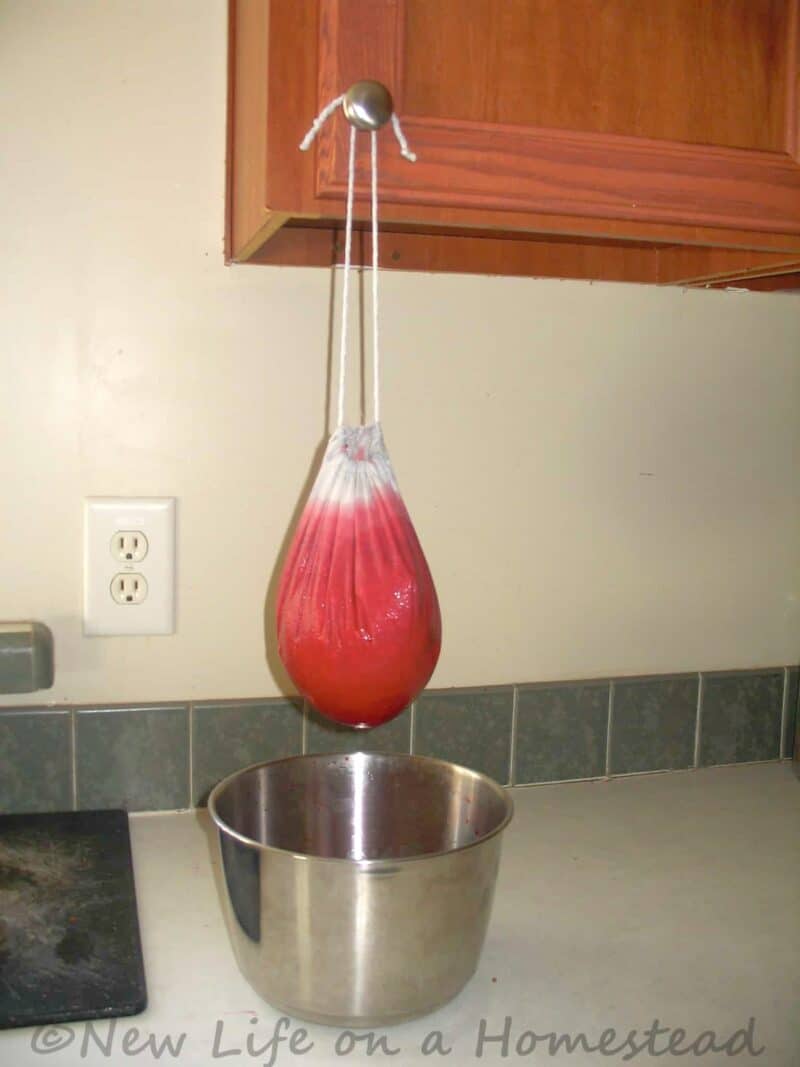
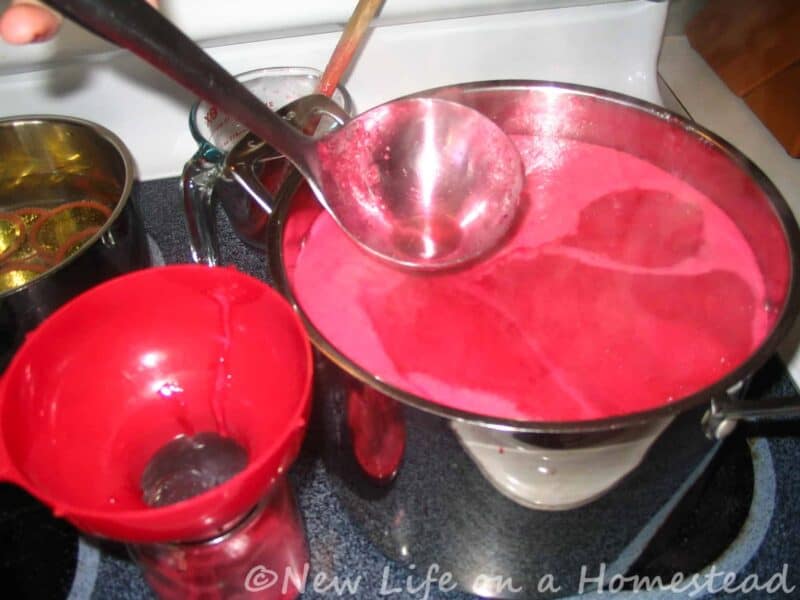
Step 3: Strain the Berries and Juice
Using a ladle, fill a jelly bag with the crushed berries and juice. Hang it over a bowl to drain for several hours.
If you don’t have a jelly bag, you may be able to get away with cheesecloth or some other method of straining the juice and berries.
Squeeze the bag to help the juices flow out (I like to use two wooden spoons to squeeze the bag on either side, to keep my hands from being stained with the juice.)
If you have a juice press, something that will squeeze the berries in a bag, that would definitely be the most efficient way to extract the juice.
As a side note, a friend of mine recently introduced me to her juice press. It worked amazingly well for squeezing the juice out of the grapes we were working with.
I couldn’t believe how dry the pulp was when we were done. I’m searching the internet for directions on how to make my own, ’cause these presses are super expensive when bought new.
Step 4: Measure Your Juice to Determine Other Quantities
Once you have your juice, measure exactly how much you end up with. The amount you have will determine how much pectin and cups of sugar you will need to use. If you need to add a little bit of water to bring the liquid to an exact amount, that is fine.
Pour the liquid back into the pot.
Step 5: Measure Your Sugar and Pectin
In a separate bowl, measure the exact amount of sugar you will need (See recipe below). If you want to make a low-sugar or sugar-free jelly, you will need to use a Low or No-Sugar-Needed Pectin.
Step 6: Stir Pectin into the Juice
Stir the pectin into the juice in the pot, and bring the liquid to a full rolling boil over high heat.
Step 7: Add the Sugar
Once the liquid has reached a full rolling boil, quickly stir in the sugar (I prefer a wooden spoon for stirring jelly as it imparts less of a metallic flavor, but a metal spoon can be beneficial in that it won’t stain like a wooden spoon will).
Return to a full rolling boil and allow to boil for exactly 1 minute. This is where you have to be careful ’cause it can boil over very easily if you don’t watch it.
Remove from heat.
You may choose to skim off any foam from the top of the juice. This is merely for looks. My mother-in-law always told me that the foam on the top of the jelly was like candy to her as a kid, so I just left it there as a treat.
Step 8: Load Your Jars
Quickly ladle the hot jelly into hot, sterilized jars, leaving 1/8″ from the top. Wipe the rims of the jars with a wet rag, to remove any sticky residue, and affix a previously simmered lid.
Step 9: Process the Raspberry Jelly in a Canner
Disclosure: if you visit an external link in this post and make a purchase, I may earn a commission. Read my full earnings disclosure here.
Lower the jars on a rack in a water bath canner (being sure the jars are covered by 1-2″ water). Bring to a boil, and process for 5 minutes.
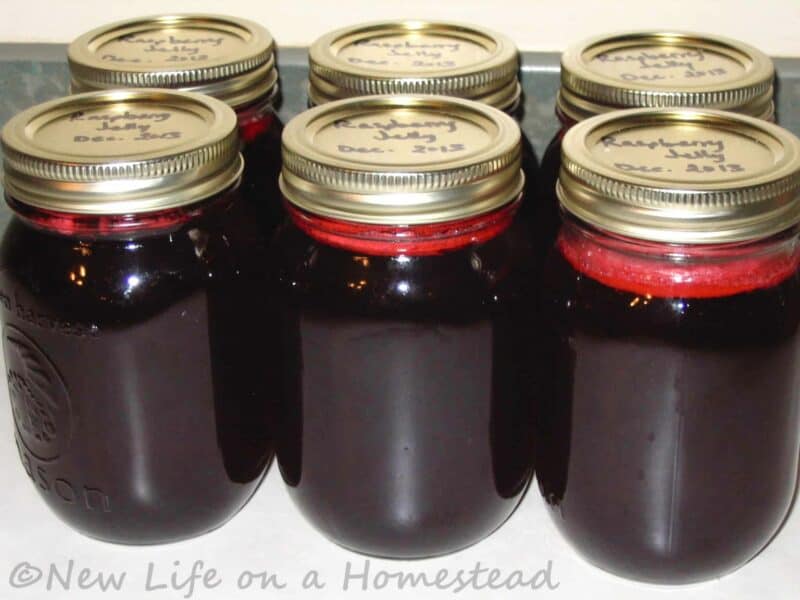
Remove the jars from the canner and place on a towel or rack to cool for 18-24 hours.
Check the lids to make sure the seals are tight before putting them away on your shelves. Don’t forget to label your jars with the contents and date!
Your seedless raspberry jam will be delicious and ready to enjoy as soon as the jars have cooled. Try not to eat it all in one sitting.
Raspberry Jelly Recipe
Equipment
- boiling water canner
- Ladle
- Funnel
- Clean canning jars
- Stainless steel stockpot
- Jelly bag
- Various mixing bowls and measuring cups
- Canning rings (screw bands) and lids
Ingredients
- 2 pints berries
- 5 1/2 c. sugar
- 1 box powdered pectin
Instructions
- Wash berries; remove any stems and rotten berries. Drain.
- Pour berries into a large, stainless steel stock pot, and heat over low just to warm. Crush berries to extract juice.
- Ladle berries and juice into a jelly bag. Hang the bag to drain over a bowl for several hours, squeezing as necessary to remove the juices.
- Measure the juice. You need 4 cups. Add water or another fruit juice as necessary to fill to this exact amount (you shouldn’t have to add much). Pour the juice back into the large stock pot.
- Measure 5 1/2 c. sugar into a separate bowl. Do not reduce. If you want a low-sugar jelly, you’ll need to use a low-sugar pectin (which will have a different set of instructions).
- Add 1 box of powdered pectin to the juice in the pot, and bring to a full rolling boil over high heat.
- Quickly pour in the sugar, and stir. Return to a full rolling boil, and allow to boil for 1 minute exactly. Remove from heat.
- Ladle hot liquid into hot, sterilized jars, leaving ⅛ inch headspace.
- Wipe rims of jars with a wet rag, to remove any sticky residue.
- Affix a previously simmered lid and ring.
- Process in a boiling water bath canner for 5 min.
- Remove from the canner, and allow to cool on the counter for 18-24 hours before testing the seals on the lids. Unsealed jars can be stored in the refrigerator for immediate use and eaten within a week or two.
I hope your family enjoys raspberry jelly as much as mine does!

A city girl learning to homestead on an acre of land in the country. Wife and homeschooling mother of four. Enjoying life, and everything that has to do with self sufficient living.
I use one gallon paint strainers. They are mesh, allow me to squeeze juice thru much faster and drain much more quickly than cheese cloth or other fabric options, and fit the strainer cone that I inherited from my lovely MIL.
They wash well, are reusable and are inexpensive.
Thanks for the recipe
Just made this today and i love your recipe…my husband does not like the seeds. Thanks for the tips it turned out great.
This is a great recipe but you MUST bring the raspberry juice + sugar to a boil and hold it at 222 degrees for 1 minute before adding pectin or the jelly will NOT turn out. The magic of making jelly is the juice must be added to the sugar and brought to temperature BEFORE pectin is added. Otherwise, you have a very ugly jelly that tastes good but you would not want to give to anyone because it won’t be clear and pretty.
Thanks for the tip! I made strawberry jelly previously and it called for the fruit juice and the sugar to boil first and the pectin at the end.
Thank you. I have never done pretty much anything substantial in the kitchen. At 67 I’m trying to learn being that I’m single and have a garden. That tip helps
I bought myself a cheapo used juicer at the Goodwill store and dispensed with all of the waiting of using a bag. I run the pulp through 2-3 times to get all of the juice. The leftover is the seeds and I dump them in the woods hoping they will create a new berry patch!
I have a problem with this recipe not telling me to add some citrus juice which seems to be needed in making berry jelly according to other sites.
Do you have any input on that?
Needs Lemon Juice…or cook it down like the old fashioned.
You can use it if you would like , but it is not necessary. I have my own raspberry bushes in my garden. I use them sugar and pectin . Sometimes you do not even need pectin . It makes some people feel more comfortable in the processing of their jelly and they use it as a preservative. Raspberries and many other fruits are already acidic so for this reason it is not necessary.
Awesome! Is it staying in good shape (the used juicer)?
Use a blender to purée. Put through a sieve. Really good as freezer jam. We use it as ice cream topping, scone sauce, even a spoonful goes good in cold or hot tea, etc.
I watched a show from martha stewart and she recommended using a food processer because it will not slice up the seeds so bad.
This is my first attempt at making this jelly as I got some from a farmers market and fell in love with it.
Thanks for the recipe. I put my raspberries in a pan that looks like a strainer on a regular 3 qt pan. Added just enough water to crest steam and heated to medium to create steam and then turned to low and let juice run through. Just poured juice through cheese cloth. Took about an hour altogether. I also run my jars through dishwasher on extra hot. Boil the kids on the stove so that both are hot when I put jelly in jars. Tighten lids and turn jar upside down on a towel and leave them overnight and they seal great. No need for hot bath. I do this with most fruits.
Boil your kids on the stove…lol. This comment made me laugh out loud.
Boil water. Turn heat off, then add the kids and cover. A full boil could damage the kids.
Yeah…you have to be very careful when you are boiling the kids…
Our raspberry bush has the same problem with worms. 🙁 But the berries are coming like crazy right now and I don’t want them to go to waste either, so this is exactly the recipe I was looking for!! Thanks for sharing, looking forward to trying it out!
When I get worms on my raspberrry bushes, I freeze the berries on a cookie sheet and the worms freeze and drop off. When you collect the frozen berries from the cookie sheets the worms are left behind.
JUST FINISHED DE-SEEDING MY RASPBERRIES. THE JUICE IS THICK AND I HAVE 11/2 CUPS OF LIQUID. WHAT CAN I USE TO DILUTE IT WITH BESIDES WATER? I WANT TO MAINTAIN THE WONDERFUL RASPBERRY FLAVOR IN MY JELLY. THANK YOU. PAM
You can try using a fruit juice if you don’t want to use water. You should halve the recipe since you don’t have anywhere near 4 cups of juice, and only add 1/2 cup liquid to your strained berries. Good luck!
I recently learned that once the seal has been set on any jar, the screw on part of the lid should be removed to avoid a false seal. A false seal is where it appears the seal is fine but in fact it’s not. Also, people at sea level , I believe, should be putting the jars with jelly in the boiling water for 10 minutes, not 5, and if over 1,000ft above sea level 15 min, and so forth. Finally, I know recipes call for cheese cloth or jelly ago, but an old, thin pillowcase that has been well laundered works just as well if not better. Just give it a hot rinse before starting. Thank you for the recipe though! I’ll try it out!
Take all the pulp in a sauce pan add enough water that you need and heat, strain it through a cheese cloth… you’ll get some flavor, better than using water
I tried a recipe very similar to this but it hasn’t jelled? What have I done wrong?
I am making raspberry jelly with this recipe and wonder if you have any ideas on what to use all the berry pulp I have left over after straining out the seeds. There must be something I can make with this wonderful smelling stuff.
If you have a dehydrator you can use it to make fruit leathers. 🙂
Find a home brewer or beer house in your area . They can make use of it
You can put the pulp in a jar, filling it halfway with the pulp. Then, fill the jar 3/4 full with white wine vinegar. Close with canning lid. Shake every day. Keep out of direct sunlight. Check taste after 2 weeks or so. Strain once you like the flavor. You now have a raspberry vinegar. See Theresa Lo’s website re: flavored vinegars.
love raspberry vinaigrette on my salads. Will have to try this when I have my left overs. Thanks for the tip .
Make fruit leather! My kids love it!
Fruit leather
How can I use this recipe and use Stevia in the Raw in place of sugar? If this is possible!
Thank you for your wonderful recipe! By the way, I do appreciate your added input of the protein as well!
No, you can’t use it in place of sugar: it will not work. if you use low-or-no-sugar-needed pactin (Ball brand) or another type of pectin, you can omit sugar, can the jam, and then add sweetening as wanted once you open a jar.
I didn’t have a jelly bag so I used a pair of nylons. Just cut the leg off (washed it), filled it up with berries and then tied it to a clothes hanger which I hung from an upper kitchen cabinet. Worked quite well. Although it’s been a long time since I used a jelly bag so I can’t honestly compare. But it certainly worked in a pinch.
If starting with juice, rather than berries, how much per box if pectin?
The pack of pectin will have recipes in it that tell you exactly how much juice you need per box. 🙂
Kendra,
I had a lot of raspberries out of our garden and I didn’t see your recipe until after I had cooked the berries with water and strained them. Is there anything I can do now since the berries were cooked with water? Thats what I get for not researching further.
Lori
It will still be great! Our family has always added some water and cooked the berries before straining. In fact, my mom would add water to the leftover pulp etc and cooked it again. Flavour was still great! We were a large family, and this extended the amount of jam. Still SO much better than the bought jelly!
Hello,
I just finished making a recipe using all of my home-grown, frozen raspberries. When I drained my thawed raspberries, I was left with a TON of juice.
Can I use this juice to make jelly with? It is the very simple juice from the thawed berries, not from cooking down the berries/pulp or anything. It was just what was in the plastic bag from thawing.
I appreciate any help! I have so much juice, not sure what to do with it. 🙂
Thanks!
Kerri
Yes! Any kind of fruit juice can be made into jelly by adding sugar and pectin. What a great way to use up what would normally go to waste!
I made the jelly this weekend – it is delicious! Thanks for the great recipe – it is truly yummy. I think I just may prefer it to jam. 🙂
Thank you for the tip on straining to remove excess protein! I recently wrote a blog about Homestead Jams and included your blog. Thanks again!
Just finished a batch of your jelly. Thanks so much for sharing the recipe. My neighbor has a huge raspberry patch in his yard and as soon as I suggested jam and jelly, he told me to help myself to whatever I wanted!
Awesome, Liz!! What a great neighbor. I bet he’d love a taste of some of that jelly 🙂 Enjoy!
Hi Kendra,
I live in northwestern New Jersey, otherwise known as God’s Country. I’ve been picking the wild raspberries and blackberries on my property which led me to your website. I have a juicer; after warming the berries and crushing them can I just process them through the juicer? I don’t know why not unless you can think of a reason.
Carol
Carol,
I don’t see why not either. Sounds like a juicer would make the work a little lighter. 🙂
I love to pick raspberries. I go off into the woods and get about 2 gallons worth of berries in no time. After cleaning them, I spread them out on a paper towel lined baking sheet and put them into the freezer. Once they’re completely frozen, I vacuum seal them. I find that dealing them while fresh squished them, but doing it this way was perfect.
Last year, I used some of my berries to make jam. Unfortunately, I was the only one that could eat it because most of the members of the household have dentures and other dental appliances, so the seeds got stuck under them. So I’m going to try this recipe and see if they’ll like it better. From the berries I had set aside for jelly, I got about 24 oz of juice! First, I used this metal funnel with a strainer attachment to get most of the juice, and I put the pulp separate. Once I got all the pulp, I took a cheese cloth and some gloves and squeezed the rest of the juice out. I didn’t have the pectin yet, so I rinsed out the funnel/strainer and used that to put the juice in a bottle for the time being and got any remaining seeds out.
Kendra,
I started wine making a few years ago, and bought a steam juicer to convert fruits to juice, to simplify the wine making process. I took some black raspberry juice and made some jelly with it, and oh what a treat that is – and I don’t have to wait a year to try it. Look up steam juicer on Youtube, and see what you think. I can’t wait to try some other jellies.
Dewey
That sounds awesome, Dewey. Thank you for sharing! I’ll definitely check that out.
I have been using a steam juicer for years and produced gallons of all kinds of jelly-all crystal clear. I love my steam juicer and just picked 4lbs of black raspberries and plan on just washing my berries, throwing them into the steam juicer and out comes up to half gallon of juice!!
When you put them in the hot water bath should the jars be completly covered in water?
Yes, Alexis. They should be covered by 1-2 inches of water.
Thank you so much Kendra!!
I have one more question, how do I test the lids after letting them sit for 18-24 hours?
Joanne,
You test the lids by unscrewing the band and pulling up on the lid. You shouldn’t be able to pull it off with your hands. If it didn’t seal, the lid will come right off. If this happens, just put it in your fridge to be eaten first. Good luck!
Kendra,
How many ounces is the box of pectin? My box is 1.75 oz. Is this the correct amount?
Thank you!
Joanne
I believe that’s right, Joanne. I don’t have a box to look at right now, but 1.75 oz. sounds right. 🙂
Kendra, this raspberry jam sounds wonderful as it’s my favorite fruit! I’ll definitely be making this along with so many things. I know the jam is made in a water bath canner but I just wanted to thank you so much again for the gift of drawing my name to win the All American canner. I am elated as is my family who is so looking forward to all the wonderful things I’ll be able to preserve from our garden and the local farmers markets! Hugs to you!
I’m trying to convince the guys at All American to create a separate lid for their canner so we can water bath in it too 😉 Wouldn’t that be cool?!
I’ve also done seedless raspberry jam using my Squeezo with the smallest berry screen. Maybe a few teeny seeds get through, but then we still get the pulp of the raspberries. Yum. (And if I’m feeling extra frugal, I can boil the seed remnants to get more juice to make jelly.)
As for a big batch of stuff… I’ve heard of folks using clean pillow cases, or I have a few extra wrong-sized-for-our-cider-press pressing bags from ebay that I also use (when I had over a gallon and a half of grapes to strain)… set up in the garage with the rotisserie rack from the grill, some folding chairs, and big 32qt pot. My poor husband sees all manner of strange creations around the house like that.
Lanna,
Jealous of your cider press. That is all. 😉
Great idea Kendra. Loved that you were able to save something in spite of the worm invasion, I would certainly have done the same when I have gone through the trouble of raising food myself. And you are absolutely right about homegrown or ripe farm produce tasting way way way better than store bought. Even organic food from the grocery store…ummmm, no taste. I guess they still have to pick at unripe stages for shipping. Last summer we were able to make a trip to pick berries from a farm in Canada (were the rest of our family lives) ripe, juicy, after eating all we could and stocking the freezer for family, I made jam to bring home! The. Best. Jam. Ever!!!
Oh, that’s wonderful, Katrina!! I agree, homemade jam from freshly picked, ripe berries just can’t be beat.
Know what’s even easier? Process your raspberries with a steam juicer! No jelly bag needed and it’s simple as pie! So much faster too. Then proceed with the rest of the recipe as normal.
We made raspberry jelly this past summer for the first time ever, and the steam juicer made it a snap. I agree, it’s some of the BEST jelly ever! I didn’t make nearly enough. Most of what I made I gave away as presents to teachers or friends this past Xmas because it was so pretty and so good.
Next year I’m making sure to save more for our family!
The Well-Rounded Mama,
I need a steam juicer, lol!!
I started making my own yogurt last spring and have been flavoring it with homemade jams – strawberry and peach. I don’t want to use the black raspberry jam that we made because the seeds get stuck in my teeth. I’ll have to add this jelly to the list for next season.
Matt,
I would recommend that you get the biggest jelly bag possible, if you don’t have one already. It’s better to have one too big, than to have one too small (which I’ve found out!). I’m looking forward to making blackberry jelly with this recipe this year! I bet it would be delicious in yogurt. 🙂
This sounds great! Can’t wait to try it. Could you use the same recipe with strawberries, blueberries and grapes as well or would the measurements change?
Angela,
No, the measurements are different. You can use this recipe for blackberries, though 🙂