At their best, electric fences are inexpensive, effective, and flexible. They can make permanent boundaries around or within a property.
Electric fences can also be set up on a short-term basis to protect special crops or vulnerable animals, and they can also be used to create rotational grazing systems to maximize pasture yield.
Fences work in three main ways. They may be physical barriers, psychological barriers, or pain barriers. Physical barriers restrain animals by being difficult to cross.
Psychological barriers make animals think they can’t be crossed. Pain barriers make an animal so uncomfortable that they stop rather than push past the fence.
Traditional fences are physical barriers. They are made with wood and wire that is difficult to cross. These fences are too high jumped or climbed, lack spaces to crawl through or under, and are strong enough that they can’t be knocked down or moved aside.
Psychological barriers are fences that work because animals think they will work. One example of a psychological barrier is a cattle guard across the road. The cattle don’t see a way to walk across the pipe bars, so they don’t cross.
Electric fences serve as pain barriers. When an animal tries to cross the fence, it gets a short, hard shock. The animal doesn’t try to cross again because of the pain.
Once the pain is established in an animal’s mind, electric fences eventually become a psychological barrier as well. Some animals won’t cross a spot where an electric fence was, even if the fence is gone.
Table of Contents:
How Electric Fences Work
Electric fences must be properly set up to work as a pain barrier. All the components must be in good working order, free of short circuits, and connected properly.
When the fence is set up correctly, the “hot” wire carries electric current from the energizer to the animal. The animal carries the current to the ground and back to the energizer. Carrying the current causes a shock to the animal.
When set up wrong, the fence doesn’t contain livestock and becomes a maintenance headache. Animals will frequently walk through fences with weak charge, damaging the fence and requiring time to repair.
You can see an overview of an electric fence setup here.
What Are the Pros and Cons of Electric Fences?
If you’re still on the fence – pun intended – about electric fences, it might be helpful to understand some of the pros and cons of this type of fencing compared to others.
First up – efficiency. As opposed to traditional fencing options, an electric fence requires minimal resources for installation and maintenance. The fence operates on a low output of energy, making it cost-effective in the long run.
Electric fences are relatively easy to set up and can be customized to fit the size and shape of your property. You don’t have to have extensive carpentry skills – you just need to follow the instructions I detailed for you in this article.
Another benefit of electric fencing is its ability to provide a psychological barrier for most animals. An electric fence is a valuable training tool because the mild shock it administers serves as a deterrent even when the fence isn’t energized (as long as the animals have been properly trained).
Over time, your animals are unlikely to escape or wander off because they associate the fence with pain. Again, this makes it a valuable tool in protecting your livestock because of the psychological component. You just don’t get this with other types of fences.
Moreover, electric fences offer durability and protection against harsh weather conditions. The materials used in constructing these fences, like steel wire, are less likely to degrade, rust, or become damaged over time.
That means reduced maintenance requirements and a longer lifespan for the fence, which can save you both money and effort.
Of course, there are some potential drawbacks that are important to consider. One essential factor to take into account is that the effectiveness of your electric fence can be limited by a variety of factors.
hings like faulty wiring or broken insulators (or even overgrown vegetation) can cause your fence to malfunction, and you likely won’t even realize it until your animals escape. Therefore, maintenance is key.
Another concern when choosing an electric fence is that not all livestock will be deterred by the mild shock. Some larger or more “determined” animals may be able to withstand the shock or find ways to bypass the fence entirely. In these cases, you may need to take extra steps to keep your animals contained.
Another safety concern is the potential for people, especially children, to come into contact with the fence. You’ll want to install appropriate signage around the fence and educate your little ones about the dangers of the fence.
You may want to put an additional “traditional” fence (like a wooden or page wire fence) around the electric fence to prevent accidental shocks and injuries.
Finally, before you choose an electric fence, be aware of the legal requirements and regulations in your area. In some places, electric fencing is restricted or banned outright due to zoning or other laws. Do your research!
Types and Parts of Electric Fences
There are three parts to a good electric fence. The most obvious is the fence itself—the wires and posts that make up the barrier. The second part is the energizer, which feeds power into the fence.
The final component is the grounding. The grounding connects the current from the hot wire back to the energizer. The key to making any electric fence work is getting power from the energizer through the wires to the animal and back to the energizer.
The fence itself can be permanent, semi-permanent, or temporary. Permanent fences stay in place for years. These are best for perimeter fencing or protecting areas with a fixed use. Orchards and long-term gardens are best protected by permanent fencing.
Permanent fencing costs the most and takes the most work to install. Permanent fencing can also serve as a physical barrier, although it is not usually as strong as traditional wire fencing.
Semi-permanent fencing stays in place for a season or two. It is good for protecting a garden that won’t stay in the same place every year. It is also useful for protecting crops that are attractive in the short-term but don’t need a permanent fence. Semi-permanent fencing is intermediate in cost and effort.
Temporary fences are put up and taken down in a matter of weeks or even days. These fences are cheap and easy to put up, take down, and move around. Temporary fences are also the weakest of electric fences.
If there is a short, animals can (and will) walk right through them. These fences often consist of only a single wire and lightweight posts.
Building any type of electric fence can be broken into three phases: setting up the fence line, setting up the energizer, and grounding the fence. The steps to follow for setting up the fence line will vary based on the type of fence. The energizer and ground rod setup are the same.
Deciding What Kind of Fence is Best For You
To figure out what kind of electric fence is right for you, ask yourself the following questions:
- What kind of animals am I trying to contain?
- Where will the fence be built?
- How will I be electrifying the fence?
- Do I need to keep out predators or nuisance animals, too?
- Will I be working with animals inside the pen?
- Will I be doing any grazing management inside the fence?
Larger, more aggressive animals (such as big bulls) require more intensive electric fencing than more docile ones, like dairy cows. Furthermore, a fence that is meant to keep out deer (who can jump) will be much different than one meant to keep out small predators, like foxes.
You will want to consider the unique characteristics of your chosen species. Some animals ignore physical barriers, or will constantly test them (pigs and goats are good examples). Others need incredibly high voltages to stay contained.
Here is a quick guide to which animals are best contained with electric fences, and some tips on installing them for that species:
- Deer: An electric fence for deer should be at least six feet tall, and have seven strains with high visibility (you need both a physical and mental barrier). It should be a voltage of 4000-5000 volts.
- Sheep and goats: At a bare minimum, a fence for sheep or goats should be 4000-5000 volts (potentially much higher if your sheep have a heavy coat of wool). Six strands is necessary, especially for goats.
- Predators: This can vary depending on the kind of predator you are trying to keep out, but usually, wires should be spaced six inches apart and the fence should be charged at a minimum of 4000 volts.
- Cows: Most docile dairy cows can be kept contained with one to three strands at 2000-3000 volts, but more aggressive bulls may need more of a charge (or additional strands).
- Horses: Horses can usually be contained with 2000-3000 volts. Horse owners often use two-inch poly tape or high-tensile wire with three or four strands.
- Pigs: I recommend no less than 2000 volts for pigs – the larger the pig, the higher the voltage you might need. You will need to use several wires, with one starting no higher than six inches from the ground.
- Poultry: The problem with containing poultry within an electric fence is that, of course, they can fly. You may want to use a poultry netting system designed specifically for birds and also install an anti-roost device. You won’t need much of a shock, though – usually 500 to 900 volts is adequate.
Building a Permanent Fence
Permanent fences are made with wooden and heavy fiberglass posts along with sturdy wire. These fences often use high-tensile steel wire which is an effective physical barrier as well. The posts don’t need to be as sturdy as the posts for a traditional wire fence, but they are still strong.
Step 1. Measure carefully for your permanent fence. You can use measuring tape for small areas. Use a land wheel, count paces, or use online tools for longer fences.
If you are building lots of fences, it’s important to buy the right quantities of material so you don’t run out or waste money.
Step 2. Start by building corner braces. The corners of a permanent electric fence should be made from H-braces using wooden posts at least four inches in diameter. H-braces use three posts in the shape of the letter H to reinforce the end of the fence against sagging.
Two posts are set deep in the ground with a third held horizontally between them. The fence wire is connected to the rear post and stretched tight. The double posts resist leaning much better than a single post.
Learn more about H-braces here:
Step 3. Set the line posts. Line posts for a permanent electric fence should be made of wood or fiberglass. Wood posts should be at least two inches in diameter, while fiberglass posts should be at least 7/8 inch in diameter.
Spacing for these posts can be wider than for a traditional fence because the wire is lighter. Fiberglass posts can be driven into the ground. Wooden posts may require digging post holes.
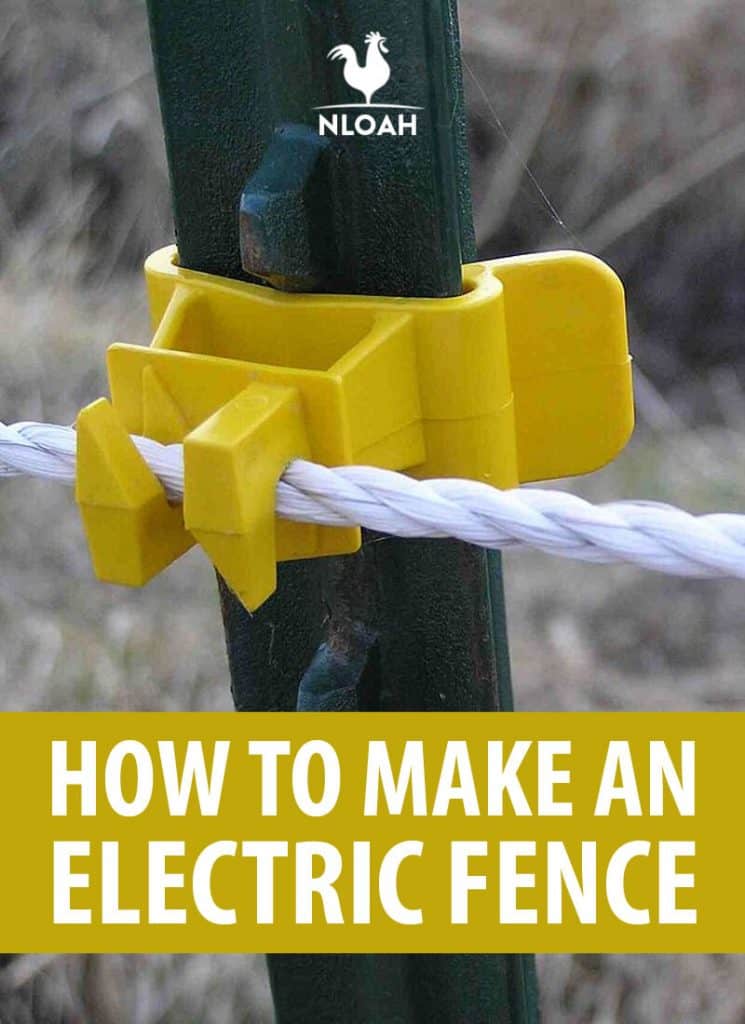
Step 4. String the fence wire. The hot wire carrying current should be roughly nose height for the animals you are containing. Clip the wire to the posts using the correct clips. Fiberglass and wood posts may have holes pre-drilled for clips, or you may use spring clips that fit around the posts.
Step 5. Stretch the wire tight using a come-along or fence stretcher. Once the wire is clipped to the posts and stretched tight, you are ready to connect the energizer.
Using Steel Posts
Steel posts are not a good choice for electric fences because they can cause short circuits. The wire touching just one steel post will eliminate the electric current from the entire fence.
If you are buying posts, don’t buy steel. If you have an existing fence with steel posts, there are ways to insulate steel posts. The most common is to use clip-on insulators for line posts and round corner insulators for corner posts.
Barbed Wire and Electricity
Don’t use barbed wire for an electric fence, and don’t electrify an existing barbed wire fence. Electrified barbed wire is dangerous. When the electric current passes through an animal (or a homesteader) touching the fence, there is an involuntary jerk of the muscles.
If you are caught on a barb and this happens, you can get a very nasty gash. There is also the possibility of getting tangled in the barbs and being unable to get free. Being tangled in electrified barbed wire is even worse than getting a single gash—never electrify barbed wire.
Setting Up Semi-Permanent Fence
Semi-permanent fencing usually uses smaller fiberglass posts with poly tape. Poly tape is a plastic thread woven into a ribbon. This product is available in a range of widths from ½ inch all the way up to 1 ½ inch. There are fine wires woven into the tape that carry the current through the tape.
Since it’s mostly plastic, the poly tape is much lighter than wire. The posts don’t need to be as strong to support it, and it can be stretched tight by hand. Poly tape is also highly visible, which increases the effectiveness of the fence.
H-braces are not usually needed for semi-permanent fencing. It is still a good idea to use heavier posts for corners, however. Corners for semi-permanent fencing should use at least one-inch fiberglass. Line posts should be ½ or ¾ inch fiberglass. Posts for semi-permanent fences can be driven into the ground.
Push posts into the ground every 30-50 feet and clip the poly tape to the posts. Poly tape fences can be stretched tight by hand.
Temporary Electric Fence
Temporary fencing uses plastic or small fiberglass posts and poly twine. Poly twine is made of the same material as poly tape, but it is much thinner, only about 1/8 of an inch thick.
The twine for temporary fences is usually stored on a reel. The twine can be played out to set up a fence, then reeled in to take down the fence.
Temporary fences aren’t strong at all, but they are quick to set up and take down. Some ranchers move temporary fences daily to keep stock on fresh grass.
Setting Up Gates
Gates are simple to make in an electric fence. The gate handle has a loop or hole on one end to connect to the wire and a hook on the other to hold the gate up.
Gate handles that use an insulated metal hook allow the gate wire to be turned off when the gate is down by breaking contact with the wire carrying current.
Solid plastic gate handles are cheaper, but the wire is live at all times, even when it’s on the ground. This shorts out the whole system when the gate is open. If you are forgetful and leave the gate open, it can lead to escapes not just at the gate but anywhere along the fence.
Electric Net Fencing
Electric netting kits are also available. These kits include a roll of electric net wire along with posts spaced to support the net. Net kits are available with the height and net spacing specific to most farm species. These are a little more expensive to purchase, but they are easy to install and move.
Electric nets are a good choice for temporary or semi-permanent fencing for a novice. All the required posts and wires are included with the net kit. The posts usually have a spike on the bottom end to be pushed into the ground.
All you have to do is roll it out, poke the posts into the ground, and connect it to an energizer. Net kits are also simple to move because everything moves as a unit. Just pull the posts out of the ground, fold the net up, and away you go.
Benefits and Challenges of Portable Electric Fences
The portable electric fence technology is one that is relatively new, and it’s one you might want to consider using on your farm. It’s not as helpful as a physical barrier, but it can be an effective psychological barrier. It’s perfect for when you want to rotationally graze your animals in a paddock within a larger perimeter.
Portable electric fences will deliver a powerful shock whenever an animal comes into contact with a conductor (the wire). You will need to install step-in posts to anchor the fence. These posts are usually easily pushed into the ground, although some extra force may be required on hard soil.
These posts usually are made out of insulating polymers like steel or fiberglass. The fence itself is typically made out of twine that is twisted from ultraviolet-stabilized polymers and fine metallic threads (also known as polywire).
This material is lightweight and easy to unspool. Some fence manufacturers include a reel to prevent tangles.
Although polywire is easy to spool and unspool, it doesn’t have as much shocking potential over a long distance as does solid, traditional wire. You can also buy specialized braided polymer lines that offer a bit more of a shock-carrying capacity along with the ability to spool and unspool with ease.
You may need multiple conductors depending on the kind of species you are trying to control – sheep and goats usually need about four to prevent going under or over the fence.
Electric netting is an example of a portable electric fence, too. This is often used for poultry. It is made with conductors for the horizontal lines and insulating stands for verticals.
Electric netting can contain difficult-to-control animals like chickens, and also keep out predators (it is also effective at keeping garden invaders – like rabbits – out). However, it can be quite expensive and cumbersome to move.
Benefits and Challenges of High-Tensile Electric Fences
A high-tensile fence is a more permanent fencing solution that’s a better choice than woven wire, barbed wire, or other permanent but non-electrified fences. It’s great for keeping out or keeping in animals and is less harmful than barbed wire.
High tensile fencing is usually made out of smooth wire and can also be referred to as a smooth wire fence. It can contain four to ten strands, depending on the kind of animal you want to contain.
It also costs less than most other permanent fence types. Both barbed wire and woven wire can be incredibly expensive.
These latter two materials also will sag and wear from animal pressure over time – without a charge, there’s nothing to prevent the animals from using the fence as a “scratching post.” High-tensile fences last longer, up to 40 years if cared for properly, and are fast to install.
Of course, you will want to make sure you’re taking the time to install and inspect your fence properly to prevent any issues with your animals getting out.
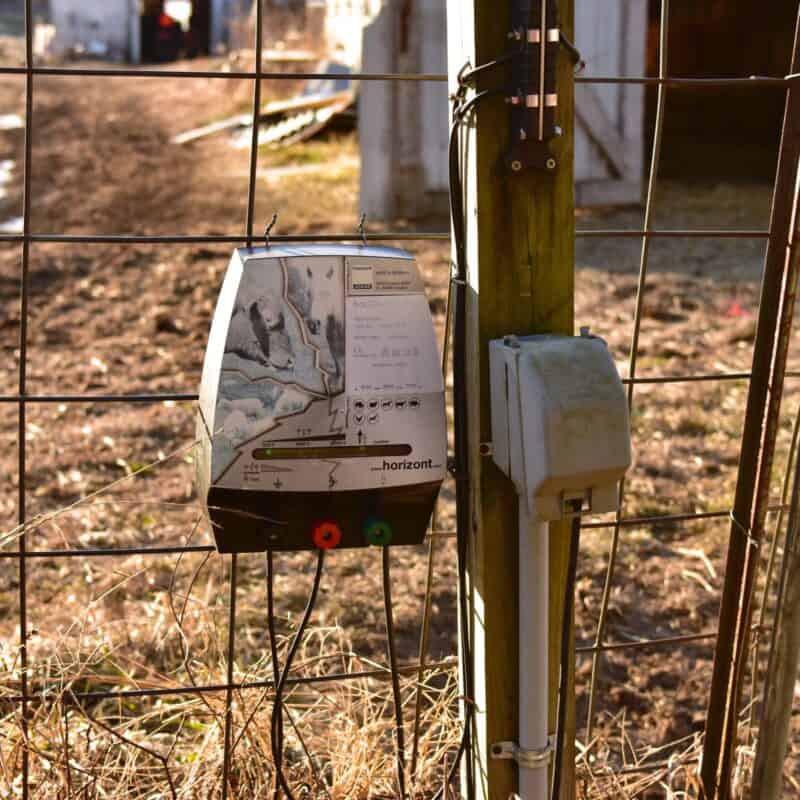
Energizers – Making the Fence Hot
Energizers are the piece that makes the fence work. They take electricity from a solar panel, battery, or wall outlet and convert it into the correct voltage for a livestock fence. Most energizers put out 5,000 to 10,000 volts….a huge amount of energy!
Electric fence energizers may have three different power sources. Some energizers plug into wall outlets. Some have solar panels that provide electricity. Some are battery-powered. There are advantages and disadvantages to each type.
Plug-In Energizers
Plug-in energizers are the least expensive per amount of energy output. The most powerful energizers on the market are plug-in models. These energizers can electrify the longest runs of the fence without losing voltage.
Plug-in energizers work well for permanent fences. They can be installed and attached to the fence, then left alone. They aren’t as good for semi-permanent or temporary fences. These energizers are not portable and don’t work that well off the grid. Plug-in energizers are best for very long fences and for homesteads with plenty of electric power.
Plug-in energizers need to be in a building near an electric outlet and near the fence as well. You may have to drill a small hole in a wall to either run the power cord into the outlet, or the wires out to the fence. If you run wires out, make sure the wire is insulated so it doesn’t short out against metal building walls.
Solar Energizers
Solar energizers work anywhere there is sun and are easy to move around. They are more expensive for a given power level than a plug-in energizer. They also may lose power during extended periods of overcast weather or very short winter days.
Solar energizers are a good choice for off-grid homesteads and as energizers for temporary fences. This kind of energizer can be moved right along with the rest of the temporary fence.
Solar energizers are usually mounted on a post that is either part of or next to the fence. Many solar energizers have an opening in the bottom to slide over a fence post to mount the energizer. Others are built to sit on the ground next to the fence.
Battery-powered energizers tend to be the smallest units. They are inexpensive and portable, but won’t energize very many fences. They also require batteries, and the batteries have to be recharged in some way. Battery energizers are best for very short fences. These energizers usually sit on the ground next to the fence.
Getting Started with Electric Fences: My Favorite Products
If you’re building your first or fiftieth electric fence, it can be tough to find the products that will help you get the job done. Here are some of my favorite picks.
Best Portable Fence: Personally, I like the Gallagher Smart Fence for keeping animals contained (sheep respect this fence as long as it’s equipped with a strong charger).
However, it can be hard to find for sale except directly from the manufacturer. The benefit of using this fence is that it unravels easily from a spool and can then be reeled back in so you don’t have to worry about tangles.
Best Polywire: If you’re going to use portable polywire, consider this option. It comes in a six-pack and is lightweight and easy to install – you can splice it easily, too, in case your animals damage it.
Disclosure: if you visit an external link in this post and make a purchase, I may earn a commission. Read my full earnings disclosure here.
Best Solar Charger: We use Gallagher chargers for our smart fences, but for all of our other fences (including our permanent electric fences), we use this Parmak Solar Pak charger. It’s available in several sizes and holds a shock well, even when there are wet weeds and brush getting in the way. It can charge up to 25 miles of fence.
Best Grounding Kit: Buying all of the grounding components for your fence separately can be a hassle. This one from Field Guardian comes with ground rod clamps, grounding rods, ground wire, and more. It’s available in several sizes.
Best Electric Poultry Netting: If you’re trying to keep chickens or other poultry contained, you won’t find a better option than this electric poultry netting from Premier 1 Supplies. You can also buy it for other animals, like goats, though I haven’t tried it.
Best Insulators: Remember – the best insulators are black and solidly built. These screw-in insulators are some of my favorites. Buy lots so you have plenty of extras on hand.
Connecting the Energizer
All energizers have two terminals to connect to wire. One is the hot terminal. This terminal is connected to the fence wire that carries the charge.
If the energizer is close to the fence, the connection can be a short piece of the same material the fence is made of. If the wire has to cover some distance, insulated wire is a good choice to prevent short circuits and keep the wire out of the way.
The other terminal is the ground terminal, used to ground the fence. Grounding is an essential part of the system. If there is no grounding, the fence won’t work.
Grounding the Fence
Grounding is often overlooked, but it is just as important as the energizer and wire. Electricity requires a circuit to flow. Circuits are circles—there must be a closed loop from the energizer through the animal and back to the energizer for the fence to work.
The grounding is the connection from the energizer to the ground. When an animal contacts the electrified wire, the current flows through the animal’s feet to the ground and back to the energizer.
Permanent fencing works best with three six-foot ground rods driven into the ground. These rods must be spaced at least six feet apart and connected to each other and to the energizer.
This completes the circuit and causes a shock to the animal. One of the most common causes of fence failure is inadequate grounding.
Semi-permanent and temporary fences also need to be grounded well, usually with a single ground rod. Using additional grounding will boost the power of the temporary fence if needed.
Grounding Problems
In very dry or cold conditions, the ground won’t carry electric current well. In these situations, use a return wire setup. These setups use two wires to complete the circuit…
One wire is connected to the energizer like a normal fence. The second wire is connected to the ground terminal of the energizer. The animal must touch both wires to complete the circuit.
Training Animals to an Electric Fence
Often, electric fences serve as more of a psychological barrier than a physical one. When the animals first get a shock from an electric fence, their instinct will be to move forward instead of backward. To prevent you from having to fix your fence all the time, take some time to train your animals.
They usually won’t see the fence until they make contact with it – they might also not view the fence as a barrier. This is why proper training is necessary. I recommend setting up a small training space, like a corral.
Use the same fencing materials you plan to use (or did use) on your larger pasture. Set up the electric fence barrier within the training area so that your animals have to move around it to get to something, like their food.
Make the fence visible by tying a piece of ribbon in a high-contrast material to the wire. You can increase the psychological effect by putting flagging or something desirable (like peanut butter, for pigs) on the fence.
This sounds cruel, as it will lead to the animal getting shocked, but remember that training your animals to the fence properly the first time can prevent them from “testing” the fence and getting shocked many more times later on down the road.
The reaction to that initial shock will vary depending on the species. Some may barrel through the fence, some might back up, and some might do nothing besides yelp.
For most animals, it will only take a day or two to train them to the fence. However, more stubborn animals may require more time, so be ready and be patient.
One more tip? Sheep are, without a doubt, the most difficult animals to train to an electric fence. Therefore, you will want to train them to the fence immediately after shearing, when the wool will not act as an insulator against the shock.
Common Electric Fence Mistakes
If it’s your first time ever building and/or using an electric fence, something that you will quickly discover is that there is a ton of room for error. Getting used to using an electric fence requires a lot of patience, diligence, and practice.
To that end, you’re probably going to make a lot of mistakes. If you can, read through this list of the most common ones and try to avoid them – it will save you a load of headaches down the road.
Poor grounding
Grounding is one of the most difficult factors to control when you’re setting up an electric fence because you can’t control the moisture content or structure of your ground. However, it’s important that you do your best to work with the conditions you have to make sure your electric fence is properly grounded.
For best results, install multiple ground rods – the more the merrier if you are trying to ground a fence in poor conditions, as I mentioned earlier in the article. Go for at least three, each of which is at least six to eight feet long and is galvanized.
Attach them with high-quality ground clamps so that the electricity can make an entire circle back to your charger. Otherwise, the shock delivered by your fence is going to be minimal and you are constantly going to have issues with animals getting out.
Using different kinds of metals
Using multiple kinds of metals (for example, connecting steel to copper wire) the process of electrolysis will take place and it can corrode the metal. Not only will this result in poor contact and weak shock, but it can completely destroy your fence over time.
Improper fencepost spacing
Read any guide on fence post spacing for an electric fence and you’ll probably see hundreds of different recommendations. It can be hard to figure out which ones are accurate.
However, if you’re building a fence on flat ground, you need to avoid spacing too many of your fence posts close together. Fifty feet might be too close.
Ideally, when something runs into the fence, it shouldn’t break the insulators or damage the posts that are in the ground. Space your posts a bit further apart, around 100 feet or so, and when something comes into contact with the wire it will just bend and then pop up.
Unnecessary wire tie-offs
Your fencing specifications may say that you need braces every quarter mile where you tie off your wire. This might be overkill – having fewer tie-offs can add additional elasticity to your electric fence, and lower the chances of wires breaking.
Wires tied too tightly
If the wires of your fence are tied too tight, they are going to snap the minute something comes into contact with them. You don’t want them to be all loosey-goosey, but they shouldn’t be too tight, either.
Using low-grade insulators
Sunlight damages plastic over time, so you’ll want to invest in high-quality insulators that will last you a long time. Insulators aren’t that expensive, but they can be a real pain to replace.
Often, black insulators are treated to resist degradation, so consider using those instead of white or clear ones (which will only last you a few years).
Too-tight staples
You want your fence staples to be tight, but not driven in all the way – that’s if you’re using plastic tubing.
Solar panel positioning issues
If you decide to use a solar energizer for your fence, make sure you put some time and thought into where you position your solar panels. They don’t function well if they aren’t properly installed.
Believe it or not, one of the most common mistakes that people make when installing solar energizers is that they don’t put them where they can get enough sunlight.
Too-small wire
The bigger the wire, the more electricity it can transmit. Don’t go cheap here.
High-tensile wire kinks
If there is even a tiny kink in the stiff wire, it will break. Avoid kinks at all costs – and avoid hitting this type of wire with a hammer. It can damage your electric fence and cause a break.
Poor charger
Invest in a cheap charger, and you’re going to have a poorly charged fence. Don’t skimp on the joules (or the voltage). Your animals will laugh at a fence that doesn’t have a strong enough bite.
Improper in-line strainer spacing
Sometimes, wires will flip together. If you install in-line strainers directly above each other, they can get caught on each other. Separate them by a fencepost to avoid this.
Improper wire spacing
Wires need to be kept at least 5 inches apart if you are running multiple wires.
Deciding not to buy a voltmeter
When we first started using electric fences, my husband thought it would be prudent to simply check the electric fence by touching it – ha! Not a good idea. Invest in a voltmeter so you know how much of a charge your fence is putting out. It’s not worth the shock.
Building new fences without taking old ones down
Take the time to get rid of old fences if you don’t plan on using them. The old fence will almost always move around and somehow come into contact with your new wires – this can create a short and make it possible for your animals to get out.
Ignoring wet vegetation
Take the time to inspect your fence for too-high or wet, heavy vegetation. Wet grass can suck a lot of power out of a fence, rendering your best efforts to keep your animals contained completely useless.
You may have to weed-whack your fence on a regular basis or consider hooking the lower wire higher (if possible) and hooking them up separately from the rest so that you can shut off the lower wires when the vegetation is tall and wet.
Poor animal training
For some animals, training to an electric fence is pretty easy, since they learn fast (pigs are an example). For others, like sheep, training to an electric fence is a challenge (their wool insulates them from a harsh shock so it requires a lot of training).
Whatever the case may be – and whatever kind of animal you are trying to keep in the fence, if you’re containing livestock – spend some time training your animals to the fence.
Teach them that the fence hurts, and when you first introduce animals to the fence, watch them carefully. It may be beneficial to first build a small “training” fence that will acquaint them with the concept before you allow them into a larger space.
Never inspecting your fence
You should do a daily inspection of your fence. Many times, you will actually be able to hear or see a poor ground or connection.
It’s especially imperative that you check your fence after a windstorm or another incident that could knock out your fence. The more often you check your fence, the less likelihood is that your animals are going to get out.
Commonly Asked Questions
Most of the time, you can’t. If the fence includes any steel posts, it can’t be electrified. The steel posts carry the current from the hot wire into the ground, shorting it out.
Most standard barbed wire fences and chain link fences include wires connected to steel posts, so they can’t be electrified. (And to repeat, never electrify barbed wire for safety’s sake.)
If you need to reinforce an existing fence with electric wire you will need to run a new wire. You can either attach insulators to the existing fence and run the new wire along the insulators, or just run a separate fence inside the existing one.
Both methods will reinforce an existing fence by adding a pain barrier to the physical barrier.
If you can find a way to attach insulators to the fence, you can. Make sure not to add the wire too high.
If climbers have their feet off the ground when they touch the wire, the circuit won’t be completed and the fence won’t work. Consider using a ground return wire if you want to electrify the top of the fence.
As long as no part of the chicken wire touches the ground, or a steel post is set in the ground, it can be electrified. Existing chicken wire fences usually have ground contact somewhere, so electrifying those fences won’t work.
For predator control, adding a separate hot wire and connecting the chicken wire to the ground wire is probably a better choice. If you want to keep chickens in, consider using an electric net fence made specifically for poultry.
If you use an electric fence energizer, the fences are perfectly safe. Energizers use direct current, which is much less dangerous than the alternating current in household outlets. The energizers also pulse the electricity, so the actual shock lasts just a fraction of a second. The shocks are painful but not harmful.
I can say from personal experience that charges of up to 6,000 volts don’t cause any injuries. I can also say from personal experience that receiving 6,000 volts is really unpleasant and leads to lots of swearing.
The minimum current for a fence to be effective is about 2,000 volts. Most energizers put out much more than this. If your fence is carrying less than this, check for shorts. If there are no short circuits, you may need to purchase a bigger energizer.
I live in rural Texas, where I am required to maintain secure fences to keep my livestock at home. There are no restrictions on using standard electric fences as described in this article.
The laws in other jurisdictions may vary. Some states require electric fencing to carry warning signs, or to be enclosed in other fencing to protect passersby. If you live within a city, electric fencing may be entirely prohibited—make sure to check the rules of the state, county, and city where you live.
You will be liable for any harm your fence does. If you use a modern energizer that is in good condition, the fence won’t cause harm. If your energizer is damaged, or if do something dangerous like hooking your fence up to a wall outlet, you can be sued for any injuries the fence causes.
Aaron Cummins operates a small farm in the Cross Timbers region of Texas. He raises pastured pigs, grass-fed cattle, and vegetables. He cures pork and makes his own sausages. He enjoys hunting, fishing, and raising his three sons.
How do I get a transform and board of energizer.