My husband recently gave me the best gift ever. No, not the dozen white roses he had waiting for me in the kitchen last week…
No, not the pack of my favorite chocolates he slipped into my hand when he got home from work.
All super sweet, by the way.
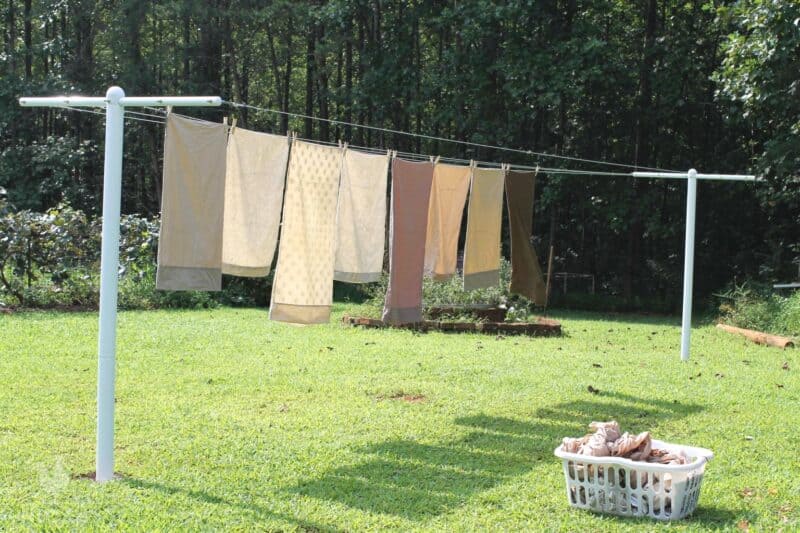
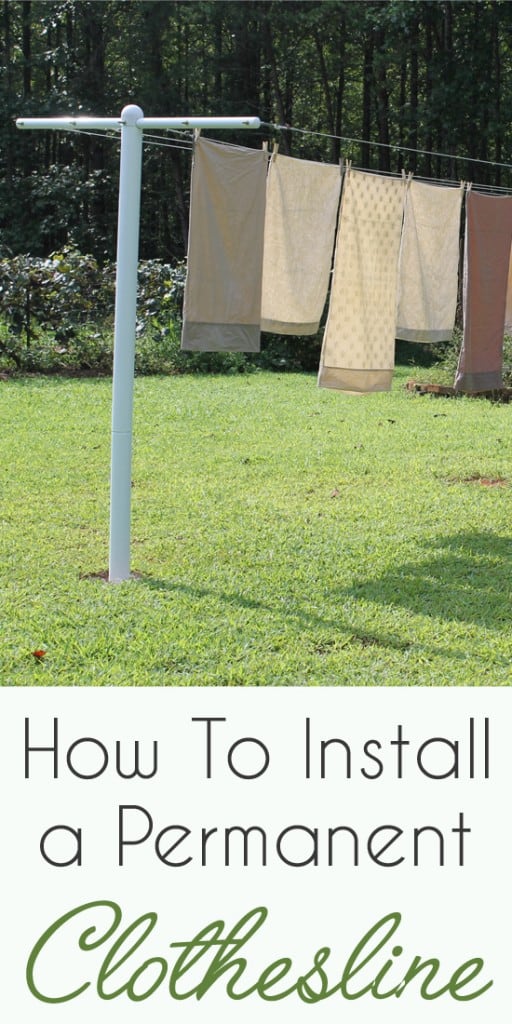
The gift I’m talking about is the metal clothesline he put up for me a few weeks ago. A brand new, five line, permanent clothesline. I’m totally thrilled.
Benefits of Using a Clothesline
If you’re wondering whether it’s worth your time to install a clothesline, whether permanent or impermanent, let me tell you – it really is.
Even if you’re not trying to live the homestead life like us, using a clothesline is advantageous for several reasons.
Not only will you save a ton of money on your electricity bills (a dryer costs up to $1500 per year to run!) but you’ll also save a ton of cash on bleach and dryer sheets.
Hanging clothes on the line is excellent exercise and boosts your health in a number of ways. You can soak in vitamin D and even get the whole family involved in the chore.
It’s eco-friendly and even helps your clothes last longer – did you know that the dryer takes a little bit of your clothing each time you use it? Dryer lint, after all, has to come from somewhere.
There’s something to be said about the look and feel of clothes dried on the line, too. They have a fresh scent that simply can’t be compared to anything else.
You’ll notice that a ton of laundry detergent manufacturers try to market their products as being “clothesline-fresh” – but why bother spending the money on detergent when you could just hang your clothes outside?
And despite what many people think, you can still use a clothesline in the winter! As long as the day is dry and sunny, you’ll find that your clothes dry just as quickly as they do in the summer. They’ll feel frozen stiff once you bring them inside, but once they get warm, they’ll thaw right out.
Deciding if a Wooden vs. Metal Clothesline is Right For You
Choosing the best materials for your clothesline posts will vary depending on a few factors. One of the most important is the climate where you live.
Choosing the right material is important, as this clothesline will be a permanent fixture in your backyard from now on.
Plus, they’ll need to be strong, as they’ll have to bear the brunt of your heavy wet laundry and occasional storms, too.
If you live in a dry, warm area, just any kind of timber can be used. You won’t have to contend with too much rot, but you will need to worry about termites (case in point…myself!). However, if you live in a rainier environment, wood might not last as long.
Beach environments are best suited to wooden clotheslines since the salt in the air will cause faster corrosion of the steel posts.
Pressure-treated wood and plain hardwood can both be used to make your permanent clothesline. Pressure-treated wood is that which has been treated with chemicals like alkaline copper quat.
The chemicals are pumped in and forced deep within the wood, helping the wood develop properties to resist fungus and insects (supposedly).
Pine is the most common wood used for pressure-treated lumber and is very easy to find. It can last up to 30 years, too.
If you’d rather go the more natural route and choose hardwood, you might want to choose heartwood posts of cedar, redwood, teak, or cypress. Heartwood has the strongest support capabilities and can withstand adverse weather.
Otherwise, there are usually three types of metal you can use to make clothesline posts, including stainless steel, galvanized steel, and aluminum. We used stainless steel but galvanized steel is one of the most popular choices.
Galvanized steel is available everywhere but is less resistant to rusting. Aluminum is more lightweight, and is more resistant to corrosion. It’s not as hard as steel, which means you might have some flexing in extreme conditions.
Keep in mind, too, that while stainless steel can be expensive, it’s going to get the job done. Some people consider it to be overkill, but I’d rather be safe than sorry.
Other DIY Clothesline Options
You don’t have to run to the store for a bunch of building supplies in order to make an attractive, functional clothesline. Instead, you might consider some of the following alternatives:
- Recycle an old fence
- String up clothes on your porch or patio
- Use an old ladder
Most people don’t recommend stringing up clotheslines between trees for a couple of reasons…
Trees produce sap – the sap can leak onto your clothes, as can the bird poop from the creatures that like to hang out in those trees! Plus, when you drill a hole into a tree, it will break the cambium.
This can kill the tree or cause girdling. Not only that, but trees move in the wind, which can cause your clothesline to snap.
You can also buy a clothesline. Store-bought options are usually made out of plastic.
My Permanent Clothesline Story
If you remember, almost one full year ago my wooden-post clothesline collapsed under the weight of a heavy load of wet laundry. Termites had eaten the posts until they no longer could bear the burden of their existence.
Termites aren’t supposed to like pressure-treated lumber.
I rewashed all of the clothes and tied two of the clotheslines together so that they were long enough to stretch to the closest tree at the edge of the woods where I secured it with a clamp.
For the past eleven months, I’ve been hanging all of our laundry on that one makeshift line from the post to the tree.
It wasn’t pretty, and it wasn’t nearly enough line for the amount of laundry I need to do each week, but we managed.
Finally, I decided it was time to invest in a proper clothesline setup. Having already experienced the downsides of using wood for a clothesline post, I knew I wanted to go with metal this time around.
I plan on hanging my laundry out for many, many more years, so I need something that will last and won’t have to be replaced anytime soon.
After reading tons of reviews, I settled on a set of White Powder Coated Steel T-Posts. The pair set us back $100, which was hard to swallow but I figured it would be worth it over time.
Other materials we had to buy were:
- three bags of Quikrete concrete mix
- (10) 3/16 Inch Stainless Steel Cable Clamps
- (5) 1/4″ Stainless Steel Hook and Eye Turnbuckles
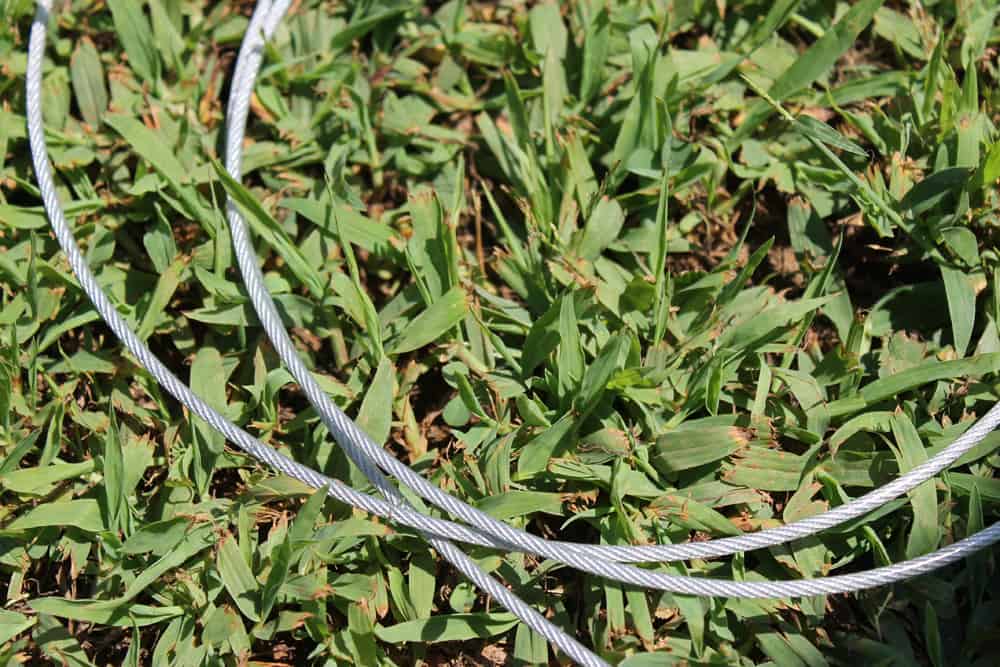
- 150′ coated clothesline wire (more or less depending on how long you want your lines)
You’ll also need the following tools:
- a tape measure
- a level
- a shovel or post hole digger
- needle nose pliers
Where Should I Put My Washing Line?
Finding the ideal spot to hang your clothesline can be a tricky task. It’s important to choose an area that gets plenty of sunlight so you can have clean clothes dried faster. If you can, put the line in an area that also receives a lot of airflow to help expedite the drying process, too.
You’ll also want to select a pulley system with securely-anchored points on either end of the clothesline, as this will ensure your laundry stays in place while drying.
How High Should a Laundry Line Be?
If the line is too low, you may be forced to crouch or kneel in order to reach it—which can be tiresome and uncomfortable.
On the other hand, if the line is too high, hanging clothes up or taking them down will require a step stool or ladder to reach the clothing.
Therefore, it’s important to take into consideration what you plan to hang on the line when deciding where to place it.
Generally speaking, setting it between six to eight feet off of the ground should suffice. This allows ample room for even large items such as bedding and towels without having to be set so high that it will look out of place in your yard.
How to Install a Permanent Clothesline
Here are some tips to help you install your new clothesline.
1. Determine the best placement.
Ideally, the best place to install a clothesline is on the south side of your property where it will get the most sun. Position the clothesline running north to south so that the sun will cross the clothesline from east to west to maximize exposure.
This will allow your laundry to dry more quickly. If there is no place to install a clothesline on the south side of your home, find the sunniest spot in your yard to place it. Partial sun is okay, it will just take your laundry longer to dry.
Install your clothesline on a sunny day, with no chance of rain for a couple of days, in order to give the concrete time to properly set up.
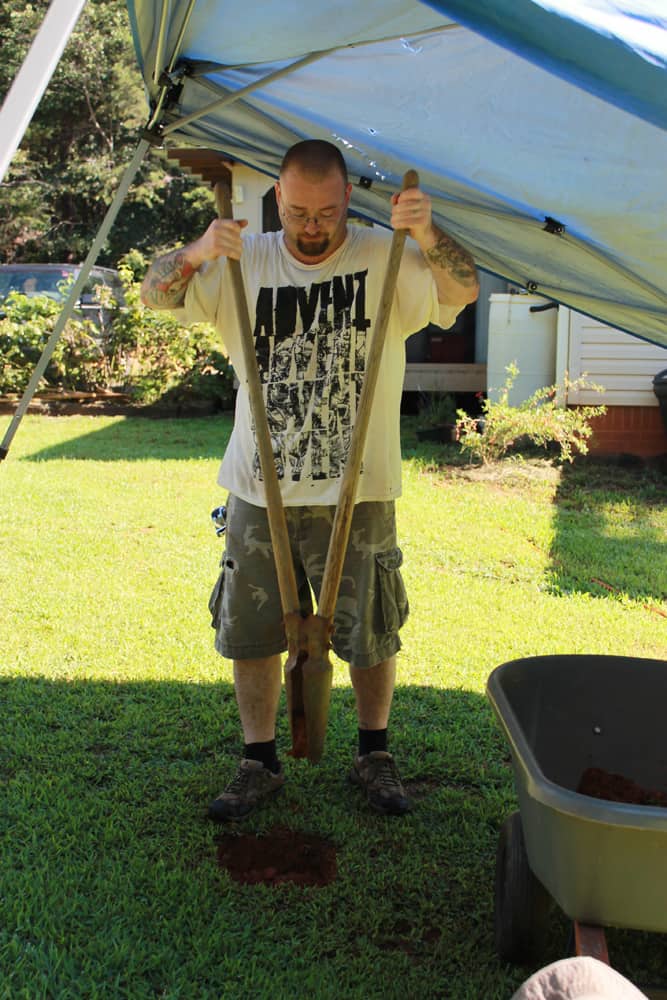
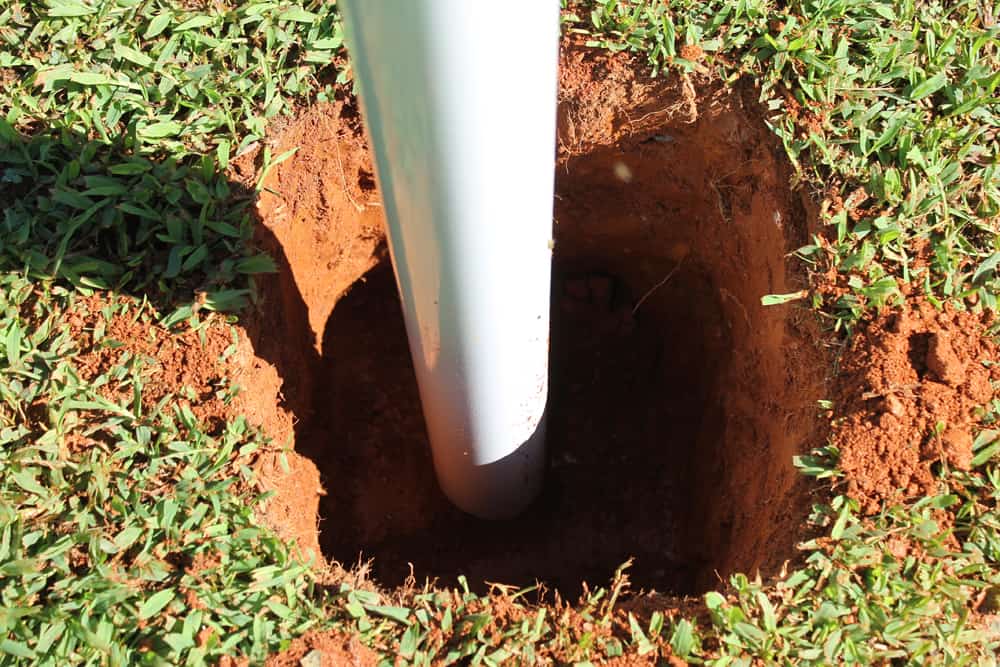
2. Dig the holes.
Using a post hole digger, dig two holes- one for each post, 18-24″ deep. We spaced ours 25 feet apart to give me 125 feet of line total.
I wouldn’t go any farther apart than that, otherwise, the line might start sagging in the middle underweight.
When you dig your holes, you’ll want to remember that the ideal height of each post will vary between each household. You’ll want to measure the best height for you by lifting your arms up straight to see how far your wrists are from the round while standing straight up.
Your clothesline needs to be tall enough to accommodate your longest sheets and dresses, but not so tall that it’s difficult for you to hang your clothes by yourself. This might be trickier for short folks!
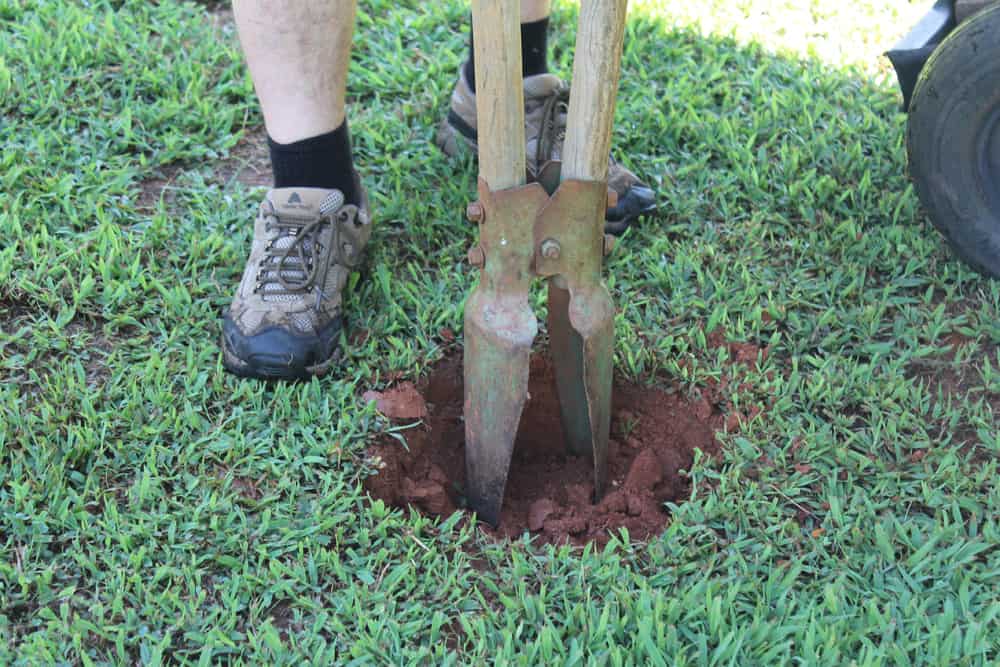
Dump the dirt in a wheelbarrow to keep your yard tidy during the installation process.
3. Place the pole in the hole.
Drop the end pole into the hole drilled somewhere near the center. It’s best to install the posts one at a time.
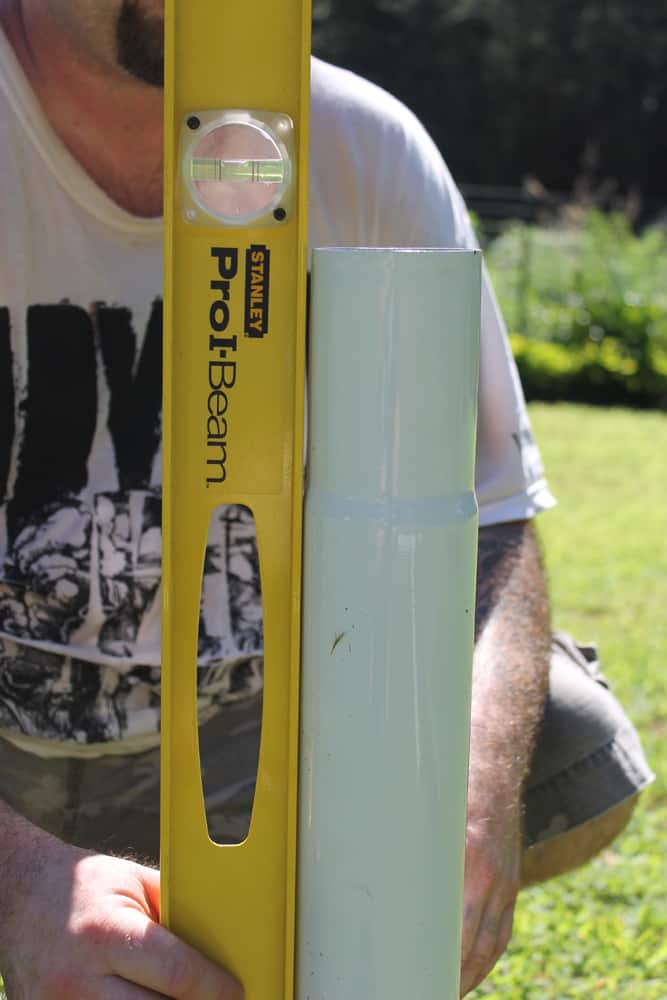
4. Level it up.
Use a level to make sure the pole isn’t leaning. You definitely want them as straight as an arrow.
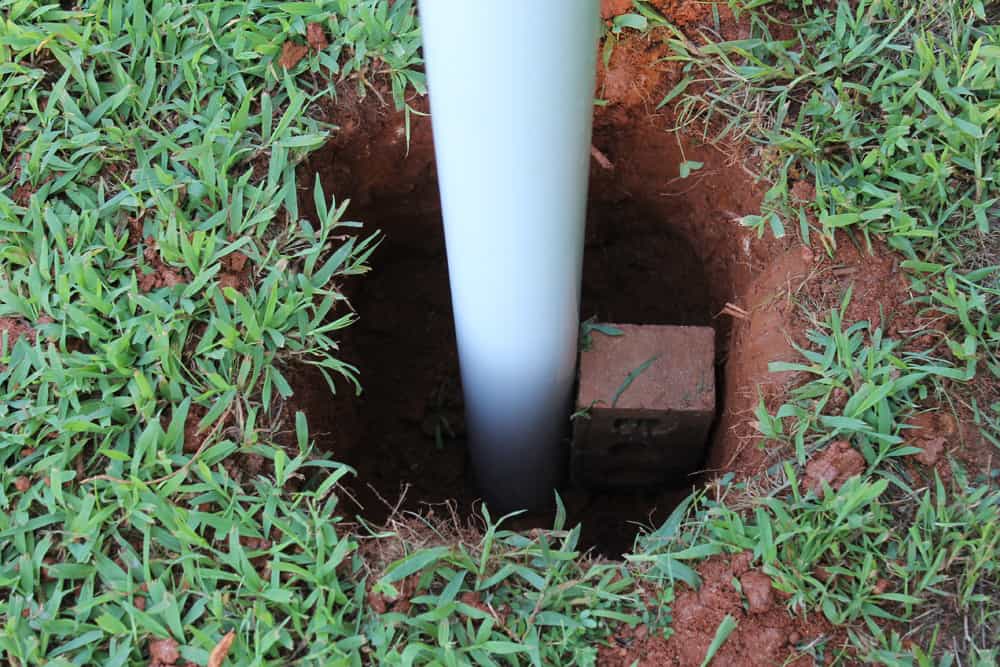
You can use rocks or bricks to help hold the pole level while you pour the concrete.
Remember, it’s important for your clothesline to be level as this will add stability. When wet, a load of laundry can weigh up to 18 pounds!
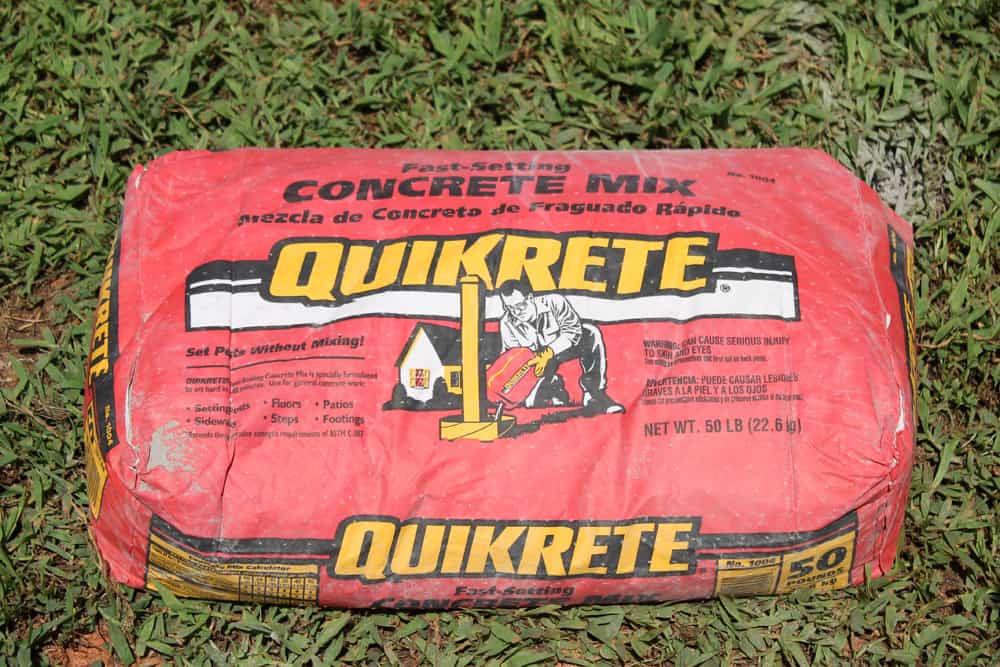
5. Pour concrete into hole.
Fill each hole flush with dry concrete mix. You’ll need 1 1/2 to 2 bags of quick-setting concrete per hole.
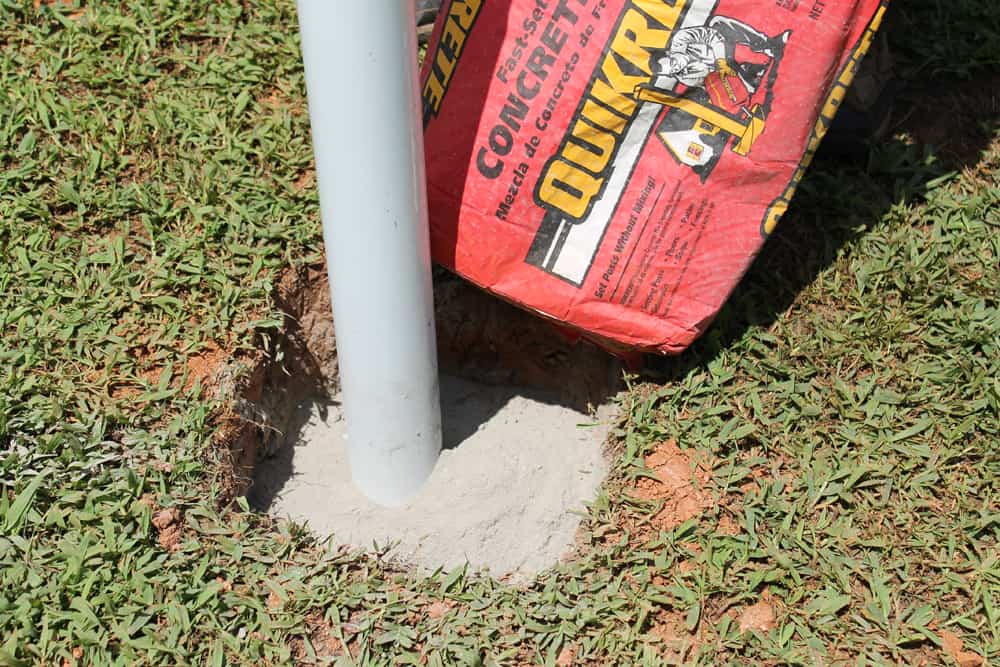
Pour the dry concrete into the hole doing your best to keep it somewhat even all the way around. You should probably wear a mask during this process so you don’t breathe in the dust.
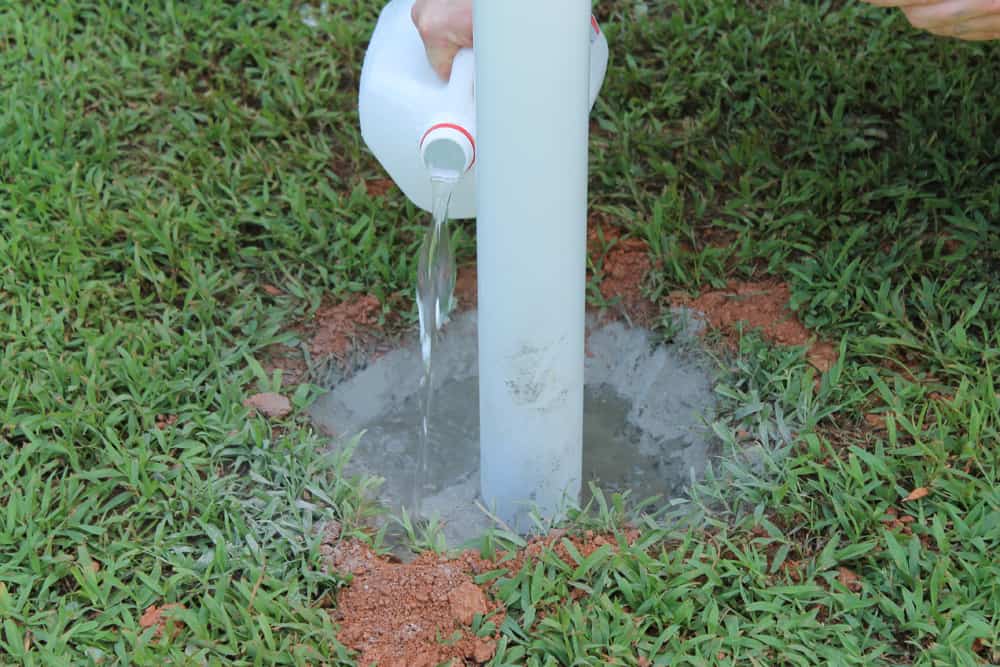
6. Add water to the concrete mix.
Next, pour 1/2 gallon of water into the hole over the powdered concrete mix. Follow the instructions on the bag of concrete as they may differ by brand.
Typically you won’t need to do any mixing or stirring. Allow it to sit undisturbed until completely dry. This takes several hours.
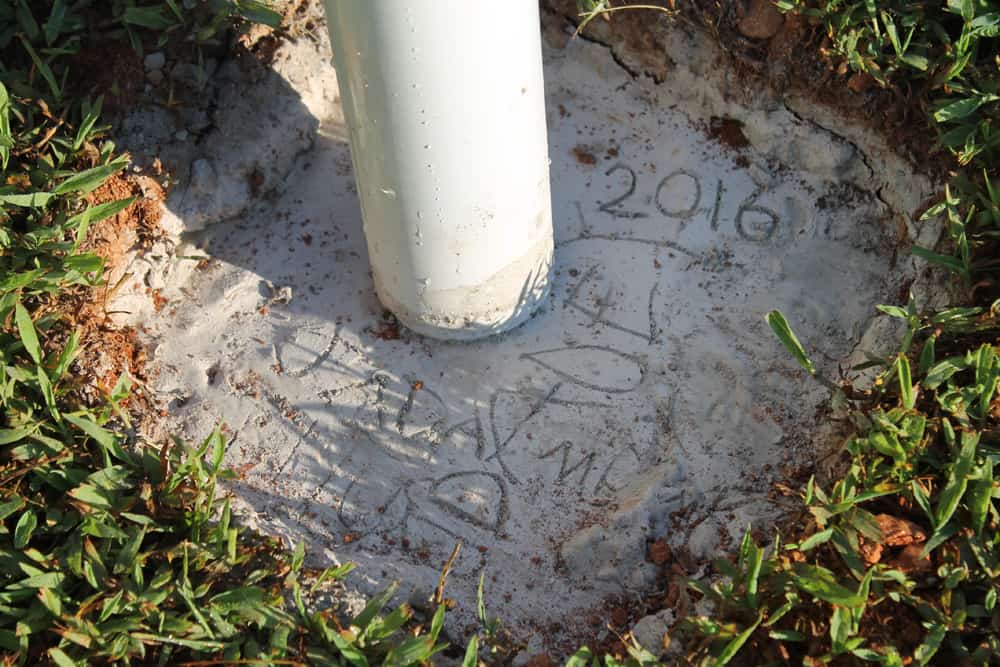
Once the concrete sets up pretty firm you can let your kids write their names in it. Xia wrote “DADEY” instead of “daddy”. Cute.
Maybe a hundred years from now somebody will unearth our scribbles and marvel over them.
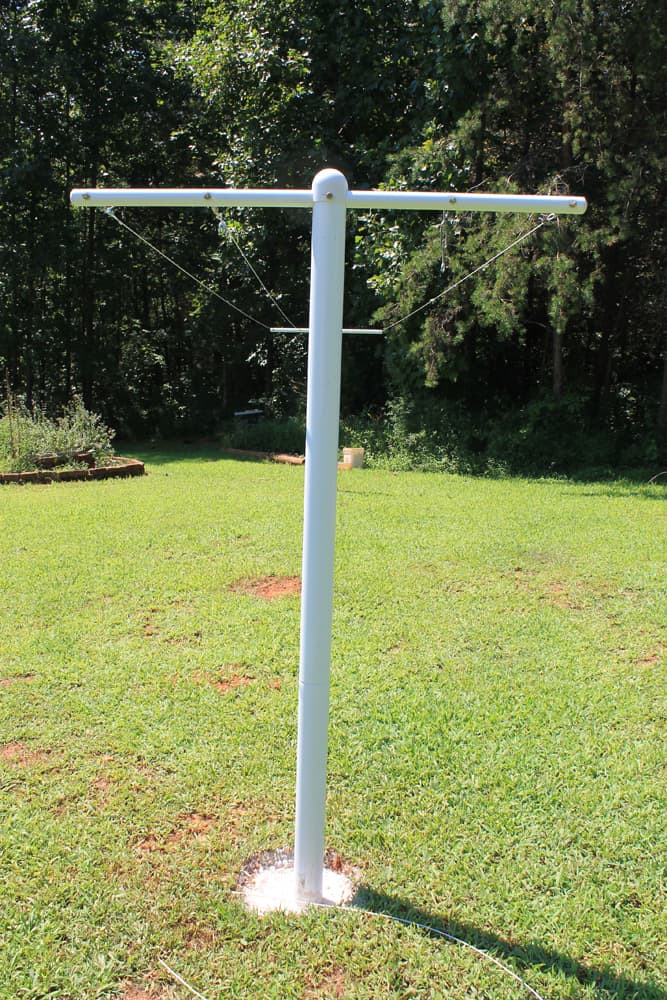
When the concrete has been set for 24 hours or so (depending on the type of concrete you used), and the poles are firm in place, attach the top of each post to the base and assemble the cross bars.
7. Setting up the actual clothesline.
Now it’s time to thread the wire from one side to the next. Definitely use coated wire for your clothesline. Cotton lines will sag and break eventually, and uncoated wire will rust over time.
Measure out enough wire to run the length of your clothesline, adding about six inches or so extra to each side to allow for doubling over to clamp it in place.
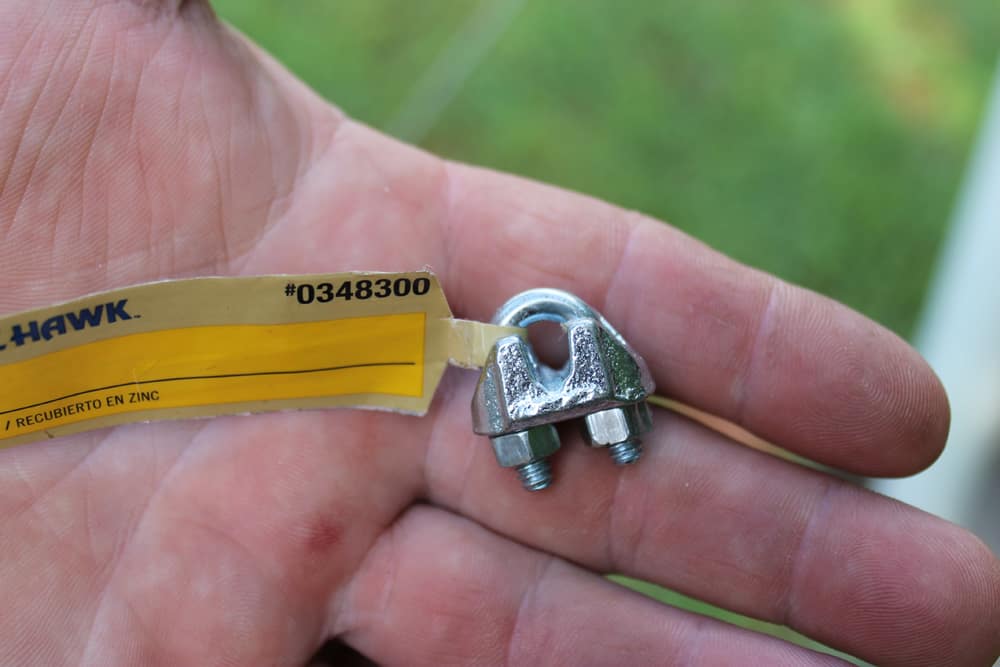
Use stainless steel cable clamps so they don’t rust.
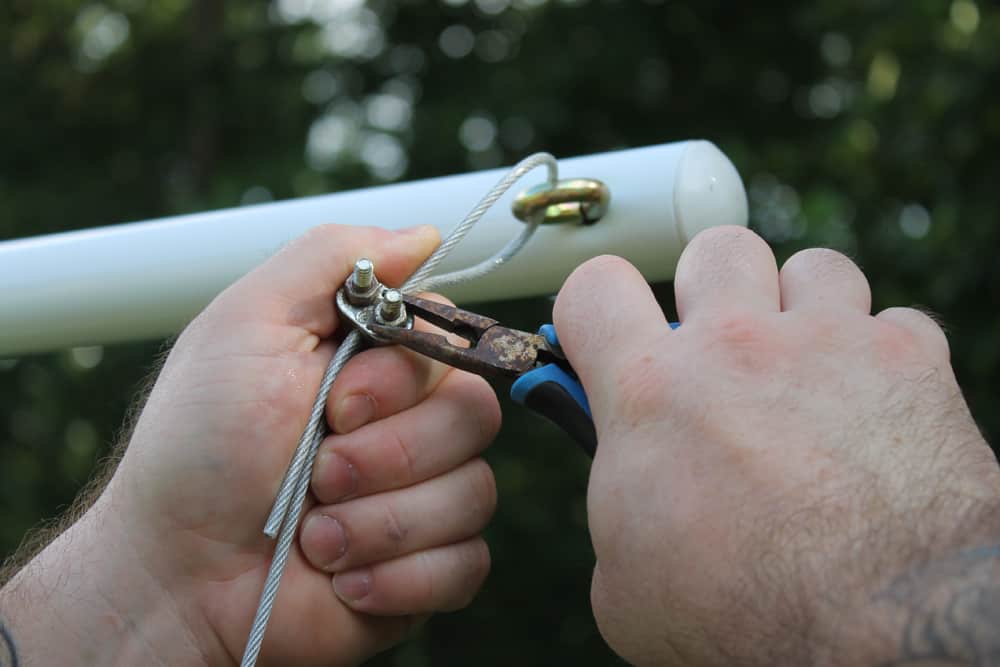
Thread the coated wire through the eye hook on one end of the clothesline post (eye hooks should have come with your t-post kit).
Double it over and clamp it together with a cable clamp, tightening the nuts with needle nose pliers.
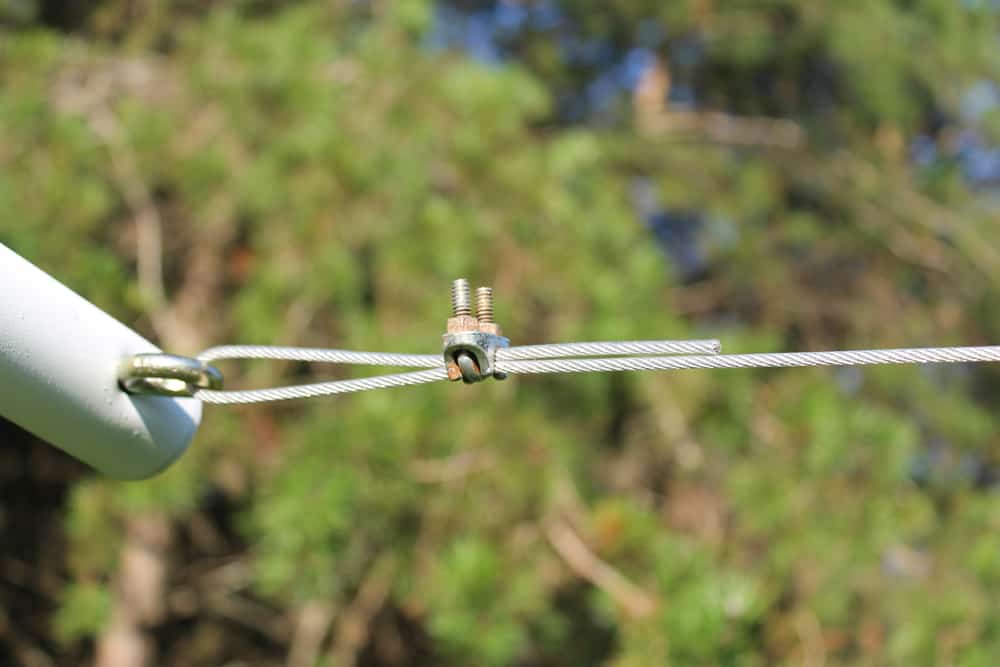
It will look something like this on one end of the line. I need to have this clamp turned over… it looks upside down to me.
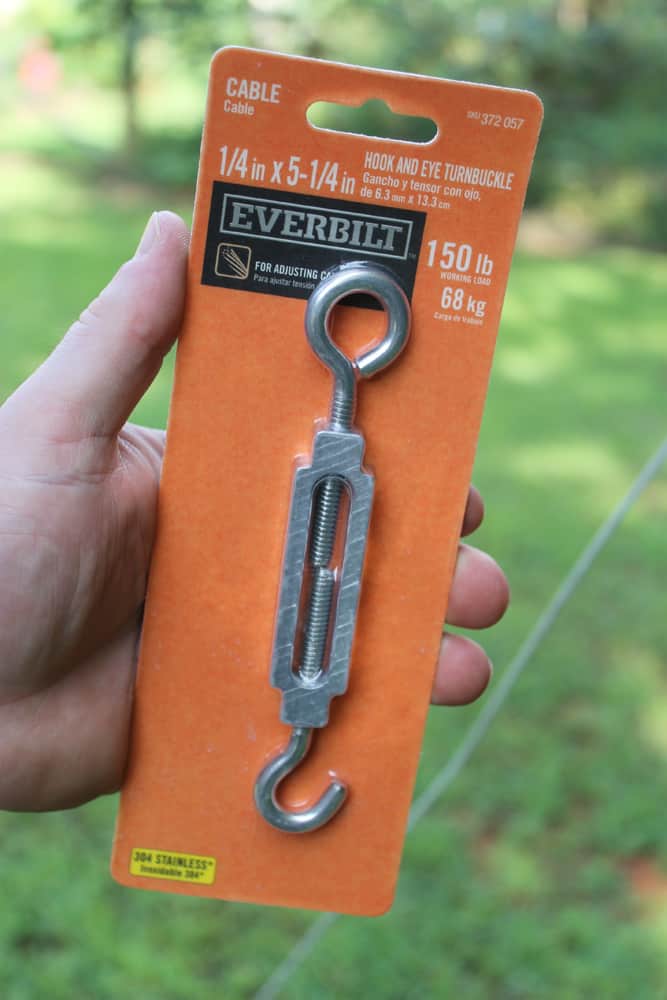
To attach the other end of the line you’ll need a hook and eye turnbuckle. One for each line.
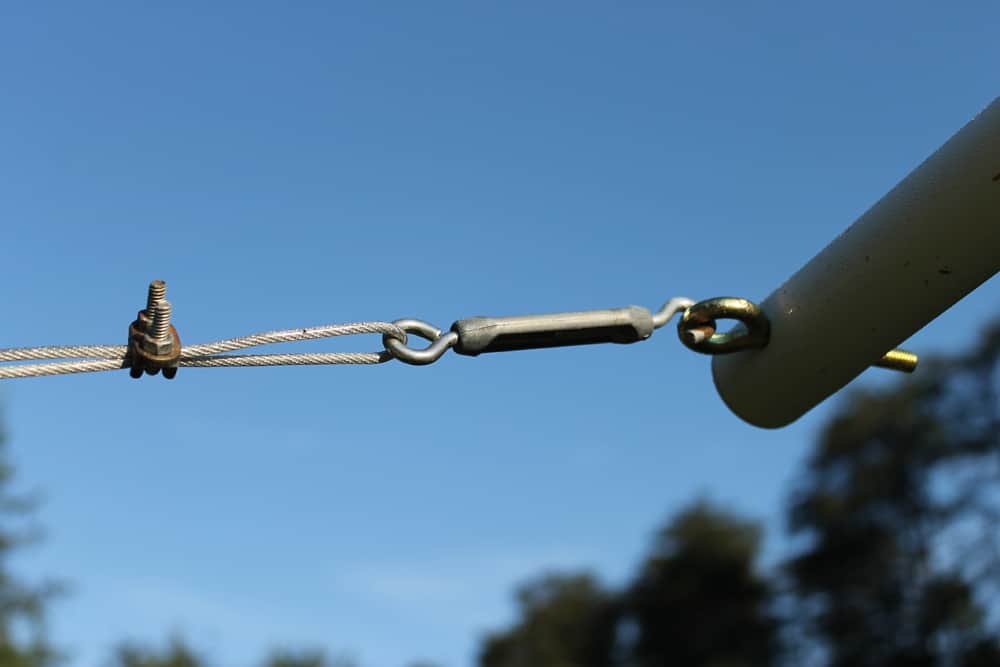
Attach the hook end of the turnbuckle into the eye hook on the opposite t-post, then loop the clothesline wire through the eye end of the turnbuckle and attach it with another cable clamp. You can use this turnbuckle to tighten your line if it starts to sag over time. (Which it will be a little.)
Repeat this process for all five lines (or however many you end up going with). Then step back and enjoy the beauty of your new clothesline.
How to Install a Pulley System
A pulley clothesline makes it easy for you to dry your clothes quickly, affordably, and in an eco-friendly manner. Here’s how to install one.
Mark and Insert the Posts
Once you’ve chosen your location, mark where your posts will be placed. You’ll need two posts for each line of your clothesline.
The height of these posts should be between 6 and 8 feet above ground level so that your clothes don’t drag on the ground when hung up. Use a measuring tape to mark off where each post will go and then use a shovel or post hole digger to create holes for them.
Once you’ve dug the holes for your posts, insert them into the ground and fill in any remaining soil around them with concrete or gravel. Allow 24 hours for them to set before moving on to the next step, which is attaching pulleys onto each post at least two feet from their tops.
Drill Pulley Holes
Drill the holes where you plan to hang the pulleys for both the top and bottom of the clothesline. Using a long screwdriver, screw hooks into these holes, then hang your pulleys onto those hooks.
Loop Clothesline and Secure
Loop the clothesline itself through the pulleys, creating a loop to beat them, then attach a clothesline to the end of the line that comes from the bottom pulley. Pull the line through the top pulley and the bearings that are in the middle of the tightener, then make sure it’s taught.
Secure the end of the clothesline and trim off any excess line.
How to Install a Rotary System
A rotary clothesline is one of the most basic clotheslines you can have. They’re compact and cost-effective, helping you to make the most of your outdoor space since they can hold more clothes than any other kind of clothesline.
Dig Hole for Post
Start by giving your rotary clothesline the most secure footing possible. Remove sod with a spade, then use a crowbar to loosen the soil.
After digging your hole, use a quick-setting post-fixing compound. Fill the hole with the dry compound, then put a short receiver tube into the dry mix. Position the top of the tube slightly below ground level.
Add Water and Level the Tube
Next, use a watering can to dampen the fixing compound. Make sure the tube is level with a spirit level. Replace any sod that you removed.
Install the Clothesline
In most cases, you’ll need to wait a few days to continue on to this step (you need to give the concrete time to harden). Check the instructions on your bag of compound to find out exactly how long you need to wait. Let the compound cure, then install your clothes.
How Do You Tighten a Clothesline Wire?
Start by making sure the wire is snuggly wrapped around the line and facing down to prevent sagging when weight is applied.
Next, secure the wire onto either end of the line using whatever ties or screws are associated with your model of clothesline. Lastly, use safety gloves to tug on the wire in various places along its length to ensure it’s secure.
Try hanging pieces of clothing an arm’s length apart to create energy that pulls the line tight when it is loaded up; using the clips you can then make sure there are no sags in between.
You can also tie a knot at the ends of the line so that it won’t go limp throughout the day, as well as running a piece of twine across the middle which will stop any drooping in the middle section.
If you need extra tension during windy days, use a couple of bricks or large stones at each end to weigh it down simply but effectively.
Get creative!
You don’t have to stick to a standard template when you’re building and setting up your new clothesline (although, admittedly, we did).
You can add some carvings, colors, or curves, or even install a canopy or trellis to help it serve double duty. I’ve even heard of people turning their clotheslines into gorgeous sculptural pieces or hammocks!
Adding some beauty to your clothesline is a great idea. It will make it much more enjoyable to keep on your property. Remember – you’re going to have to look at it all the time, so you might as well make it pretty!
Sigh. Isn’t ours lovely?
Take that, termites!

A city girl learning to homestead on an acre of land in the country. Wife and homeschooling mother of four. Enjoying life, and everything that has to do with self sufficient living.
I found it easier to just drive over to the neighbors and use theirs when there not looking or home.
Where did you get the poles??
Exactly my question too.
I bought two poles at Home Depot $49.00 each. This doesn’t work. Instructions on box say cement 12 inches in ground and poles bend in when you tighten lines. Never going to work. Cement in deeper lines too low. Build your own out of 4×4. Wasted $$$
I have also done one but to strain the wire , I just welded a headed eye on a plain bolt and is enough to use to strain the wire using a spanner and a lock nut
Where did you get the poles? Are they heavy duty steel? I just looked at some on Amazon and the pole is in 2 pieces which doesn’t seem sturdy to me. Thanks
My question, too. They’re either flimsy, cheap poles or sturdy steel ones that cost $400 each!
After a number of years of UV sunlight exposure the plastic coating of my clothesline cracked and fell off in bits into the yard. Not so nice for the environment.
There are at least three alternatives to plastic coated line:
* Stainless steel line, as above mentioned by Ant
* Stranded galvanized clothesline wire
* Solid aluminum clothesline wire
use pullys on both ends then you don’t have to walk all over your grass.
what is the size of the pipe how tall and wide it look good
What gave wire should be used please?
#9
Did any of you use cement in side the poles to keep them from flexing ..I have 2″ post 24 ” in the ground with 6′ above ground with a 20’3 lines ..worried about it saging..??
This was exactly what I was searching for! Thank you for the pics I was easily able to identify what I needed from the hardware store to install my new clothesline! Thank you!
PERFECT!Just what I’ve been looking for! Building it begins next week. Thank you SO much for the pictures and instructions!!! Big, big help! And please thank your husband, too!
I am so jealous!! That is a wonderful line. Enjoy.
If you do a lot of cable ties get a swage crimping tool and some metal crimps all of which can be purchased at home depot. Also use stainless steel cable without the plastic coating if you use the swage. The plastic coating can cause the cable to get loose since the clamps are not making direct contact with the metal. Stainless steel cable is worth the extra cost for outside projects.
The swage tool is really useful for any number of projects, from fencing to construction. I built a garden house using it. A swage tool looks like a large bolt cutter but only crimps metal. Another helpful hint is to use an electric cut off saw or dremel tool with a metal grinding cutter. It is much easier to use and makes a cleaner cut then using a hand wire cutter.
You can take a sharp knife and peel away the plastic coating at the ends where you double it back and clamp it down.
Alternately, use a bicycle cable cutter to cut the cable, rather than a saw or Dremel. These are designed to cut cables cleanly and are readily available from your local bike shop, Park Tools or any online bike store.
Ain’t playing with concrete fun!
A couple of thoughts …
Use a combination or box end wrench instead of needle-nosed pliers to tighten the nuts on the wire clamps. An adjustable wrench is handy to hold the back side of the clamp. Keep the nuts on the downhill side.
Bore a 1/2 inch hole near the bottom of the post and put either a long bolt through it or a piece of #4 re-bar. This keeps the post from pulling out or twisting when it loosens up. The set pin keeps the post from loosening.
Mix the concrete in a wheelbarrow so you know for a fact the entire batch is wet. Then dump it in the hole.
Daryle in VT
Thanks for the tips, Daryle! 🙂