Okay, so you got your hands on a bunch of fresh picked corn, still in the husks. Now what? Well, other than enjoying them right away, you can either can them, or freeze them.

This time around, I chose to freeze what we got the other day when we all went corn picking in a local farmer’s field. It’s much quicker and easier than canning. Although, canning does hold that advantage of storing food without the use of electricity.
Freezing is a quick and easy way to preserve your own corn at home. You will be able to enjoy the fresh tastes of summer all year long by following a few simple steps.
Freezing corn isn’t as easy as simply cutting it off the cob and packing it up, though. There are a few steps you need to take if you want to do it right. Let me walk you through them.
Table of Contents:
What is the Best Way to Freeze Fresh Corn?
Fresh corn is a summertime staple, and there are few things more disappointing than finding a freezer-burned bag of frozen corn in your freezer come winter.
However, with a little care and attention, it is possible to freeze fresh corn that will taste almost as good as the day it was picked.
The key is to blanch the corn before freezing it. This process helps to preserve the flavor and texture of the corn by stopping the natural enzymes that cause deterioration. I’ll give you more detailed steps on how to do this below.
Some other ways to freeze fresh corn are:
- Freezing whole cobs (blanched or unblanched)
- Freezing individual corn kernels
- Flash freezing kernels
- Freezing creamed corn
- Freezing unblanched corn kernels
Whichever method you choose, for best results, use the corn within six months. With a little effort, you can enjoy the taste of summer all year long.
Is it Better to Freeze Corn Cooked or Uncooked?
The answer may surprise you.
While both methods have their benefits, I find that freezing corn cooked (aka, blanched) delivers the best results.
First, cooked corn is less likely to become mushy when thawed. Second, it’s easier to portion out cooked corn, so you can defrost only as much as you need. Finally, cooked corn retains its sweetness better than uncooked corn.
Of course, there are some downsides to freezing corn cooked. It takes a bit more time and effort to cook the corn first, and you’ll need to use up some additional counter space while the corn cools before transferring it to the freezer.
Getting the Corn Cobs Ready
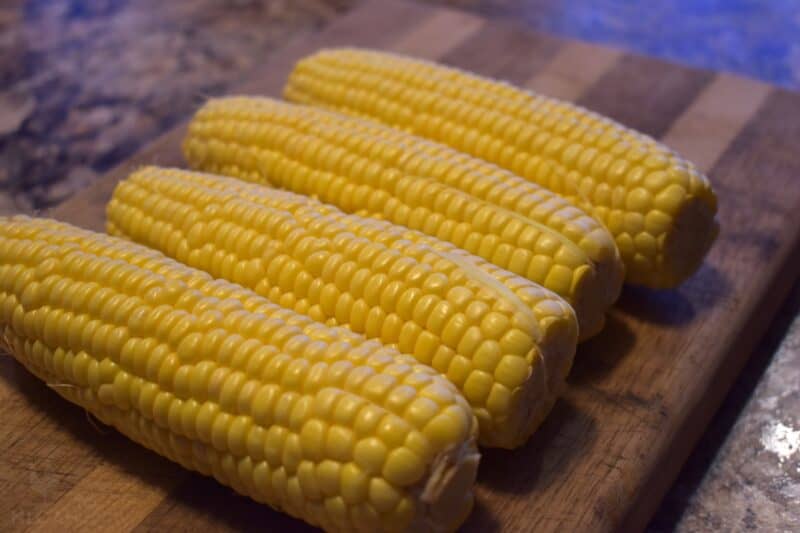
Sweet corn is best for freezing. Look for large ears with tight, bright green husks and plump, creamy kernels.
Avoid ears with brown or dried-out husks, as well as those with kernels that are tough, starchy, or mealy. Freshness is key, so try to select corn that was picked within the past day or two. If you can’t find fresh sweet corn, frozen corn is a decent second choice.
Frozen corn is typically less sweet than fresh, but it can still make a delicious addition to your meal. Look for corn labeled “sweet corn” and avoid those labeled “field corn” or “feed corn.”
When in doubt, taste a small sampling of kernels before purchasing to get an idea of the sweetness level. Store fresh sweet corn in the fridge until you’re ready to use it. If you won’t be using it within a day or two, you can store it in the freezer.
How To Freeze Corn – Blanching Method
First step, round up some helpers. Kids especially LOVE shucking corn! Jada’s thing is finding the worms. It’s like a treasure hunt for her. (Yes, there are worms in there!)
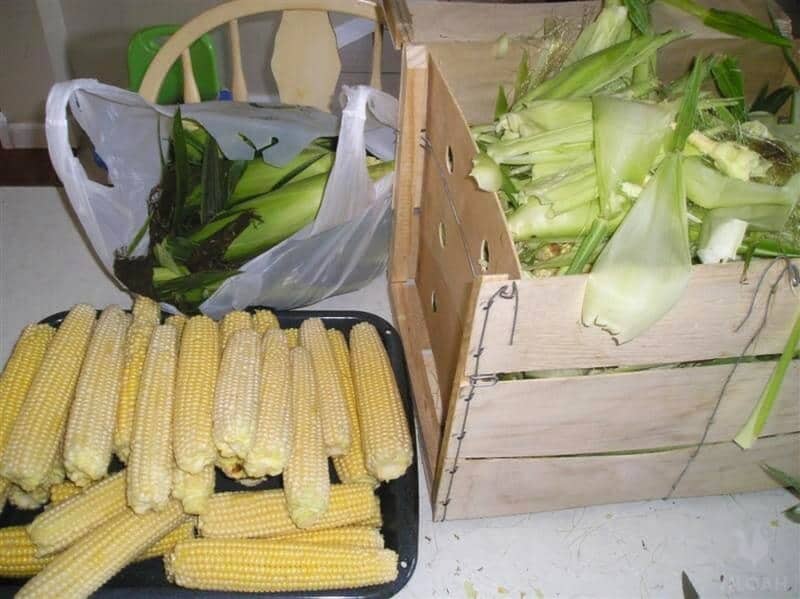
Set your station up. Throw the corn husks into a container to compost (or feed the pig!).
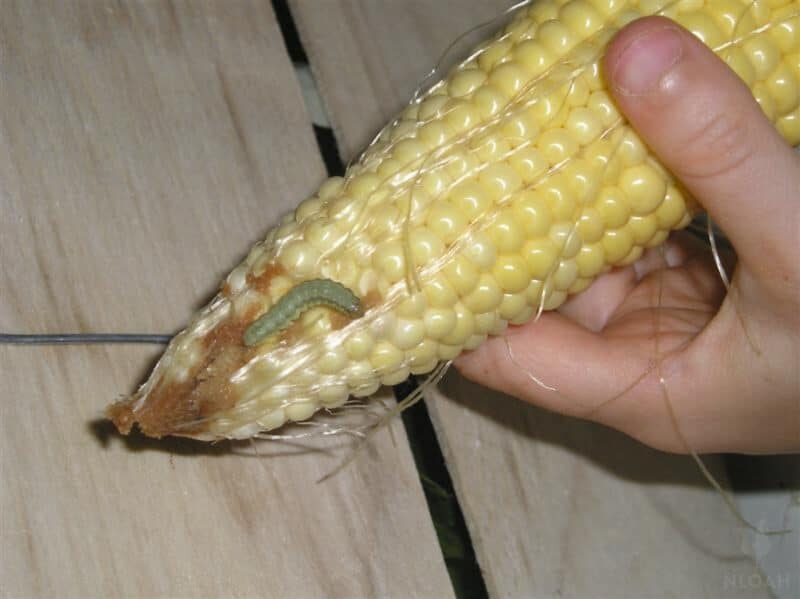
Pick the worms out. (I told you there were worms. You didn’t believe me, did you?!)
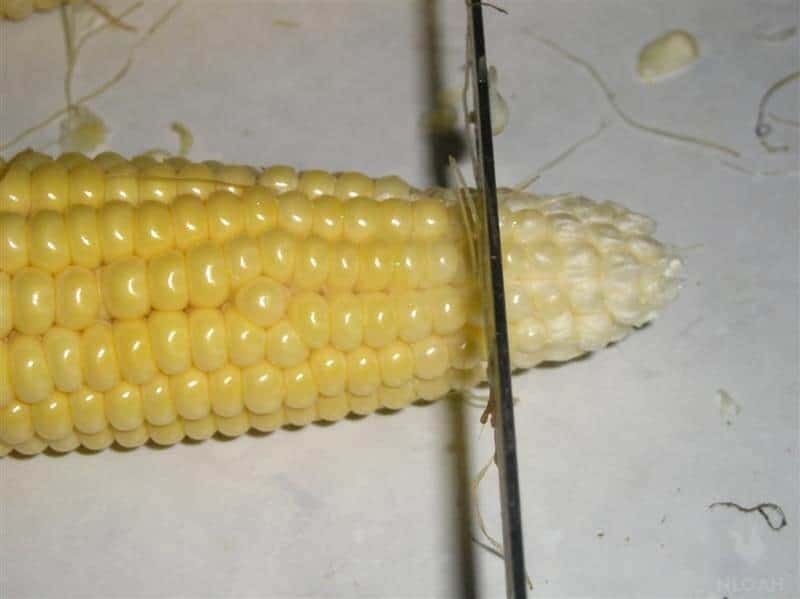
Cut the tip off, along with any bad parts.
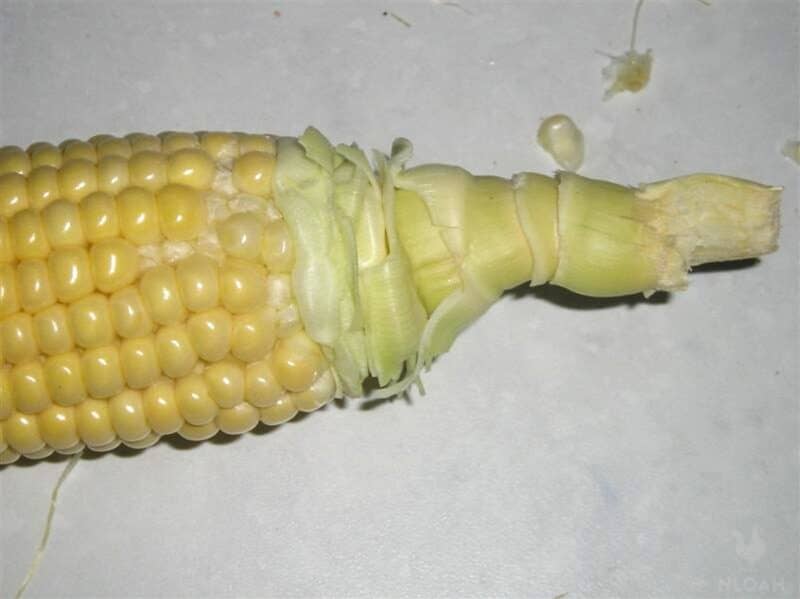
Break off the stem.
And line up your nice, clean corn for the next step: Blanching.
Do I Have to Blanch Corn Before Freezing?
Blanching is a good idea for several reasons, and it’s the method that I prefer for freezing my corn. It’s helpful in preserving the corn for long term storage.
When you blanch your corn even for just 4 minutes, you inactivate the natural enzymes that are found in the corn, which prevents the loss of both nutrients and color. It can also help protect the texture of your corn.
While blanching is not required if you’re going to use your frozen corn for something that doesn’t need that special corn crunch – like cornbread or corn chowder – I recommend blanching for all other purposes.
Otherwise, you’ll find that the corn becomes mushy and discolored after being stored in the freezer.
How to Blanch Corn Before Freezing
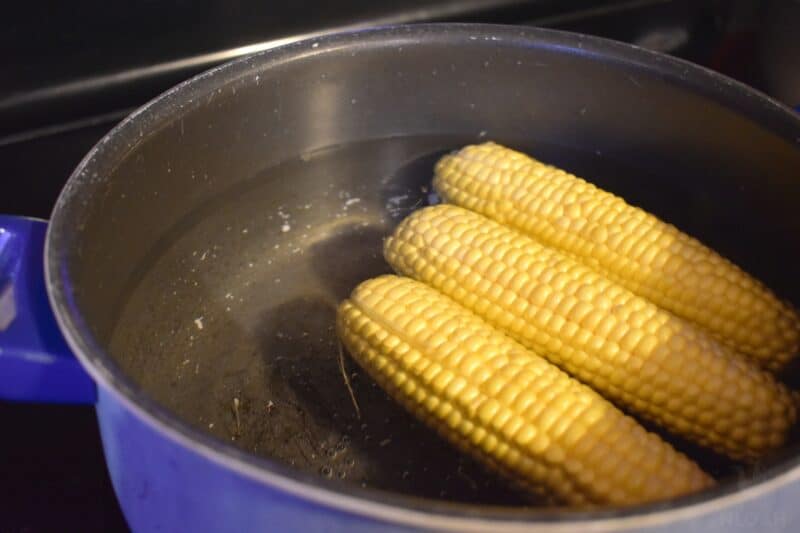
You’ll need a pot of boiling water, and a bowl of ice cold water with lots of ice cubes. It’s also handy to have a pair of tongs on hand, to get the corn out of the hot water easily.
Once your water is boiling, put as many ears of corn as you can fit into the pot and keep it boiling. Start your time using a microwave timer or stopwatch; you wanna let it boil for about 4-6 minutes.
When the timer goes off, immediately plunge the hot corn cobs into the ice water bath. Let them sit and cool for the same amount of time, 4-6 minutes. You’ll have to keep adding more ice to the pot as you go.
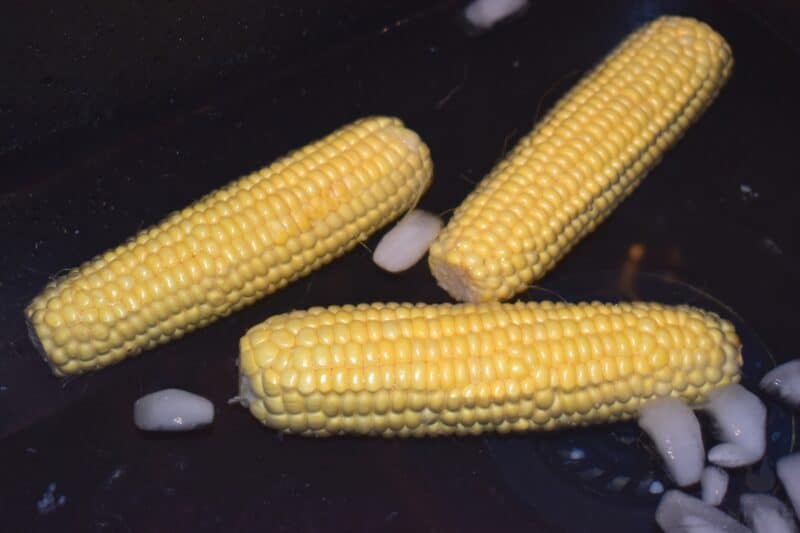
The ice bath is just as important as the blanching. The process of chilling prevents the corn from softening and losing its crisp texture when you cook it.
Rotate the next batch through, letting the cooled corn drain to the side until it’s all blanched.
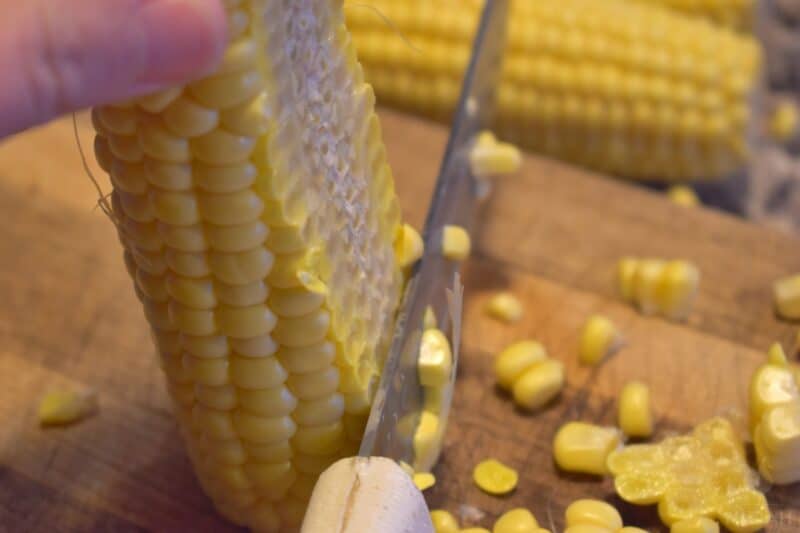
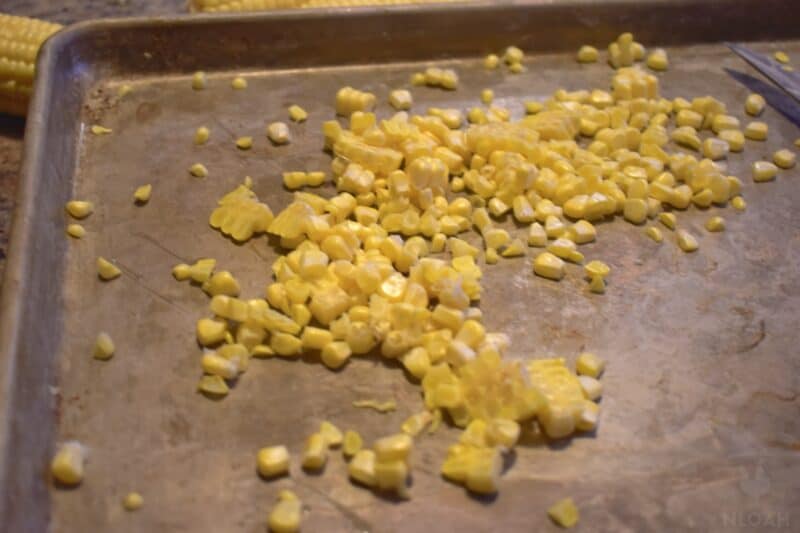
Next, using a good and sharp knife, cut the corn off of the cob, as closely to the cob as possible. It’s best to cut with the smaller end up.
Be warned – this process is messy! You might want to use a large cookie sheet or some baking trays to catch the kernels that will fly everywhere. You’ll also get juice everywhere, so wait to clean up until you’re totally done freezing your corn.
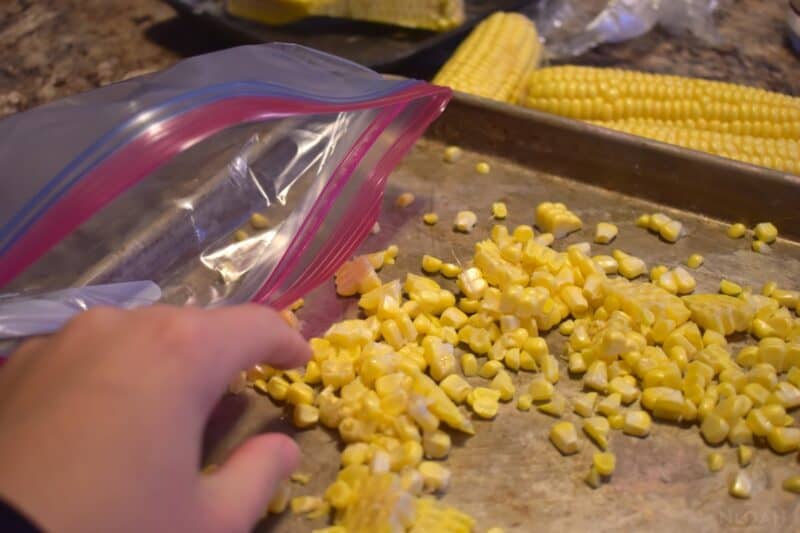
Once all of your corn is cut, you’re ready to fill some freezer bags. I always use a straw to vacuum seal the bags whenever I freeze anything in Ziplocs. Label and date, and there you go!
Sealing the Corn
You can also use a vacuum sealer to seal your bags of corn. Just keep in mind that it will suck a lot of juice from the kernels, making it difficult for your sealer to function properly and to get a good seal.
If you are struggling with this problem, try freezing your corn first with the bag unsealed, wait a few hours, and then use your vacuum sealer.
Here’s an additional option – you can freeze the individual kernels so they don’t stick together in one big mess, too. To do this, you will want to place the corn onto a tray and put it in the freezer for twelve hours. Then remove the tray and scrape the frozen kernels into containers.
Want cream-style corn? All you need to do is follow the steps above, but add one more. After you’ve scraped the kernels off the cob, run your knife along the cob again. This will remove extra pulp and juice. You can put this juice into the same containers that you use to freeze your corn.
Finally, you can also make a brine for your sweet corn before you freeze it. Simply mix together a brine with water, sugar, and salt, heat it until dissolved, then add the brine to your Ziploc bags. Your frozen corn will be ready to eat immediately upon thawing!
How to Freeze Corn Without Blanching
Blanching is only done to preserve the taste and texture of your corn and offers no food preservation benefits. It is not required for safety. In fact, if you eat your frozen corn within a few weeks, you likely won’t be able to tell whether it has been blanched or not. It will start to lose flavor after a few months.
Keep in mind that if your hesitations to blanch have to do with the fact that you already cut the kernels off the cob, you can blanch after they’ve been cut, too. It will just be a bit messier.
Otherwise, if you really want to stick to your guns and forgo blanching altogether, it can be done. Simply follow the same steps you would follow for the blanching method described above –but of course, skip the blanching, ice bath, and cooling steps.
How to Freeze Corn While Still on the Cob & In Husks
You can even freeze corn while it’s still right on the cob. Most people have mixed results with this. Some report that it has a woody, rubbery, or even mushy taste and texture, while others don’t like doing this while it takes up more room in the freezer.
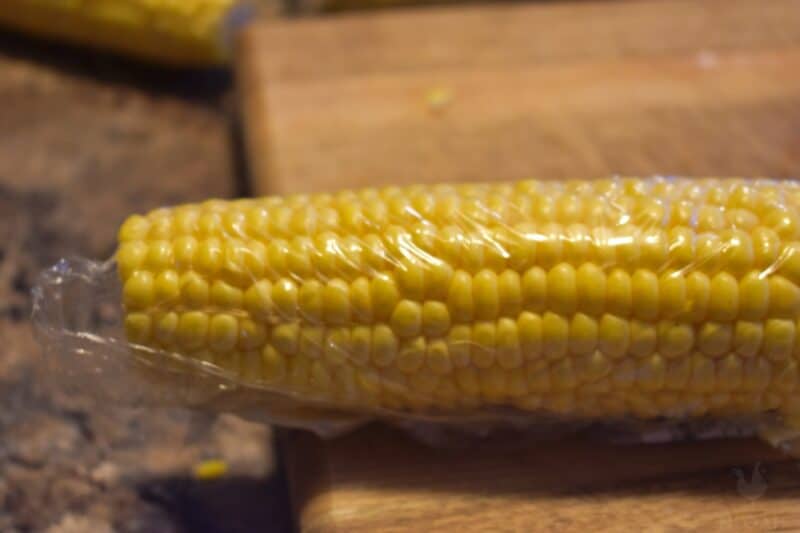
You can freeze your corn on the cob either after it’s been husked or while it’s still in the husks. It’s up to you. If you freeze without the husks, simply husk and blanch the corn cobs using the same methods as described above.
After the ears of corn have drained and cooled, you can wrap them individually in plastic wrap. Place each individual corn cob in a gallon freezer bag. Label and freeze.
There’s really no benefit of freezing corn directly in the husk, except that some people find this a quicker method of preserving their corn. It literally takes just a few minutes. However, the cobs won’t be quite as easy to use in recipes and can be a bit chewy.
Freezing Cream-Style Corn
Cream-style corn is a variety of sweet corn that is harvested later in the season, when the kernels are larger and more mature. Unlike other types of corn, cream-style corn has a higher sugar content, which gives it a richer flavor and creamy texture. Consequently, it is often used in recipes that call for creamed corn.
One way to enjoy cream-style corn all year round is to freeze it. Freezing cream-style corn is a simple process that involves blanching the kernels in water for 4 minutes, then promptly cooling and draining them.
Next, the kernels need to be cut from the cob and scraped with the back of a knife to remove the juice and heart of the kernel. Once this is done, the kernels can be packaged in freezer bags, leaving ½-inch headspace. Finally, the bags should be sealed and placed in the freezer.
When stored properly, frozen cream-style corn will retain its flavor and quality for up to 12 months. After that, the corn is still edible, but you may have some freezer burn to contend with.
FAQ – Common Questions
The answer is yes, you can freeze whole cobs of corn. However, there are a few things to keep in mind if you choose to do this.
First, the cob will no longer be suitable for eating on the cob once it’s been frozen and thawed. If you want to eat frozen corn on the cob, you’ll need to blanch it first.
Second, unless you take precautions, the cobs may stick together when they’re frozen. To prevent this, wrap each cob in plastic wrap before placing it in the freezer.
If you decide to freeze corn on the cob whole, I highly recommend that you check out this resource from the National Center for Home Food Preservation. It has more detailed instructions in addition to the ones I outlined above.
For best results, use frozen corn within six to eight months. To extend the shelf life of your frozen corn, be sure to store it in an airtight container or freezer bag. In addition, for maximum freshness, try to use up older packages of frozen corn before opening new ones.
Other Tips for Freezing Corn
If you want to keep your corn fresh for as long as possible, there are a few key tips to follow.
Use Quart Size Bags Instead of Containers or Jars
Sweet corn is best frozen shortly after it’s picked, and using quart size freezer bags will save you a lot of space in your freezer compared to plastic containers or even mason jars. Squeeze out as much air as possible before sealing the bag, then place it in the freezer.
To Minimize Mess, Use and Over the Sink Cutting Board
One of the best ways to ensure that you don’t make a huge mess when cutting corn off the cob is to use an over-the-sink cutting board. This type of cutting board is specifically designed to fit over most kitchen sinks, so that you can easily rinse off any loose corn kernels before they have a chance to fall on the floor.
Another advantage of using an over-the-sink cutting board is that it keeps your corn from flying all over the place when you slice it; the sides of the sink help to contain the corn so that it stays put.
If you don’t have an over-the-sink cutting board, you can also try using a regular cutting board placed on top of a large bowl or tray. This will help to catch any fallen kernels, and make cleanup a breeze.
When Blanching, Don’t Add Salt
When blanching corn, it is important not to add salt to the water. Salt can make the corn tough, and it is best to add salt later if desired.
Consider Investing in a Corn Stripper for Large Numbers of Corn
If you are lucky enough to have access to fresh, locally grown corn, you may want to consider investing in a corn stripper. This kitchen gadget can save you a lot of time and effort when it comes to freezing large quantities of corn. Simply strip the kernels from the cob and place them in freezer-safe bags or containers.
Try Flash Freezing Individual Kernels on a Cookie Sheet
If you want to freeze corn but are worried about the kernels sticking together, try flash freezing them. First, remove the uncooked corn kernels from the cob and spread them out on a cookie sheet in a single layer. Then place the cookie sheet in the freezer for about two hours, or until the kernels are frozen solid.
Once they are frozen, you can transfer them to a freezer-safe bag or container. This method ensures that the kernels will stay separate when they are frozen, making it easy to thaw and cook only as much as you need.
Alternatives to Freezing Corn
When stored correctly, your frozen corn will last for eight to twelve months in the freezer. Try to use up your frozen corn in no more than a year for the best flavor.
If you decide not to freeze your corn, remember that you can always preserve it by canning, too. It can even be dehydrated and rehydrated for later use, although I’ve never given this method a try.
And what to do with all those leftover cobs? Here’s an idea – feed them to your pigs or chickens! They will love these tasty treats, and then you won’t have to let them go to waste. You can always compost them, too.
Freezing corn is a great way to make sure you make the most of those juicy large ears. Whether you eat corn as a main course or even as a side dish, freezing it is a great way to extend the freshness of summer long into the winter months.

A city girl learning to homestead on an acre of land in the country. Wife and homeschooling mother of four. Enjoying life, and everything that has to do with self sufficient living.
I just husk and clean the corn and then cut it off the ear and put in freezer bags. When time to cook add a little water and cook till tender. Add butter salt and pepper. Family Love’s This!!
That looks great! I don’t ever freeze my corn in the husk just because living in a cold climate winter area it would suck to be sitting outside in the middle of winter shucking corn! BRRRRRR! Also what I do that is easier on us is we cut the corn off the cob FIRST and then blanch in a great big pot of water and sugar. Then we throw it into cold water and into freezer bags.
We just put up our annual round of corn yesterday. We use a wood corn cutter, that we have had in the family, and actually just purchased a new one. Think around 9.00, and it is so easy to use andreally speads up the process and it has a creamed corn attachment so you can put up creamed corn. Enjoy
Tips from a Pampered Chef consultant:
How to Buy Fresh Corn:
The most important thing to remember when buying fresh corn on the cob is that it starts converting sweet tasting sugars to starches immediately after it is picked. So ideally you want to buy it, cook it and consume it the same day it is picked or as close to then as possible. I have read that sweet corn has an 80:20 sugar-starch ratio when harvested but within 3 days that ratio will shift to 20:80. That’s the difference between really sweet-tender corn and mealy tough corn.
The more silk, the more kernels of corn.
You also want the husks to have a good green color – not brown.
Even though most stores don’t appreciate your doing this, try popping one of the kernels with your thumbnail. If the juice from the kernel is milky, the fresher the corn.
Look at the bottom of the ear of corn where it has been broken off at the stalk. If it has already turned brown, it most likely is at least 2 days old.
If you are not going to cook and eat your fresh corn that day, store it in the refrigerator with the husks left on.
Cooking Don’ts:
Don’t add salt to the water. It only toughens the corn when it cooks.
Don’t cool off hot corn by running under cold water. It will make the corn soggy.
Don’t overcook or the kernels will get hard and the corn will lose some of its sweet flavor.
Hope that helps!
Great tips, Mandie!! I do the pop-the-kernel thing to test mine, but I’ve never heard the other methods you mentioned. Good to know 🙂
I’ve never frozen my own corn, but I do have an old Czech recipe for corn cob jelly! They really DIDN’T waste anything back then!
Thanks for this, I should be getting a lot of corn this year if my garden does good (first time I’ve ever tried growing corn and only my second attempt at a garden) so I’ll definitely need to freeze some!
still need to get my corn done for this year – we use a turkey cooker (big pan from walmart with gas hookup) and cook ours outside in pillowcases to just pull it out and dump in cold water. New thing in this area is electronic silkers. We usually can borrow someones as this is a large mennonite community. Literally cuts your time to minutes when silking 100’s! When I was young my grandparents cooked in the husks and then silking was easier but this beats even that.
Best wishes in your corner of the world. Love to read about what you are doing.
This is a great posting – and so informational. Corn is like berries – you get it all at once for about three weeks, so you are scrambling like mad to get it frozen, preserved, eaten, whatever. Here’s to the summer bounty! 🙂
great tip Dawn ( about the freezing your ice ) and I wish I could have the memories that you will from you and your sisters doing this together…..my mom hates canning ( she is burnt out from when she was younger ) 🙁 cherish those memories
I also use the angel food cake pan like Stephanie… I found a couple at a thrift store for $0.50 total! Another tip I have though, is to use an electric knife if you can get your hands on one! (I haven’t actually tried it, but have seen it done… oh man, it went fast!)
Aaahhh, fond memories…:) Freezing corn is the one thing that my parents did (and made my brother and I do!) on a regular basis. We always had freezer corn till the next batch came in. It really is great! Someday, when I actually have a deep chest freezer and some corn I’m ready to start my own kids on their own corn freezing memories 🙂
My mom, sisters, and I do this every August. It’s an all-day event! There are usually 6 of us working while the kids run around & play.
My mom goes to a nearby farmer’s market, and she places an order for 30 dozen ears of corn. We sit in the garage all morning, shucking the corn, talking, and laughing together.
She has a second kitchen in her basement, so we all go downstairs with the shucked corn, and then we go through your steps in assembly-line style, each with our own job for the day.
It’s such a fun day together, just enjoying each other’s company.
One thing we always do is freeze cool whip bowls full of water a few days in advance. The big ice cubes that we make last longer than typical ice cubes.
I would have to say (according to the pictures) that is the cleanest corn-party I have ever seen.
We ususally do about 700+ ears at a time… everyone gets involved. I have to admit I never heard of the bundt pan idea that someone mentioned. But we usually donn aprons, sit with our pans on our laps and cut the corn off, scaping as we go. There also is someone using a corn crusher.
Makes for quite a corn mess, the bees love it… as we’re all outside. Everything gets done outside. And, needless to say we’re all abit corny after that. Then there is usually corn pie for supper or lunch, depending on what time we get started.
Good memories.
Last year we were told about just chopping each end off and just putting it husk and all in freezer bags… This was so easy to do and just last week we pulled out a couple of bags from the freezer that we froze from last year…It was as good as the day we froze it!!! That is the way we are going to do it this year too 🙂
I have frozen corn still in the shucks. When we cut the corn off the cob we also scrap the cob with the knife to get all the pulp and milky juices as well.
Oh wow, this brings back memories! I usually was the shucker and then cut the corn off the cobs. 🙂
I need to this this for my family. But, I’ll have to buy a lot of corn. We kind of stuff ourselves with it for the few months that it’s fresh. 😉
If you prefer it on the cob, you can skip the step of cutting off the corn. Just lightly dry the ears after the blanching/cooling process and continue with the putting in the bag part. Then when you’re ready to eat it, put it in a pot of water and bring to a strong boil for about 5-6 minutes. Great post and great pictures, Kendra! Thanks for sharing!
I put up some corn the other week and used the Bundt pan. It worked great. I was able to cut the corn off of 12 ears and fill the pan. My vegetable eating dog was not pleased, but the cleaning lady – ME – was very pleased.
I froze some corn last year and my aunt gave me a great tip.. When she cuts the corn off the cob she uses an angel food cake pan or a bundt pan. The corn fits perfectly on the hole and all the corn falls into the pan. Easy clean up too!
Huh, interesting! Great tip!!
Yup to that. Or use an upside-down bowl on top of a tablecloth/sheetpan. Or maybe it’s just me that can’t manage to do anything cleanly a la Martha Stewart. 😀