I’d never really considered dehydrating honey on the homestead, however, the other day I was gifted a lot of honey and I really wanted to use the five-gallon buckets that it came in for another project on the homestead.
So I did some research and came up with some ways to store the honey that didn’t involve tying up my newly acquired five-gallon buckets that I had other uses for on the homestead.
When properly stored, honey will last indefinitely. In fact, more than one archaeological dig has found honey that is still edible even centuries after it was stored away in tombs.
However, there are other ways to preserve this tasty little treat. Honey powder is nothing more than honey that has gone through the process of being dehydrated, and then ground into a fine powder. This can easily be stored in a sealed jar or other container, and rehydrated with some water.
The process of dehydrating the honey will prevent any yeast from forming on the honey. When considering foods on the homestead to dehydrate, most of us don’t think of honey, but, it’s an ideal food to dehydrate and it’s really easy to do.
Dehydrating honey also makes it easy to store for emergency food supplies as well as take on camping trips, hiking, fishing trips, and hunting trips, and to add to baking projects in place of regular or brown sugar.
I made a few phone calls to my grandmother to inquire as to the feasibility of dehydrating honey, and she told me that she had done it a time or two and that it was kind of easy.
I was hesitant as the term “kind of” made me wonder if she had some horror stories that I maybe should know about prior to my dive into dehydrating honey.
She stressed to me to “start small”. That was all she would tell me. The wise should always listen to their grandmothers. I had a huge mess to clean up the first time around, so the next time I tried it, I remember that grandma had said to “start small”.
You Will Need
You’ll need to have a few preparations before you embark on your honey drying project. To begin with, you’re going to need the following items…
Disclosure: if you visit an external link in this post and make a purchase, I may earn a commission. Read my full earnings disclosure here.
- Dehydrator
- Parchment paper for the dehydrator trays (or silicone mats that are used for making fruit leather)
- Honey
- Food processor or blender
- Sealed storage containers (jelly jars work great for this project)
Dehydrating Honey Steps
Step 1
Start by thoroughly cleaning your dehydrator. When you’re dehydrating food you want to have the dehydrator as clean as possible to prevent any bacteria from forming on the food that you’re dehydrating. After cleaning the dehydrator you may proceed.
Step 2
Start by placing your parchment paper or silicone mats on your dehydrator trays. You want a solid surface before, and don’t want to have to move parchment paper or silicone mats to the trays after you’ve poured them.
Step 3
Once you’ve accomplished this, you’ll want to pour about 1 to 1.5 cups of honey onto your parchment paper. You can go up to 2 cups, but not the first time; only after you’ve gained some experience.
Caution, “Less is more” here! If you add too much honey to the parchment paper, it will begin to spread when you turn the dehydrator on and it will ooze out onto the floor and into the components of your dehydrator.
I learned this lesson the hard way, and the cleanup took quite a bit of time (thank you to the dog that wandered in and helped me clean the floor up).
This is also the time to add any *“flavor” to your honey by sprinkling some cinnamon, cloves, ginger, or any other spices that you desire. Simply sprinkle a small amount onto the honey before you place the sheets into the dehydrator. This is a fun way to add some extra flavor to your honey.
Step 4
This step is the longest in the entire process. It can take hours upon hours to get the right level of dryness, and you’ll have to be ready to put the dehydrated honey into the blender or food processor right away when it’s done to prevent it from rehydrating. Patience is key in this step.
Every dehydrator is slightly different, so you’ll have to get the hang of how your specific model of dehydrators works. If you’re unsure, do a test run. If at all possible, choose a dehydrator that has a thermostat so that you can set your temperature as low as possible for this project.
Turn your dehydrator on to 120 degrees Fahrenheit (48 Celsius). If you don’t have a dehydrator with a thermostat, you can set it on the lowest setting. If you dehydrate your honey at too high of a heat, you will burn it. This process can take several hours to several days depending on the consistency of your honey and the power of your dehydrator.
Step 5
Check your honey frequently, about every two to three hours, to ensure that it’s not becoming burnt. If you do burn it, you’ll have to start over with fresh parchment paper, and a fresh supply of honey.
As you dry the honey, you’re looking for it to become hardened and almost crispy like a chip. Again, this can depend on the weather (humid weather is going to make the process take longer), the dehydrator, and the consistency of your honey.
Step 6
Once your honey is dry and crisp, it’s time to remove it from the dehydrator. Don’t wait too long to do this or your honey may absorb moisture from the air and begin to rehydrate naturally.
Simply grab a spatula and remove the honey.
Step 7
Break it apart into smaller pieces, and use your food processor or blender to grind it up into a fine powder.
Simply place your dehydrated honey “crisps” into your dehydrator and put the lid on, and blend or process on high or pulse setting until you reach the desired consistency. Be patient and remember that the longer you process it the finer your honey crystals are going to be.
You can grind your honey up into crystals or a fine powder, it’s all a matter of personal preference. If you’re going to be using it in place of sugar in recipes or on your breakfast cereal for example, you’ll likely want it to be ground finer like sugar. This is entirely up to you, and how you’ll be using your dehydrated honey.
Dehydrated Honey Recipe
Equipment
- Dehydrator
- Parchment paper
- Food processor or blender
- Sealed storage containers
Ingredients
- 1 – 1.5 cups honey
Instructions
- Clean your dehydrator.
- Place the parchment paper or silicone mats on the dehydrator trays.
- Pour 1 to 1.5 cups of honey onto the parchment paper or silicone sheet.
- Turn the dehydrator on to 120 degrees Fahrenheit (48 Celsius).
- Check your honey frequently, about every two to three hours, to ensure that it's not becoming burnt.
- Remove the honey from the dehydrator once it is crisp.
- Break the dehydrated honey apart into smaller pieces, and use your food processor or blender to grind it up into a fine powder.
Storing Dehydrated Honey
After you’ve ground your honey up into crystals or a fine powder, you’ll need to store it in a sealed container that has absolutely no moisture. A canning jar is ideal for such a purpose.
You’ll want to clean and sterilize your jar prior to using it to store your honey crystals. Also, make sure that your jar is completely dry.
Just one drop of water will start the rehydration process with your honey, so make sure that your jars are sterilized and at the clean and ready stage before you begin to process your dried honey in your blender or food processor.
Dehydrating Honey in the Oven
If you don’t have a dehydrator, you can set your oven on a very low setting of about 150 Fahrenheit (65 F), place a piece of parchment paper on a baking tray, put your cup of honey on that, and proceed as you would with a dehydrator.
Just keep a close eye on it if you’re using the oven, and make sure you check it frequently.
When it’s no longer sticky and you can put it through the blender or the food processor, make sure to do so immediately before it begins to absorb moisture from the air.
“Flavored” dehydrated Honey
If you wish to make “flavored” honey, you can sprinkle any of the following spices onto your honey just prior to placing it into the dehydrator.
- Cinnamon
- Chili Powder
- Cayenne Pepper
- Citrus Peels (finely ground)
- Cloves (finely ground)
- Nutmeg
- Pumpkin Spice
Or simply experiment and make up your own special blend of spices to sprinkle on top of your honey as it dehydrates and enjoy a new taste sensation in your homestead.
Always remember that it’s recommended that young children under the age of two not eat honey products.
Tips and Tricks
I prefer to use smaller jelly-sized jars to store my honey crystals in as any exposure to air can allow moisture into the jar and begin to rehydrate the honey. Once the jar is opened, the moisture in the air will begin to rehydrate the honey. Smaller jars help to prevent that possibility.
For baking purposes, I grind my dehydrated honey into larger-sized crystals. This way, it’s easy to use in recipes in lieu of sugar. I like to use it at the consistency of “raw sugar” that hasn’t been processed.
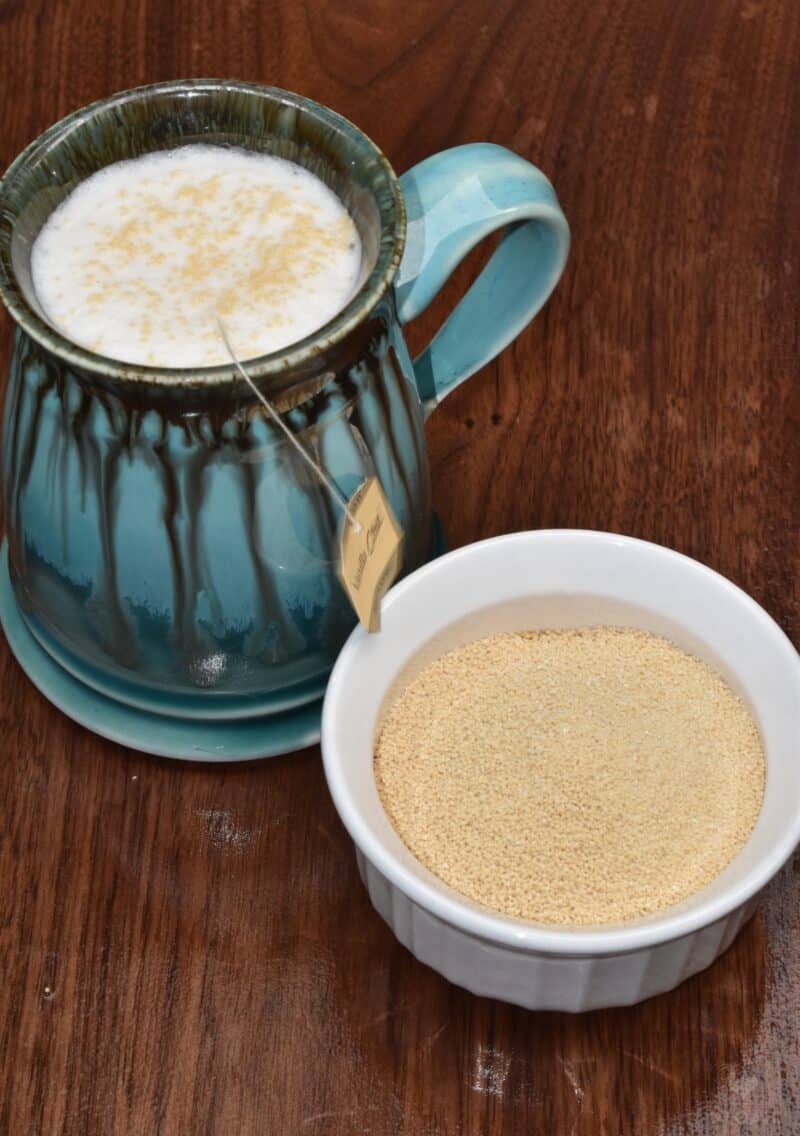
For eating cereal or in my coffee, I prefer to use the smaller honey crystals that are nearly in powder form. To do this simply continue grinding after your honey begins to form smaller-sized bits. These stir right into my coffee or on top of my cereal without any effort.
Dehydrating honey is a bit of an art. Always remember that the less honey that you dehydrate at one time the better. I always start with approximately one cup of honey at a time on the dehydrator tray.
Too much honey in the dehydrator at one time and you’re going to have a huge mess to clean up (trust me on this, the dog discovered the blob of honey on the floor and helped himself to it so that cleanup project wasn’t quite as sticky as I thought it was going to be).
Dehydrated vs. Powdered vs. Dried Honey? Are They the Same?
One question that I’m frequently asked is whether or not there is a difference between dehydrated honey and dried honey. The short answer is “no”, there is no difference, they are the same thing. However, many people get confused as some people will call it powdered honey while others will call it dried or dehydrated.
The bottom line here is that it’s all honey regardless of how finely ground the crystals are ground.
Final Word
If you’re looking for hiking foods, dehydrated honey is an ideal thing to take along. It can be used in beverages, it’s easy to carry, it won’t add weight to your backpack, and it has a very long shelf life.
It’s ideal for camping trips as well as hiking, as you can easily store it and won’t have to add any extra weight to your camping gear.
Dehydrated honey is also an excellent substitute for sugar in recipes and in food that we eat. We use dehydrated honey in place of sugar on “cinnamon toast”, in breakfast cereal, and in smoothies. It’s delicious and we love it.
When you find a great deal of honey or run across a great flavor of honey, you can easily store it by dehydrating it. You won’t have to take up an entire shelf with a huge five-gallon bucket of honey if you dehydrate it and turn it into a powdered form.
Once you get the hang of it, dehydrating honey is no different than dehydrating other things in and around the homestead. It’s fun to try it in recipes and juices as well as other beverages.
How you rehydrate your honey is all up to you and you’ll find more ways than ever to enjoy your dehydrated honey once you get going on it.


Hi, I’m Linda. I’m a mom, grandmother, homesteader. I love simple living and enjoy my life on a homestead where I garden, raise a variety of animals and strive for a life more like my grandparents lived.
My goal is to enrich life by living it as simply as possible and focusing on the way my grandparents did things. Life is so much more fun when it’s lived simply.
Ginger honey is my absolute favorite. It makes a great tea, hot or cold, or added to black or green tea.
Hello,
I have a question. I have a recipe to make whipped honey (creamed honey) that calls for “Crystalized Honey”. Would dehydrated (dried) honey work? Would Crystalized Honey be considered the same thing?
What dehydrated do you use? Mine doesn’t do the job. Doesn’t matter how little of honey I use it just won’t harden ??♀️ Also do you add anything to the powder to keep it from becoming sticky and hard?
Interesting. I wonder if I could make maple sugar this way also?
You make maple sugar by heating maple syrup to 255 or 260 degrees Farenheit. Then remove it from the heat and stir or mix. I use a stand mixer and the first time I thought I broke it. The moisture comes out randomly and suddenly. It will continue to loose moisture until it’s dry. If using instead of white sugar remember to match the weight not volume when substituting.
This is fantastic. I thank you for sharing your insight, expertise and experiments. Very cool.
Will try to dehydrate honey very soon.