As I’ve delved more heavily into the use of essential oils, I’ve often thought about how cool it would be to make them myself with some of the herbs I’m growing here on our land. Peppermint, Oregano, Marjoram, Spearmint, Dill, Eucalyptus, and Lavender are just a few that I could totally make myself, if I just had the right equipment. I know they won’t be as good of a quality as the oils I’m currently buying, but it would be a great backup alternative (especially with the way the FDA is cracking down on the natural healthcare business and essential oil companies lately, I’m honestly afraid they’re going to put them out of business and stifle our ability to purchase these oils in the future. I would tell you what brand of oils I’m stocking up on, but the FDA won’t allow me to share that information on my blog. ).
Turns out, it actually isn’t too complicated to home distill essential oils yourself! The main piece of equipment you will need is a still. Yep. The same kind moonshiners use.
The guys at Clawhammer Supply were kind enough to supply us with a 5 Gallon Copper Moonshine Still Kit in exchange for us testing it out and giving an honest review. Although this still can be used to make alcohol (which would be awesome for making tinctures, by the way), there are legalities to consider. According to information on Clawhammer’s website:
Federal law states that it is legal to own a still of any size. It doesn’t matter if you have a 1 gallon still or a 100 gallon still. According to the feds, it is legal to have a still for decoration, distilling water, distilling essential oils, etc. The still does not need to be registered with anyone and no permits are needed as long as it is being used for the aforementioned purposes. However, be advised it is illegal to distill alcohol without having either a “distilled spirits permit” or a “federal fuel alcohol permit.” It does not matter if the alcohol is for personal use only, not for sale, etc.
So, in order to stay within our legal limits we’ll only be using this still for distilling water and essential oils. Not to mention that moonshining is dangerous business if you don’t know what you’re doing!
The Kit, Tools & Materials
It should be heavily noted that this was our very first attempt at assembling a still. Before this project, my husband had never in his life sweated copper. We were complete novices (and when I say “we” I mean “he”, ’cause my husband was totally in charge of this one).
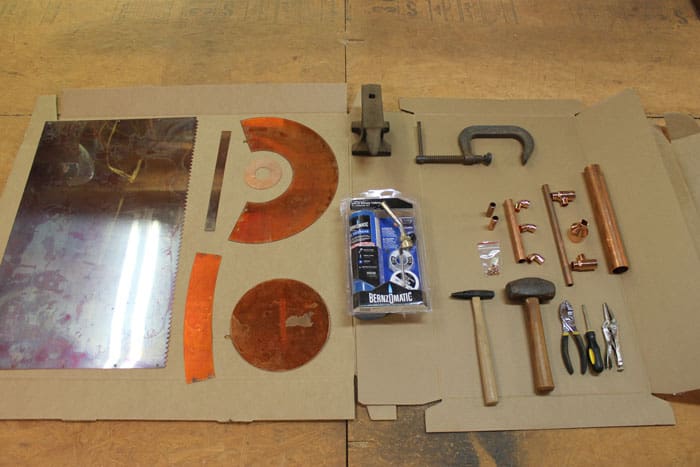
The still kit basically came as flat sheets of copper pieces and several copper fittings. There was also a boiler thermometer included. Jerry’s job was to weld them all together. Here you see a few other basic tools required to assemble the kit.
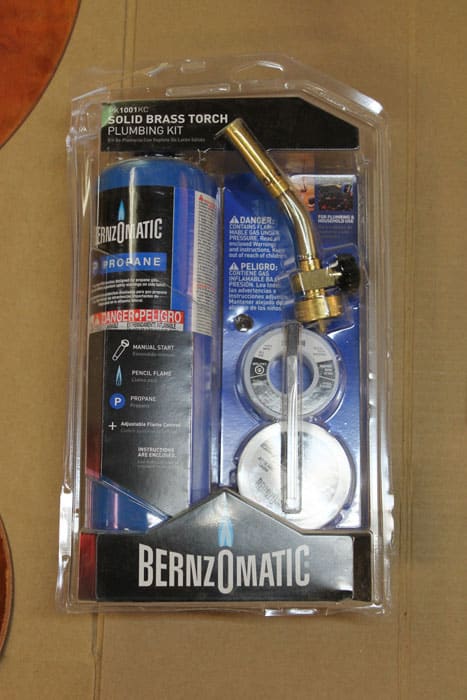
We picked up a Bernzomatic brass plumbing kit from our local hardware store for about $20. It came with some lead-free silver solder in the kit, though later we realized it wasn’t going to be enough.
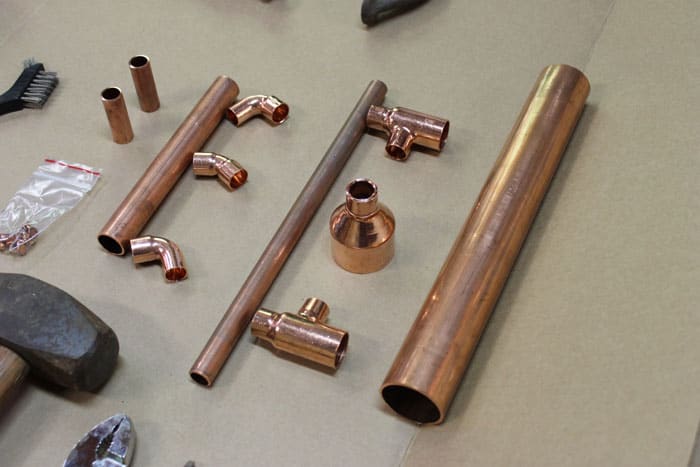
Here are some of the fittings for the column and drip arm.
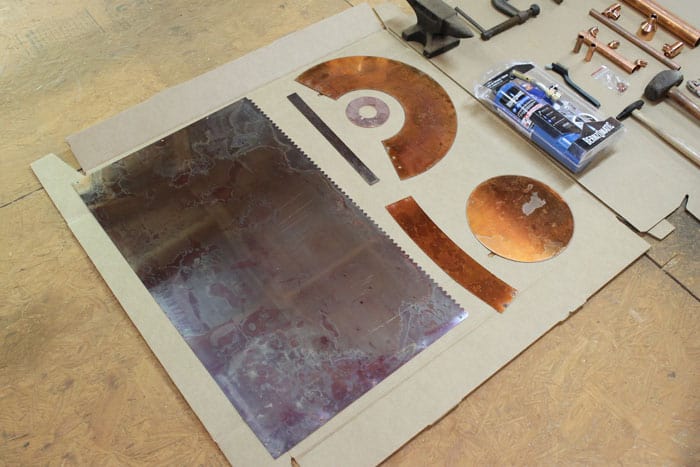
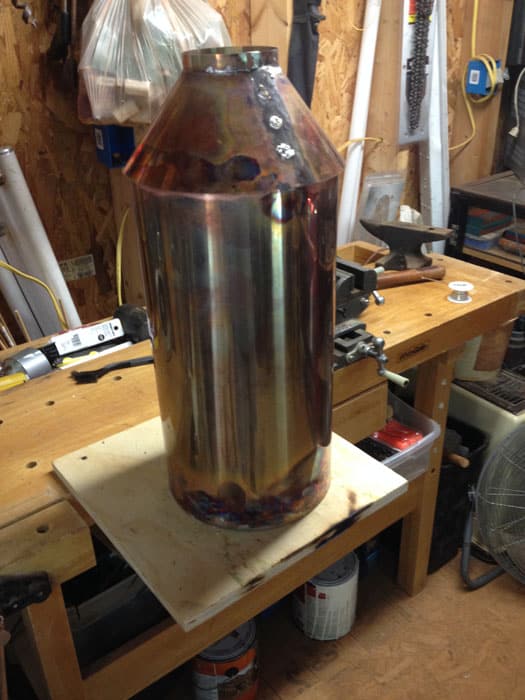
These flat copper pieces are what make up the boiler and vapor cone sections.
We did have to purchase some extra length of copper pipe and soldering, which came up to about $50 in additional materials.
Assembling The Still
Clawhammer has a full video series with step-by-step instructions on how to assemble their still kits. These were extremely helpful for us to watch as we went through the process!
Looks fun? Let’s get started…

I’ll let Jerry explain the process in his own words…
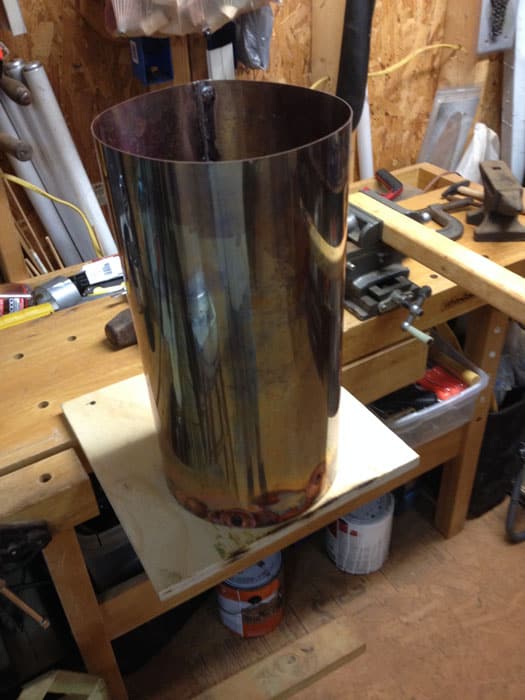
First I bent the ends up at a 90 degree angle that is shown in the picture below. Then I clamped both ends of the copper making a cylinder with the holes for the rivets lining up and inserted 1 rivet at the end. After that I started hammering around the rivet to soften the copper, then hammered the rivet flat. I did the same to the next rivet, working my way from one end down to the other. After hammering all the rivets flat, I clamped a 2×4 to my work bench and clamped the cylinder to the 2×4 to make it easier to solder. Having never used a torch to solder anything like this before it was a little intimidating not knowing what to expect. After making this first line and learning how much heat to apply it became a little easier until later.
Here you can see what that looks like on the inside of the boiler. He admits his soldering job was a little messy, but like I said this was his very first time using a blow torch and solder.
Once it cooled, the next step was to secure the bottom of the boiler.
This was a little tricky because of not being able to see where I was putting the solder. I had to heat the bottom of the still while extending the solder to reach to the bottom through the open top. I took me about 5 tries of filling it up with water and watching for holes before it was sealed up.
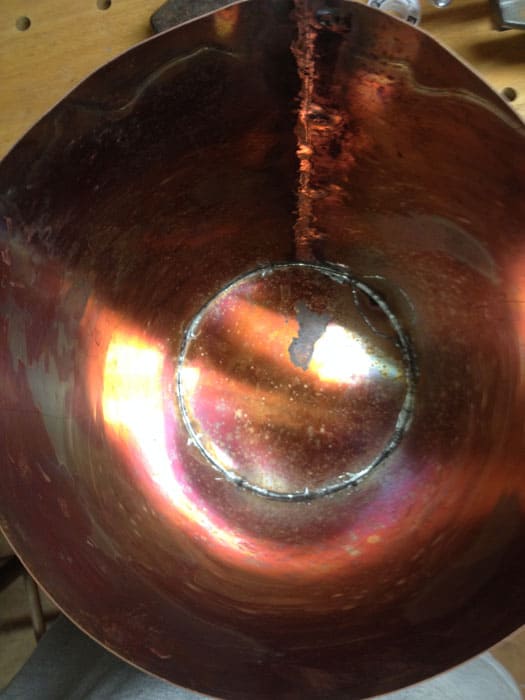
He had some trouble getting in there to solder the bottom in place, but eventually he got all of the holes filled. You want to make sure there aren’t any tiny holes in the soldering, or else it will leak. We had to fill the boiler with water several times to make sure all of the leaks were plugged.
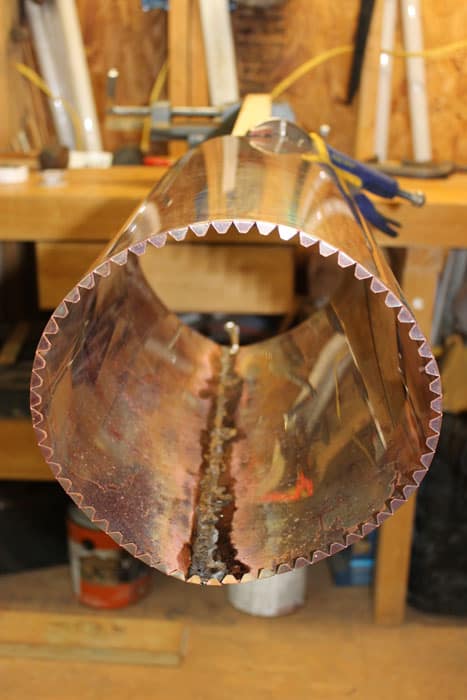
Next, Jerry riveted and soldered the vapor cone.
This part wasn’t that bad, just lined up the holes and clamped the ends and then hammered the rivets
Then the collar, cap skirt, and cap plate were put together on the vapor cone.
Not too hard to do this step. You have to make sure the cylinder and the vapor cone are as circular as you can so the solder doesn’t run down the side as you’re heating it up.
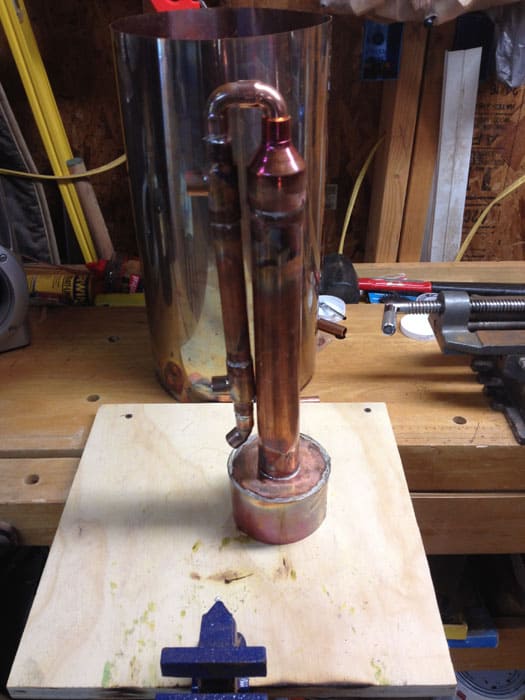
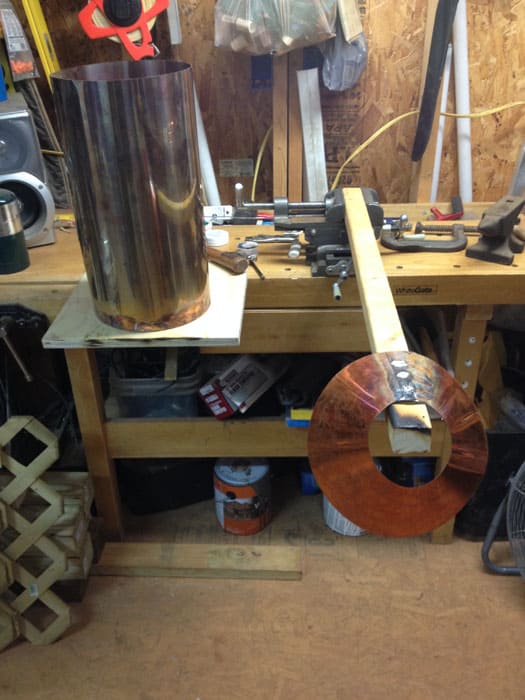
Assembling the column and drip arm pieces.
This part was pretty easy, just clamp it in a vice and heat up each part, rotating to get both sides.
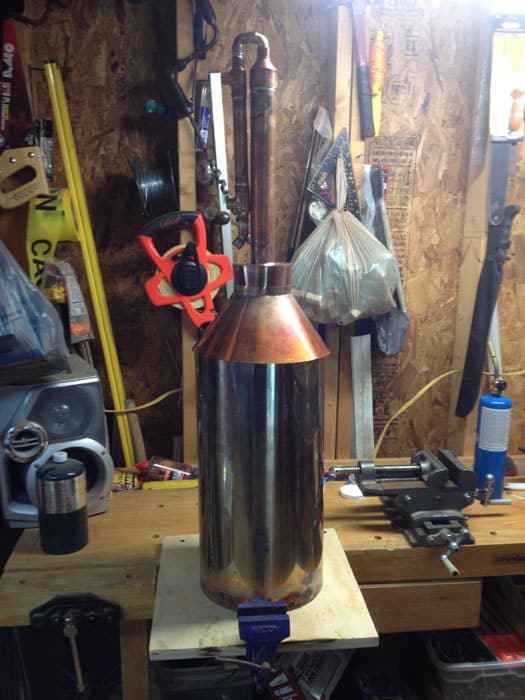
Finally, all of the pieces were in place and fit snugly. The only piece left to add was the boiler thermometer.
Jerry drilled a hole about halfway up the boiler, just large enough for the thermometer to fit into. Then he soldered it in place. Unfortunately, he didn’t realize he screwed it in a little cockeyed, so now the thermometer is upside down. Doh!
The Field Test
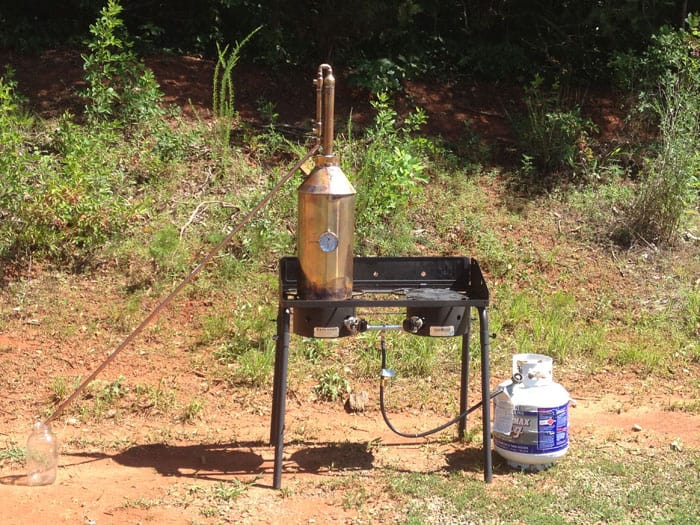
It isn’t recommended that you use a still indoors, so we set this one up on our propane stove outdoors, away from the house. We did have to buy an additional length of copper pipe to extend away from the still into a collection container.
We filled the still with water, fired it up, and stepped back to see what would happen.
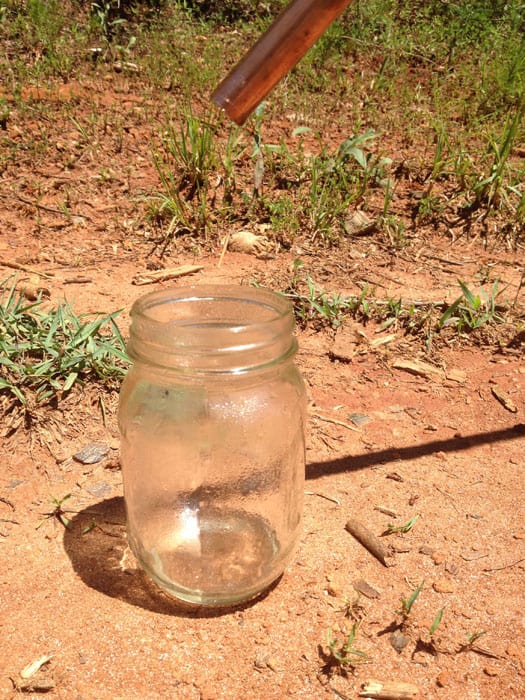
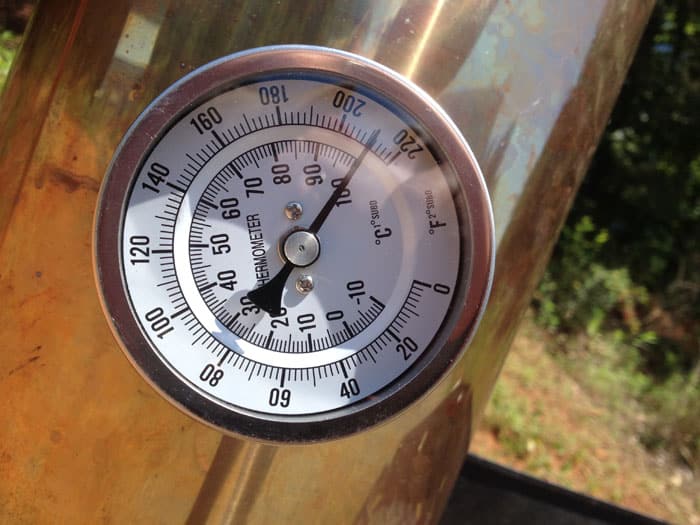
After about 1 hour and 30 min it reached 212 degrees and hot water began spurting out of the copper pipe, filling the glass container with freshly distilled water. It worked! Although we might not have done the neatest copper sweating you’ve ever seen, the most important thing is that the still is doing what it’s supposed to.
We did have a few drops coming from where the thermometer was screwed into the threaded solder piece but it stopped dripping after it was boiling for a while.
Our Thoughts…
On a scale of 1 to 10 for difficulty level, my husband gives this project a 7 for novices. I’m sure if you have experience sweating copper you wouldn’t have as much trouble putting the kit together.
Although it was a little tricky for us newbies, we LOVE our new still. It has so many uses: making essential oils, distilling spirits, fuel alcohol, making antiseptics, purifying water… it’s just one of those things that we definitely wanted to add to our emergency preps.
Clawhammer has some fantastic resources on their blog with moonshine recipes, instructionals, and other distilling inspiration. I’ve had a lot of fun reading through (and printing off!) the ample information there.
I haven’t had a chance to try my hand at making essential oils yet, but I’m excited to have a key piece of equipment on hand whenever I’m ready to delve into the next fun project.
A big thanks again to the guys at Clawhammer Supply for providing a 5 gallon copper still kit to test and review.

A city girl learning to homestead on an acre of land in the country. Wife and homeschooling mother of four. Enjoying life, and everything that has to do with self sufficient living.
Glad you don’t use it for distilling alcohol.
FYI: Years ago, I ran across a scanned ebook that was published ~1800. An English gentleman was the world expert in liquor production, having studied the research of the French chemist, Lavoirsier. The book was intended to help American whiskey distillers become profitable. One of the hundreds of tidbits he discussed was that early British whiskey was highly toxic. The mash was acidic, so it dissolved a toxic level of copper into the distilled product. When this became known, British distillers overcame the problem by having their stills’ interior ‘tinned’. That is an electrolytic deposition of tin which lasted about a year.
If you are interested in this comment and want the book, I believe you have my email address. The ebook was free on Amazon. If you want it, I’ll hunt up the title and send it to you. Best Wishes.
I see you don’t have the cooling hooked up in your photos – I assume it worked OK for water since you have such long pipe for the outflow? Folks should know that for this to work well, you want to be running active cooling by pumping water through the cooling jacket. I use a cheap pond pump (Harbor Freight) and a large bucket of water. Water starts cold and ends up hot, but all you need is for it to stay under the temp of the vapor.
would love to own one of these stills but they will not sell to north carolina residents, guess they are punishing the residents for some reason. other companys sell here but i dont want a different still as these are awesome. so clawhammer if and when you guys decide to not punish us anymore and sell us your stills please e mail me as i will be the first to order one.
I haven’t thought about getting a still because from what I understand you can do the same thing with a pressure canner. You just need to get the appropriate copper tube attachments for the steam vent. There are some good videos on Youtube under “pressure canner water distillers” and from time to time I do come across older models in Thrift shops.
I have heard of using a pressure canner as a still, though I’ve never tried it. I definitely wouldn’t do it with my good All American canner, but maybe with a cheap second-hand one. Let me know if you ever try it!
Don’t use a pressure canner. Most are made from cast aluminum, which can contaminate what you’re trying to distill. Whether water, essential oils and most especially if you are distilling spirits. If you do sue a canner, make sure it is a stainless steel. Only use stainless or copper for any type of distilling. Always safety first. And there are now several states, including MO, the state in which I live that have legalized hobby distilling. In MO if two or more people are of the age 21 or over, 200 gallons may be distilled per calender year. If only one, then 100 gallons per year, for personal use, no selling. It is still against Federal Law, but is viewed much like Marijuana in states like Colorado, California and Arkansas. It’s against Federal Law, but the law is not enforced in these states.
Try distilling wine. Living in wine country it is an inexpensive base and you are not creating alcohol as it already is present in the wine at roughly 13%. Replace your gas fired heat source with a modern digital electric hot plate. This allows you do your cooking indoors while maintaining still temperatures as your needs dictate. Prepare smoking chips for your BBQ grill by soaking them in wine, that has been lightly laced with meat flavoring smoke rub. Spread your soaked chips on a tray and bake in your oven till dark and bone dry. Follow instructions for your still and collect your sweet liquor. Place your prepared oak wood chips in a large open mouth glass container. Pour your liquor over the chips, cover and store in a dark undisturbed area. Test monthly till you are satisfied with smoothness, taste and color. Look for Lilwilli at the 2015 Moonshiners Championship. Best of luck with your Sippin Likker.
Thanks for the advice, Lilwilli! 🙂
Lilwilli, distilled wine is called Brandy and is considered illegal to distill in most states. It is a spirit like whiskey, vodka, gin, etc. I make it, but it’s still illegal. I wouldn’t be advising others to try it that it’s legal. You can make wine, but not distill it. once distilled, it is no longer wine, but liquor. Good liquor, if you know what your doing. lol