
The best thing about canning food at home is the sheer versatility of it all. There are a ton of things that can be canned safely at home with the right approach, including some things that you just wouldn’t expect. Like… juice, for instance!

Yes, it’s true. Juice can be canned, and after some friends gave us a big bunch of tangerines I knew it was time to take a crack at it myself.
The experience was definitely illuminating and interesting, and I also found out it’s possible to can freshly squeezed citrus juice simply using the water bath method with minimal investment.
PennState Extension gives some guidelines on how to can high-acid juices, meaning with a pH of under 4.6. And guess what: oranges have a pH between 3.1 and 4.3 depending on variety!
What You’ll Need
This post contains affiliate links. If you click them and buy, I may earn a commission. Read my disclosure policy.
Compared to canning other kinds of foods you don’t need much to can orange juice successfully and safely, though you do need a couple of specialty items. In any case, if you buy a water bath canning kit, almost everything you need will be included.
Orange Juice, Fresh-Squeezed: if you want to try canning your own juice at home, be prepared to squeeze it yourself.
Juicer: you’ll need a juicer to get the most from your oranges and do so without wasting a ton of time. A manual juicer is just fine if you want to bring some muscle to the endeavor, but otherwise an electric juicer or mechanical one is a good idea.
Thermometer: precise temperature control is critical for this operation. You need to heat your orange juice to 195° Fahrenheit / 91° Celsius. Use an accurate and quick-reading clip-on thermometer that can take the temperature of liquids for this job.
Sieve/Strainer: a sieve or strainer will help you get pulp out of your juice, but you don’t have to remove it for canning. You can leave in or take out as much pulp as you prefer.
Canning Jars: canning requires canning jars, and for canning OJ you’ll want to use pint or quart sizes depending on your preferences.
Consider investing in wide-mouth, freezer-rated canning jars for canning orange juice because, well, that’s what the recipe calls!
You can use brand-new or used jars, but make sure you look them over well for any indications of damage, especially if you are going with used ones. Cracks and chips around the rim are instant disqualifiers.
Lids: assuming your jars take a disposable lid, get a quantity of brand-new, unused lids for canning the juice.
Get enough to fit all of your jars, plus a few extras in case you have failures or want to make an extra batch. Under no circumstances should you reuse a jar lid that is designed to be disposable!
Bands: new or used jar bands are fine, as they are reusable, unlike the lids. Make sure you check the bands over for damage nonetheless, looking for dents, rust, and other defects that could compromise a good seal.
Water Canner: this is the large pot you will load all of your canning jars into for processing. If you bought a kit, this is the primary item. Otherwise, you can use any large stock pot or soup pot that will hold your canning rack below.
Pot: you need a separate, large pot for heating your orange juice. Make sure it is big enough to hold however many jars are in a single batch. If you’re using quart jars, that’s 7 quarts of juice you’ll need to heat. If you are processing a batch of pint jars, that would be 9 pints.
Can Rack: a can rack, or canning rack, rests on the bottom of the canner to keep the jars in position and out of contact with the bottom. This prevents rattling and reduces the likelihood of seal failure and also breakage during the canning process.
You can get a standalone rack that you place into the canner separately or a nicer one that has handles allowing you to lift a load of jars out or put them in all at once and under control. Both work, but in any case, it’s still good to have the next item on our list.
Jar Tongs: jar tongs, also known as jar lifters, are a specialized set of tongs designed to grip the round body and neck of a canning jar without breaking it, allowing you to move it without getting burned and under control.
Whatever kind of rack you have, this is definitely a helpful item that will improve efficiency and safety.
Jar Funnel: jar funnels are specialized funnels that slip on the rim of an open jar and allow you to fill in while minimizing the likelihood of misses and also preventing drips and splashes from getting on the rim, an occurrence that can cause seal failure.
Knife: for slicing your oranges in half.
Cutting Board: a cutting board will help you protect your counters when slicing your oranges in two.
Paper Towel: paper towels are a must-have for cleaning up inevitable kitchen messes during canning forays, and also for wiping off the rims of your jars immediately before packing.
Timer: any timing device will do the job for canning as long as it’s accurate and reliable. You can use the clock on your stove, an app on your phone, or a separate kitchen timer.
Just make sure it works and be sure it’ll go off so you can hear it if you’re not going to stand there and watch it.
That’s all you need. Gather everything, familiarize yourself with it if necessary and then we will move on to the steps.
Canning Orange Juice, Hot Packed, Step by Step
The following steps will guide you through the process of canning your own fresh-squeezed orange juice at home.
I urge you to read over all of these steps before you begin at all so you know what to expect: Several of them must be done at speed to reduce the likelihood of failure or compromising the contents of your jars.
Step 1: prepare canning space. Take a break and get your canning space set up before you go on. Make sure you got room for both pots on your stovetop.
Make double sure that you can easily load and unload jars from the canner without banging into your fume hood or cabinets. Remember, you’ve got to keep the jars completely upright during that movement!
Also, protect your countertops ahead of time with clean cutting boards or folded towels so you don’t scorch them with hot jars later.
Step 2: sanitize all equipment. Note that is is basically cleaning, do NOT confuse it with sterilization! The very first thing you have to do when canning is sanitize everything. You’re cutting board, knife, jars and everything else must be scrupulously clean.
Note that, since you will be processing the canning jars for at least 15 minutes (altitude-adjusted), you don’t need the extra step to sterilize your jars. But you do need to sanitize, so:
Anyway, run the jars through the dishwasher on a hot cycle immediately before you get started canning, or give them a soapy wash and piping hot water by hand. In any case, you absolutely need to be sure that the jars are hot when you fill them with juice to avoid a thermal shock.
Step 3: juice oranges. Gather your oranges and cut them in half on your cutting board. Then juice them using whatever juicer you have.
If the juicer has a large collection basin, you can do all of them at once. If it has a small basin, empty the contents into the smaller pot as you go to make room.
Step 4: strain. If you want to remove some or all of the pulp from your juice, do so now. Remember, it’s okay to leave the pulp in if you want; it won’t interfere with the canning process.

Step 5: fill canner with water, bring water to 180 ºF (82 ºC). Fill the canner with water. The level, when fully loaded with all jars and rack, should be at least an inch over the tops of the jars. Since the jars are not in there yet, you’ll need to eyeball it.
At the same time, leave room for displacement so that it doesn’t overflow. Once you’ve got the water level dialed in, turn on the heat and, because this is a hot pack recipe, you need to bring it to 180 ºF or 82 ºC.
The point is you want to have the empty jars at this specific temperature to avoid a thermal shock when you load them with the hot juice.
Step 6: preheat jars. Load the jars onto the canning rack if it has handles, or place the canning rack if it doesn’t into the water before it gets too hot.
Use your jar tongs to move the empty jars with the lids removed. Place them all into the water and let them sit there to warm up (while you complete the following steps). The jars will get filled with water, but make sure they don’t float around in it! They need to be secured inside, and if they do start to move, they could hit the canner walls or each-other and get chipped.

Keep the temperature steady at 180 ºF because that’s where you want it to be when you add the full jars.
Step 7: heat orange juice, watch temperature. Attach the thermometer to the pot that has the juice. Place it on a burner and set it to medium heat.
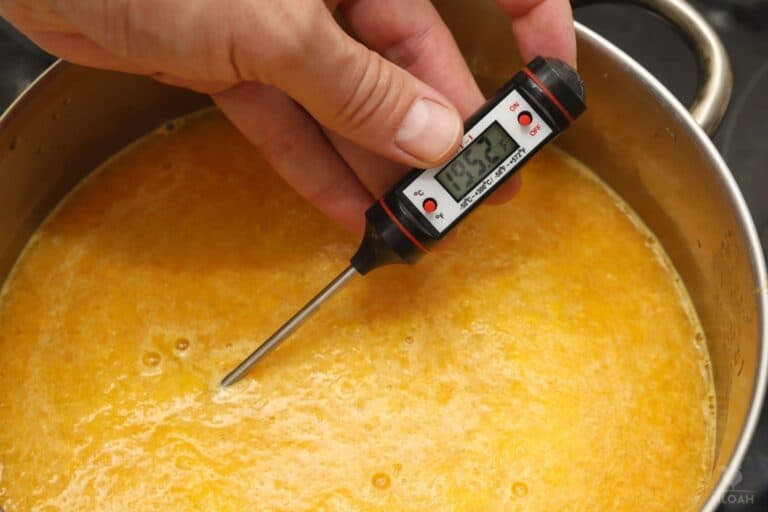
Keep a close watch on the thermometer: you want to heat the OJ to 195°F / 91°C! When the temperature starts to get fairly close, move on to the next step but work quickly from here on.
Step 8: remove jars. Carefully, remove the (still empty) jars from the canner and set them close to the pot with the heated orange juice. Again, make sure you protect your countertops.
Step 9: pour orange juice into jars. Once the jars are removed and the juice has reached 195°F / 91°C, kill the heat under the juice pot, then use your funnel to pour the juice into the individual jars as quickly as you can. Leave a quarter of an inch (0.63 centimeters) of headspace at the top.
Wipe off the jar rims with a moist paper towel.

Step 10: attach lid and band. Working quickly, place a lid onto each jar, handling it only by the edges. Then place a band and tighten them down hand tight. You can use a towel at this point so it’s easier to screw them.
Do not over-tighten the bands! Some air must be allowed to escape during the canning process, and a too-tight band can lead to a broken jar.
Step 11: load jars into canner. Load all the jars back into the rack or use your jar tongs to place them back into the boiling water of the canner.

When moving the jars, it is imperative that you keep them perfectly upright and level. If the contents are allowed to slosh and press against the lid, it can result in seal failure.
Step 12: bring canner to boil. Once all of the jars have been loaded into the canner, wait for the water to come back up to a boil.
Step 13: start timer for processing. Once the water in the canner is properly boiling, processing is officially underway. Whether you are using pint or quart jars, but only the moment it starts to actually boil, Set your timer to:
- 15 minutes if you live below 1,000 feet elevation
- 20 minutes if you’re between 1,000 and 5,000 feet
- and 25 minutes if you live at over 5,000 feet of elevation
Step 14: cut heat. When the timer goes off, cut the heat to the canner, and leave the jars where they are undisturbed.
Step 15: rest jars in canner. Don’t bother the jars and the counter for about 5 minutes.
Step 16: remove jars. Once the jars have rested, carefully remove them using the rack or your jar tongs and set them aside on the counter, preferably on a towel to protect surfaces from heat. Also, be sure to keep the jars upright and perfectly level as before.

Pay particular attention that you don’t place the jars anywhere they might be subjected to a cold draft, or onto any stone or metal surfaces which could cause temperature shock and sudden breakage.
Step 17: cool jars completely. Leave the finished jars alone, totally undisturbed, for at least 12 hours and potentially as long as 24 hours until they’re completely cool.
Step 18: check lids for good seal. Once your jars have cooled down it’s time to check the seal.
Press gently on the top of the lid and be alert for any movement or flexing. If it springs up, that#s bad news: the jar is compromised.
Assuming you can’t feel any movement and the lid feels totally firm, remove the band and then gently press the lid right in the middle with your thumb. It should not move or hiss, but stay firmly in place.
Move on with all the jars that passed, and check the section after this step-by-step guide for what to do with any jar that failed the test.
Step 19: wipe down. Use a damp paper towel to wipe down the jars, removing any OJ residue from processing or handling.
Step 20: store. Keep your jars of canned OJ in any cool, dark space, ideally at around 50–70°F (10–21°C). For longe shelf life, you can freeze your canned if you’ve used a freezer-rated wide mouth canning jar as detailed above.
Step 21: chill before serving. Assuming you aren’t thawing frozen canned juice, make sure you chill it before serving.
Step 22: done! And we are finished! Your canned orange juice will still taste great after about a year in storage,so it will be best if you drink it or use it in recipes before that long.
Is Your Juice Ruined if a Lid Fails?
No, your OJ is not ruined if a lid fails after the canning process. But you do have a decision to make. If you’d like some orange juice on hand, simply pop it in the refrigerator and drink it or use it within the next few days.
However, if you are committed to canning it you can reprocess it by pouring it into a fresh jar and using a fresh lid, assuming that your jars don’t use reusable ones.
This should only be attempted if no more than 24 hours have passed from the initial canning attempt. And remember, never, ever try to reuse a disposable lid, especially one that’s already failed!
Useful Tips
- Pulp separation is normal. If you like pulp in your OJ, you’ll notice significant separation after it has been in storage for a little while. Don’t worry about that, it’s not a symptom or contributing factor to quality loss either way. Just stir or shake it when you’re ready to drink and it will be fine.
- Watch the temp! I cannot impress upon you enough how important tight temperature control is for the success of this recipe. A few degrees too high might change the flavor of your orange juice.


Get your gift and learn things like:
- how to make this really quick pest spray
- how to prevent egg waste
- two cheap automation devices that will make your life easier
Tom has lived and worked on farms and homesteads from the Carolinas to Kentucky and beyond. He is passionate about helping people prepare for tough times by embracing lifestyles of self-sufficiency.
Does it affect the quality of the juice when you heat it up like that?
Does it still taste like fresh?
How long of a shelf life does canned oj have?
I agree with you Maggie. Any membrane from citrus will change the composition and taste. Fresh sqeezed is the answer
I got a bright idea today, decided to check the web to see if it was possible to can orange juice…..glad I came across this sight I will NOT be attempting to can orange juice now. Thanks for saving my taste buds.
Did it say something about changing the taste?
Found this link very interesting. We live in N. Florida and have Navel orange, Lakeland Limes, Orangequat, Kumquat. I have a favorite salesman I wanted to share our fresh oj with. So like very one else went to search the internet and found this site. I am going to try pints first. I have a electric squeezer and a double metal strainer I use for my fresh and frozen juice. I am looking forward to trying to can the oj. Thank you for this site.
You might be right, Jennie. It would be interesting to experiment with canning hand-juiced OJ.
Yeah, Preppy Pink, that sounds like a great idea to try next time 🙂
Chantil- REALLY??? Fascinating! I wonder what made the difference?! Very interesting.
Thank you so much Tony!! You know I try 🙂