Cherry season starts at the beginning of June in these parts. This past week, my family took a drive to a you-pick cherry orchard not too far from here to do some harvesting. I think the kids ate their weight in cherries. We went home with 15 lbs of cherries…

I got a cherry pitter last year that I hadn’t had a chance to use yet, so I pulled it out and put it to the test. It worked amazingly well; even the suction base stayed firm in place on the table as I worked.
I was able to pit all of the cherries in no time at all. If you’re in the market for a cherry pitter, other than it not coming with any assembly directions (which took a minute to figure out) I’m very pleased with mine…
This post contains affiliate links. If you click them and buy, I may earn a commission. Read my disclosure policy.
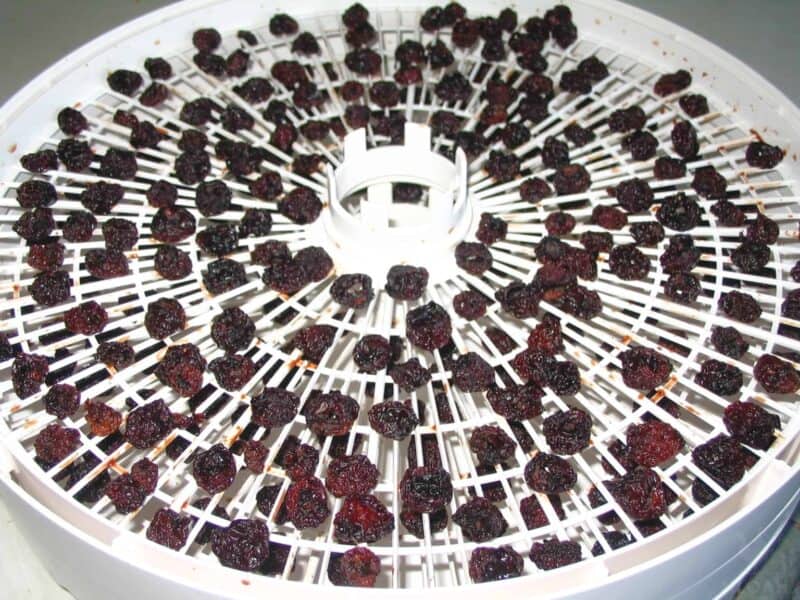
We ate a ton of the cherries fresh, but I also put some aside to preserve. Some were frozen for a cold summer snack. Freezing is easy; you just wash and pit the cherries, and pop them into a Ziploc bag. I dried some in the dehydrator to add to granola, muffins, and other future snacks:
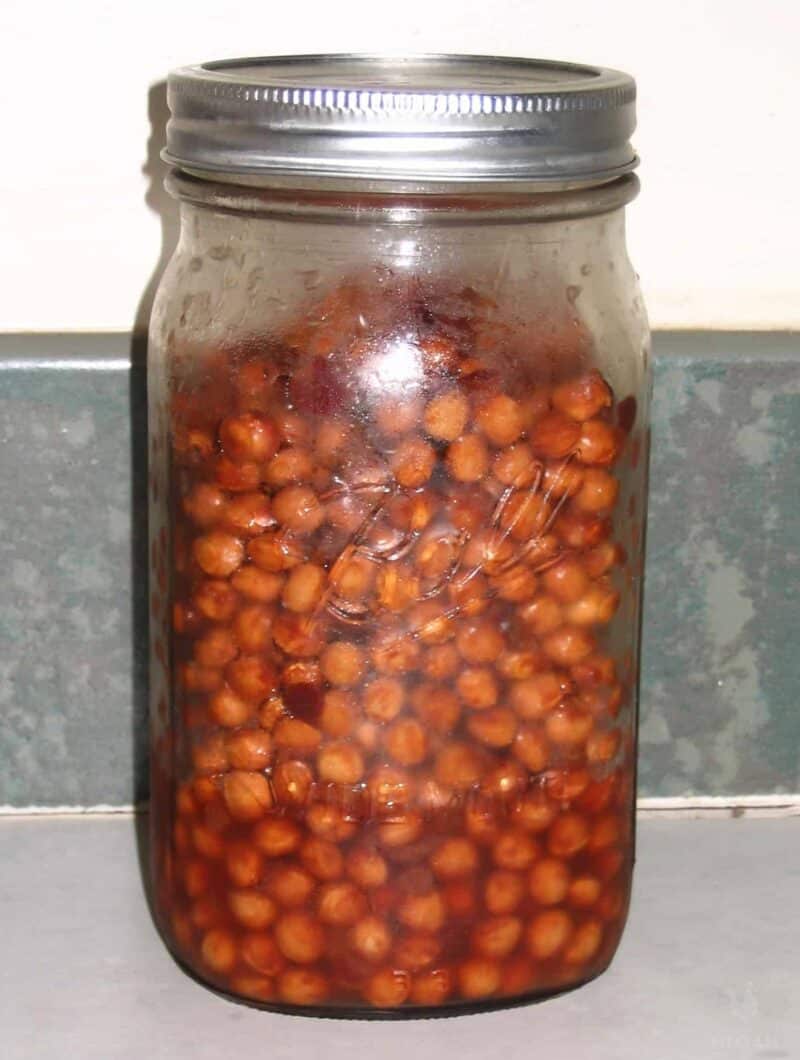
I also made an absolutely delicious cherry pie filling and canned it (but not from the pits, from the cherries themselves):

I estimate that it cost me between $4-$5 per quart jar to make this pie filling, roughly (not including the jars themselves). It’s nice to know what’s in the pie filling and where it came from, but now I know what price range is a good deal for natural pie filling if I come across it at the store.
When all was said and done, I had almost a quart of cherry pits left over. It seemed such a shame to throw them out. I thought, surely there’s something I can do with them.
Turns out there’s a lot one can do with cherry pits. Just keep in mind that some of them require larger amounts, so you’ll need to wait a while until you save enough. Be sure to thoroughly clean and dry them before saving them…
Pitting The Cherries
If you have a lot of cherries to pit, be sure to get a cherry pitter before you start. There aren’t that many ways to separate the pits from toe pulp without making a mess. The only other way that works reasonably well is to use a metal straw, but really, the cherry pitter is the least messy.
Cherry Pit Recipes
Warning Before We Start
Please keep in mind that cherry pits contain a cyanide-producing toxin known as amygdalin. If you accidentally swallow a seed you probably won’t feel any effects, but if you eat enough of them, or if you eat even one crushed cherry pit, it could be fatal.
Cherries and their pits aren’t the only fruits to host this chemical – other stone fruits, like plums and peaches, as well as the seeds of apples also have it. It’s not the pit that harms you but instead the nut inside the pit. Therefore, you don’t have to worry a ton about getting sick, but you do want to keep them far away from kids and pets.
That said, this hasn’t stopped people from using cherry pits in the following recipes – simply because the recipes call for the pits to be strained. You’re basically making infusions, and so long as you don’t crush the pits or eat them at any point, you should be fine…
1. Cherry Pit Vinegar
Cherry pit vinegar is really easy to make. All you need is a cup of cherry pits and 2 to 4 cups of the vinegar of your choice.
Put the pits in a clean Ball jar, cover them with white vinegar, and shake them before securing the lid. Let the mixture remain in a dark place – without opening it to break the seal – for about three weeks.
When it’s done, you will have some delicious cherry pit vinegar that you can use as a salad dressing, a simple sauce, or a topping for fish or poultry. Yum! Keep in mind that this recipe works well on other fruits with pits, like peaches, plums, or nectarines, too. Just remember to strain the pits and only use the infused vinegar (we talked about the reason why just above).
2. Cherry Pit Syrup
Like the cherry pit vinegar, this recipe also works well with the pits of nectarines, peaches, or plums. To make it, all you need to do is combine one-part pits with two parts sugar.
Put all of the ingredients in a saucepan along with two parts water and bring to a boil. Remove the mixture from the heat and allow it to cool overnight in the refrigerator.
You will store the pits and the syrup together, and just strain off the syrup before use. It’s delicious in cocktails or when used as a compote! You can store it for up to three weeks or you can process it in a canner for long-term storage.
3. Cherry Pit Glaze
Make a glaze for your favorite kind of pork chop or chicken breast! You only need nine pounds of cherry pits (this might sound high at first glance but keep in mind the pits don’t have as much flavor as the pulp), a cup of red wine, a cup of sugar, and some basil.
Combine everything with a cup of water in a saucepan and bring it to a low boil. Cool it in the refrigerator overnight and strain through a cheesecloth. It can also be stored in the fridge for three weeks.
4. Cherry Pit Whipped Cream
If you’re looking for a tantalizing dessert to use up all those stone pits, here’s an option for you! This cherry pit whipped cream combines a cup of cream with a handful of pits.
All you need to do is mix the two together, put them in the fridge overnight, strain into a bowl of sugar, and whip it up. You can use this whipped cream on chocolate ice cream, cherry pie, or even eat it on its own!
Don’t make a hot infusion with this recipe as you’ll run the risk of curding. Stick to a cold infusion.
5. Cherry Pit Liqueur
If you enjoy a nice cocktail every now and then, you might want to try cherry pit liqueur. This can also be used in desserts, so no worries if you aren’t much of a drinker. Basically, all you need to do is layer a bunch of cherry pits (ideally with some extra cherries, too) and cover them with vodka.
Other Uses for Cherry Pits
If you’d rather steer clear of eating them, but still want to do something other than toss out the seeds, here are a few more fun options.
1. Make a Cherry Pit Bed Warmer
A cherry pit heating pad (or a bed warmer, if you have a ton of pits!) can really keep you warm on those chilly homestead nights. You’ll need a lot of pits – about the amount you would use to make fifteen pies!
But once you get them saved up, all you need to do is rinse and thoroughly clean the pits. You will squeeze them to loosen the pulp and simmer them in a pot of water. You will do this for fifteen minutes before cleaning and squeezing them again. Then, you will allow them to dry for some time.
Use old pillowcases and stuff them full of the pits. You could use cut-up pieces of fabric, too, depending on how big you want your heating pads to be. Sew the other end of the sack closed, and you’re done!
You’ll be toasty warm all winter because all you will need to do is microwave the pad or place it in front of the fireplace to rewarm it between uses.
Mode detailed instructions here.

2. Burn Dried Cherry Pits For Fuel
Cherry pits are excellent alternative fuel sources for heating your home – you can use them n a pellet burning stove, but first, they must be cleaned, scrubbed, and dried.
3. Plant them!
When all else fails, re-planting your cherry pits is a great way to grow your own cherry trees. Just place two or three pits in a small container and add your planting medium.

Keep the soil moist, and once the seedlings are a couple of inches tall, you can remove the weakest seedlings and allow the sturdiest seedling to remain.
4. Cherry Pit Pillow
Cherry pits are much better than beans or rice at conducting heat – meaning they will work wonders if you put them in a therapeutic pillow! You can purchase therapeutic pillows for your neck at the store, but these cost a lot of money. Instead, all you need to do is save your pits.
You will need about 30 pounds of cherries for one pillow – and if you don’t have enough the first time you process your cherries, you can always save them until you have enough. These pillows can be used either hot or cold.

5. Stress Ball
Similar to the pillow above. Just stuff a small cotton pouch with these pits, start squeezing them, and you’ll relax in no time!
6. As Compost
Anything that’s organic will decompose, and this means you can use it to feed your garden plants. Be sure to ground the pits first to speed up the process – before throwing them in your compost bin!
7. To Stop Drafts
If you know how to sew, you can fashion these pillow-like draft stoppers and fill them with cherry pits! They will stop drafts from chilling the air inside your home during winter while looking fashionable.
I’d love to know your favorite way of preserving cherries! How do you use them, and have you found a way to use the seeds as well?


A city girl learning to homestead on an acre of land in the country. Wife and homeschooling mother of four. Enjoying life, and everything that has to do with self sufficient living.
Thank you, for the great ideas. I just purchased a big 3lb container of cherries at Sam’s. I’m gonna dehydrate at least 1/2 of them, then make some preserves or something like that. I came looking for an idea with all the pits. I think I started vinegar last week by mistake. ? I took the pits from a handful of cherries I ate, rinsed them and put them and some water in a Crystal Lite container. I wanted them to soak off the pieces left on. I thought I’d try & grow them. Well I forgot about them for a little over a week. I kept smelling this strange smell like a bad potato. I looked high & low for the smell. I opened the container and woo it stunk! I got rid of it, but after I thought that may of been vinegar! ?
Do you rinse the pits before the vinegar recipe?
Could you use them instead of dry beans when you’re pre-baking a pie-shell? And if so, could they be used over and over?
Nine pounds of cherry pits for the glaze? Seems a bit much.
My thoughts exactly! And no way to figure out the actual measurement!
I can cherries in a simple syrup & we eat them in a bowl as is with the juice, add cream or over ice cream. Yum!! This year I’m also going to make cherry jam, try a cherry salsa recipe I found online & cherry syrup.
Yum! Enjoy!
I have used cherry pits to make corn hole bags. They tend to be lighter. But they are washable…and you can put them in the dryer. I used kiln dried cherry pits i bought at a TSC. I was making therapy bags for a craft fair.
Silly question – For the dried pits – can you just dry them in a dehydrator or is there a special way to dry them so that you can use them for fuel?
Patty,
I’d think the dehydrator would work great for drying the pits.
I LOVE fresh cherries but I’m not keen on the taste of cooked ones, so I always struggle with what to do with the extra cherries we don’t eat fresh.
We have made brandied cherries in the past couple of years and given them as gifts at Xmas, but they are a little strong for my taste. A better choice was to make Cherry Amaretto Jam. Perfect flavor combination, and the amaretto seems to mellow the cooked cherry flavor. It’s really quite good.
I think this year I will also dehydrate some of our cherries. Good idea! Don’t know why I didn’t think of that already. And there’s an online recipe for Cherry Salsa that sounds interesting too.
Have you tried freezing them? Closet to fresh I have tasted. And great on ice cream or in smoothies
Hi Kendra! I think we live in the same state, so I was wondering which pick your own Cherry farm you went to? I am always on the hunt for good sources especially the pick your own.
When I was a child we lived near Detroit, MI and every summer we would make the long trip up to Mackinac Island. There we would hit the pick your own cherries farms and eat them until we’d get sick. Fond memories!
I am wondering. I saw this recipe for cherry vinegar. I have made apple cider vinegar recently, but how do I store it? Do I just leave it in a jar unrefrigerated? I see floaties in it, so not sure if I am doing it right. I just strained it and put it in a glass jar and lidded it. I strained it twice and I seem to still get floaties at the top, white floaties. Not sure what that is. Please help. Thanks.
That’s the “Mother” that forms in unpasteurized, home made vinegar. You leave it in. When it coagulates into a big enough mass you can remove some or all and put it in your apple (or other juice) and start another batch of vinegar from it.
How about bean(pits)bags for corn hole game?
Karen, great idea!