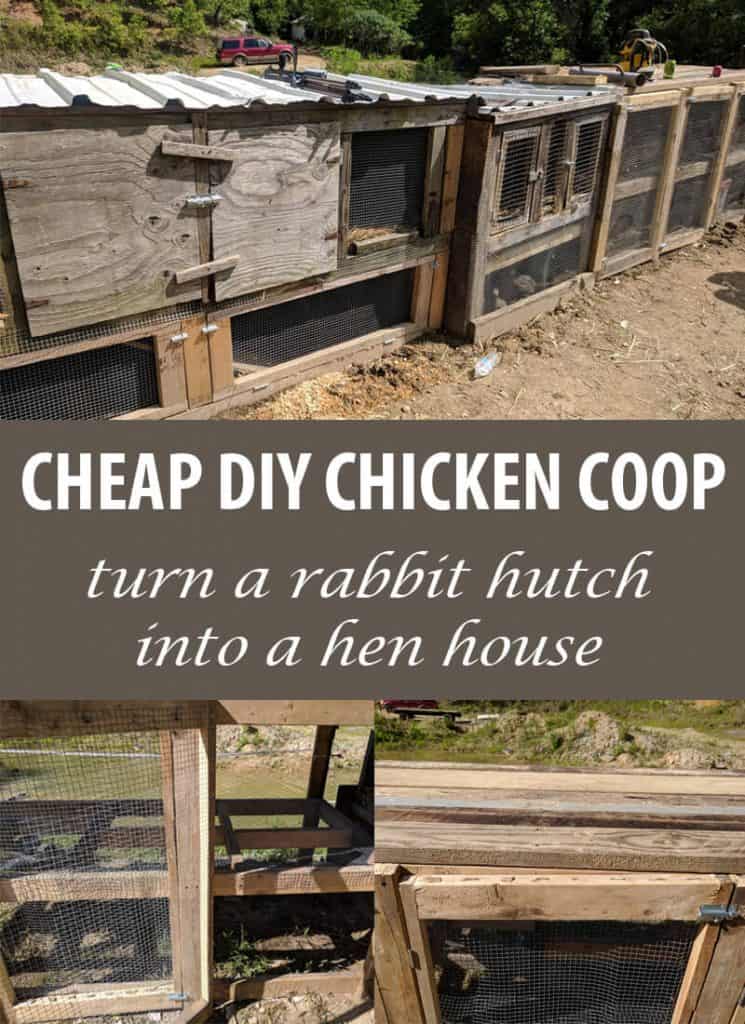
Building a chicken coop doesn’t have to cost either a lot of money or a lot of time. This DIY chicken coop is predator-proof, very spacious, takes only a full day to create, and costs less than $300.
If you have scrap wood and/or wire stockpiled on your homestead, the cost of building this rabbit hutch style DIY chicken coop shouldn’t be more than $100 in materials.
Last winter I crossed my fingers and hoped the old chicken coop that existed on our homestead when we bought it, could remain solid and predator-proof until spring when we could build a new one.
In all the pondering that goes into building a new chicken coop, I had what I thought was both an original and clever idea – and one that would save us a lot of money and time as well. Then, when searching online for possible rehabs or builds that were similar, I found out other frugal homesteaders had already been making coops in the same style for years.

Turning two rabbit hutches and a homemade outdoor brooder into a chicken coop sounded like an ideal way to quickly and cheaply create new coop sleeping quarters and build a large round around them – especially since the hutches were given to us for free, and had no current occupants.
Now, not everyone is lucky enough to get free rabbit hutches to turn into a chicken coop, but no worries – we ended up building another hutch-style enclosure as part of this project when the wood on the brooder was showing signs of rot, and couldn’t be used.
Before building a hutch, check your local Facebook trading post type pages and Craigslist, you could probably score a hutch on either website for next to nothing.
Why Rabbit Hutches Make Great Chicken Coops
If you have browsed the chicken coop kits on sale at Tractor Supply, Rural King, or similar stores online and off that sell livestock items, you already know how similar the design of the overpriced kits are to a rabbit hutch.
The kits and plans to make them all feature small living quarters that double as nesting boxes that are elevated above a tiny run. They are basically a more square version of a rabbit hutch with a bit of cute siding and a ladder.
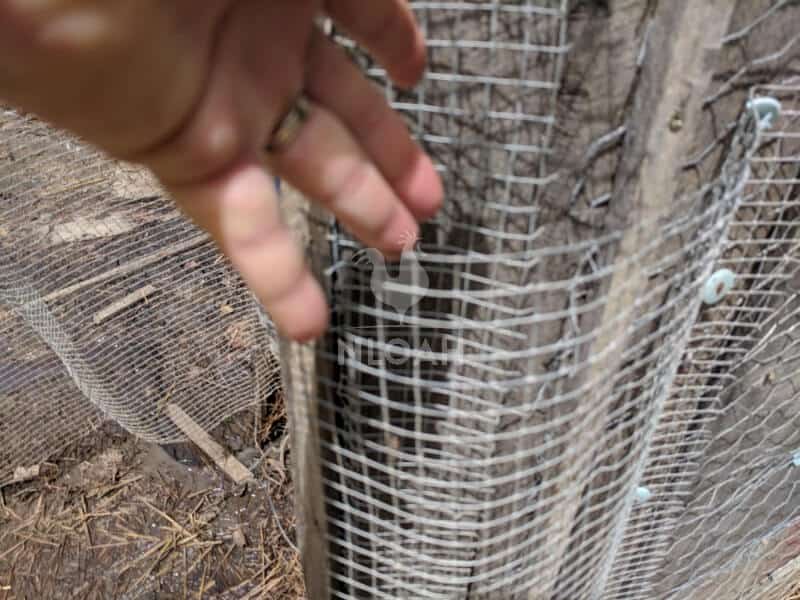
The hutches are comprised of sturdy wood support pressure treated posts, 2 X 4 boards, also pressure treated, and hardware cloth. Chicken wire is only good for keeping birds in folks, it will NOT keep predators out.
These prefab kits or related DIY plans, have small doors that open to release the flock or collect eggs that are akin to the hardware cloth covered doors on rabbit hutches.
The concept is simple, and will keep predators from getting to your meat and egg birds. If you purchased such a hutch style coop at a store it would run you at least $200 for a structure that is only one-quarter of the dimensions of the one we built on our homestead.
Rabbit Hutch to Chicken Coop Conversion Tips
Measure the hutch by both width and length to find out the square footage of the enclosure. Every chicken you keep needs 4 square feet of space total in their coop and run environment.
If the birds are going to live solely in the rabbit hutch chicken coop, using it for both their sleeping quarters and a run, each bird should be given 10 square feet of living space.
Clean and disinfect the rabbit hutch thoroughly, no matter how long it has been empty.
Check for signs of chewing damage on the wood post and support boards from the former rabbit inhabitants – especially around where the hardware cloth is attached to the wood frame, baseboards, and doors.
If the birds will not have access to a run outside of the coop, a perch about 2 inches wide going across the hutch at a location of your choosing should be added.
If the flock will be watered inside of the coop and not an attached run, consider using hanging fountain waterers to cut down on mess inside the enclosure, and to allow for easy pouring in of the water from outside.
An opening in the hardware cloth in the base of the rabbit hutch will need to be cut out large enough for the birds to fit through to access the bottom of the enclosure. Make sure to trim, cut, or turn in firmly the ends of the hardware cloth so the sharp wire does not harm your chickens, or ducks.
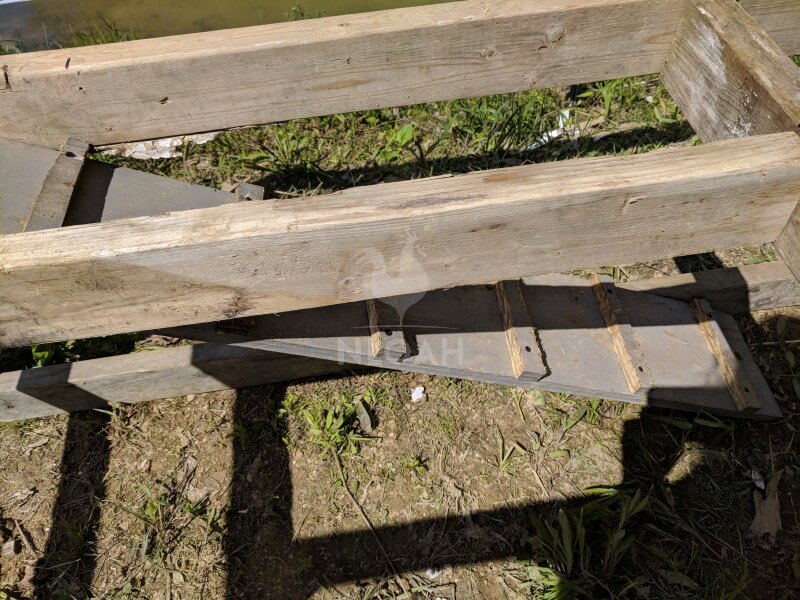
A wood board with little stepping slats screws into it will also need to be added so the flock can travel from the top to the bottom of the rabbit hutch chicken coop.
Slant the board so it reduces the steepness a much as possible, and place the slat style steps as close together as possible, so young birds can also traverse the entryway connecting the double decker chicken coop.
The run area and sleeping quarters will need to be cleaned regularly. Keep this in mind when factoring in both doors and attaching multiple hutches together.
Initially, we thought we would just tip up the hutches and prop them on a cinder block when the lower portion needed cleaning, but decided once they settle in mud after a rain this would be difficult and would not allow us to hook them all together. Instead, we added wide and ample doors onto the lower portion of the rabbit hutch chicken coop so the mess inside could easily be shoveled out.
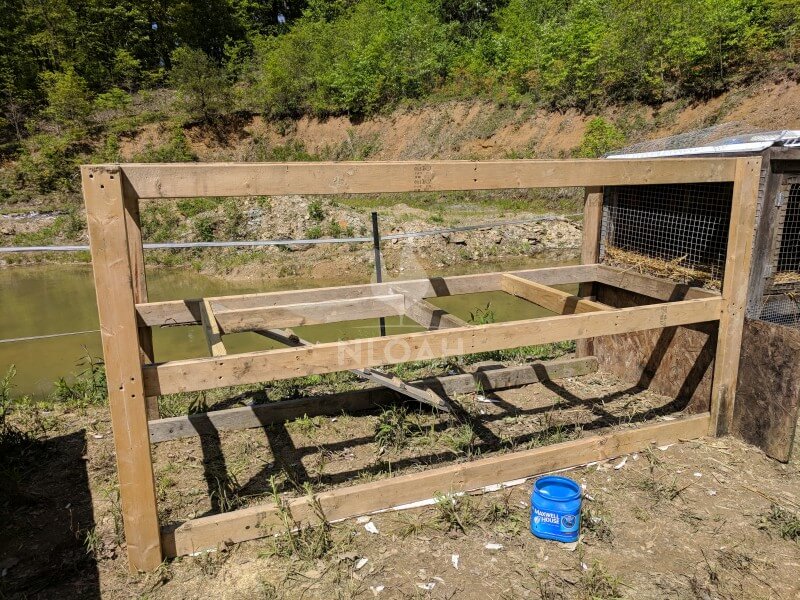
DIY Chicken Coop Design
Dimensions
Our rabbit-hutch-turned-chicken-coop project combines two upgraded hutches, and a third build in the same style that are all connected. The set up gives my flock an approximately 36 inch wide sleeping space on the top and about 22 feet of either additional sleeping quarters or a run underneath.
Perimeter and Bottom
To help ensure burrowing predators cannot get under the new chicken coop, we trenched about 1 foot deep both down and out, all the way around the rabbit hutch chicken coop build.
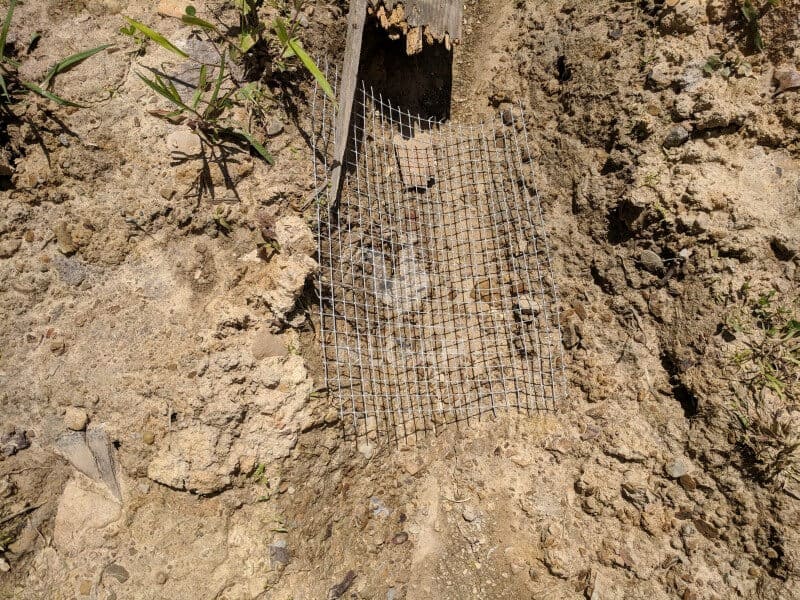
We laid hardware cloth that was 2 foot wide into the trench, making sure it overlaps both inside and outside of the coop. Any raccoon, mink, or fox that tries to dig into the coop will be met with hardware cloth.
While this method is not full proof (a predator could dig deep and out a further distance to get into the coop), it has never happened once in our old chicken run, which was designed in the same manner.
Our old chicken coop has a combination floor that has pressure treated plywood on the bottom, hardware cloth stapled to it in the middle, and another layer of pressure treated hardware cloth on top.
This type of flooring is predator-proof, and you could use it in the rabbit hutch chicken coop as well. But, the pressure treated plywood still deteriorates at the ground level and the top level (thanks to chicken and duck feces) and becomes really slick when not cleaned out at least once per week.
The wood also tends to hold the smell of the droppings, even when agriculture lime and fresh straw are added regularly after cleaning.
You could also attach a layer of hardware cloth all across the bottom of the DIY chicken at ground level to deter predators. The only downfall with this option is replacing the hardware cloth due to both bird waste and rusting from ground exposure and the possibility of bird nails or little chick feet getting attached to the wire squares and causing an injury.
Since hardware cloth is about $18 a roll, I would rather replace a little bit of it than a lot of it, on an as needed basis. The hardware cloth on our old coop and run lasted nearly three years without needing replaced.
Roof
We replaced rotted boards on top of the freebie and homemade rabbit hutches with barn wood planks we had on hand in our DIY chicken coop build. You could use either pressure treated wood planks, or pressure treated plywood as a roof on the rabbit hutch chicken coop.
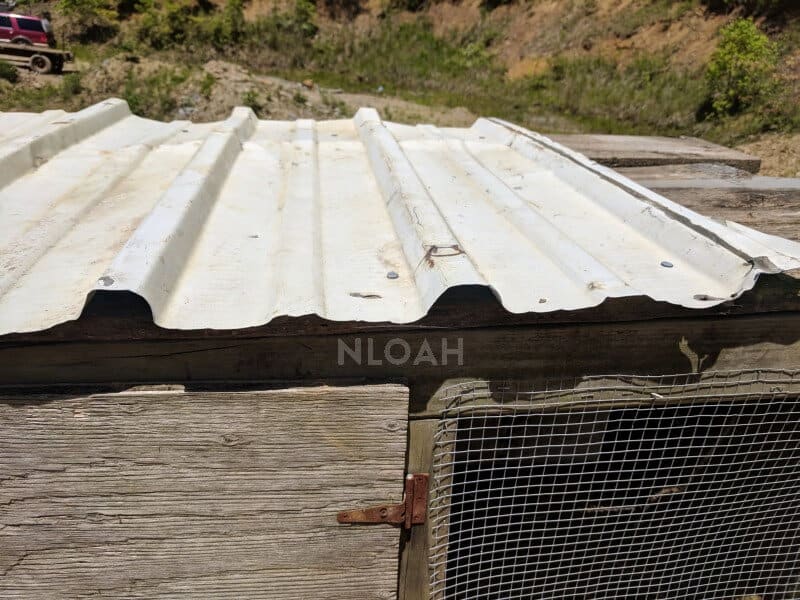
On top of the wood we placed some white metal sheeting to provide additional protection from the elements and predators. Add some pressure treated trim board to the front of the roof area, so the roofing material will be slanted and allow for run off of rain, snow, and ice.
While regular roofing shingles could be added as a covering for the boards, if you are going to tie the coop into a day run like we did, the roof will often be used as a perch for the birds. It is far easier to spray chicken droppings off of metal sheeting than it is roofing shingles – and the sheeting is a lot more durable.
Side Panels
Originally, we thought about having an access door at one or both of the lower ends of the coop. Ultimately, we decided against that option, and instead covered each end in hardware cloth and pressure treated wood.
I feel this will give any bird exercising or sleeping in the bottom part of the chicken run better weather protection during the late fall, winter, and early spring. I will also be covering the side panels with metal sheeting, but ran out of what we had stashed away in my beloved’s homesteading junk to treasure piles.
The top side panels on one chicken hutch were already covered in wood, and an underlying layer of chicken wire when we got them. The boards were rotting, and the chicken wire was badly rusted and torn in parts. Chicken wire, because it is far thinner than hardware cloth, rusts and tears a lot easier.
We tore off the old side panels, and replaced them in the manner noted above. While my flock runs the length of the chicken coop on the bottom, they cannot on top.
I chose to divide the top of the enclosure, so I could keep the small middle hutch as a decided brooder and/or quarantine area. This also allowed us to divide the upper sleeping quarters into nesting box areas.
Back
The back of the rabbit hutch chicken coop was covered first in hardware cloth, then pressure treated boards were screwed onto the support posts. On top of the wood boards, we placed metal sheeting as an added layer of protection against the weather.

Connecting The Hutches
While the large freebie hutch and the one we built using the first as a model are the same width, the small freebie hutch being used as a brooder is not.To ensure the hutches were firmly together (chicken wire will stretch wide enough with minimal effort to allow a mink to get through it).
We covered around the now adjacent support posts with two layers of hardware cloth, then connected another wider post or screwed in another board on top of it.
Even if the rabbit hutches had all been the same width, I still would have connected them in the same manner to ensure nothing could get inbetween the enclosures after they settled into the ground, and possibly shifted even an inch.
Front and Doors
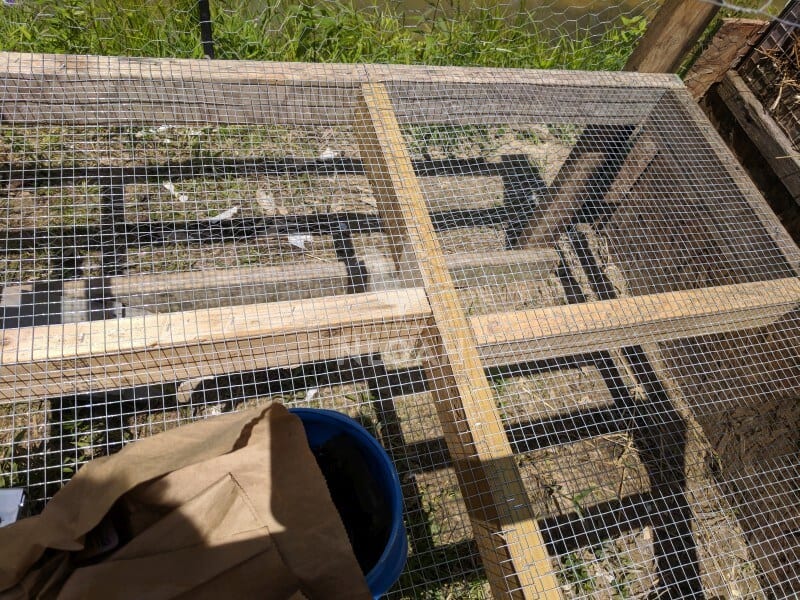
The front of the DIY chicken coop is comprised of a combination of hardware cloth and pressure treated 2 X 4 boards. We created doors that were large enough to open and easily get a shovel inside for cleaning.
While we kept the plywood doors that existed on the large freebie rabbit hutch, we simply framed the rest of them out to fit the desired space, and covered them in hardware cloth.
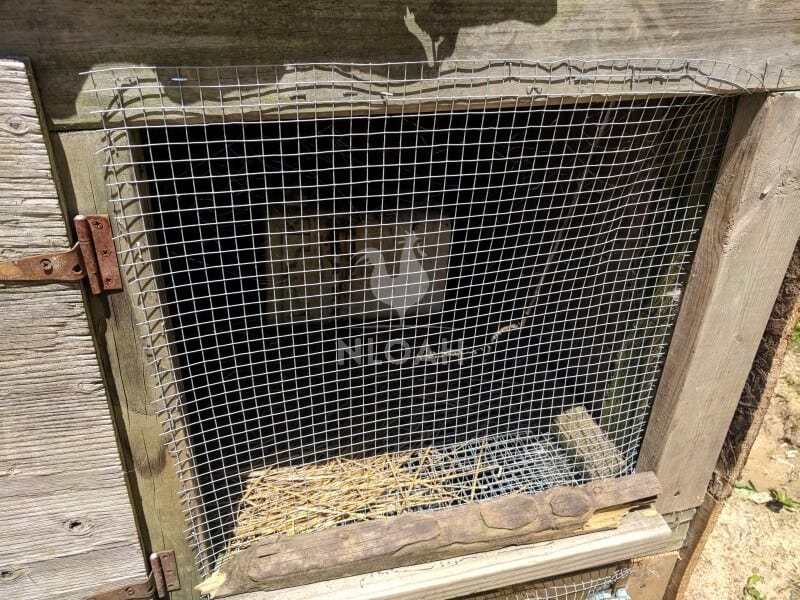
Currently, there is only one layer of hardware cloth, but I am going to add a second layer for added protection as soon as I can find more. It is a busy time of year for fencing wire at agriculture stores, and they were all sold out when I stopped at three to buy materials.
When using hardware cloth to cover a frame, coop frame, or doors, it is best to place the wire on the exterior and staple it down (excessively) to avoid drooping which can occur over time, or risk it being pushed in my either human hands or predators.
Even though the price of hardware cloth is a bit high when compared to chicken wire, always leave an overlap of about two inches, and staple on both the top and sides when wrapping it around a piece of wood to avoid it pulling loose when weight is placed upon it.
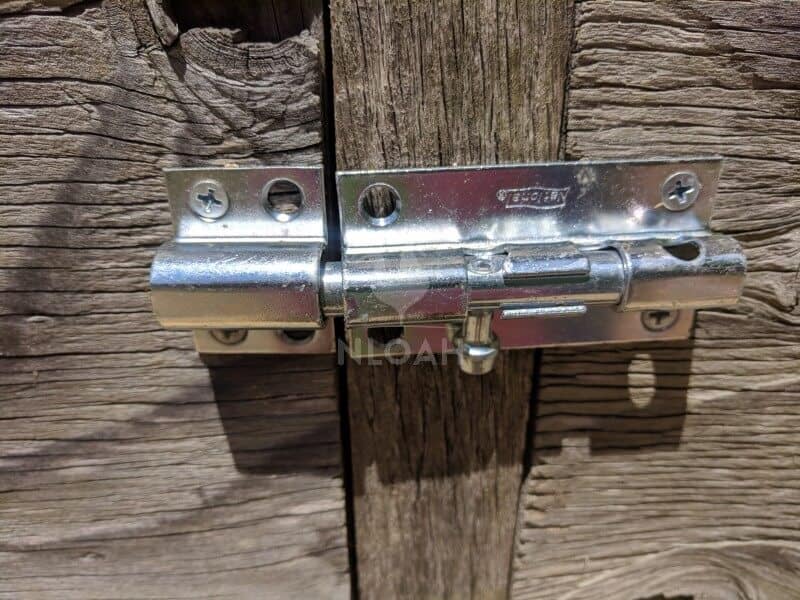
Always use a 2-step lock on doors to chicken coops. A clever raccoon can easily flip a hook latch or open a 1-step lock when it is hungry, and out looking for a meal. I recommend using slide bolt locks than turn down into a groove to lock. Using multiple locks and sturdy hinges on all access doors to better protect your birds from predators.
Attached Chicken Run
We built a spacious day run around the connected rabbit hutches turned chicken coop. Because the attached run will be used for daytime leisure only when the flock is not free ranging, its level of security does not need to be as robust as the coop itself.
To keep the birds in the run during daytime hours, we used chicken wire for the sides and bird netting as a top covering. While this type of day run has always served us well, how well it will work for you depends solely upon the type of predators in your area. If bears are roaming about near your homestead, this style of day run would not last long.
Wild boar and coyotes are almost commonplace in our county, but we have not had to battle them on our homestead. A bobcat hung around in our deep woods for a while, but did not venture too close to the barnyard or home thanks to our livestock guardian dogs and solar motion detector solar lights – we place those on and around our coop, as well.
We have had frequent issues with raccoons, mink, and the occasional fox. Because of this, particularly, the fox, we employ the same trenching and hardware cloth base measures around the perimeter of the chicken run.
We have had to deal with more hawks than I would like, but no owls. The bird netting will deter any hawk or other feathered creating from landing on it because it fluctuates under their movement and catches horribly on their feet if they attempt to walk on it. Again, this is a daytime only safe run, I would not trust neither bird netting nor chicken wire to protect my flock at night.
The chicken wire sides of the run are tied with wire to the hardware cloth and T-posts that support it. Building a wood frame as a run perimeter, and stapling both the trenched hardware cloth and chicken wire sides to the board also help secure it firmly into place.
We positioned the rabbit hutch chicken run so it borders my apothecary patch. This saved us both time and money on T-posts, and adds an additional layer of protection for each fenced in area.
I wanted to be able to stand up and walk through the chicken run without being hunched over the whole time, like in the old run. To accomplish this economically, I purchased only enough of the taller 8-foot T-posts (about $9 each in my area) to hold up the bird netting top and chicken wire sides at the front of the run and down the middle.
It has a house roof type angle now, allowing me to walk upright in the middle and towards the opening of the rabbit hutch chicken coop doors to open them – which would require bending over anyway
The bird netting on top of the chicken run is tied with wire onto the chicken run sides, around the top of the T-posts, and stapled firmly onto the backside of the coop. Using the enclosure itself to staple to saved us about $25 on T-posts.
Chicken Run Door
The entry door into the chicken run was constructed out of pressure-treated hardwood posts and wood boards. A two step lock was attached to the entry door for predator protection. Solar motion detector lights are attached to the top of the door to help scare predators away, and to alert our dogs when a threat could be lurking about.
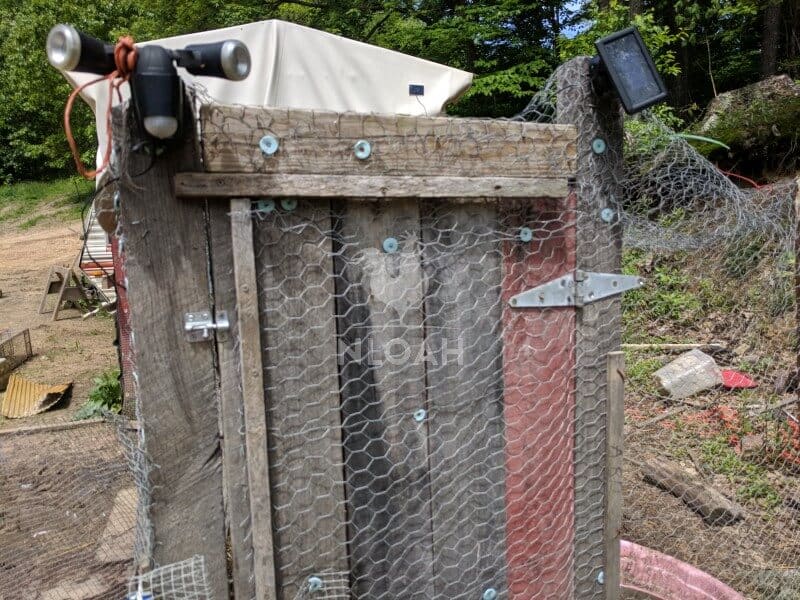
To further deter hawks or owls, we tied aluminum foil pie pans and old CDs to the door and run panels. They act as prisms when sunlight hits them, startling feathered predators away.

Painting large black eyes on top of your coop (or on a board screwed into a post that points towards the sky), is also supposed to curtail predators from coming near the coop.
Apparently, hawks and other birds of prey think the eyes belong to a predator larger than themselves, and fly along to somewhere else to hunt. It actually seems to help, so black eyes will be painted at the top of the door support posts.
Staple hardware cloth onto the door, and leave enough on the end so it can wrap around the post attached to the door for added protection against predators.
This upcycled rabbit hutch and newly built hutch style chicken coop was worked on over the course of a few weeks in-between other homesteading chores.
If we had dedicated time to the project in one fell swoop it could easily be finished in a single weekend from start to finish – even if you build all of the rabbit hutch style enclosures yourself.
Our heritage breed Buckeye hens and roosters, Pekin ducks, and guineas are all now living happily together in their rabbit hutch chicken coop and large run. It did not take them but a few hours to get used to their new environment after calming down from the disruption from their relocation and change of routine.
If you only needed to build one hutch to house your flock or opted not to connect them together or attach the run directly to them, this type of DIY chicken coop could also easily be outfitted with wheels and used as both living quarters and as a chicken tractor.

Tara lives on a 56 acres farm in the Appalachian Mountains, where she faces homesteading and farming challenges every single day, raising chickens, goats, horses, and tons of vegetables. She’s an expert in all sorts of homesteading skills such as hide tanning, doll making, tree tapping, and many more.