One of the fastest vegetables to mature in your garden, radishes are arguably also one of the easiest. This pungent-tasting veggie is grown by homesteaders all over the country, and is a great addition to any garden, big or small.
Radishes were first cultivated in China and Japan, popular as a root crop for both culinary and trading purposes.
In modern-day Japan, the white daikon radish is a popular food, and while the conventional radishes we grow in our gardens tend to be much smaller, they are equally flavorful and are a staple in any homestead garden.
In fact, the ancient Greeks loved radishes so much that they used to make replicas of them in gold! Radishes were also popular in ancient Egypt, ancient Rome, and other parts of the world before being brought to America by the early settlers.
Easy to cultivate and fun to grow, radishes are without a doubt one of the most popular DIY crop sin the United States.
Yet despite their reputation as being an easy vegetable to grow, many gardeners still find themselves shying away from this tasty favorite.
While radishes do command some special care in their growth, with a little bit of practice and know-how you can grow a bountiful harvest of these colorful vegetables in no time.
Health Benefits of Radishes
The humble radish may not be a nutritional “superfood” like kale or other newsworthy veggies, but it has plenty of flavor and nutritional value to make up for any perceived shortcomings.
The radish is a good source of vitamin C and iron, and while these quantities are small (meaning you would have to eat quite a few radishes to make a difference in your diet), they are also a fantastic source of fiber.

Types of Radishes
In general, there are two types of radishes: spring and winter. Spring varieties are best planted in early spring, which will allow them to mature in cool weather before summer’s scorching temperatures arrive. Popular spring radishes include Burpee White, and Crimson Giant. These radishes tend to mature in a month or so.
Winter radishes, on the other hand, take longer to mature, but tend to store better. If you plan on preserving large quantities of radishes, winter radishes are the way to go, as they will hold their flavor for longer in storage.
They also harbor a more distinctive flavor, giving dishes the “radish”-y taste you have come to know and love. You can wait longer before harvesting these types of radishes, too, meaning you won’t be overwhelmed by a massive crop all at once.
Varieties of Radishes
Besides the two broad categories of spring and winter radishes, there are also varieties within those categories. Among the most popular kinds of radishes are White Icicles, Cherry Belles, and White Beauties.
White Icicles are pungent white radishes that grow to about eight inches in length. These longer radishes are great for growing in light, fluffy soil, as are other long radish types like Daikon Long Whites.
Cherry Belles are small, round radishes that are a reddish-purple hue. These are the radishes that you most often see on supermarket shelves, and provide a crunchy, delectable flavor to salads and side dishes.
White Beauties are similar in flavor to Chery Belles, but instead of being red in color, they are white both inside and out.
Other varieties of radishes include Sparklers, French Breakfast, Fire and Ice, Early Scarlet Gold, Easter Egg, Green Meat, Black Spanish, Watermelon, and more.
When purchasing seeds, consider planting more than one variety so that you can experiment with the different flavors, textures, and culinary applications of each type of radish.
Planting
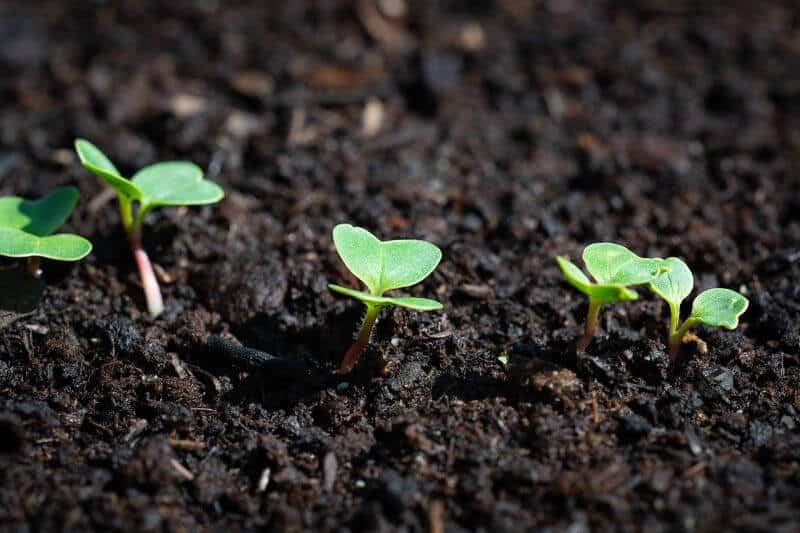
Radishes are a great crop for new or young gardeners-in-training to try. Because they offer a minimal waiting period between sowing and harvest, it is easy to experience a (nearly) instant gratification.
Radishes are a cool-season crop, meaning they can be planted early in the spring and long before the soil is warm enough for other garden vegetables, like tomatoes or beans. Ideally, you should sow radish seeds when the daytime temperatures reach around 50 degrees Fahrenheit or so.
The soil does not need to be overly warm, and soil that is too hot will actually harm the growth of your radishes.
A light frost, on the other hand, will not hurt your fragile seedlings. Therefore, earlier is better when it comes to planting this hardy crop.
As soon as the soil is workable in the spring, get out there and start sowing your seeds. Select a planting site that gets about six hours of sun every day, and prepare your soil.
You want soil that is well-draining and light, with a semi-neutral pH. Radishes can tolerate a pH between 5.8 and 6.8, but the more balanced the soil can be, the better.
If your soil needs any modification, try to do so long before you need to plant. Avoid fresh manure and other fertilizers that are high in nitrogen. Radishes are root crops, increasing the likelihood of contamination by manure that has not been aged properly.
Furthermore, soil that is too high in nitrogen will cause your radish tops to bloom and produce lush foliage, sacrificing their roots in order to do so. Since the root is the part of the radish that is typically eaten, this is a definite misstep.
That being said, you can add aged compost that has a good balance of nitrogen, potassium, and phosphorous, so long as it has been given ample time to break down. This can be done at any time. You can also use compost tea after your seedlings have developed.
You need two or three radish seeds per hole and the depth that you will need to sow your seeds will vary depending on the variety of radish you decide to plant. Some require more depth than others.
To sow, create furrows roughly three or four inches apart, then plant the seeds about half an inch deep. Cover these seeds loosely with soil, and then water lightly (try to avoid washing your seeds away, though!).
A good tip for growing radishes is to plant several batches in successive sowings. This will allow you to experience a continual harvest of fresh, tasty radishes throughout the duration of the summer.
Use longer varieties of radishes later in the season, as they will be able to tolerate heat better than shorter, rounder ones. Use short radishes early, so that you can harvest them before the hot temperatures arrive.
Mulching
Mulching is especially important when planting radishes. Because their tops are small, they are often unable to compete with weeds. Mulching also helps retain moisture, meaning you won’t need to water as often. For best results, use wood chips or straw to mulch your radishes.
You don’t want your soil to dry out, but you don’t want it to be swampy, either, as this can cause your radishes to rot in the ground before they are ready for harvest. Too-dry soil will cause your radishes to become overly pungent and dense-tasting. Mulching can also help keep common radish pests, like root maggots, at bay.
Radishes aren’t prone to many pests or diseases as long as you are taking care to water and mulch appropriately. The root maggot is one of the few pests that tends to affect these tasty vegetables, but you can usually prevent it by planting your crops in a rotational pattern.
Don’t plant radishes in a bed or area that contained radishes or similar cole crops within the last three years and you should be able to avoid this pest -as well as others – with ease.
Diseases
Diseases are also uncommon in radishes. While rot can occasionally occur if the soil is too wet or dense, this is avoidable by selecting the proper planting site and mulching liberally. Black root is a disease that is common to long radishes, causing dark spots at the bottom of your roots.
While this disease is difficult to treat and prevent, if you find it coming back it might be worth your time to consider only planting round radish species.
Radishes can be planted by themselves or intermixed with other plants. They can be grown in containers, indoors, or in raised beds, as well as sown directly in the ground. Because they are such small plants, you can sow radishes without worrying about crowding in any empty spaces you might have.
Because radishes are ready to be harvested long before other root crops like carrots or beets, this practice will allow you to maximize your space and increase your yields.
Radishes are great companion plants for peppers, cucumbers, and other vegetables, helping to prevent pests like aphids and flea beetles from decimating your crops.
Harvesting Radishes
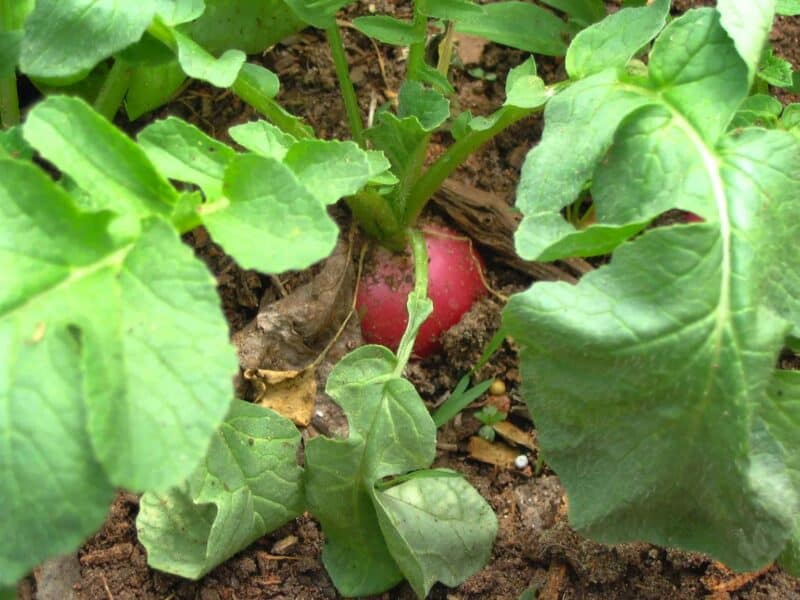
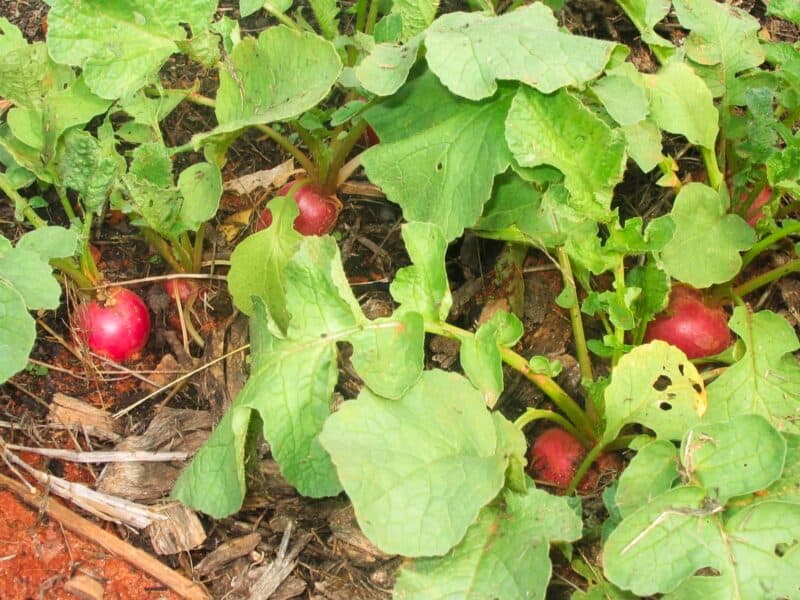
The key to growing a delicious bounty of radishes is to know exactly when to harvest. Radishes that are harvested too late will taste overly spicy and too chewy. Radishes that are harvested at the perfect time, however, will have a crunchy and mild taste.
Spring varieties mature quickly, as previously mentioned, so it’s important to stay on top of your ideal harvest times so that you don’t miss your window of opportunity.
How do you know when your radishes are ready to be harvested? There are a couple of ways – neither of them foolproof – to help determine whether your carefully cultivated radishes are ready to be eaten.
The first method is to gently brush back some soil to see if a bulb has developed to the proper size. If the bulb has developed to your liking, pull it out and ample it.
If one bulb has developed to the size and taste you were expecting, chances are the other ones did, too (assuming you didn’t plant them too closely together and that they were all grown under the same circumstances, of course).
You will need to check your spring radishes on a regular basis and avoid leaving them in the ground for too long. Once you have determined that they are mature, pull them out immediately and cut off the leaves. Store the radishes in your refrigerator, and use them within fourteen days.
Winter radishes can be stored in a root cellar, and will last for several months as long as you store them in a bucket of moist sand. If you’d like, you can even keep winter radishes right in the garden throughout the winter. Just keep in mind that you will need to keep them mulched and pull them by late winter or early spring.
The other method of testing whether your radishes are ready for harvest is to simply read your seed packet. The packet will have plenty of information about the time to maturity for your specific variety of radish. This will leave you with little doubt about when they are ready to be harvested, but keep in mind that weather and growing conditions can alter the estimated date by a few days or so.
Preserving and Using Radishes in Cooking
Most people rely on the classic fallback of sliced radishes on a salad. However, they have dozens of other uses that can add a particularly unique zest to your usually bland cooking.
Try slicing and dicing your radishes and adding them to soups or stews, or consider tossing them in honey and soy sauce for use in a stir fry. You can marinate, roast, or sauté your radishes, serving them plain or seasoned. They even make a fantastic addition to mayonnaise salads like potato salad or coleslaw.
Radishes are easy to preserve, particularly if they have been harvested right at the peak of freshness. If your radishes bolt before you have a choice to harvest, no worries. It’s easy to salvage something from your harvest so that it was not a total waste.
All you need to do is a leave a few radishes in the ground to develop seed pods. These seed pods can be stored for use in growing a new batch of radishes next year, or they can even be eaten atop a salad, where they have a taste not unlike that of pea pods.
If you’re looking to preserve your radishes in the long term, you have several options You can store them in a mason jar, which will allow you to store them in the refrigerator for a couple of weeks without them becoming wilted. This will provide you with crisp, tasty radishes that will be delicious when placed atop a salad.
You can also dehydrate your radishes to make radish chips. A healthier alternative to the classic potato chip, dehydrated radishes are easy to make. All you need to do is wash the radishes, removing all dirt and debris, before cutting off the leaves, roots, and stems. Place the radishes in your dehydrator for several hours, toss with salt, and add oil if desired. That’s all there is to it!
Pickled radishes are another tasty option of preservation. When pickled and then canned in a water-bath canner, pickled radishes can last for months or years at a time. These tart treats make great snacks, side dishes, and garnishes, to say the least.
Thinking about growing radishes in your garden this spring? Don’t delay. Radishes are a quick-to-grow, quick-to-harvest crop that should be a staple in your homestead kitchen. Plant a few varieties this year for a tasty treat in the weeks that follow.

Rebekah is a high-school English teacher n New York, where she lives on a 22 acre homestead. She raises and grows chickens, bees, and veggies such as zucchini (among other things).
Another really good treat with radishes is to place sliced radishes between two slices of bread with butter, salt and pepper. Don’t knock it until you try it!
We’ve started making raw radishes our “crunchy” snack in place of chips. I keep a bag in the fridge to add more fiber and nutrition to our diet.
paper seed rolls are great for the newbies getting started – helps get that seed spacing correct and plant at that exact perfect depth >>>> making the seed rolls can be an entire family craft type project during the winter ….
I love radishes! I discovered stir-frying them one year when I got a whole bunch from a neighbor. So delicious. I can’t believe I keep forgetting to plant them. My lettuces are encouraging me so I think I will put in some radishes now.