Kefir is a fermented, cultured milk product that is packed with a wide range of probiotics and yeast, similar to yogurt. This guide will teach you all you need to know about making your own delicious kefir milk at home.
Kefir has been around for centuries, and while nobody knows exactly how or where it originated, its birthplace is thought to be somewhere around the Northern Caucasus Mountains in the former USSR.
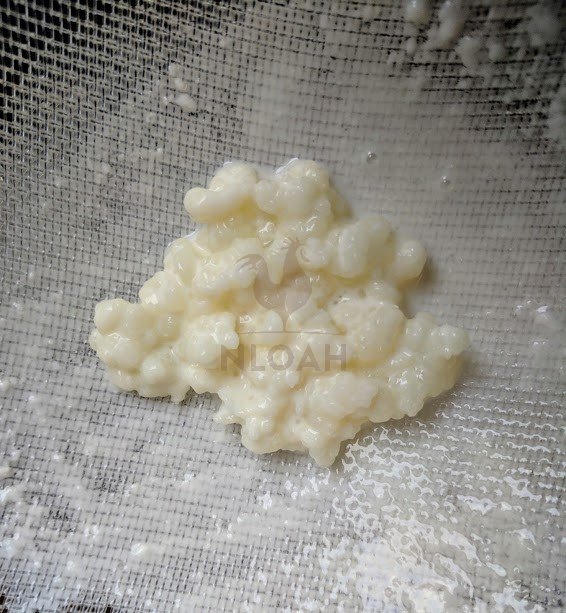
In order to make kefir milk, the first thing you need are milk kefir grains. These are not actually grains in the traditional sense, and are more like gelatinous white particles that look similar to grains.
The grains are added to the milk, and then the fermentation process begins. Once the kefir is done fermenting, the grains are then strained out and used for the next batch, leaving you with a smooth glass of kefir milk (as you’re about to see).
What Does Kefir Taste Like?
Kefir has quite a sour taste, and is extremely similar to yogurt although with a thinner consistency. Its taste varies on so many different factors, from the type of milk you use to how long you have left it to ferment, to whether or not you have fermented it a second time with additional flavorings.
While you can easily try a store-bought bottle of kefir if you have never tasted it before, this does not even nearly compare to the fresh, vibrant taste that homemade kefir has.
What Benefits Does Milk Kefir Bring?
Kefir milk can benefit your health in several different ways:
- Boosts the immune system
- Helps with digestion and IBS
- Improves allergies
- Heals the skin and helps to treat certain skin conditions, such as eczema
- Possible anti-inflammatory effects
For those who are lactose intolerant, you still have a couple of options when it comes to making and drinking kefir. The first is to just give it a try, because there is quite a bit of evidence out there that suggests that the fermentation process breaks down the lactose in the milk, leaving the milk relatively lactose-free.
Alternatively, you could try making it with non-dairy milk (more on that in a minute).
Homemade vs Store-Bought Kefir
You may have noticed bottles of milk kefir in supermarkets. While these too contain probiotics, it doesn’t have nearly as many cultures as the homemade version.
Here are a few of the other benefits to making your own kefir rather than purchasing it pre-made:
- It doesn’t get much fresher than making it yourself
- Homemade kefir contains less lactose than store-bought, as store-bought versions are usually cultured for shorter amounts of time
- You can make as much or as little as you need
- Once you begin making it with the grains, you will be able to make kefir for the rest of your life
- By using glass jars, you will be avoiding the toxins that come from plastic, while also producing less waste
Kefir vs Yogurt
Kefir is often compared to yogurt, and while they may both be cultured milk products, there are a few significant differences between them.
To begin with, as mentioned above, kefir has a thinner consistency than yogurt. Both kefir and yogurt contain probiotics, but kefir has around ten times the amount of probiotics that yogurt has. Kefir usually has around 30 to 50 different probiotic cultures, while yogurt contains just a few.
However, when it comes to recipes that make use of yogurt, you can usually easily substitute kefir for this, making the final dish, or beverage, much healthier. Keep reading on for some exciting ways in which you can use kefir when cooking.
Milk Kefir vs Water Kefir
There are actually two types of kefir out there – milk kefir and water kefir.
Unlike milk kefir, water kefir is completely dairy-free, making it a much lighter beverage. Instead of being made with milk, it is made with sugar water, fruit juice or coconut water.
However, while water kefir contains probiotics, it only has around 10-15 strains, which is nothing compared to the 50 strains that milk kefir has.
Nevertheless, water kefir has its health benefits, and is a completely different drink to milk kefir. If you are trying to increase your probiotic intake, then it would be worth making both. Keep in mind that this guide is only for milk kefir, as the starter grains that you will need, as well as the process, differs when it comes to water kefir.
This video will help you to better understand the differences between milk and water kefir:
Where to Find Milk Kefir Grains
There are a few different ways to get started when it comes to making milk kefir, but the most beneficial is by using fresh, live milk kefir grains. These grains are made up of a bacteria and yeast mixture, but the exact composition varies depending on where the grains have come from, as well as how they have been used.
If you have a friend who makes kefir, then this is the person to turn to when it comes to getting some grains for yourself. With each batch of kefir, the grains slowly multiply, meaning that it does not take long for a person to have enough grains to share.
Of course, an online search would likely reward you with a few places that sell kefir grains, but make sure you are purchasing the fresh, live variety, rather than the dehydrated form.
Social media is also a great asset in the search for kefir grains. On Facebook there are several groups dedicated to kefir. The members of these groups are always happy to share extra grains, and will send you some for nothing more than the cost of postage.
Dehydrated Grains
As mentioned above, kefir grains can also be bought in dehydrated form. Unlike fresh grains, which need to be used immediately, dried grains have quite a long shelf life, and can be kept, in their dried form, for up to six months.
However, dried grains need to be rehydrated in fresh milk beforehand. This rehydration process can take up to a week, so you will have to wait a while before you can actually consume your kefir. It takes a little bit of daily work, but clear instructions should be provided by the company that you ordered the grains from.
Powdered Culture
While kefir is most beneficial when made from grains, you can also purchase a powdered culture. These are created in laboratories, and are designed to be used just once. If you care for them well, you may be able to make a couple of extra batches from the starter, but the kefir will be weaker with each batch that you make.
If you cannot find kefir grains anywhere, or if you know you are only going to be making it just once, then it may be worth considering a powdered culture.
What You Need to Get Started
Before getting started, you will need to have the following supplies:
- A glass mason jar
- A small cloth, or kitchen towel, to cover the jar
- A rubber band
- A plastic strainer/sieve
- A plastic or wooden spoon
One key point to remember is that you should never allow your milk kefir grains to come into contact with metal, as this can damage them.
In terms of ingredients, this is what you’ll need:
- Milk kefir grains
- Milk
You do have a few options available when it comes to the different types of milk you can use, and these are explained in more detail further down.
How to MakeKefir Milk
The process of making kefir milk is surprisingly easy…
To begin with, place your grains into a clean glass jar, before filling the jar with fresh milk. When it comes to understanding the ratio between the grains and the milk, this is something that you will only work out with the more batches you make, as it varies depending on everything from your grains to the climate you live in.
Keep these in mind when it comes to the grain:milk ratio:
- For colder climates, aim for somewhere between 1:7 and 1:15
- For warmer climates, between 1:20 and 1:30 would be better
The ratio of grains to milk has quite an impact on the final outcome, as well as the amount of time that you need to ferment it for. With fewer grains, you can leave it fermenting for longer, and the flavor will not be as strong, whereas the opposite occurs when you use more grains.
Next, cover the jar with a cloth and a rubber band. While it is possible to use the jar’s lid, this does not allow for any pressure to escape, which can lead to a more effervescent final outcome.
Leave the jar standing at room temperature, and it will soon begin to ferment. However, if you also make other cultured foods, whether this may be kombucha, sourdough or anything else, you need to keep a distance of at least four feet between each culture, so that they do not interfere with each other.
Fermentation should take around 24 hours, but can be more or less depending on what you want your kefir to be like:
- 12 hours will result in a thinner, sweeter, more milk-like kefir
- 24 hours is usually optimum
- 48 hours will give you a thicker, more sour kefir
Of course, room temperature varies. The warmer it is, the faster your kefir will ferment, so you may need to leave it fermenting for longer in the winter than you would in the summer.
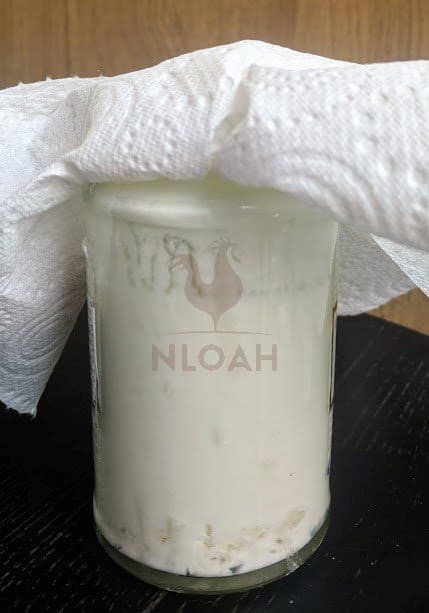
When you are ready to stop the fermentation process, give the jar a stir with a plastic spoon. Your kefir will have likely separated a bit, so stirring it will help to mix it all back up, making it easier to strain. You’ll know when your kefir is done because it will have more of a sour scent to it, and little rivers will also have formed within it, as you can see from the photo below:

Then, empty the contents of the jar into your plastic strainer, over a clean bowl. While you do need to treat your grains relatively gently, do not be afraid to use the spoon to squeeze out any milk remnants from the grains while they are in the strainer.
After straining your grains, place them back into a jar. There is absolutely nothing wrong with using the same jar, without cleaning it, and, in fact, many tend to have better results when doing so. This is because the grains need to micro-adapt each time they are placed into a new environment, but will not need to do this when placed back into the same jar, so will likely multiply much faster too. When it comes to bacteria, the fermentation process from your next batch will kill any of this off.
However, if you prefer to use a clean jar, that’s fine.
Make sure you do not wash your grains before placing them back into the jar.
Once the grains are in, fill the jar with milk, and repeat the process.
When making kefir with new grains for the first time, you will likely need to discard of your first couple of batches, as your grains will still be re-activating. While there is nothing wrong with consuming these batches, your kefir will taste much better, and have a thicker consistency, after a few rounds.
Here is a video that will take you through the kefir-making process:
How to Store Kefir
Once you have strained your kefir, the best way to store it is in a glass jar or bottle, keeping this in the fridge. It will have a shelf life of around two to three weeks.
Each time you make a new batch, it is completely up to you whether you store this in a separate jar, or add it to the previous batch. If you do decide to add it to the previous batch, simply give the jar a shake once you are done, to mix the batches together.
You also have the option of storing the jar at room temperature, but keep in mind that the kefir will continue to ferment, although not at the rate that it would have if it still had the grains in it. If you do this, your kefir will only have a shelf life of around 1-2 days, and you would need to use a jar that has a rubber seal. If you do not, pressure from the fermentation process will build up within the jar, and could blow up.
Second Fermentations
As mentioned above, leaving your strained kefir out at room temperature causes it to continue fermenting, and this can be referred to as a second fermentation.
There are a few benefits to doing this:
- A more mellowed flavor
- An increase in bacterial content
- A decrease in lactose content
- The opportunity to add in flavorings
If you would like to do a second fermentation without adding in any flavorings, just leave your jar of strained kefir out at room temperature for up to an additional 24 hours. Again, this depends on your climate, so keep tasting your kefir every couple of hours, placing the jar into the fridge once you are satisfied with the taste.
For those who would like some extra flavor to their kefir, try adding one of these ingredients into your jar of strained kefir, before leaving it out for the second fermentation:
- Chopped fruit
- Citrus peel
- Honey
- Vanilla
- Cinnamon
- Cocoa powder
- Tea bags
- Garlic or onion, if you want to use your kefir in a savory dish
When it comes to the amount that you need to add, keep in mind that less is more. Only a couple of slices of fruit, or a sprinkle of cocoa powder, is all you need, as you can always serve up your kefir topped with more of those ingredients.
Take a look at this video for more information on second fermenting your kefir with fruit:
Which Milk Is Best?
The type of milk that you choose to make your kefir with will have quite an impact on the outcome of your kefir, not only in terms of taste, but also consistency.
Cow’s milk is the most commonly used type, not only because it is easily available, but also because it produces a smooth and relatively thick kefir. Full-fat cow’s milk is always better, but reduced fat will work too, although your kefir will be thinner in consistency.
Goat’s milk is also starting to become more popular when making kefir, and this is because it is already lower in lactose than cow’s milk. However, due to the differing structure of goat’s milk to cow’s milk, your kefir will be thinner.
Sheep’s milk is less common, and is usually used for making cheese. However, if you can get your hands on some, this milk is sweeter and higher in protein than cow’s milk, and creates a thicker and creamier kefir.
Cream, or half-and-half, is another option that you have, and this produces a rich and thick kefir cream, which some would say is similar to sour cream. However, due to the thickness of the kefir, it can be quite hard to strain and separate the grains out. Unless you are confident in your kefir-making abilities, try using half cream and half milk instead of going for full cream.
Out of all of the dairy milks, you also have the option of pasteurized or raw. While pasteurized may be the most easily available, do try to make your kefir with raw milk if you get the chance, as this is not only so good for the grains, but will produce a much creamier finished product.
When it comes to non-dairy milks, such as coconut milk or nut milks, these can be used, but be prepared for inconsistent results.
You should also only use non-dairy milks for a couple of batches, before revitalizing your grains in an animal milk. This is important because the grains will only really thrive and grow when they are able to feed on the lactose sugar that is naturally found within animal milk.
There’s nothing wrong with switching between milk types, as your grains will easily adapt to each type. In fact, this is often the best way for those new to making kefir to begin, as it will give you the opportunity to taste some of the many different possibilities out there.
How Quickly Do Milk Kefir Grains Multiply?
It is hard to give an accurate time frame when it comes to how quickly milk kefir grains multiply, because this is influenced by many factors.
Your grains will slowly naturally multiply anyway each time you feed them, meaning with each new batch of kefir that you make, but, if you would like to speed this process up, here are a few tips that you can try:
- Kefir grains love cream, so try adding in a few spoonfuls of cream to your next batch
- When straining your kefir, you will notice tiny pieces of grain in your strainer. These are new grains beginning to grow, so make sure that you do not throw them out
- Use a wide jar, rather than a narrow one, as the larger surface area means that your grains are able to feed off the milk more easily
- Keep your jar in a warmer part of your house while it is fermenting, but remember to reduce the amount of time you ferment it for, since the heat will speed the process up
What To Do With Extra Kefir Grains
After you have been making kefir for a while, you will likely soon end up with more grains than you need. Rather than throwing out the excess, here are a few ideas as to what you can do with them:
- Share them with friends, along with this guide so that they know what to do
- Feed them to your animals. Whether you have dogs, cats, chickens or goats, your animals will likely love the grains, as well as the kefir milk, and the probiotics will do them plenty of good
- Eat them yourself, either blending them up into a smoothie or incorporating them in dishes that you cook
- Add them to your compost bin to feed your soil with some probiotics
- Dehydrate them for future use. The process is explained in more detail below
Need a Kefir Break?
There is no denying that it can sometimes become a little tiresome having to make a fresh batch of kefir every day, especially when you already have a fridge full of previous batches.
If you would like to slow this down, simply follow the standard process when it comes to making kefir, but keep the jar in your fridge, rather than standing out at room temperature. The colder temperatures will slow down the fermentation process, and you will not need to strain the batch nearly as often, with some people able to leave it for up to two to three weeks in the fridge before straining.
Keeping your kefir in the fridge is a great option if you are going away for a while, and do not want to have to bring your kefir with you. However, if you would like to take a longer term break from making kefir, of up to six months, then your next option is to dehydrate the grains.
These are the steps that you will need to follow:
- Gently rinse the grains using filtered water
- Either lay them on some parchment paper in a dry, safe location for three to five days, or place them in a dehydrator, making sure that the temperature does not rise above 85 degrees Fahrenheit.
- Place your dried grains into an air-tight bag, adding in a sprinkle of powdered milk too
- Store this bag in your fridge for up to six months
When the time comes to rehydrate your grains, you will likely need to discard the first few batches that you make, in the same way that you did when you began using your grains for the very first time.
Is Kefir Safe?
Kefir has been made for centuries, and used to be a way in which people would preserve milk.
While you may think that kefir could pose some health risks, fermented foods are actually less likely to cause a foodborne illness, and this is all thanks to the fermentation process. Thanks to the way in which the culture metabolizes during the process, this inhibits and kills any other microorganisms
Ideally, your kefir should have a pH of around 4.5, and there are labs that you can send a sample to for testing if you are really concerned.
Side Effects
While kefir may be safe, it is still a fermented food, and those who are not used to eating fermented foods should start off slowly, with just a couple of tablespoons of kefir a day. Build this up until you are having around one small glass a day, which is the ideal amount.
If you do end up having too much too quickly, you may experience some side effects, such as diarrhea, bloating or constipation.
If you have a compromised immune system, talk to your doctor before beginning to take kefir. While kefir is great for boosting the immune system, yours could be out of balance, and needs to be fixed before you work on strengthening it.
Ways to Use Kefir Milk
In addition to drinking it straight, there are so many other ways in which you can make use of kefir in the kitchen. The most popular method tends to be smoothies, as these are so easy to whip up and can incorporate such a wide range of other ingredients.
Kefir ice cream is another easy one to make, as you can just replace the milk in just about any ice cream recipe for kefir. The ice cream that you will produce will still be just as creamy, and while it may have a slight tang to it, you won’t be able to taste the difference between kefir ice cream and standard milk ice cream.
Since kefir already contains yeast, it can actually be used to create a fermented dough, which can then be used to make bread, with no extra yeast needed. Kefir sourdough loaves are delicious, as are kefir flatbreads, the recipe for which you can see in the video below:
Kefir pancakes are another popular dish, but you may need to experiment with a few different recipes in order to get your pancakes fluffy enough. Here is an easy recipe for you to try:
Once you have been making kefir for a while, and are confident with the process, a great next step to take is making kefir cheese. The result is similar to a cream cheese, except for the fact that it contains all of the nutritional benefits that kefir brings.
The process for kefir cheese is a bit longer than the other recipes mentioned here. To begin with, you need to allow your kefir to ferment for 48 hours, so that the curds and whey separate in the jar.
You will then need to drain the kefir in a cheesecloth for another 24 hours, so that you can properly separate out the curds, before you then mix it with herbs, spices or any other ingredients you want to create a flavored cheese.
The leftover whey can be used in a number of ways, from blending it into a smoothie to using it to ferment other vegetables, such as sauerkraut.
While the methods of making kefir cheese do vary quite a bit, this is a good recipe to get you started:
In addition to all of the dishes mentioned above, kefir can be used for cooking in so many other ways. Here are some ideas to inspire you:
- As a dressing for salads, eg. potato salad or chicken salad
- As a marinade to tenderize meat
- Kefir muffins or waffles
- As a dip, mixed with everything from blue cheese and walnut to roasted beetroot
- Mixed with either herbs and spices or fruit to make both savory and sweet sauces
- As a face mask to help rebalance your skin’s acid and alkaline ratio and to heal any skin conditions
Kefir FAQs
Working out how to make the best kefir is quite an experimental process, as the method differs slightly for just about everybody. However, here are a few of the most common issues and questions that people have:
My kefir has separated into curds and whey. What do I do?
This happens when your kefir has over-cultured, meaning that you left it fermenting for too long. Simply strain out your grains and then start again, making sure to either reduce the fermentation time, reduce the amount of grains you use, or increase the amount of milk you use.
My kefir isn’t thickening. What do I do?
If your grains are new, then this could be a reason, as they are not fully activated yet. Make a few more batches and see if the problem resolves.
Alternatively, you could try reducing the amount of milk that you use, as this will speed up the rate at which your kefir thickens.
I forgot about my kefir for a week. It has now completely separated and smells strange. What do I do?
Ideally, you should not leave your grains fermenting for longer than 48 hours, as they will have run out of nutrients from the milk by then, and will begin to starve. However, if you have done this as a one-off, you should still be able to separate out the grains and then immediately put them in some fresh milk.
When it comes to the separated kefir, give this a mix to combine it all again, and then give it another sniff. If it smells and tastes normal once you have done this, then it is ok to consume it.
My kefir has grown mold. What do I do?
It is extremely unusual for kefir to grow mold, and grains do naturally have a yellowish tinge to them. However, if you notice orange, red, green, black or pink mold, then this likely means that your batch, as well as the grains, have been contaminated, and need to be discarded.
My kefir grains have a sticky, thread-like substance between them. Is this normal?
Yes, this is absolutely normal, and is actually a sign that your grains are thriving and growing. These threads are known as kefiran, and are what gives kefir its creamy taste and texture.
Does kefir contain alcohol?
Yes, just like with any other fermented food, kefir has a low alcohol content. For 24 hour ferments, the alcohol content is usually around 0.08%, although this can increase to up to 3% if you have done a second fermentation.


Alina was a born and bred city girl, until she moved to the Scottish countryside in 2013 to live the self-sufficient life. Thrown in at the deep end, she spent all her time learning as much about homesteading as she could, putting theory into practice each and every day. T
oday, Alina grows large amounts of food in her garden, greenhouse and polytunnel, and also has a number of different animals that call her little farm “home”.
…just wondering about the unit measure of ingredients – tablespoons, grams…use weight or volume…? Thanks Dan, Alina.
Hi Bob,
It is hard to give specifics when it comes to measuring the ingredients, because everything from the type of milk used to the temperature of your kitchen will affect how much milk you should add in.
If you take a look at the How to Make Kefir Milk section, you will see a few different grain:milk ratios. Generally, you would be best off starting with a ratio of around 1:10, and then adjusting that based on your results. This would mean one tablespoon of grains to ten tablespoons of milk.
If your kefir is taking too long to ferment, reduce the amount of milk you add the next time, and vice versa.
I hope this helps, let us know if you have any other questions! 🙂