I’ve really been trying to get a plan for my front yard garden this year. I’d give anything to be able to just hire somebody to do my landscaping for me! It takes so much work to turn a bare yard, made up of nothing but hard red clay and weeds, into something beautiful and green.
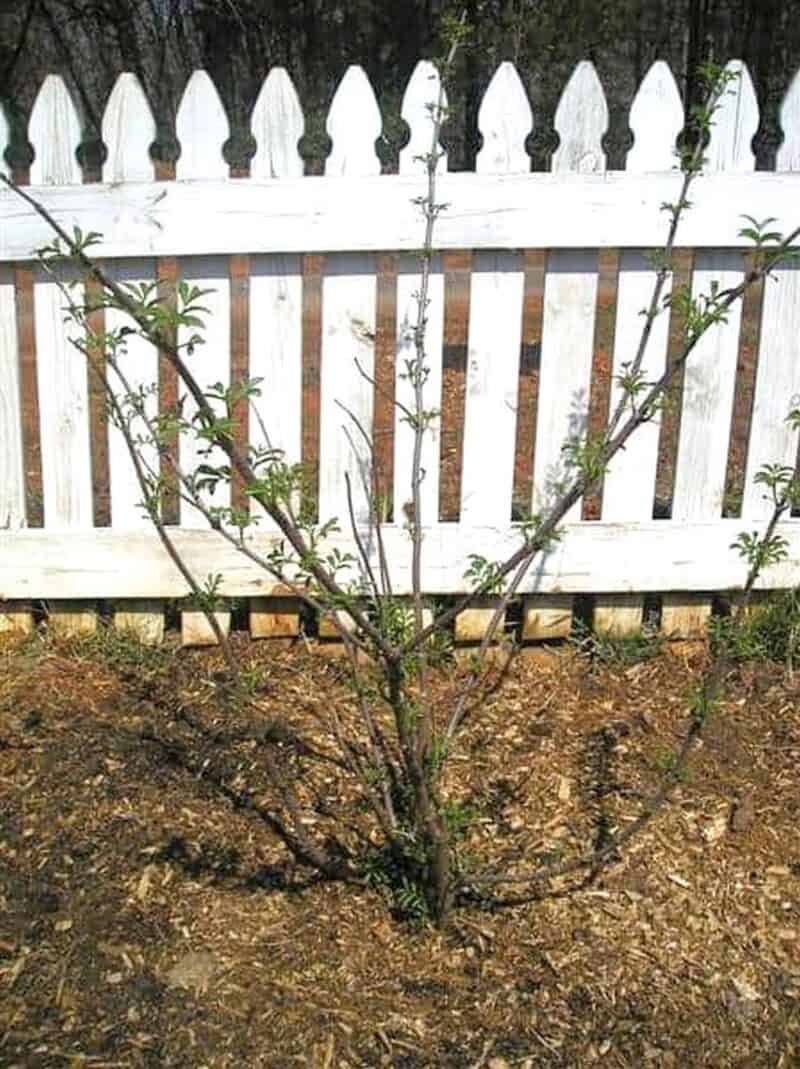
We put in two elderberry bushes last spring (I think it was), and since I’d love to have more, I took some time today to work on propagating them. Plus, it really needed to be done now, in early spring.
Basically, propagating is taking a cutting, and planting it to make a new plant.
It’s a great way to expand your current garden into a larger, more productive one without having to spend any money at all.
Here are some tips on propagating elderberry bushes for your own homestead…
Can You Grow Elderberry From Cuttings?
Elderberries are a type of woody shrub that belong to the Adoxaceae family. They are native to Europe, North America, and parts of Asia and Africa. Elderberries are deciduous, meaning they lose their leaves in the winter months.
Elderberries grow best in full sun but can tolerate partial shade. They prefer well-drained soil but are adaptable to other types of soil as well. Elderberries are relatively drought-tolerant once they are established.
The easiest way to propagate elderberry bushes is from cuttings. Cuttings should be taken from healthy, disease-free plants in the late spring or early summer months. Make sure to take cuttings that include both leaves and stems. These cuttings can then be rooting in water or planted directly in soil.
Ever since I was a little girl, I’ve loved elderberries. I remember going out with my grandma to pick them every summer and then making pies, jam, and cordial with the fruits we collected. So, when I started gardening as an adult, it was only natural that I would want to grow my own elderberry bushes.
Fortunately, propagating elderberry bushes from cuttings is relatively easy and doesn’t require any special equipment. All you need is a sharp knife, some rooting hormone, and a pot filled with moist sand or perlite. In this article, I’ll explain how to take cuttings from an existing elderberry bush and turn them into new plants.
When Should I Take Elder Cuttings?
The best time to take cuttings from elderberry bushes is in late fall or early winter, until February, after the leaves have dropped but before the ground has frozen solid. This gives the cutting plenty of time to develop roots before it needs to start growing new leaves in the spring.
You should avoid taking cuttings from elderberry bushes in late winter or early spring, when the sap is beginning to flow again and new leaves are just starting to bud.
The sap can interfere with the rooting process, and new leaves require more energy than a cutting can provide. You also want to avoid taking cuttings from very old elderberry bushes, as they are less likely to produce strong, healthy roots.
How Do You Propagate an Elderberry Tree?
Before we get started, there are a few things you’ll need:
- A sharp knife
- A clean, plastic container with drainage holes in the bottom (a quart-sized container will work nicely)
- Potting mix
- Perlite or vermiculite
- A humidity dome or clear plastic bag
- An eldeberry tree cutting that is 6-8 inches long with 2-3 leaf nodes
Now let’s get started!
Taking the Cutting
Taking cuttings from an elderberry bush is a simple process. Start by using a sharp knife or pruning shears to remove a 6-inch section of stem from the plant. Make sure that the section you choose has at least two pairs of leaf nodes, as these will be important for root development.
Look for a branch that is about a year old, and cut it at a 45 degree angle about 6 inches from the main stem. It should be roughly the size of a pencil but make sure those leaf buds are still intact (just not actual leaves themselves, if there are any already).
Remove any leaves from the bottom half of the cutting.
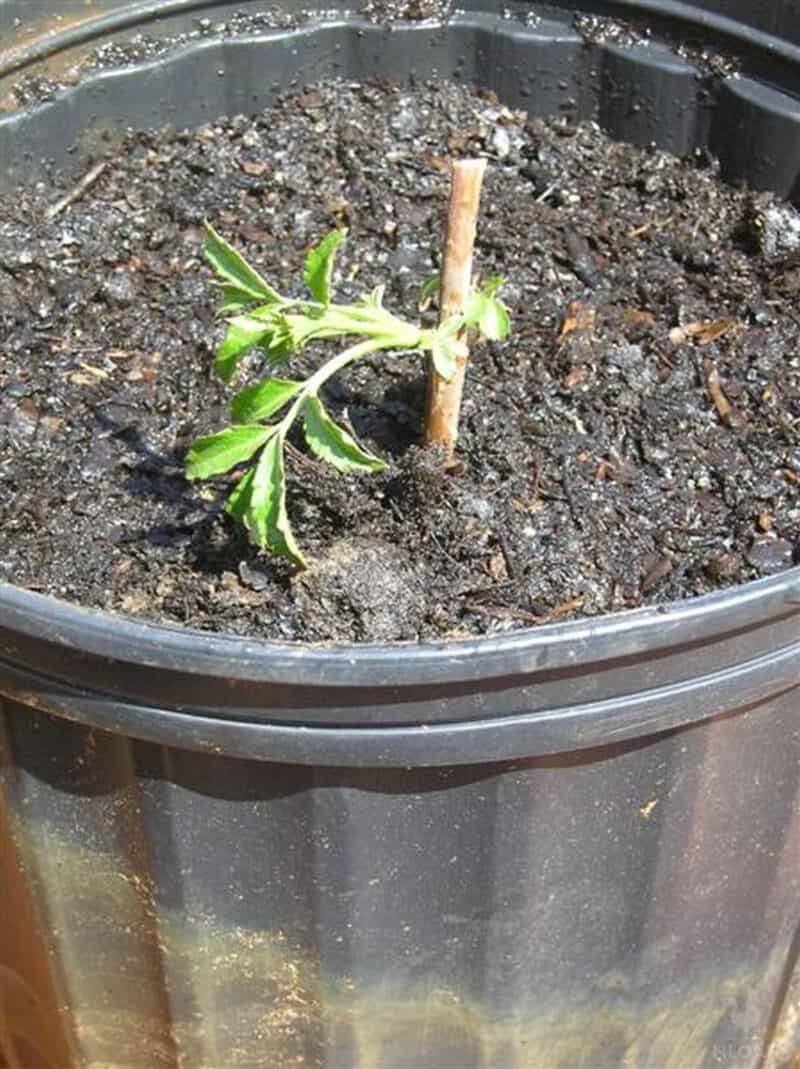
Step One: Add Hardwood Cuttings to Potting Medium
Fill your container with potting mix until it is about ¾ of the way full. Then, add perlite or vermiculite to the potting mix. This will help with drainage and aeration.
Step Two: Soak/Dip in Rooting Medium
Dip the cut end of the elderberry tree cutting into water and then into rooting hormone or powder. This will help encourage root growth.
Step Three: Plant the Cuttings
Plant the cutting in the potting mix so that the leaf node is buried. Then, water the soil around the cutting.
Step Four: Put the Humidity Dome On Top
Place the humidity dome or clear plastic bag over the container to help retain moisture and place in a well-lit area but out of direct sunlight.
Step Five: Wait for New Roots – and Eventually, a Harvest!
Check on your elderberry tree cutting every few days to make sure that the soil hasn’t dried out. If it has, water accordingly. After a few weeks, you should see new growth emerging from the leaf node. At this point, you can remove the humidity dome or plastic bag.
Congratulations! You have now successfully propagated an elderberry tree!
What is the Best Potting Medium for Elderberry Shrubs?
There are a few things to keep in mind when choosing a potting medium for your elderberry shrub.
First, the pH level of the soil should be slightly acidic, around 6.0. Second, the soil should be able to hold moisture well and drain well. Third, the soil should be loose and not packed down too tightly. All of these factors will help your elderberry shrub thrive.
When it comes to potting mediums, there are a few different options to choose from. One option is simple, nitrogen-rich organic matter, such as compost or manure.
Another option is peat moss. Peat moss is slightly acidic, which elderberries like. In addition, peat moss holds moisture well and drains well. All of these factors make peat moss an ideal potting medium for elderberry shrubs.
In general, any kind of potting medium that offers ferility as well as has a well-draining nature should work well.
How Long Does it Take Elderberry Cuttings to Root?
No matter which method you choose, it’s important to place your cuttings in a bright location out of direct sunlight. When roots begin to form (usually after 4-6 weeks), you can then transplant them into individual pots or outdoors into your garden beds.
How Long Does it Take Elderberry Cuttings to Fruit?
The answer, unfortunately, is not as straightforward as one might hope. It can take anywhere from 2-5 years for elderberry cuttings to fruit, depending on the variety of plant and the growing conditions. So, if you’re thinking about planting elderberries, be prepared to be patient!
One of the main reasons why elderberry cuttings take so long to fruit is because the plants are slow-growing. Elderberries are notoriously finicky plants and they can be difficult to get started. However, once they take root, they can live for many years—even up to 50 years in some cases!
Another reason why it can take a while for elderberry cuttings to fruit is because the plants need to reach a certain size before they will produce berries.
A mature plant will typically be about 6-8 feet tall and have several branches. Once a plant reaches this size, it will begin to produce small white flowers which will eventually turn into berries.
Lastly, the type of elderberry plant can also affect how long it takes for the cuttings to fruit. American elderberries (Sambucus canadensis) generally produce berries sooner than European elderberries (Sambucus nigra), with 2-3 years being typical for American elderberries and 3-5 years being typical for European elderberries.
However, there are always exceptions to this rule—some varieties of American and European elderberries may take longer or shorter to fruit depending on the growing conditions.
All in all, elderberry cuttings can take anywhere from 2-5 years to fruit, although most plants will produce berries within 3-4 years.
Can You Propagate Elderberry in Water?
Elderberry propagation is possible in water, but it’s not the most common method. The vast majority of people who propagate elderberries do so via rooting cuttings in potting mix or perlite. However, if you don’t have any potting mix or perlite on hand, water propagation is an viable option.
To propagate elderberries in water, start by filling a clean jar or glass with room-temperature water. Next, take a 4-6 inch cutting from a healthy elderberry bush. Make sure that the cutting has several leaves and that it’s been taken from new growth.
Once you have your cutting, remove the bottom leaves and dip the end into the water. Allow the cutting to sit in the water for 24 hours so that it can develop a good root system.
After 24 hours have passed, transfer the cutting to a pot filled with potting mix or perlite. Place the pot in a spot that receives indirect sunlight and water regularly. With a little bit of care, your elderberry bush will soon be propagated!
Should You Use a Rooting Hormone When Propagating Elderberry Cuttings?
One of the best ways to propagate elderberry is by taking cuttings from an existing plant. This ensures that the new plants will be identical to the parent plant, which is important if you’re looking to maintain a certain level of consistency in your garden. That being said, cuttings can be finicky, and it’s often difficult to get them to take root.
This is where rooting hormone comes in. Rooting hormone helps to encourage root growth, making it more likely that your cutting will successfully take root and grow into a healthy plant.
Rooting hormone is a naturally occurring substance that helps to encourage root growth in plants. It’s often used when propagating plants from cuttings, as it can help to increase the likelihood of success.
However, it’s important to note that rooting hormone is not a guarantee that your cutting will take root—it’s simply an extra boost that can help tip the scales in your favor.
There are two main types of rooting hormones: synthetic and organic. Synthetic rooting hormones are typically more potent than organic ones, but they can also be more difficult to find.
Organic rooting hormones are generally easier to find, but they may not be as effective as their synthetic counterparts. Personally, I prefer to use organic rooting hormone whenever possible, but ultimately it’s up to you which type you use.
When using rooting hormone, it’s important to follow the instructions on the packaging carefully.
The amount of hormone needed will vary depending on the type of plant you’re propagating, so make sure to read the label carefully before applying anything to your cutting. In general, you’ll want to dip the bottom inch or so of your cutting into the rooting hormone before planting it in soil or water.
Once you’ve applied the hormone, plant your cutting as usual—and cross your fingers!
Final Thoughts on Elderberry Propagation
Using a pair of pruning shears, I cut a healthy stem off of one of my plants. The stem you choose needs to be about 6″ long, with at least two sets of leaves on it.
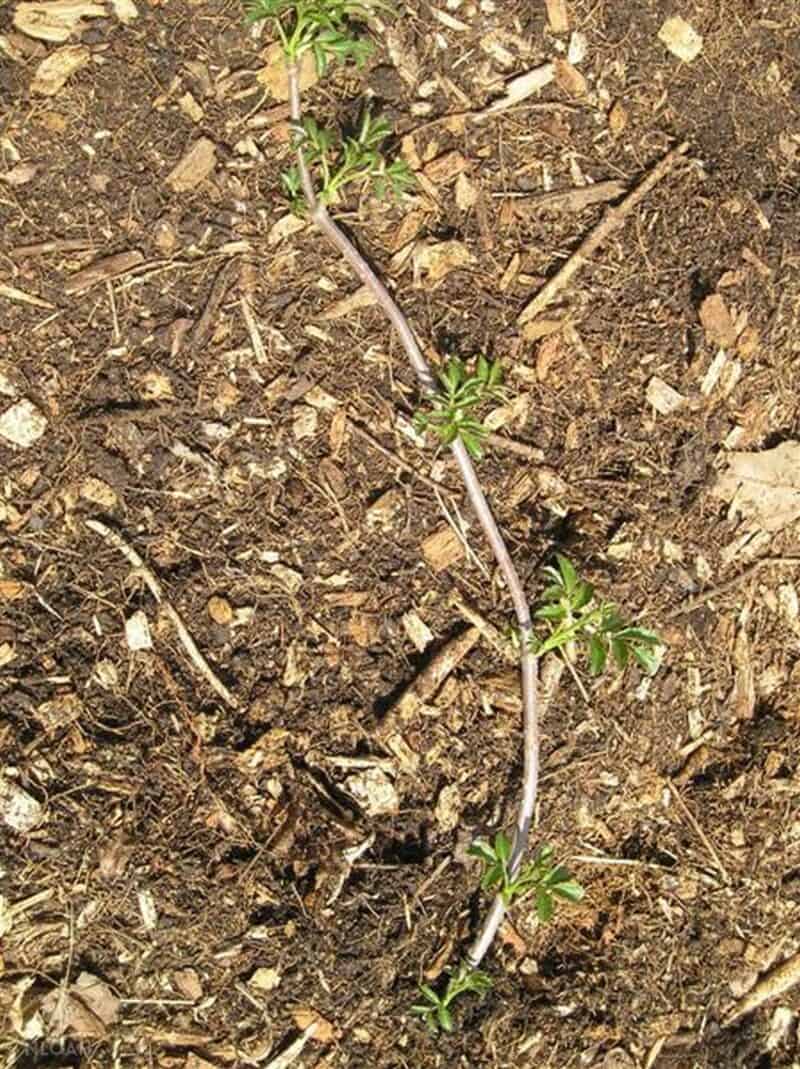
I chose this stem, since it crossed at an angle I didn’t like on the plant, and I cut it in half in order to make two new plants.
I decided to put these cuttings into pots instead of straight into the ground, since I don’t have a place ready for them yet. I just filled the pots with compost, and buried the stems up to the second set of leaves. The set of leaf nodes beneath the soil are supposed to turn into a root system.
It’ll be really great if these continue to grow into new plants. Especially since bare root elderberry plants can cost around $25 each!
Now that you know how to propagate elderberry bushes, you can go out and create your own new plants. The best news? Many of these tips can be applied toward propagating other types of plants as well.
Double win!

A city girl learning to homestead on an acre of land in the country. Wife and homeschooling mother of four. Enjoying life, and everything that has to do with self sufficient living.
I Propagate about 1,000 plants each fall. In the spring I pull the pots from the ground and donate them to fish & game, forest service and other non profits for habitat projects.
I have seen little difference in success in using rooting hormone. I am going to try the cinnamon this fall.
i use different pots depending on the size of the cuttings 1, 2 ,3 gallon pots. the larger the pot the more success, usually run about 75-80%.
my best success comes from taking root cuttings from suckers. I normally get 98% success.
Wow! 98% with elderberry root suckers? I have one that is spreading rapidly and I would love to move it to a better location. Do you happen to know if deer will eat them? Thnx! 🙂 Laura
Cinnamon is a natural rooting hormone! Any time I propagate plants I sprinkle the end that will go in the ground with cinnamon. It works wonders. Cinnamon also keeps ants and other bugs away from your plant!
Good to know, Elizabeth!
I want to try this with grape vines.
My father makes elderberry wine and syrups. Since we have some land, and he is just on a small city plot he asked to grow some trees on my property. He brought me about 10 4 foot long elderberry branches that had just grown in that season (last summer). You can tell the new growth because the bark is differently colored. We put them in a water bucket until roots appeared and then I planted them. All of them are doing well. I hope my dad shares a bottle of elderberry wine with me. 🙂
Caroline,
That’s interesting… you just stuck them in water, huh?! Mine are still looking alive. Wilted, but alive, so that’s good! Thanks for sharing what has worked for you. Very cool 🙂
I have rooted some in just water. I sit them where the sun hits them and change the water out every 4 or 5 days. I takes about four weeks for the roots to form.I do cut them on a slant and strip off about 6 inches of the bottom leaves!!! It does work!!!
i soak mine a few days in a vitamin b solution, before planting.
Yep I’ve known of and used the tip about willow sprigs forever. I keep willow switches in a bucket of water in spring and use that water to water new transplants and my sprouted seedlings, as well as for any plant that needs help with roots – i.e. when you divide a perennial or move a shrub. The willow branches will root in the water as well and you can share baby willow trees with your friends. Most of us know that we can get salycin from willow bark, so a willow tree is a good tree to have. Three foot long switches from my curly willows grew into shade-providing sizes in three years. That kind of fast growth could help with firewood; I know it’s not the best but it’s better than not having any.
I used to pick the ripe elderberries along the road side. Then my gramma and I would make elderberry jam. It was so good on toast for breakfast.
I have not done it myself, but I will definitely be checking in to see how it is working out for you.
If you have a willow tree or Forsythia, soak your little branch in water into which you have a couple of willow or Forsythia branches That makes a natural rooting hormone. I usually put sand in with my compost and sometimes use just sand alone to root things like roses, shrubs etc. Keep them damp, in semi-shade and hopefully it’ll root for you.
I do have some Forsythia, Jackie. Thanks for that tip!
What I have done with bushes like this is just bend down an outside stem till it touches the ground. Place a clump of top soil over the branch in a couple of places to weight it down and keep it covered and in contact with the garden soil. Just leave it there for the summer. Where ever the stem touches the ground will develop a root bunch (not sure if that’s what it is actually called but that’s what it looks like to me). After that I snip the stem just below that spot and between each root bunch and plant the root bunch in a pot. I’ve successfully raised Forsythia this way and it seems to work with raspberries too. Not sure about Elderberry. Yup, a little Root-Tone might help too.
My dad said to make new starts to grape vines very similar to what you said. The only difference was that he would lightly scrape the outer bark of just one side of the stem to be buried in the ground. He said it would help it to root, and then once rooted, slice the original part of the vine just above ground level to separate the two, and dig up and re-plant the new growth.
Just a note to tell that I have had a pretty good outcome using Root-tone. I usually cut the part I’m going to plant on a slant so I can get more Root-tone on it. I’m surely no expert. This is just the way I have tried with some success. Happy Planting………
Thank you for that tip, Penny!